Toro Flex-Force Power System 60V MAX 21in Recycler Lawn Mower Manuel utilisateur
- Catégorie
- Outils de jardin
- Taper
- Manuel utilisateur
Ce manuel convient également à

Form No. 3449-636 Rev C
Flex-Force Power System
™
60V MAX 21in Recycler
®
Lawn Mower
21467 and 21467T
Cortacésped Recycler
®
60V MAX de 53 cm (21") con Flex-Force
Power System
™
21467 and 21467T
T ondeuse Recycler
®
60 V MAX 53 cm (21 po) avec Flex-Force Power
System
™
21467 and 21467T
www .T oro.com.
*3449-636*


FormNo.3444-712RevC
Flex-ForcePowerSystem™60V
MAX21inRecycler®LawnMower
ModelNo.21467—SerialNo.400000000andUp
ModelNo.21467T—SerialNo.400000000andUp
Registeratwww.Toro.com.
OriginalInstructions(EN)*3444-712*

Forassistance,pleasesee
www.Toro.com/support
forinstructionalvideos
orcontact1-888-384-9939
beforereturningthis
product.
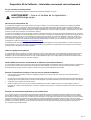
WARNING
CALIFORNIA
Proposition65Warning
Thepowercordonthisproductcontains
lead,achemicalknowntotheState
ofCaliforniatocausebirthdefects
orotherreproductiveharm.Wash
handsafterhandling.
Useofthisproductmaycauseexposure
tochemicalsknowntotheStateof
Californiatocausecancer,birthdefects,
orotherreproductiveharm.
Introduction
Thisrotary-blade,walk-behindlawnmowerisintended
tobeusedbyresidentialhomeowners.Itisdesigned
primarilyforcuttinggrassonwell-maintainedlawns
onresidentialproperties.Itisnotdesignedforcutting
brushorforagriculturaluses.Itisdesignedtouse
Toro60Vlithium-ionbatterypacks.Thesebattery
packsaredesignedtobechargedonlybyT oro60V
lithium-ionbatterychargers.Usingtheseproductsfor
purposesotherthantheirintendedusecouldprove
dangeroustoyouandbystanders.
Model21467Tdoesnotincludeabatteryora
charger.
Readthisinformationcarefullytolearnhowtooperate
andmaintainyourproductproperlyandtoavoid
injuryandproductdamage.Youareresponsiblefor
operatingtheproductproperlyandsafely.
Visitwww.T oro.comformoreinformation,including
safetytips,trainingmaterials,accessoryinformation,
helpndingadealer,ortoregisteryourproduct.
Wheneveryouneedservice,genuineToroparts,or
additionalinformation,contactanAuthorizedService
DealerorT oroCustomerServiceandhavethemodel
andserialnumbersofyourproductready.Figure1
identiesthelocationofthemodelandserialnumbers
ontheproduct.Writethenumbersinthespace
provided.
Important:Withyourmobiledevice,youcan
scantheQRcodeontheserialnumberdecal(if
equipped)toaccesswarranty,parts,andother
productinformation.
g275230
Figure1
1.Modelandserialnumberlocation
ModelNo.
SerialNo.
Safety-AlertSymbol
Thesafety-alertsymbol(Figure2)showninthis
manualandonthemachineidentiesimportantsafety
messagesthatyoumustfollowtopreventaccidents.
g000502
Figure2
Safety-alertsymbol
Thesafety-alertsymbolappearsaboveinformation
thatalertsyoutounsafeactionsorsituationsand
isfollowedbythewordDANGER,WARNING,or
CAUTION.
DANGERindicatesanimminentlyhazardoussituation
which,ifnotavoided,willresultindeathorserious
injury.
WARNINGindicatesapotentiallyhazardoussituation
which,ifnotavoided,couldresultindeathorserious
injury.
CAUTIONindicatesapotentiallyhazardoussituation
which,ifnotavoided,mayresultinminorormoderate
injury.
Thismanualusestwootherwordstohighlight
information.Importantcallsattentiontospecial
mechanicalinformationandNoteemphasizesgeneral
informationworthyofspecialattention.
©2023—TheToro®Company
8111LyndaleAvenueSouth
Bloomington,MN554202
Contactusatwww.Toro.com.
PrintedinMexico
AllRightsReserved

Safety
IMPORTANTSAFETY
INSTRUCTIONS
WARNING
Whenusingelectriclawnmowers,basic
safetyprecautionsshouldalwaysbefollowed
toreducetheriskofre,electricshock,and
personalinjury,includingthefollowing:
ReadAllInstructions
I.Training
1.Theoperatorofthemachineisresponsiblefor
anyaccidentsorhazardsoccurringtoothersor
theirproperty.
2.Donotallowchildrentouseorplaywiththe
machine,batterypack,orthebatterycharger;
localregulationsmayrestricttheageofthe
operator.
3.Donotallowchildrenoruntrainedpeopleto
operateorservicethisdevice.Allowonlypeople
whoareresponsible,trained,familiarwiththe
instructions,andphysicallycapabletooperate
orservicethedevice.
4.Beforeusingthemachine,batterypack,and
batterycharger,readalltheinstructionsand
cautionarymarkingsontheseproducts.
5.Becomefamiliarwiththecontrolsandproper
useofthemachine,batterypack,andbattery
charger.
II.Preparation
1.Keepbystanders,especiallychildrenandpets,
outoftheoperatingarea.
2.Donotoperatethemachinewithoutallguards
andsafetydevices,suchasdeectorsandgrass
catchers,inplaceandfunctioningproperlyon
themachine.
3.Inspecttheareawhereyouwillusethemachine
andremoveallobjectsthatcouldinterferewith
theoperationofthemachineorthatthemachine
couldthrow.
4.Beforeusingthemachine,ensurethattheblade,
bladebolt,andbladeassemblyarenotwornor
damaged.Replaceanydamagedorunreadable
labels.
5.UseonlythebatterypackspeciedbyToro.
Usingotheraccessoriesandattachmentsmay
increasetheriskofinjuryandre.
6.Pluggingthebatterychargerintoanoutletthatis
not120Vcancauseareorelectricshock.Do
notplugthebatterychargerintoanoutletother
than120V.Foradifferentstyleofconnection,
useanattachmentplugadapteroftheproper
congurationforthepoweroutletifneeded.
7.Donotuseadamagedormodiedbattery
packorbatterycharger,whichmayexhibit
unpredictablebehaviorthatresultsinre,
explosion,orriskofinjury.
8.Ifthesupplycordtothebatterychargeris
damaged,contactanAuthorizedServiceDealer
toreplaceit.
9.Chargethebatterypackwithonlythebattery
chargerspeciedbyToro.Achargersuitablefor
1typeofbatterypackmaycreateariskofre
whenusedwithanotherbatterypack.
10.Chargethebatterypackinawell-ventilatedarea
only.
11.Followallcharginginstructionsanddo
notchargethebatterypackoutsideofthe
temperaturerangespeciedintheinstructions.
Otherwise,youmaydamagethebatterypack
andincreasetheriskofre.
12.Dressproperly—Wearappropriateclothing,
includingeyeprotection;longpants;substantial,
slip-resistantfootwear(notbarefootorwearing
sandals);andhearingprotection.Tiebacklong
hairanddonotwearlooseclothingorloose
jewelrythatcangetcaughtinmovingparts.
Wearadustmaskindustyoperatingconditions.
Useofrubberglovesisrecommended.
III.Operation
1.Contactwiththemovingbladewillcauseserious
injury.Keepyourhandsandfeetawayfromthe
cuttingareaandallmovingpartsofthemachine.
Keepclearofanydischargeopening.
2.Usingthismachineforpurposesotherthanits
intendedusecouldprovedangeroustoyouand
bystanders.
3.Disengagetheself-propeldrive(ifequipped)
beforestartingthemachine.
4.Donottiltthemachinewhenstartingthemotor.
5.Preventunintentionalstarting—Ensurethat
theelectric-startbuttonisremovedfromthe
electric-startswitchbeforeconnectingthe
batterypackandhandlingthemachine.
6.Useyourfullattentionwhileoperatingthe
machine.Donotengageinanyactivitythat
causesdistractions;otherwise,injuryorproperty
damagemayoccur.
7.Stopthemachine,removetheelectric-start
button,removethebatterypackfromthe
machine,andwaitforallmovementtostop
beforeadjusting,servicing,cleaning,orstoring
themachine.
3

8.Removethebatterypackandelectric-start
buttonfromthemachinewheneveryouleaveit
unattendedorbeforechangingaccessories.
9.Donotforcethemachine—Allowthemachineto
dothejobbetterandsaferattherateforwhichit
wasdesigned.
10.Stayalert—Watchwhatyouaredoinganduse
commonsensewhenoperatingthemachine.
Donotusethemachinewhileill,tired,orunder
theinuenceofalcoholordrugs.
11.Donotuseabattery-operatedlawnmowerin
rain.
12.Operatethemachineonlyingoodvisibilityand
appropriateweatherconditions.Donotoperate
themachinewhenthereistheriskoflightning.
13.Useextremecautionwhenreversingorpulling
themachinetowardyou.
14.Keepproperfootingandbalanceatalltimes,
especiallyonslopes.Mowacrosstheface
ofslopes,neverupanddown.Useextreme
cautionwhenchangingdirectionsonslopes.Do
notmowexceedinglysteepslopes.Walk,never
runwiththemachine.
15.Donotdirectthedischargematerialtoward
anyone.Avoiddischargingmaterialagainsta
wallorobstruction;materialmayricochettoward
you.Stoptheblade(s)whencrossingsurfaces
otherthangrass.
16.Watchforholes,ruts,bumps,rocks,orother
hiddenobjects.Uneventerraincouldcauseyou
toloseyourbalanceorfooting.
17.Wetgrassorleavescancauseseriousinjuryif
youslipandcontacttheblade.Donotmowin
wetconditions.Donotmowwhenitisraining.
18.Ifthemachinestrikesanobjectorstartsto
vibrate,immediatelyshutoffthemachine,
removetheelectric-startbutton,removethe
batterypack,andwaitforallmovementtostop
beforeexaminingthemachinefordamage.
Makeallnecessaryrepairsbeforeresuming
operation.
19.Stopthemachineandremovetheelectric-start
buttonbeforeloadingthemachineforhauling.
20.Underabusiveconditions,thebatterypackmay
ejectliquid;avoidcontact.Ifyouaccidently
comeintocontactwiththeliquid,ushwith
water.Iftheliquidcontactsyoureyes,seek
medicalhelp.Liquidejectedfromthebattery
packmaycauseirritationorburns.
IV.MaintenanceandStorage
1.Stopthemachine,removetheelectric-start
button,removethebatterypackfromthe
machine,andwaitforallmovementtostop
beforeadjusting,servicing,cleaning,orstoring
themachine.
2.Donotattempttorepairthemachineexceptas
indicatedintheinstructions.HaveanAuthorized
ServiceDealerperformserviceonthemachine
usingidenticalreplacementparts.
3.Wearglovesandeyeprotectionwhenservicing
themachine.
4.Sharpenadullbladeonbothedgestomaintain
balance.Cleanthebladeandensurethatitis
balanced.
5.Replacethebladeifitisbent,worn,orcracked.
Anunbalancedbladecausesvibration,which
coulddamagethemotororcausepersonal
injury.
6.Whenservicingtheblade,beawarethatthe
bladecanstillmoveeventhoughthepower
sourceisoff.
7.Checkthegrasscollectionbagfrequentlyfor
deteriorationorwear,andreplaceawornbag
withaT oro[replacement]bag.
8.Forbestperformance,useonlygenuineToro
replacementpartsandaccessories.Other
replacementpartsandaccessoriescouldbe
dangerous,andsuchusecouldvoidtheproduct
warranty.
9.Maintainthemachine—Keepcuttingedges
sharpandcleanforthebestandsafest
performance.Keephandlesdry,clean,andfree
fromoilandgrease.Keepguardsinplaceandin
workingorder.Keepbladessharp.Useidentical
replacementbladesonly.
10.Checkthemachinefordamagedparts—Ifthere
aredamagedguardsorotherparts,determine
whetherthemachinewilloperateproperly.
Checkformisalignedandbindingmovingparts,
brokenparts,mounting,andanyothercondition
thatmayaffectitsoperation.Unlessindicated
intheinstructions,haveanAuthorizedService
Dealerrepairorreplaceadamagedguardor
part.
11.Whenthebatterypackisnotinuse,keepit
awayfrommetalobjectssuchaspaperclips,
coins,keys,nails,andscrewsthatcanmakea
connectionfrom1terminaltoanother.Shorting
thebatteryterminalsmaycauseburnsorare.
12.Checkthebladeandmotormountingbolts
frequentlyfortightness.
4

13.Whenyouarenotusingthemachine,storeit
indoorsinadry,secureplaceoutofthereach
ofchildren.
14.Donotexposeabatterypackormachinetore
orexcessivetemperature.Exposuretoreor
temperatureabove130°C(265°F)maycause
explosion.
15.CAUTION—Amistreatedbatterypackmay
presentariskofre,explosion,orchemical
burn.
•Donotdisassemblethebatterypack.
•Replacethebatterypackwithagenuine
Torobatterypackonly;usinganothertypeof
batterypackmaycauseareorriskofinjury.
•Keepbatterypacksoutofthereachof
childrenandintheoriginalpackaginguntil
youarereadytousethem.
SAVETHESE
INSTRUCTIONS
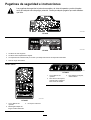
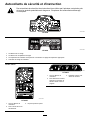
SafetyandInstructionalDecals
Safetydecalsandinstructionsareeasilyvisibletotheoperatorandarelocatednearanyarea
ofpotentialdanger.Replaceanydecalthatisdamagedormissing.
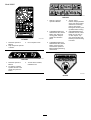
decal137-9462
137-9462
decal137-9463
137-9463
1.Thebatterypackischarging.
2.Thebatterypackisfullycharged.
3.Thebatterypackisoverorundertheappropriatetemperaturerange.
4.Batterypackchargingfault
5

Model88660
decal137-9455
137-9455
1.ReadtheOperator’s
Manual.
3.Donotexposetorain.
2.Keepawayfromopenre
orames.
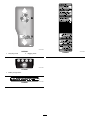
decal140-1324
140-1324
1.ReadtheOperator’s
Manual.
3.Toshutoffthemachine,
releasethebar.
2.Tostartthemachine,
squeezethebartothe
handleandpressthe
button.
decal140-1328
140-1328
1.Warning—readthe
Operator’sManual.
4.Thrownobject
hazard—keepbystanders
away;shutofftheengine
andwaitforallmoving
partstostopbefore
leavingthemachine;pick
updebrisbeforemowing.
2.Cutting/dismemberment
hazardofthehand,mower
blade—stayawayfrom
movingparts;keepall
guardsandshieldsin
place.
5.Cutting/dismemberment
hazardofthefoot,mower
blade—donotmowup
ordownslopes;only
mowacrossslopes;look
behindyouwhenmowing
inreverse.
3.Cutting/dismemberment
hazardofthehand,mower
blade—removethekey
andreadtheOperator’s
Manualbeforeperforming
maintenance.
decal94-8072
94-8072
6

decal125-5026
125-5026
1.Recyclingmode2.Baggingmode
decal137-9461
137-9461
1.Batterychargestatus
decal133-8061
133-8061
decal139-8986
139-8986
7

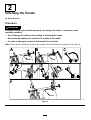
Setup
Important:Thebatterypackisnotfullycharged
whenitispurchased.Beforeusingthemachine
forthersttime,refertoChargingtheBattery
Pack(page17).
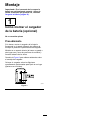
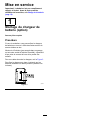
1
MountingtheBattery
Charger(Optional)
NoPartsRequired
Procedure
Ifdesired,mountthebatterychargersecurelyona
wallusingthewall-mountkeyholesonthebackof
thecharger.
Mountitindoors(suchasagarageorotherdryplace),
nearapoweroutlet,andoutofthereachofchildren.
RefertoFigure3forassistanceinmountingthe
charger.
Slidethechargerovertheappropriatelypositioned
hardwaretosecurethechargerinplace(hardware
notincluded).
g290534
Figure3
8

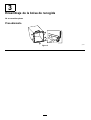
2
UnfoldingtheHandle
NoPartsRequired
Procedure
WARNING
Foldingorunfoldingthehandleimproperlycandamagethecables,causinganunsafe
operatingcondition.
•Donotdamagethecable(s)whenfoldingorunfoldingthehandle.
•Ensurethatthecable(s)areroutedtotheoutsideofthehandle.
•Ifacableisdamaged,contactanAuthorizedServiceDealer.
Note:Ensurethatthecablesareroutedontheoutsideofthehandleandarenotpinched(DofFigure4).
g335466
Figure4
9

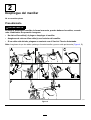
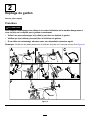
3
AssemblingtheGrassBag
NoPartsRequired
Procedure
g334351
Figure5
10

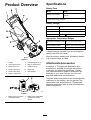
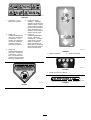
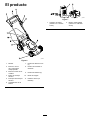
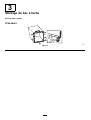
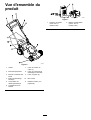
ProductOverview
g436946
Figure6
1.Handle7.Cutting-heightlever(4)
2.Self-propeldrivebar8.Bag-on-demandlever
3.Blade-controlbar9.Handlelever(2)
4.Electric-startbutton10.Grassbag
5.Electric-startswitch11.Reardeector
6.Batterycompartment
g355813
Figure7
1.Batterycharger(included
withModel21467)
2.Batterypackmodel88660
(includedwithModel
21467)
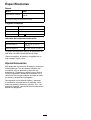
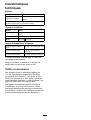
Specications
BatteryPack
Model88660
6.0Ah
Batterypackcapacity324Wh
Batterymanufacturerrating=60Vmaximumand54Vnominal.
Actualvoltagevarieswithload.
BatteryCharger
Model88602
Type60VMAXLithium-IonBatteryCharger
Input120VAC~2.0A,60Hz
Output60VDC2.0AMAX
AppropriateTemperatureRanges
Charge/storethebatterypack
at
5°C(41°F)to40°C(104°F)*
Usethebatterypackat-30°C(-22°F)to49°C(120°F)*
Usethemachineat0°C(32°F)to49°C(120°F)*
*Chargingtimewillincreaseifyoudonotchargethe
batterypackwithinthisrange.
Storethemachine,batterypack,andbatterycharger
inanenclosedclean,dryarea.
Attachments/Accessories
AselectionofToroapprovedattachmentsand
accessoriesisavailableforusewiththemachine
toenhanceandexpanditscapabilities.Contact
yourAuthorizedServiceDealerorauthorizedToro
distributororgotowww.T oro.comforalistofall
approvedattachmentsandaccessories.
Toensureoptimumperformanceandcontinuedsafety
certicationofthemachine,useonlygenuineToro
replacementpartsandaccessories.Replacement
partsandaccessoriesmadebyothermanufacturers
couldbedangerous.
11

Operation
BeforeOperation
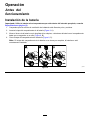
InstallingtheBatteryPack
Important:Usethebatterypackonlyintemperaturesthatarewithintheappropriaterange;refer
toSpecications(page11).
1.Ensurethattheventsonthebatteryareclearofanydustanddebris.
2.Pressdownonthebattery-compartmentlidtoopenit(AofFigure8).
3.Lineupthecavityinthebatterypackwiththetongueonthemachineandslidethebatterypackintothe
compartmentuntilitlocksintoplace(BofFigure8).
4.Pressdownonthebattery-compartmentliduntilitclicksintoplace(CofFigure8).
Note:Ifthebattery-compartmentliddoesnotclosecompletely,thebatteryisnotfullyinstalled.
g436947
Figure8
12

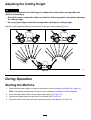
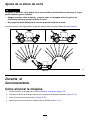
AdjustingtheCuttingHeight
DANGER
Adjustingtheheight-of-cutcouldbringyourhandsintocontactwithamovingbladeand
resultinseriousinjury.
•Shutoffthemotor,removethebattery,andwaitforallmovingpartstostopbeforeadjusting
thecuttingheight.
•Donotputyourngersunderthehousingwhenadjustingthecuttingheight.
Adjustthecuttingheightasdesired.Setallwheelstothesamecuttingheight(Figure9).
g254131
Figure9
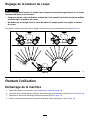
DuringOperation
StartingtheMachine
1.Ensurethatthebatterypackisinstalledinthemachine;refertoInstallingtheBatteryPack(page12).
Note:Ifthebattery-compartmentliddoesnotclosecompletely,thebatteryisnotfullyinstalled.
2.Inserttheelectric-startbuttonintotheelectric-startswitch(AofFigure10).
3.Squeezetheblade-controlbarandholdittothehandle(BofFigure10).
4.Presstheelectric-startbuttonandkeepitpresseduntilthemotorstarts(CofFigure10).
13

g370586
Figure10
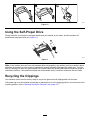
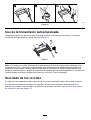
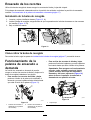
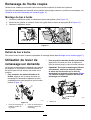
UsingtheSelf-PropelDrive
Simplywalkwithyourhandsontheupperhandleandyourelbowsatyoursides,andthemachinewill
automaticallykeeppacewithyou(Figure11).
g334136
Figure11
Note:Ifthemachinedoesnotfreelyrollbackwardafterself-propelling,stopwalking,holdyourhandsinplace,
andallowthemachinetorollacoupleofcentimeters(inches)forwardtodisengagethewheeldrive.Youcan
alsotryreachingjustundertheupperhandletothemetalhandleandpushingthemachineforwardacoupleof
centimeters(inches).Ifthemachinestilldoesnotrollbackwardeasily,contactanAuthorizedServiceDealer.
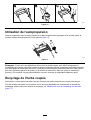
RecyclingtheClippings
Yourmachinecomesfromthefactoryreadytorecyclethegrassandleafclippingsbackintothelawn.
Ifthegrassbagisonthemachineandthebag-on-demandleverisinthebaggingposition,movethelevertothe
recyclingposition;refertoOperatingtheBag-on-DemandLever(page15).
14

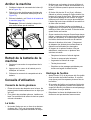
BaggingtheClippings
Usethegrassbagwhenyouwanttocollectgrassandleafclippingsfromthelawn.
Ifthebag-on-demandleverisintherecyclingposition,moveittothebaggingposition;refertoOperatingthe
Bag-on-DemandLever(page15).
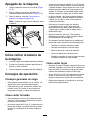
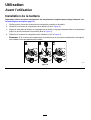
InstallingtheGrassBag
1.Raiseandholdupthereardeector(AofFigure12).
2.Installthegrassbag,ensuringthatthepinsonthebagrestinthenotchesonthehandle(BofFigure12).
3.Lowerthereardeector.
g334207
Figure12
RemovingtheGrassBag
Toremovethebag,reversethestepsinInstallingtheGrassBag(page15).
Operatingthe
Bag-on-DemandLever
Thebag-on-demandfeatureallowsyoutoeither
collectorrecyclegrassandleafclippingswhilethe
grassbagisattachedtothemachine.
•Tobagthegrassandleafclippings,pressthe
buttononthebag-on-demandleverandmovethe
leverforwarduntilthebuttonontheleverpopsup
(Figure13).
g251583
Figure13
1.Bag-on-demandlever(in
therecyclingposition)
2.Bag-on-demandlever(in
thebaggingposition)
•Torecyclethegrassandleafclippings,press
thebuttonontheleverandmovethelever
rearwarduntilthebuttonontheleverpopsup.
Important:Forproperoperation,remove
anygrassclippingsanddebrisfromthe
bag-on-demanddoorandthesurrounding
opening(Figure14)beforeyoumovethe
bag-on-demandleverfrom1positionto
another.
g251584
Figure14
1.Cleanhere
15

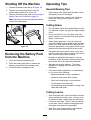
ShuttingOfftheMachine
1.Releasetheblade-controlbar(AofFigure15).
2.Removetheelectric-startbuttonfromthe
electric-starterswitch(BofFigure15).
3.Removethebatterypack;refertoRemovingthe
BatteryPackfromtheMachine(page16).
Note:Wheneveryouarenotusingthemachine,
removethebatterypack.
g335480
Figure15
RemovingtheBatteryPack
fromtheMachine
1.Liftupthebattery-compartmentlid.
2.Pressthebattery-packlatchtoreleasethe
batterypackandremovethebatterypack.
3.Closethebattery-compartmentlid.
OperatingTips
GeneralMowingTips
•Avoidstrikingsolidobjectswiththeblade.Never
deliberatelymowoveranyobject.
•Forbestperformance,installanewT oroblade
beforethecuttingseasonbeginsorwhen
necessary.
CuttingGrass
•Cutonlyaboutathirdofthegrassbladeatatime.
Forimprovedruntime,cutgrassatahigherheight
ofcut.
•Donotcutbelow51mm(2inches)unlessthe
grassissparseoritislatefallwhengrassgrowth
beginstoslowdown.
•Whencuttinggrassover15cm(6inches)tall,
mowatthehighestcuttingheightsettingandwalk
slower;thenmowagainatalowersettingforthe
bestlawnappearance.Ifthegrassistoolong,the
machinemayplugandcausethemotortostall.
•Wetgrassandleavestendtoclumpontheyard
andcancausethemachinetoplugorthemotorto
stall.Avoidmowinginwetconditions.
•Beawareofapotentialrehazardinverydry
conditions,followalllocalrewarnings,andkeep
themachinefreeofdrygrassandleafdebris.
•Alternatethemowingdirection.Thishelps
dispersetheclippingsoverthelawnforeven
fertilization.
•Ifthenishedlawnappearanceisunsatisfactory,
try1ormoreofthefollowing:
–Replacethebladeorhaveitsharpened.
–Walkataslowerpacewhilemowing.
–Raisethecuttingheightonyourmachine.
–Cutthegrassmorefrequently.
–Overlapcuttingswathsinsteadofcuttingafull
swathwitheachpass.
CuttingLeaves
•Aftercuttingthelawn,ensurethathalfofthelawn
showsthroughthecutleafcover.Youmayneed
tomakemorethanasinglepassovertheleaves.
•Iftherearemorethan13cm(5inches)ofleaves
onthelawn,mowatahighercuttingheightand
thenagainatthedesiredcuttingheight.
•Slowdownyourmowingspeedifthemachine
doesnotcuttheleavesnelyenough.
16

AfterOperation
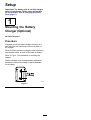
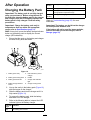
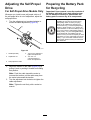
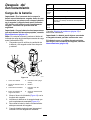
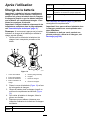
ChargingtheBatteryPack
Important:Thebatterypackisnotfullycharged
whenyoupurchaseit.Beforeusingthetoolfor
thersttime,placethebatterypackinthecharger
andchargeituntiltheLEDdisplayindicatesthe
batterypackisfullycharged.Readallsafety
precautions.
Important:Chargethebatterypackonlyin
temperaturesthatarewithintheappropriate
range;refertoSpecications(page11).
Note:Atanytime,pressthebattery-charge-indicator
buttononthebatterypacktodisplaythecurrent
charge(LEDindicators).
1.Ensurethattheventsonthebatteryandcharger
areclearofanydustanddebris.
g290533
Figure16
1.Batterypackcavity5.LEDindicators(current
charge)
2.Batterypackventingareas6.Handle
3.Batterypackterminals7.ChargerLEDindicator
light
4.Battery-charge-indicator
button
8.Chargerventingareas
2.Lineupthecavityinthebatterypack(Figure16)
withthetongueonthecharger.
3.Slidethebatterypackintothechargeruntilitis
fullyseated(Figure16).
4.Toremovethebatterypack,slidethebattery
backwardoutofthecharger.
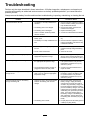
5.RefertothefollowingtabletointerprettheLED
indicatorlightonthebatterycharger.
Indicator
light
Indicates
OffNobatterypackinserted
Green
blinking
Batterypackischarging
GreenBatterypackischarged
RedBatterypackand/orbatterychargerisoverorunder
theappropriatetemperaturerange
Red
blinking
Batterypackchargingfault*
*RefertoTroubleshooting(page23)formore
information.
Important:Thebatterycanbeleftonthecharger
forshortperiodsbetweenuses.
Ifthebatterywillnotbeusedforlongerperiods,
removethebatteryfromthecharger;referto
Storage(page22).
17

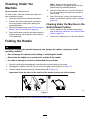
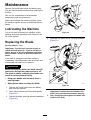
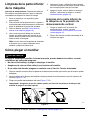
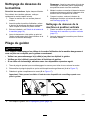
CleaningUnderthe
Machine
ServiceInterval:Aftereachuse
Forbestresults,cleanthemachinesoonafteryou
havecompletedmowing.
1.Movethemachineontoaatpavedsurface.
2.Removetheelectric-startbuttonandwaitfor
allmovingpartstostopbeforeleavingthe
operatingposition.
3.Removethebatterypack;refertoRemovingthe
BatteryPackfromtheMachine(page16).
4.Washouttheareaunderthereardoorwherethe
clippingsgofromtheundersideofthemachine
tothegrassbag.
Note:Washouttheareawiththe
bag-on-demand(ifequipped)inboththefully
forwardandfullyrearwardpositions.
5.Startthemotorandrunitforafewminutesto
drytheundersideofthemachinetopreventit
fromrusting.
6.Shutoffthemotor,removetheelectric-start
button,andstorethemachine;refertoStorage
(page22).
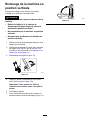
CleaningUndertheMachineinthe
Vertical-StowPosition
1.Setthemachineinthevertical-stowposition;
refertoStoringtheMachineintheVertical-Stow
Position(page19).
2.Washouttheclippingsfromunderthemachine.
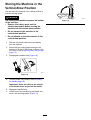
FoldingtheHandle
WARNING
Foldingorunfoldingthehandleimproperlycandamagethecables,causinganunsafe
operatingcondition.
•Donotdamagethecable(s)whenfoldingorunfoldingthehandle.
•Ensurethatthecable(s)areroutedtotheoutsideofthehandle.
•Ifacableisdamaged,contactanAuthorizedServiceDealer.
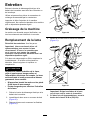
1.Holdthehandlewhiledisengagingthehandlelockstoavoidpinchingyourhands.
2.Disengagethehandlelocksuntilyoucanmovetheupperhandlefreely(AofFigure17)
3.Foldthehandleforwardtothefullyforwardposition(BofFigure17).
Important:Routethecablestotheoutsideofthehandlelocksasyoufoldthehandle.
g334367
Figure17
4.Tounfoldthehandle,referto2UnfoldingtheHandle(page9).
18
La page charge ...
La page charge ...
La page charge ...
La page charge ...
La page charge ...
La page charge ...
La page charge ...
La page charge ...
La page charge ...
La page charge ...
La page charge ...
La page charge ...
La page charge ...
La page charge ...
La page charge ...
La page charge ...
La page charge ...
La page charge ...
La page charge ...
La page charge ...
La page charge ...
La page charge ...
La page charge ...
La page charge ...
La page charge ...
La page charge ...
La page charge ...
La page charge ...
La page charge ...
La page charge ...
La page charge ...
La page charge ...
La page charge ...
La page charge ...
La page charge ...
La page charge ...
La page charge ...
La page charge ...
La page charge ...
La page charge ...
La page charge ...
La page charge ...
La page charge ...
La page charge ...
La page charge ...
La page charge ...
La page charge ...
La page charge ...
La page charge ...
La page charge ...
La page charge ...
La page charge ...
La page charge ...
La page charge ...
La page charge ...
La page charge ...
La page charge ...
La page charge ...
La page charge ...
La page charge ...
La page charge ...
La page charge ...
La page charge ...
La page charge ...
La page charge ...
La page charge ...
La page charge ...
La page charge ...
-
 1
1
-
 2
2
-
 3
3
-
 4
4
-
 5
5
-
 6
6
-
 7
7
-
 8
8
-
 9
9
-
 10
10
-
 11
11
-
 12
12
-
 13
13
-
 14
14
-
 15
15
-
 16
16
-
 17
17
-
 18
18
-
 19
19
-
 20
20
-
 21
21
-
 22
22
-
 23
23
-
 24
24
-
 25
25
-
 26
26
-
 27
27
-
 28
28
-
 29
29
-
 30
30
-
 31
31
-
 32
32
-
 33
33
-
 34
34
-
 35
35
-
 36
36
-
 37
37
-
 38
38
-
 39
39
-
 40
40
-
 41
41
-
 42
42
-
 43
43
-
 44
44
-
 45
45
-
 46
46
-
 47
47
-
 48
48
-
 49
49
-
 50
50
-
 51
51
-
 52
52
-
 53
53
-
 54
54
-
 55
55
-
 56
56
-
 57
57
-
 58
58
-
 59
59
-
 60
60
-
 61
61
-
 62
62
-
 63
63
-
 64
64
-
 65
65
-
 66
66
-
 67
67
-
 68
68
-
 69
69
-
 70
70
-
 71
71
-
 72
72
-
 73
73
-
 74
74
-
 75
75
-
 76
76
-
 77
77
-
 78
78
-
 79
79
-
 80
80
-
 81
81
-
 82
82
-
 83
83
-
 84
84
-
 85
85
-
 86
86
-
 87
87
-
 88
88


Toro Flex-Force Power System 60V MAX 21in Recycler Lawn Mower Manuel utilisateur
- Catégorie
- Outils de jardin
- Taper
- Manuel utilisateur
- Ce manuel convient également à