
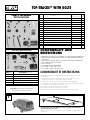
TOP-TRACKS™ WITH BOLTS
SWEDEN
®
CAR RACK SYSTEMS
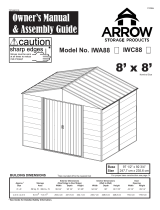
PARTS INCLUDED
PIÈCES INCLUSES
TOOLS REQUIRED (NOT INCLUDED)
OUTILS NÉCESSAIRES (NON FOURNIS)
5/16" wrench/clé de 8 mm (5/16 po)
tape measure/mètre-ruban
electric drill/perceuse
fine tip marker/marqueur fin
safety glasses/lunettes de sécurité
A
B
C
D
E
part/pièce
description/description
screw M5 x 40mm/vis M5 x 40 mm
locking hex nut M5/écrou de blocage hexagonal M5
self adhesive washer M5/rondelle auto-adhésive M5
steel washer M5/rondelle en acier M5
acorn cap/capuchon
screw end protector/protection de vis
7
⁄32" drill bit/mèche de 5,5 mm (7/32 po)
1
⁄8" drill bit/mèche de 3,2 mm (1/8 po)
3mm hex key/clé hexagonale de 3 mm
silicone sealant/tube de silicone
track/glissière
vinyl roof protector/protection de toit vinyle
track end cap/embout de glissière
A
B
C
D
E
F
G
H
I
J
K
L
M
12
12
24
12
12
12
1
1
1
1
2
2
4
part
pièce
924-0540-20
938-0500-11
853-5367
951-0520-11
853-5364
853-5373
853-5369-02
853-5369-03
853-0947
853-5374
853-5359-03
853-5360-03-97
853-5361
description
description
part number
numéro de pièce
qty.
qté
A
A B C
D E F
J
K
L
M
G
H
I
B
E
C
D
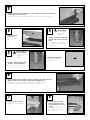
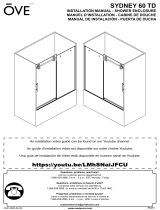
NOTE: This product requires two people for proper installation.
REMARQUE:Deux personnes sont nécessaires
pour installer correctement ce produit.
• Place the tracks on the shell, making sure they are parallel and equal distance
from the front edge of the shell.
• Placez les glissières sur la coque et assurez-vous qu’elles sont parallèles et à égale distance de
l’avant du toit.
1
• Installation of Top-Tracks™ requires drilling the roof and permamently installing parts.
• Only install track on fiberglass shells. Not for use on shells manufactured from any
other material.
• Tools and some mechanical skills are required. If concerned about installation, have
tracks installed by professional installer.
• Not for off road use.
• Do not install if roof has had bodywork.
• Do not install on vehicles with sunroofs.
• Do not install on vehicles with factory racks.
COMPATIBILITY AND
RESTRICTIONS
COMPATIBILITÉ ET RESTRICTIONS
• L’installation des Top-Tracks™ exige de percer le toit et d’installer des pièces de
façon définitive.
• Ce produit doit uniquement être installé sur des coques en fibre de verre. Il ne
doit pas être monté sur des coques à base d’autres matériaux.
• Certains outils et quelques connaissances mécaniques sont indispensables.
Si l’installation pose un problème, elle doit être confiée à un installateur professionnel.
• Ce produit n’est pas prévu pour un usage hors route.
• Ce produit ne doit pas être installé sur un toit carrossé.
• Ce produit ne doit pas être installé sur un toit ouvrant.
• Ce produit ne doit pas être installé sur un véhicule avec des barres d’usine.

• Starting at either end of the track, mark the end hole using a fine tip marker, and continue to
mark every other hole on the track.
• En commençant par une extrémité de la glissière, marquez un trou sur deux avec un marqueur à pointe fine.
2
• Remove the tracks
from the roof.
• Retirez les glissières du
toit.
3
• Using the
7
⁄32" drill bit supplied, drill
a hole into each of the pilot holes.
• Avec la mèche de 5,5 mm (7/32 po)
fournie, repercez chaque avant-trou.
• Carefully blow away debris.
• Soufflez avec précaution sur les
débris pour les éliminer.
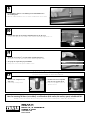
5
• Remove backing from the self adhesive washers and apply to the bottom of the track.
Only place washers on holes that line up with the holes drilled in the roof.
• Retirez le papier des rondelles auto-adhésives et appliquez-les sur le fond de la glissière.
N’installez des rondelles qu’autour des trous qui correspondent à ceux du toit.
6
• Using the
1
⁄8" drill bit supplied, drill a
pilot hole in the center of each of the
marks.
• Avec la mèche de 3,2 mm (1/8 po)
fournie, percez un avant-trou au centre
de chaque marque.
4
• Apply silcone into each hole.
• Appliquez du silicone dans chaque
trou.
7
• With end caps inserted into
track, position track over the
holes and install screws at front
and rear.
• Insérez les embouts de la glissière et
placez-la sur les trous, puis installez
les vis avant et arrière.
8
Wear safety glasses
during installation.
Portez des lunettes de
sécurité lors de
l`installation.
Wear safety glasses
during installation.
Portez des lunettes de
sécurité lors de
l`installation.

• Put self adhesive washers on to remaining screws and install them in to
the remaining holes.
• Placez les rondelles auto-adhésives sur les vis restantes et installez-les dans les trous restants.
9
• Inside the shell, place the steel washer and locking hex nut onto the screw.
• À l’intérieur de la coque, placez les rondelles en acier et les écrous de blocage hexagonaux sur les vis.
10
ROOF/TOIT
• Tighten all screws using a
5
⁄16" wrench and the supplied 3mm hex key.
• Serrez toutes les vis avec une clé de 8 mm (5/16 po) et la clé hexagonale de 3 mm.
• Two people are required for proper installation.
• Deux personnes sont nécessaires pour une installation correcte.
11
ROOF/TOIT
To finish the installation there are two options.
Vous pouvez terminer l’installation de deux manières différentes.
• Attach a screw end protector onto
each screw.
• Coiffez chaque vis d’une protection.
• Cut off the bolt excess length and
place an acorn cap onto the nut.
• Coupez la vis qui dépasse et placez un
capuchon sur l’écrou.
12
A
B
Note: For mounting TK1 bases (not included), use all hardware (thick washer, thin washer, spacer) included with TK1.
Remarque : pour monter les bases TK1 (non fournies), utilisez tout le matériel (rondelle épaisse, rondelle fine, cale) inclus avec.
MADE IN U.S.A.
FABRIQUÉ AUX É.-U.
THULE U.S.A., 42 SILVERMINE RD.
SEYMOUR CT 06483
www.thule.com
501-5335-02
SWEDEN
®
CAR RACK SYSTEMS
-
 1
1
-
 2
2
-
 3
3


dans d''autres langues
- English: Thule Top Tracks 60" User manual
Documents connexes
Autres documents
-
Homestyles 73005128 Guide d'installation
-
 WEATHER GUARD 96102-3-01 Guide d'installation
-
 EZ Tubular Skylight TS14FORME Guide d'installation
-
Delta BVS422CS Guide d'installation
-
 Arrow Storage Products IWC88 Manuel utilisateur
-
 OVE Decors 15BGP-SYDN59-GLD Guide d'installation
-
Arrow IWC108 Manuel utilisateur


