Wright Products V1033WH Guide d'installation
- Taper
- Guide d'installation
La page est en cours de chargement...

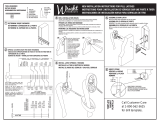
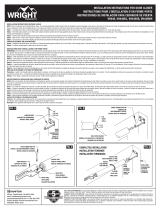
PHILLIPS SCREWDIVER
PLIERS - QTY 2
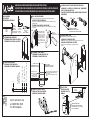
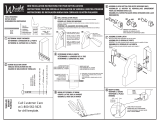
REPLACEMENT INSTALLATION INSTRUCTIONS FOR PUSH BUTTON LATCHES
INSTRUCTIONS POUR UNE INSTALLATION DE VERROUS À BOUTON-POUSSOIR DE
REMPLACEMENT
INSTRUCCIONES DE INSTALACIÓN DE CERROJOS DE BOTÓN PULSADOR DE REEMPLAZO
EXISITING MOUNTING HOLES IN DOOR
TROUS DE MONTAGE EXISTANTS DANS LA PORTE
AGUJEROS DE MONTAJE YA PERFORADOS EN LA PUERTA
3
DETERMINE DOOR THICKNESS
DÉTERMINER L’ÉPAISSEUR DE LA PORTE
DETERMINE EL ESPESOR DE LA PUERTA
RULER
TOURNEVIS CRUCIFORME
2 PINCES
RÈGLE
DESATORNILLADOR
DE CRUZ PHILLIPS
PINZAS – CANTIDAD 2
REGLA
TOOLS REQUIRED
OUTILS REQUIS
PORTE
PUERTA
DOOR
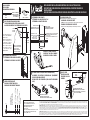
BREAK OFF SPINDLE AT MARK
COUPER LA TIGE SUR LA MARQUE
QUIEBRE EL HUSO EN LA MARCA
6B6A
ORIENTATE FLAT SURFACES
ORIENTER LES SURFACES PLATES
HAGA COINCIDIR LAS SUPERFICIES PLANAS
6C
1-3/4"
44,45 mm
44.45 mm
5/16"
7,94 mm
7.94 mm
1/4"
6,35 mm
6.35 mm
VERIFY DOOR HOLE PATTERN
VÉRIFIER LA DISPOSITION DES
TROUS DE LA PORTE
VERIFIQUE EL PATRÓN DE
AGUJEROS EN LA PUERTA
SCREW SELECTION CHART
TABLEAU DE SÉLECTION DES VIS
CUADRO DE SELECCIÓN DE TORNILLOS
2
1
180°
Note: If hole pattern does not
match see "New Installation"
instruction step 4
Remarque: Si la disposition des
trous ne correspond pas, voir
les instructions de l’Étape 4
pour la « nouvelle installation ».
Nota: Si el patrón de agujeros
no corresponde, vea el paso 4
de las instrucciones para
"Instalación Nueva".
4
8
7
5
6
ASSEMBLE LOCK BUTTON (FOR KEYED VERSIONS ONLY)
ASSEMBLER LE BOUTON DE VERROUILLAGE (UNIQUEMENT
POUR LES VERSIONS AVEC CLÉ)
REUNA BOTON DE CERRADURA (PARA ADAPTO VERSIONES
SOLO)
ASSEMBLE DOOR LATCH
NOTE: The handle styles illustrated may vary by model.
ASSEMBLER LE VERROU DE PORTE
REMARQUE: Les styles de poigné illustrés peuvent varier d’un modèle à l’autre.
Hampton Products International Corp.
50 Icon, Foothill Ranch, CA 92610-3000
email: [email protected]
www.hamptonproducts.com
1-800-562-5625
Made in China, Fabriqué en Chine, Hecho en China
©2012 Hampton Products International Corp.
95009000_REVB 03/12
FULL LIFETIME WARRANTY - This product is fully warranted to be free of defects in material and workmanship for the life of the product. If a defect in material or workmanship occurs, call 800-562-5625 for instructions on how
to have it replaced or repaired free of charge. This warranty is null and void if the product was used for purposes for which it was not designed, is abused, misused, modied or improperly installed, operated, maintained, and/or
repaired. NOT LIABLE FOR INCIDENTAL, INDIRECT, OR CONSEQUENTIAL DAMAGES. Some states do not allow the exclusion or limitation of incidental or consequential damages, so the above limitation or exclusion may not apply
to you. This warranty gives you specic rights, and you may also have other rights that vary from state to state.
GARANTIE TOTALE À VIE - Ce produit est garanti comme étant dépourvu de vices de fabrication et de main d’œuvre pour toute la durée de service du produit. Si un tel vice se manifeste, composer le 1-800-562-5625 pour obtenir
les instructions permettant de faire réparer ou de remplacer gratuitement le produit. Cette garantie est nulle et non avenue si le produit a été utilisé à des ns autres que celles pour lesquelles il a été conçu, s'il a subi des abus, s'il
a été mal utilisé ou modié, ou s'il a été incorrectement installé, utilisé, entretenu et/ou réparé. NOTRE RESPONSABILITÉ NE PEUT ÊTRE MISE EN JEU POUR DES DOMMAGES INDIRECTS QUELS QU’ILS SOIENT. Certains états
ou provinces ne permettent pas l’exclusion ou la limitation des dommages indirects et il est possible que les limites ou l’exclusion ci-dessus ne vous soient pas applicables. Cette garantie vous confère des droits spéciques et il
est possible que vous déteniez d’autres droits variant d’un état ou d’une province à l’autre.
GARANTÍA TOTAL DE POR VIDA - Este producto está totalmente garantizado de no tener defectos en materiales y mano de obra durante la vida del producto. Si ocurre un defecto en materiales o en la mano de obra, llame al
teléfono 800-562-5625 para obtener instrucciones sobre cómo poder reemplazarlo o repararlo sin costo alguno. Esta garantía es nula y sin valor si el producto se utilizó para objetivos para el que no fue diseñado, o sufre abuso,
mal uso, es modicado o instalado, accionado, mantenido y/o es reparado incorrectament. NO HAY RESPONSABILIDAD ALGUNA POR DAÑOS INCIDENTALES O INDIRECTOS. Algunos estados no permiten la exclusión o limitación de
daños incidentales o indirectos, por lo que esta exclusión puede no ser aplicable a usted. Esta garantía le proporciona derechos legales y usted podrá tener otros derechos que varían de estado a estado.
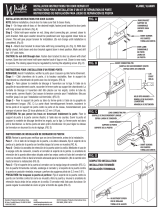
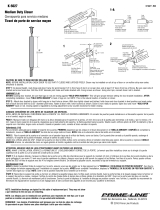
DOOR THICKNESS
ÉPAISSEUR DE PORTE
ESPESOR DE LA PUERTA
0
3/4" • 19,1 mm • 19.1 mm
1" • 25,4 mm • 25.4 mm
1-1/4" • 31,75 mm •
31.75 mm
6-32 THD
OUTSIDE DOOR FACE
INSIDE DOOR FACE
FACE EXTÉRIEURE DE LA PORT
FACE INTÉRIEURE DE LA PORTE
ALIGN ARROW TO DOOR FACE
THEN IDENTIFY THE FIRST EXPOSED BREAK OFF MARK
ALIGNER LA FLÈCHE SUR LA
FACE DE LA PORTE
PUIS IDENTIFIER LA PREMIÈRE ENTAILLE EXPOSÉE
POUR LA COUPURE
DETERMINE SPINDLE LENGTH
DÉTERMINER LA LONGUEUR DE LA TIGE
HERRAMIENTAS NECESARIAS
CARA EXTERIOR DE LA PUERTA
CARA INTERIOR DE LA PUERTA
ALINEE LA FLECHA CON
LA CARA DE LA PUERTA
LUEGO IDENTIFIQUE LA PRIMERA MARCA DE CORTE
VISIBLE
DETERMINE LA LONGITUD DEL HUSO
ENSAMBLE EL CERROJO DE LA PUERTA
NOTA: Los estilos de manija ilustrados pueden variar según el modelo.
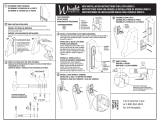
VERIFY STRIKE
SHIM STRIKE IF NECESSARY
INSÉRER DES CALES SI NÉCESSAIRE
VÉRIFIER LA GÂCHE
VERIFIQUE LA PLACA
HEMBRA
EN CASO NECESARIO, COLOQUE CALZAS
BAJO LA PLACA HEMBRA

Hampton Products International Corp.
50 Icon, Foothill Ranch, CA 92610-3000
email: [email protected]
www.hamptonproducts.com
1-800-562-5625
Made in China, Fabriqué en Chine, Hecho en China
©2012 Hampton Products International Corp.
95001000_REVB 02/12
FULL LIFETIME WARRANTY - This product is fully warranted to be free of defects in material and workmanship for the life of the product. If a defect in material or workmanship occurs, call 800-562-5625 for instructions on how
to have it replaced or repaired free of charge. This warranty is null and void if the product was used for purposes for which it was not designed, is abused, misused, modied or improperly installed, operated, maintained, and/or
repaired. NOT LIABLE FOR INCIDENTAL, INDIRECT, OR CONSEQUENTIAL DAMAGES. Some states do not allow the exclusion or limitation of incidental or consequential damages, so the above limitation or exclusion may not apply
to you. This warranty gives you specic rights, and you may also have other rights that vary from state to state.
GARANTIE TOTALE À VIE - Ce produit est garanti comme étant dépourvu de vices de fabrication et de main d’œuvre pour toute la durée de service du produit. Si un tel vice se manifeste, composer le 1-800-562-5625 pour obtenir
les instructions permettant de faire réparer ou de remplacer gratuitement le produit. Cette garantie est nulle et non avenue si le produit a été utilisé à des ns autres que celles pour lesquelles il a été conçu, s'il a subi des abus, s'il
a été mal utilisé ou modié, ou s'il a été incorrectement installé, utilisé, entretenu et/ou réparé. NOTRE RESPONSABILITÉ NE PEUT ÊTRE MISE EN JEU POUR DES DOMMAGES INDIRECTS QUELS QU’ILS SOIENT. Certains états
ou provinces ne permettent pas l’exclusion ou la limitation des dommages indirects et il est possible que les limites ou l’exclusion ci-dessus ne vous soient pas applicables. Cette garantie vous confère des droits spéciques et il
est possible que vous déteniez d’autres droits variant d’un état ou d’une province à l’autre.
GARANTÍA TOTAL DE POR VIDA - Este producto está totalmente garantizado de no tener defectos en materiales y mano de obra durante la vida del producto. Si ocurre un defecto en materiales o en la mano de obra, llame alteléfono
800-562-5625 para obtener instrucciones sobre cómo poder reemplazarlo o repararlo sin costo alguno. Esta garantía es nula y sin valor si el producto se utilizó para objetivos para el que no fue diseñado, o sufre abuso, mal uso,
es modicado o instalado, accionado, mantenido y/o es reparado incorrectamente. NO HAY RESPONSABILIDAD ALGUNA POR DAÑOS INCIDENTALES O INDIRECTOS. Algunos estados no permiten la exclusión o limitación de daños
incidentales o indirectos, por lo que esta exclusión puede no ser aplicable a usted. Esta garantía le proporciona derechos legales y usted podrá tener otros derechos que varían de estado a estado.
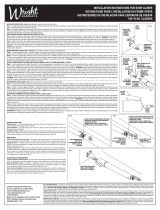
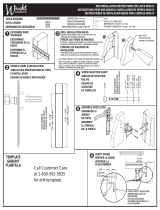
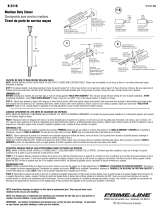
V150, V820, V920, V1020
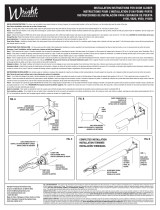
INSTALLATION INSTRUCTIONS FOR DOOR CLOSER
INSTRUCTIONS POUR L’INSTALLATION D’UN FERME-PORTE
INSTRUCCIONES DE INSTALACIÓN PARA CERRADOR DE PUERTA
CLOSER TUBE
TUBE DE FERME-PORTE
TUBO DE CERRADOR DE PUERTA
DOOR
PANEL
PANNEAU
DE PORTE
PANEL DE
PUERTA
FRONT HOLE
TROU AVANT
AGUJERO DELANTERO
REAR HOLE
TROU ARRIÈRE
AGUJERO TRASERO
COMPLETED INSTALLATION
INSTALLATION TERMINÉE
INSTALACIÓN TERMINADA
ADJUSTMENT SCREW
VIS DE RÉGLAGE
TORNILLO DE AJUSTE
LONG CONNECTING PIN
GOUPILLE DE RACCORDEMENT LONGUE
ESPIGA LARGA DE CONEXIÓN
DOOR JAMB
CHAMBRANLE
DE PORTE
JAMBA DE
LA PUERTA
INSTALLATION INSTRUCTIONS: This closer may be installed at any desired location on the door, however the recommended location is at the top of the door, or on the mullion strip near the center of the door.
Note: Before installation, check door to see that it closes freely.
Step 1 - On hinge side of door, at the desired height, fasten the jamb bracket to the door jamb with the (4) long screws. The open side of the bracket should be 1/4” from door as shown. (FIG. A)
Step 2 - Slide hold-open washer on rod. Using short connecting pin, connect closer to jamb bracket. Hold-open washer should be positioned over lugs against closer tube as shown. (FIG.B) This will give proper tension for installation. (Do not change until
installation is completed).
Step 3 - Attach door bracket to FRONT hole of the closer with long connecting pin. (FIG. C) With door tightly closed, hold closer and door bracket against door in level position, mark and drill (2) 1/8” pilot holes. CAUTION: Do not drill holes all the way
through the door. Fasten door bracket to door as shown with short screws. Open door and move hold-open washer back of lugs on rod. Closer is now ready to operate.
Speed Adjustment - To regulate closing speed of door, turn adjusting screw counter-clockwise for faster and clockwise for slower. (FIG. D)
Snap Action Closing - Installed as directed above, the closing speed of door will accelerate in the last few inches of travel. If a smoother, quieter closing action is desired, hold door open about 8” with hold-open washer, remove the long connecting pin
and relocate closer in rear hole.
INSTRUCTIONS POUR L’INSTALLATION : Ce ferme-porte peut être installé à tout emplacement souhaité sur la porte, cependant il est recommandé que cet emplacement se situe en haut de la porte, ou sur un meneau proche du centre de la porte.
Remarque : Avant l’installation, vérier la porte pour s’assurer qu’elle ferme librement.
Step 1 - Côté charnières de la porte, à la hauteur souhaitée, xer le support de chambranle au chambranle de porte à l’aide des quatre (4) vis longues. Le côté ouverture du support doit se trouver à 6,35 mm (1/4 po) de la porte, selon l’illustration. (FIG. A)
Step 2 - Faire glisser la rondelle de blocage maintenant la porte ouverte sur la tige. À l’aide de la goupille de raccordement courte, raccorder le ferme-porte au support de chambranle. La rondelle de blocage doit être placée sur les ergots, contre le tube
du ferme-porte, comme illustré. (FIG.B) Cela assure la tension correcte pour l’installation. (Ne pas modier jusqu’à ce que l’installation soit terminée.)
Step 3 - Fixer le support de porte au trou AVANT du ferme-porte à l’aide de la goupille de raccordement longue. (FIG. C) La porte étant hermétiquement fermée, maintenir le ferme-porte et le support de porte contre la porte et de niveau, horizontalement,
puis marquer et percer deux (2) trous pilotes de 3,2 mm (1/8 po). ATTENTION : Ne pas percer les trous en traversant totalement la porte. Fixer le support de porte à la porte comme illustré à l’aide des vis courtes. Ouvrir la porte et pousser la rondelle
de blocage derrière les ergots, sur la tige. Le ferme-porte est alors prêt à fonctionner.
Réglage de vitesse - Pour régler la vitesse de fermeture de la porte, tourner la vis de réglage en sens inverse des aiguilles d’une montre pour fermer plus vite, et dans le sens inverse pour ralentir la fermeture. (FIG. D)
Fermeture à déclic - Quand le ferme-porte est installé selon les instructions ci-dessus, sa vitesse de fermeture accélère sur les quelques derniers centimètre de sa course. Si l’on souhaite une fermeture plus régulière et plus silencieuse, maintenir la porte
ouverte sur environ 20 cm (8 po) à l’aide de la rondelle de blocage, enlever la goupille de raccordement longue et repositionner le ferme-porte dans le trou arrière.
INSTRUCCIONES DE INSTALACIÓN: Este cerrador puede ser instalado en cualquier sitio deseado de la puerta, sin embargo, el sitio recomendado es en la parte superior de la puerta, o en el larguero central de la puerta cerca del centro de la puerta.
Nota: Revise la puerta para vericar que se cierra libremente, antes de la instalación.
Paso 1 - En el lado de la bisagra de la puerta, a la altura deseada, je el soporte de la jamba a la jamba de la puerta con cuatro (4) tornillos largos. El lado abierto del soporte debe quedar a 6.35 mm (1.4") de la puerta tal como se muestra (FIG. A)
Paso 2 - Deslice la arandela de retención de la puerta sobre la varilla. Mediante el uso de la espiga corta de conexión, conecte el cerrador al soporte de la jamba. La arandela de retención de la puerta debe estar situada sobre las orejas contra el tubo del
cerrador tal como se muestra (FIG. B). Esto le dará la tensión adecuada para la instalación. (No la cambie sino hasta terminar la instalación).
Paso 3 - Fije el soporte de la puerta al agujero DELANTERO del cerrador con la espiga larga de conexión (FIG. C). Con la puerta rmemente cerrada, sostenga el cerrador y el soporte de la puerta contra la puerta en posición nivelada; marque y perfore dos
(2) agujeros piloto de 3.2 mm (1/8"). PRECAUCIÓN: No traspase la puerta al perforar agujeros. Fije el soporte de la puerta tal como se muestra con tornillos cortos. Abra la puerta y mueva la arandela de retención de la puerta hacia atrás de las orejas
en la varilla. El cerrador está listo para funcionar.
Ajuste de velocidad - Para regular la velocidad de cierre de la puerta, gire el tornillo de ajuste hacia la izquierda para incrementar la velocidad y hacia la derecha para reducir la velocidad (FIG. D)
Cierre uniforme y callado - Si se instala tal como se indica arriba, la velocidad de cierre de la puerta se acelerará en los últimos centímetros de cierre. Si se desea un cierre más uniforme y callado, mantenga la puerta abierta aproximadamente 20 cm
(8") con la arandela de retención, quite la espiga larga de conexión y coloque el cerrador en el agujero trasero.
FIG. A
FIG. C
FIG. B
FIG. D
1/4"
6,35 mm
6.35 mm
DOOR
JAMB
CHAMBRANLE
DE PORTE
JAMBA DE
LA PUERTA
JAMB BRACKET
SUPPORT DE CHAMBRANLE
SOPORTE PARA JAMBA
SHORT CONNECTING PIN
GOUPILLE DE
RACCORDEMENT COURTE
ESPIGA CORTA DE CONEXIÓN
HOLD OPEN WASHER
RONDELLE DE BLOCAGE À L’OUVERTURE
ARANDELA DE RETENCIÓN
LUG
ERGOT
OREJA
-
 1
1
-
 2
2
-
 3
3


Wright Products V1033WH Guide d'installation
- Taper
- Guide d'installation
dans d''autres langues
Documents connexes
-
 Wright Products V1020WH Mode d'emploi
-
 Wright Products VK333X3BL Guide d'installation
-
 Wright Products VF333WH Mode d'emploi
-
 Wright Products VLANBZ Mode d'emploi
-
 Wright Products V2010BL Manuel utilisateur
-
 Wright Products VCA112PB Mode d'emploi
-
 Wright Products VIL333WH Mode d'emploi
-
 Wright Products VIL333SN Mode d'emploi
-
 Wright Products VBR225BL Guide d'installation
-
 Wright Products VBA213BL Mode d'emploi


Autres documents
-
 HAMPTON VH440 Mode d'emploi
-
IDEAL Security SK4015BL Mode d'emploi
-
-
-
-
 Ideal Security Inc. SK1730B Mode d'emploi
-
 Prime-Line K 5027 Guide d'installation
-
 Prime-Line K 5028 Mode d'emploi
-
 Prime-Line K 5118 Mode d'emploi
-


