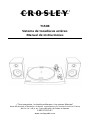
Crosley T150 Bluetooth Record Player Manuel utilisateur
- Catégorie
- Plaque tournante
- Taper
- Manuel utilisateur

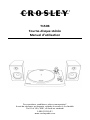
T150B
Stereo Turntable System
Instruction Manual
Questions, problems, missing parts?
Before returning to the store, call Customer Service
8 a.m. – 6 p.m., EST, Monday – Friday
1-888-CROSLEY
www.crosleyradio.com

English
2
Safety Instructions
Read and understand this entire manual before using this product. Keep these
instructions for future reference.
1. Do not use this product near water.
2. This product should be operated only by the type of power source indicated
on the marking label or in this instruction manual.
3. Do not defeat the safety purpose of the polarized plug. A polarized plug has
two blades with one blade wider than the other. This plug will fit into the
power outlet only one way. If you are unable to insert the plug fully into the
outlet try reversing the plug. If the plug should still fail to fit, contact your
electrician.
4. Protect the power cord from being walked on or pinched particularly at plugs,
convenience receptacles, and the point where they exit from the product.
5. Do not overload wall outlets, extension cords, or integral convenience
receptacles as this can result in a risk of fire or electric shock.
6. Never push objects of any kind into this product through openings as they
may touch dangerous voltage points or short-out parts that could result in a
fire or electric shock. Never spill liquid of any kind on the product.
7. Do not attempt to service this product yourself as opening or removing
covers may expose you to dangerous voltage or other hazards. Refer all
servicing to qualified service personnel.
8. Changes or modifications to this unit not expressly approved by the party
responsible for compliance could void the user’s authority to operate the
equipment.
9. Do not use attachments not recommended by the product manufacturer as
they may cause hazards.
10. A product and cart combination should be moved with care. Quick stops,
excessive force, and uneven surfaces may cause the product and cart
combination to overturn.
11. Slots and openings in the cabinet are provided for ventilation and to ensure
reliable operation of the product and to protect it from overheating. Do not
block or cover these openings.
12. Unplug the product during lightning storm or when unused for long periods of
time.

English
3
Items in this package
Before throwing away any packaging materials, please check thoroughly and
make sure you find the following items that come along with this package:
•Turntable
•Turntable Slip Mat
•45 RPM adapter
•Speaker wire
•Power adaptor
Please contact Crosley customer service if there is any accessory missing from
the package. Retain the original packaging materials for exchange or return
purposes.
Specifications
Power
Power consumption
Speaker
Turntable speed
Replacement needle
AC power adaptor, DC output 12V 1.5A
32 W
4”, 4Ω, 15W x 2
331/3, 45 RPM
Crosley NP15
Note:
•Design and specifications are subject to change without notice.

English
4
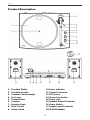
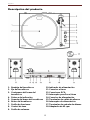
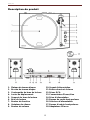
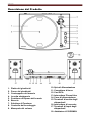
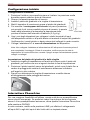
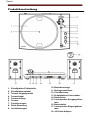
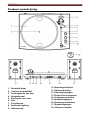
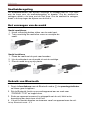
Product Description
1. Turntable Platter
2. Turntable Spindle
3. Tonearm Counterweight
4. Cue Lever
5. Tonearm Rest
6. Tonearm
7. Function Knob
8. Pitch Control
9. Volume Knob
10. Power Indicator
11. Ground Connector
12. RCA Jacks
13. Phono/Line Switch
14. Power Jack
15. Speaker Output Terminals
16. Power Switch
17. Speaker Input Terminals
18. 45 RPM Adapter

English
5
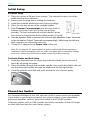
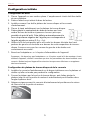
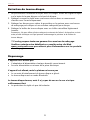
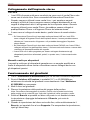
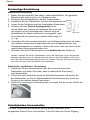
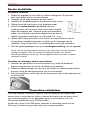
Initial Setup
Essential Setup
1. Place the unit on a flat and level surface. The selected location should be
stable and free from vibration.
2. Remove the tie-wrap that is holding the tonearm.
3. Install the turntable platter and drive belt accordingly
4. Place the slip mat on top of the turntable platter.
5. Slide Tonearm Counterweight onto the rear shaft of
tonearm and push it as close to the stop point as
possible. This will automatically set the needle’s down
force to be in range for the factory fitted needle (3.5g-4g).
6. Use the Speaker Wire to connect the left and right speakers’ Input Terminals
to the turntable’s Output Terminals correspondingly. Make sure the left and
right channels are connected correctly.
7. Connect AC adaptor to the Power Jack of the unit.
Note: Do not plug the AC power adaptor to power outlet before all the assembly is
completed. Before turning the power on, make sure again all the connection settings
are correct. Always turn off the power when connecting or disconnecting.
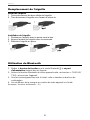
Turntable Platter and Belt Setup
1. Install the drive belt over the inner ring under the platter and make sure it
won’t fall off during the setup.
2. Place the platter through the turntable spindle, then rotate the platter until you
see the drive motor pulley through the window at the top right corner.
3. Carefully grab the drive belt and put it around the slot of motor pulley.
Phono/Line Switch
For increased flexibility of use, this unit has a built-in stereo phono pre-amplifier.
If you prefer to use the phono input of your stereo system or your standalone
phono pre-amplifier, set the Phono/Line switch to the PHONO position.
Otherwise, please set it to LINE position and make connection to the AUX input
or other high-level input on your stereo system.

English
6
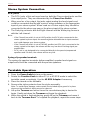
Stereo System Connection
RCA Jacks
• The RCA Jacks of this unit are shared as both the Phono output jacks and the
Line output jacks. They are determined by the Phono/Line Switch.
• When used as a line output, the jacks output analog line-level signals and
could be connected directly with a pair of active speakers or the appropriate
input of your stereo system. When used as a Phono output, they should be
connected to the phono pre-amp or the phono input of the stereo system.
• The Red plug connects with the Right channel and the White plug connects
with the Left channel.
Note:
− If the Phono/Line switch is set at LINE position but RCA jacks connected to the
stereo system’s phono input, the sound might be distorted due to input overload
and could damage your stereo system.
− If the Phono/Line switch is set at PHONO position but RCA jack connected to the
stereo system’s line input, the volume will be very low due to lacking signal pre-
amplification.
− RCA Jack is not designed to be connected directly to the passive/unpowered
speakers and if it does, the volume will be very low.
Spring clip speaker terminals
The spring clip speaker terminals deliver amplified, speaker-level signals as
output and should be connected with the passive speakers.
Turntable Operation
1. Press the Power Switch to turn on the power.
2. Rotate the Function Knob to either 33 1/3 or 45 RPM mode to select the
turntable speed accordingly. Use the 45 RPM Adapter if necessary
3. Place the record on the turntable.
4. Remove the stylus protector from the stylus assembly.
Note: To avoid stylus damage, make certain the included stylus guard is in place
whenever the turntable is being moved or cleaned.
5. Lift up the Tonearm and move it over the record where play is desired to
begin. Gently put down the Tonearm and begin the playback.
6. When the record is finished playing, gently lift up the Tonearm and move it
back to the Tonearm Rest. To suspend the playback, repeat the same steps.

English
7
Pitch Control
The turntable speed can be increased or decreased by approximately 10% by
rotating the Pitch Control Knob. To increase the speed, turn the Pitch Control
Knob clockwise. To decrease the speed, turn the knob counter-clockwise.
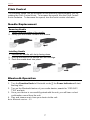
Needle Replacement
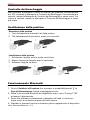
Bluetooth Operation
1. Turn the Function Knob to Bluetooth mode , the Power Indicator will start
flashing blue.
2. Turn on the Bluetooth feature of your audio device, search for “CROSLEY
T150” and pair.
3. Once your device is successfully paired with the unit, you will hear a short
confirmation sound from the unit.
4. Play and stream music from your device to the unit.
Note: Bluetooth version – 5.2
Removing Needle
1. Gently hold both sides of the needle.
2. Gently pull the needle forward and remove.
Installing Needle
1. Position the needle with its tip facing down.
2. Line up the back of the needle with the cartridge.
3. Push the needle back into place.

English
8
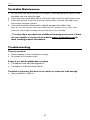
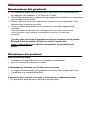
Turntable Maintenance
1. Do not touch the stylus tip with your fingers. Avoid bumping the stylus on the
turntable mat or a record’s edge.
2. Clean the stylus frequently with a soft brush with a back-to-front motion only.
3. Clean the records to get rid of dust or grease with a record cleaning brush
and record cleaning solution.
4. Clean the turntable cabinet with a slightly damped microfiber cloth.
Note: Do not use cleanser other that contains alcohol, benzene or any other harsh
chemicals, which might damage the paint and finish of the turntable.
** Crosley offers a product line of different cleaning accessories. Please
ask your retailer or check out our website www.crosleyradio.com for
more cleaning product information.
Troubleshooting
There is no power
• Power adaptor is not connected correctly.
• No power at the power outlet.
Power is on, but the platter does not turn
• Turntable’s drive belt has slipped off.
• Turntable is under Bluetooth Mode.
Turntable is spinning, but there is no sound, or sound not loud enough
• Stylus protector is still on.

English
9
FCC Statements
This device complies with part 15 of the FCC Rules. Operation is subject to the following
two conditions:
(1) This device may not cause harmful interference, and
(2) this device must accept any interference received, including interference that may
cause undesired operation.
Note: This equipment has been tested and found to comply with the limits for a Class B
digital device, pursuant to part 15 of the FCC Rules. These limits are designed to provide
reasonable protection against harmful interference in a residential installation. This
equipment generates, uses and can radiate radio frequency energy and, if not installed and
used in accordance with the instructions, may cause harmful interference to radio
communications. However, there is no guarantee that interference will not occur in a
particular installation. If this equipment does cause harmful interference to radio or
television reception, which can be determined by turning the equipment off and on, the user
is encouraged to try to correct the interference by one or more of the following measures:
−Reorient or relocate the receiving antenna.
−Increase the separation between the equipment and receiver.
−Connect the equipment into an outlet on a circuit different from that to which the
receiver is connected.
−Consult the dealer or an experienced radio/TV technician for help.
Note: The Grantee is not responsible for any changes or modifications not expressly
approved by the party responsible for compliance. such modifications could void the user's
authority to operate the equipment.
The device has been evaluated to meet general RF exposure requirement.
To maintain compliance with FCC's RF exposure guidelines, the distance must be at least
20 cm between the radiator and your body, and fully supported by the operating and
installation configurations of the transmitter and its antenna(s).
SIMPLIFIED EU DECLARATION OF CONFORMITY
Hereby, Modern Marketing Concepts Inc. dba Crosley Brands, declares that the radio
equipment type is in compliance with Directive 2014/53/EU. The full text of the EU
declaration of conformity is available at the following internet address:
http://crosleybrands.com/euDoC

T150B
Sistema de tocadiscos estéreo
Manual de instrucciones
¿Tiene preguntas, ha tenido problemas o hay piezas faltantes?
Antes de devolver el producto a la tienda, comuníquese con nuestro Servicio al Cliente
de 8 a. m. a 6 p. m., hora del este, de lunes a viernes
1-888-CROSLEY
www.crosleyradio.com

Español
2
Instrucciones de seguridad
Lea y comprenda este manual en su totalidad antes de usar este producto.
Conserve estas instrucciones para consultarlas en el futuro.
1. No use este producto cerca del agua.
2. Este producto debe ser utilizado solo con el tipo de fuente de alimentación
indicado en la etiqueta o en este manual de instrucciones.
3. No subestime el propósito de seguridad del enchufe polarizado. Un enchufe
polarizado posee dos hojas; una de ellas es más ancha que la otra. Este
enchufe encajará en el tomacorriente en un solo sentido. Si no logra insertar
completamente el enchufe en el tomacorriente, pruebe invirtiendo el
enchufe. Si aún así el enchufe no encaja, comuníquese con su electricista.
4. Proteja el cable de alimentación de ser pisado o pinzado, en especial en los
enchufes, los tomacorrientes y en el punto donde el cable sale del producto.
5. No sobrecargue los tomacorrientes de pared, cables de alargue, o
receptáculos integrales, ya que puede generar un riesgo de incendio o
descarga eléctrica.
6. No introduzca objetos de ningún tipo en el producto a través de las ranuras,
ya que pueden hacer contacto con puntos de alto voltaje o provocar un
cortocircuito que ocasione fuego o una descarga eléctrica. No derrame
líquidos de ningún tipo sobre el producto.
7. No intente realizar tareas de mantenimiento por su cuenta, ya que abrir o
remover la cubierta puede exponerlo a un voltaje peligroso y a otros riesgos.
Deje toda tarea de mantenimiento en manos de un técnico de servicio
calificado.
8. Los cambios o las modificaciones que no tengan la aprobación expresa de
la parte responsable del cumplimiento pueden anular el permiso del usuario
para utilizar el equipo.
9. No utilice accesorios que no son recomendados por los fabricantes del
producto porque pueden ser peligrosos.
10. Cualquier combinación de carro y producto debe moverse con cuidado. Las
paradas súbitas, el uso de fuerza excesiva y las superficies irregulares
pueden causar que el producto y el carro se vuelquen.
11. Las ranuras de ventilación y las aberturas del gabinete son provistas para la
ventilación y para asegurar el correcto funcionamiento del producto y evitar
el recalentamiento. No bloquee ni cubra estas aberturas.
12. Desconecte el producto durante las tormentas eléctricas o cuando no se
utilice durante períodos extendidos.

Español
3
Artículos en este empaque
Antes de deshacerse de cualquier material del empaque, revíselo con atención y
asegúrese de encontrar los siguientes artículos que se incluyen en este paquete:
•Tocadiscos
•Cobertor deslizable del tocadiscos
•Adaptador de 45 rpm
•Fil de haut-parleur
•Transformador
Comuníquese con el Servicio al Cliente de Crosley en caso de que faltara algún
accesorio en el empaque. Conserve el material de embalaje original para
realizar cambios o devoluciones.
Especificaciones
Fuente de energía
Consumo de energía
Potencia del altavoz
Altavoz
Aguja de repuesto
Transformador de CA, salida CC de 12 V 1.5 A
32 W
4”, 4Ω, 15W x 2
331/3, 45
Crosley NP15
Nota:
•El diseño y las especificaciones están sujetos a cambios sin previo aviso.

Español
4
Descripción del producto
1. Bandeja del tocadiscos
2. Eje del tocadiscos
3. Contrapeso del brazo del
tocadiscos
4. Palanca de indicación
5. Soporte del brazo del tocadiscos
6. Brazo del tocadiscos
7. Perilla de funciones
8. Control de tono
9. Perilla de volumen
10. Indicador de alimentación
11. Conector a tierra
12. Conectores RCA
13. Interruptor para Fono/Línea
14. Conector de alimentación
15. Terminales de salida de altavoz
16. Interruptor de alimentación
17. Terminales de entrada de altavoz
18. Adaptador de 45 rpm

Español
5
Instalación inicial
Instalación indispensable
1. Coloque la unidad en una superficie plana y nivelada. El lugar seleccionado
debe ser estable y estar libre de vibraciones.
2. Quite la banda de sujeción que sostiene el brazo del tocadiscos.
3. Instale la bandeja del tocadiscos y la correa de transmisión según
corresponda.
4. Coloque el cobertor deslizable sobre la bandeja del tocadiscos.
5. Deslice el Contrapeso del brazo del tocadiscos en el mango
posterior del tocadiscos y empújelo lo más cerca posible al
punto de parada. Esto automáticamente establecerá la
presión de la aguja para que esté en el rango de la aguja
instalada por la fábrica (3.5g-4g).
6. Utilisez le fil de haut-parleur pour raccorder les bornes d'entrée des haut-
parleurs de gauche et de droite aux bornes de sortie respectives du tourne-
disque. Assurez-vous que les canaux de gauche et de droite sont
correctement raccordés.
7. Conecte el adaptador de CA al conector de alimentación de la unidad.
Nota: No enchufe el transformador de CA a un tomacorriente hasta terminar de
ensamblar las partes. Antes de encender el equipo, vuelva a asegurarse de que todos
los ajustes de conexión estén correctos. Siempre apague la unidad al conectarla o
desconectarla.
Instalación de la bandeja y la correa del tocadiscos
1. Instale la correa de transmisión en el anillo interior debajo de la bandeja y
asegúrese de que no se salga durante la instalación.
2. Coloque la bandeja a través del eje del tocadiscos y luego gírela hasta que
observe la polea de motor de accionamiento a través de la ventana que se
encuentra en la esquina superior derecha.
3. Tome con cuidado la correa de transmisión y colóquela alrededor de la
ranura de la polea de motor.

Español
6
Interruptor para Fono/Línea
Para un uso más flexible, esta unidad posee un preamplificador de fono estéreo
incorporado. Si prefiere usar la entrada fono de su sistema estéreo o su
preamplificador de fono independiente, ajuste el interruptor para Fono/Línea en
la posición FONO. De lo contrario, colóquelo en la posición LÍNEA y conecte la
entrada AUX u otra entrada de alto nivel en su sistema estéreo.
Conexión del sistema estéreo
Conectores RCA
• Los conectores RCA de esta unidad son tanto los conectores de salida Fono
como los conectores de salida de Línea. Esto se determina mediante el
interruptor para Fono/Línea.
• Cuando se utilizan como salida de línea, los conectores generan señales
analógicas de nivel de línea y se pueden conectar directamente con un par
de parlantes o en la entrada correspondiente de su sistema estéreo. Cuando
se utilizan como salida Fono, se deben conectar al preamplificador de fono o
a la entrada fono del sistema estéreo.
• El cable rojo se conecta en el canal derecho, y el cable blanco se conecta en
el canal izquierdo.
Nota:
− Si el Interruptor para Fono/Línea se ajusta en la posición LÍNEA pero los
conectores RCA están conectados a la entrada fono del sistema estéreo, es
posible que el sonido se distorsione debido a la sobrecarga de entradas y esto
podría dañar su sistema estéreo.
− Si el interruptor para Fono/Línea está en la posición FONO pero el conector RCA
está conectado a la entrada de línea del sistema estéreo, el volumen será muy bajo
debido a la falta de preamplificación de la señal.
− Los conectores RCA no están diseñados para conectarse directamente a parlantes
pasivos y, si se los conecta, el volumen será muy bajo.
Terminales de parlantes con conector de broche elástico
Las terminales de parlantes con broche elástico brindan señales amplificadas de
nivel del parlante como salida y se deben conectar a parlantes pasivos.

Español
7
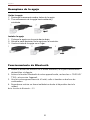
Funcionamiento del tocadiscos
1. Appuyez sur l’interrupteur d’alimentation pour mettre l’appareil sous tension.
Le plateau du tourne-disque se mettra à tourner automatiquement.
2. Mettez le bouton de fonction sur 33 1/3 ou 45 tours pour choisir la vitesse du
tourne-disque. Utilisez l'adaptateur 45 tours si besoin
3. Placez le disque sur le tourne-disque.
4. Quite el protector de la aguja fonográfica de su ensamblaje.
Nota: Para evitar los daños de la aguja fonográfica, asegúrese de que el protector esté
ubicado correctamente cada vez que mueva o limpie el tocadiscos.
5. Soulevez le bras de lecture et placez-le au-dessus du disque, là où vous
souhaitez commencer la lecture. Reposez doucement le bras de lecture et
commencez la lecture.
6. Lorsque la lecture du disque est terminée, soulevez doucement le bras de
lecture et remettez-le sur le support du bras de lecture. Pour interrompre la
lecture, répétez les mêmes étapes.
Control de tono
La velocidad de la plataforma puede ser aumentado o disminuido en
aproximadamente un 10% girando el botón de control de tono. Para aumentar la
velocidad, gire la perilla de control de Pitch las agujas del reloj. Para disminuir la
velocidad, girar el mando en sentido antihorario.

Español
8
Reemplazo de la aguja
Funcionamiento de Bluetooth
1. Mettez le bouton de fonction sur le mode Bluetooth; le voyant d'alimentation
devient bleu et clignote.
2. Activez la fonction Bluetooth de votre appareil audio, recherchez « CROSLEY
T150 » et associez l'appareil.
3. Une fois votre appareil associé à l'unité, celle-ci émettra un bref son de
confirmation.
4. Reproduzca música en forma inalámbrica desde el dispositivo hacia la
unidad.
Nota: Versión de Bluetooth – 5.2
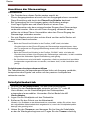
Quitar la aguja
1. Sostenga suavemente ambos lados de la aguja.
2. Tire suavemente de la aguja hacia adelante y
extráigala.
Instalar la aguja
1. Coloque la aguja con la punta hacia abajo.
2. Alinee la parte posterior de la aguja con el cartucho.
3. Vuelva a colocar la aguja en su lugar.

Español
9
Mantenimiento del tocadiscos
1. No toque la punta de la aguja fonográfica con los dedos. Evite golpear la
aguja fonográfica con el cobertor para el tocadiscos o con el borde del disco.
2. Limpie la aguja fonográfica con frecuencia con un cepillo suave mediante
movimientos de atrás hacia adelante.
3. Limpie los discos para quitarles el polvo o la grasa con un cepillo para limpiar
discos y con una solución de limpieza para discos.
4. Limpie el gabinete con un paño de microfibras ligeramente humedecido.
Nota: No utilice otros limpiadores que contengan alcohol, benceno o cualquier otro
químico agresivo que pueda dañar la pintura y la terminación del tocadiscos.
** Crosley ofrece una línea de productos de distintos accesorios de
limpieza. Para obtener más información acerca de los productos de
limpieza, consulte a un comerciante o visite nuestro sitio web
www.crosleyradio.com.
Solución de problemas
La unidad no enciende.
• El transformador no está conectado correctamente.
• No hay energía en el tomacorriente.
El equipo está encendido pero la bandeja no gira.
• Se ha salido la correa de transmisión del tocadiscos.
• Le tourne-disque est en mode Bluetooth.
El tocadiscos gira pero no emite sonidos o los sonidos no son lo
suficientemente fuertes.
• El protector de la aguja fonográfica aún está colocado.

Español
10
Declaraciones de la FCC
Este dispositivo cumple con la Sección 15 de las reglas de la Comisión Federal de
Comunicaciones (FCC). El uso de este equipo está sujeto a las dos condiciones
siguientes:
(1) Este dispositivo no causa interferencia perjudicial y
(2) este dispositivo debe aceptar cualquier interferencia recibida, incluso interferencia que
pueda causar un funcionamiento no deseado.
Nota: Este equipo se verificó y se comprobó que cumple con los límites para un dispositivo
digital clase B, conforme a la Sección 15 de las reglas de la Comisión Federal de
Comunicaciones (FCC). Estos límites están diseñados para brindar una protección
razonable frente a interferencia perjudicial en un establecimiento residencial. Este equipo
genera, usa y puede irradiar energía de radiofrecuencia y, si no se instala y utiliza
siguiendo las instrucciones, puede causar interferencia perjudicial a las
radiocomunicaciones. Sin embargo, no existe garantía de que la interferencia no ocurrirá
en una instalación en particular. Si este equipo causa interferencia perjudicial a las
radiocomunicaciones o a la recepción televisiva, lo que se puede determinar al encender y
apagar el equipo, se recomienda que el usuario intente corregir la interferencia mediante
una o más de las siguientes medidas:
−Reorientar o reubicar la antena de recepción.
−Aumentar la separación entre el equipo y el receptor.
−Conectar el equipo a una toma en un circuito diferente del circuito en el que está
conectado el receptor.
−Consultar al proveedor o a un técnico con experiencia en radio/TV para obtener ayuda.
Nota: El Beneficiario no es responsable de cualquier cambio o modificación que no tenga
la aprobación expresa de la parte responsable del cumplimiento. Estas modificaciones
podrían anular la autoridad del usuario para operar el equipo.
El dispositivo ha sido evaluado para cumplir con el requisito general de exposición a RF.
Para mantener el cumplimiento de las pautas de exposición a RF de la FCC, la distancia
debe ser de al menos 20 cm entre el radiador y su cuerpo, y debe estar totalmente
soportada por las configuraciones de instalación y operación del transmisor y su(s)
antena(s).
DECLARACIÓN DE CONFORMIDAD SIMPLIFICADA DE EU
Por la presente, Modern Marketing Concepts Inc., que opera bajo la denominación
comercial de Crosley Brands, declara que el tipo de equipo de radio cumple con la
Directiva 2014/53/UE. El texto completo de la declaración de conformidad de la UE está
disponible en la siguiente dirección de Internet:
http://crosleybrands.com/euDoC

T150B
Tourne-disque stéréo
Manuel d’utilisation
Des questions, problèmes, pièces manquantes?
Avant de retourner au magasin, appelez le service à la clientèle
De 8 h à 18 h, HNE, du lundi au vendredi
1-888-CROSLEY
www.crosleyradio.com
La page charge ...
La page charge ...
La page charge ...
La page charge ...
La page charge ...
La page charge ...
La page charge ...
La page charge ...
La page charge ...
La page charge ...
La page charge ...
La page charge ...
La page charge ...
La page charge ...
La page charge ...
La page charge ...
La page charge ...
La page charge ...
La page charge ...
La page charge ...
La page charge ...
La page charge ...
La page charge ...
La page charge ...
La page charge ...
La page charge ...
La page charge ...
La page charge ...
La page charge ...
La page charge ...
La page charge ...
La page charge ...
La page charge ...
La page charge ...
La page charge ...
La page charge ...
La page charge ...
La page charge ...
La page charge ...
-
 1
1
-
 2
2
-
 3
3
-
 4
4
-
 5
5
-
 6
6
-
 7
7
-
 8
8
-
 9
9
-
 10
10
-
 11
11
-
 12
12
-
 13
13
-
 14
14
-
 15
15
-
 16
16
-
 17
17
-
 18
18
-
 19
19
-
 20
20
-
 21
21
-
 22
22
-
 23
23
-
 24
24
-
 25
25
-
 26
26
-
 27
27
-
 28
28
-
 29
29
-
 30
30
-
 31
31
-
 32
32
-
 33
33
-
 34
34
-
 35
35
-
 36
36
-
 37
37
-
 38
38
-
 39
39
-
 40
40
-
 41
41
-
 42
42
-
 43
43
-
 44
44
-
 45
45
-
 46
46
-
 47
47
-
 48
48
-
 49
49
-
 50
50
-
 51
51
-
 52
52
-
 53
53
-
 54
54
-
 55
55
-
 56
56
-
 57
57
-
 58
58
-
 59
59


Crosley T150 Bluetooth Record Player Manuel utilisateur
- Catégorie
- Plaque tournante
- Taper
- Manuel utilisateur
dans d''autres langues
- italiano: Crosley T150 Bluetooth Record Player Manuale utente
- English: Crosley T150 Bluetooth Record Player User manual
- español: Crosley T150 Bluetooth Record Player Manual de usuario
- Deutsch: Crosley T150 Bluetooth Record Player Benutzerhandbuch
- Nederlands: Crosley T150 Bluetooth Record Player Handleiding