
24-Port Gigabit Ethernet Unmanaged Switch
GS324v2
• NETGEAR24-PortGigabitEthernetUnmanagedSwitchModelGS324v2
• Powercord(variesbyregion)
• Rack-mountbracketsandscrews
• Wall-mountscrews
• Rubberfootpads
• Installationguide
Package contents
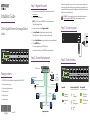
Step 2. Connect the equipment. Step 4. Check the status.
January2022
Step 3. Connect to power.
Power LED Port Link and Activity LED
(onenumberedLEDforeachport)
Port Speed LED
(onesquareLEDforeachport)
Poweredon
(solidgreen)
Link
(solidgreen)
1000Mbpslink
(solidgreen)
Poweredoff
(off)
Activity
(blinkinggreen)
100/10Mbpslink
(solidyellow)
Nolink
(off)
Thisswitchisdesignedforindooruseonly.Ifyouwanttoconnectittoadevicelocated
outdoors,theoutdoordevicemustbeproperlygroundedandsurgeprotected,andyou
mustinstallanEthernetsurgeprotectorinlinebetweentheswitchandtheoutdoordevice.
Failuretodosocandamagetheswitch.
WARNING: Beforeconnectingthisswitchtooutdoorcablesordevices,see
https://kb.netgear.com/000057103forsafetyandwarrantyinformation.
1. FromacomputerormobiledevicethatisconnectedtotheInternet,visit
my.netgear.com.
2. LogintoyourNETGEARaccount.
NOTE: Ifyoudon’thaveafreeNETGEARaccount,youcancreateone.
TheMyProductspagedisplays.
3. Fromthemenuontheleft,selectRegister a Product.
4. IntheSerial Numbereld,typetheserialnumberofyourswitch.
Theserialnumberis13digitslong.Itisprintedontheswitchlabel.
5. FromtheDate of Purchasemenu,selectthedatethatyoupurchasedtheswitch.
6. ClicktheREGISTERbutton.
YourswitchisregisteredtoyourNETGEARaccount.
AconrmationemailissenttoyourNETGEARaccountemailaddress.
Step 1. Register the switch.
GS324v2switch
Desktop
Sample connections
Laptop
ReadyNAS SmartTV
Desktop
Gamingconsole
Router
Internet
IPcamera
Installation Guide

©NETGEAR,Inc.,NETGEARandthe
NETGEARLogoaretrademarksof
NETGEAR,Inc.Anynon-NETGEAR
trademarksareusedforreference
purposesonly.
NETGEAR, Inc.
350EastPlumeriaDrive
SanJose,CA95134,USA
NETGEAR INTERNATIONAL LTD
Floor1,Building3
UniversityTechnologyCentre
CurraheenRoad,Cork,
T12EF21,Ireland
Support and Community
Regulatory and Legal
SiceproduitestvenduauCanada,vouspouvezaccéderàcedocumentenfrançais
canadienàhttps://www.netgear.com/support/download/.
(IfthisproductissoldinCanada,youcanaccessthisdocumentinCanadianFrenchat
https://www.netgear.com/support/download/.)
ForregulatorycomplianceinformationincludingtheEUDeclarationofConformity,visit
https://www.netgear.com/about/regulatory/.
Seetheregulatorycompliancedocumentbeforeconnectingthepowersupply.
ForNETGEAR’sPrivacyPolicy,visithttps://www.netgear.com/about/privacy-policy/.
Byusingthisdevice,youareagreeingtoNETGEAR’sTermsandConditionsat
https://www.netgear.com/about/terms-and-conditions/.Ifyoudonotagree,returnthe
devicetoyourplaceofpurchasewithinyourreturnperiod.
Donotusethisdeviceoutdoors.
Visitnetgear.com/supporttogetyourquestionsansweredandaccessthelatest
downloads.
YoucanalsocheckoutourNETGEARCommunityforhelpfuladviceat
community.netgear.com.
Specication Description
Networkinterface RJ-45connectorfor1000BASE-T,100BASE-T,or10BASE-T
Networkcable Category5e(Cat5e)orhigherratedEthernetcable
Ports 24
Power 100-240VAC50/60Hz,0.7A
Powerconsumption 12Wmax.
Weight 2.67lb.(1.21kg)
Dimensions(WxDxH) 9.92x7.09x1.73in(252x180x44mm)
Operatingtemperature 32–122°F(0–50°C)
Operatinghumidity 10%–90%relativehumidity,noncondensing
SpecicationsAttach the switch to a wall
Toattachtheswitchtoawall,youneedthewall-mountscrewsthataresuppliedwiththe
switch.Thesescrewsare6.3mmindiameter,27mminlength.
To attach the switch to a wall:
1. Locatethetwomountholesonthebottompaneloftheswitch.
2. Markanddrilltwomountingholesinthewallwhereyouwanttomounttheswitch.
Youcanmounttheswitchhorizontallyorvertically:
• Horizontally:Thetwomountingholesmustbeataprecisedistanceof7.0in.
(178mm)fromeachother.
• Vertically:Thetwomountingholesmustbeataprecisedistanceof3.5in.
(89mm)fromeachother.
3. InsertthesuppliedanchorsintothewallandtightenthesuppliedscrewswithaNo.2
Phillipsscrewdriver.
Leaveabout0.15in.(4mm)ofeachscrewprotrudingfromthewallsothatyoucan
insertthescrewsintotheholesonthebottompanel.
Install the switch in a rack
Toinstalltheswitchinarack,youneedtherack-mountbracketsandscrewsthatare
suppliedwiththeswitch.
To install the switch in a rack:
1. Attachthesuppliedmountingbracketstothesideoftheswitch.
Insertthescrewsprovidedintheproductpackagethrougheachbracketandintothe
bracketmountingholesintheswitch.
2. TightenthescrewswithaNo.2Phillipsscrewdrivertosecureeachbracket.
3. Alignthemountingholesinthebracketswiththeholesintherack,andinserttwopan-
headscrewswithnylonwashersthrougheachbracketandintotherack.
4. TightenthescrewswithaNo.2Phillipsscrewdrivertosecuremountingbracketstothe
rack.
-
 1
1
-
 2
2


dans d''autres langues
- English: Netgear GS324v2 Installation guide
Documents connexes
-
Netgear GS105GE 5-Port Gigabit Switch Guide d'installation
-
Netgear MS105 Guide d'installation
-
Netgear MS305 Guide d'installation
-
-
-
-
-
-
-