
4 pcs widespread bath/showermixer
Installation guide
Montageanleitung
Installatiegids
Guide d’installation
ENG
Maintenance advice
Clean your bath tap with a liquid, gentle, citric acid-based cleanser.
After cleaning always rinse the tap thoroughly with clean water and dry with a
soft cloth. Do not use cleaners containing hydrochloric acid, acetic acid,
chlorine or other harmful, aggressive agents. Do not use cleaners containing
phos-
phoric acid. Similarly, do not use abrasive sponges or other rough cloths.
Warranty conditions
Your receipt or invoice is your only valid proof of warranty, store it carefully.
In the event of a defect with your tap, contact your dealer. The warranty on
your tap covers manufacturing defects. Damage or malfunction caused by
poor water quality (limescale, sand, metals etc.) are not covered by the warranty.
Use a lter and / or descaling device. In the event of misuse or poor installation,
the manufacturer cannot accept liability and the warranty is voided.
The warranty is at the point of purchase. Under no circumstances will goods
be collected from you or repairs conducted on site.
NL
Onderhoudsadvies
Reinig uw badkraan met een vloeibaar, zacht reinigingsmiddel op basis van
citroenzuur. Spoel, na reiniging, altijd de kraan goed af met zuiver water en
droog af met een zachte doek. Gebruik nooit reinigingsmiddelen die zout-
zuur, azijnzuur, chloor of een ander schadelijk, agressief middel bevatten.
Gebruik geen fosforzuurhoudende reinigingsmiddelen. Gebruik bovendien
nooit schuursponzen of andere ruwe doeken.
Garantiebepalingen
Uw kassabon of aankoopfactuur is uw enige geldige garantiebewijs;
bewaar ze zorgvuldig. Bij een defect aan uw kraan, raadpleeg uw dealer.
De garantie van uw kraan slaat op productiefouten. Beschadigingen of
gebrekkige werking veroorzaakt door een slechte waterkwaliteit (kalk,
zand, metalen, ...) vallen niet onder de garantie. Gebruik een lter en/of een
ontkalkingsapparaat. Bij verkeerd gebruik of gebrekkige installatie kan de
fabrikant geen aansprakelijkheid aanvaarden en vervalt elke garantie. De gar-
antie betreft garantie in uw aankooppunt. In geen geval worden de goederen
bij u opgehaald of worden er ter plaatse interventies verricht.
FR
Conseils d’entretien
Nettoyez votre mitigeur à l’aide d’un détergent doux liquide à base d’acide
citrique. Après nettoyage, rincez toujours soigneusement le mitigeur à l’eau
claire et séchez-le à l’aide d’un chi on doux. N’utilisez jamais de produits de
nettoyage contenant de l’acide chlorhydrique, de l’acide acétique, du chlore
ou tout autre produit agressif et nocif. N’utilisez pas de produits de nettoyage
contenant de l’acide phosphorique. N’utilisez jamais non plus d’éponges à
récurer ou autres tissus rêches.
Conditions de garantie
Votre bon de caisse ou votre facture d’achat sont vos seules preuves de
garantie valide ; conservez-les soigneusement. En cas de défectuosité de votre
mitigeur, consultez votre revendeur. La garantie de votre mitigeur porte
sur les défauts de production. Les dommages ou les défauts de fonctionne-
ment dus à une mauvaise qualité de l’eau (calcaire, sable, métaux, ...) ne sont
pas couverts par la garantie. Utilisez un ltre et/ou un adoucisseur d’eau.
Le fabricant ne peut accepter aucune responsabilité du fait d’une utilisation
inadéquate ou d’une installation défectueuse et toute garantie est invalidée.
La garantie est une garantie dans votre point d’achat. En aucun cas les march-
andises ne sont reprises chez vous ou des interventions e ectuées sur place.
DE
P ege
Reinigen Sie Ihre Armatur mit einem üssigen, milden Reinigungsmittel auf
Zitronensäurebasis. Spülen Sie die Armatur nach der Reinigung gründlich
mit sauberem Wasser ab und trocknen Sie sie mit einem weichen Tuch ab.
Verwenden Sie keine Reinigungsmittel, die Salzsäure, Essigsäure, Chlor oder
ein sonstiges, schädliches und aggressives Mittel enthalten. Verwenden Sie
keine Reinigungsmittel, die Phosphorsäure enthalten. Verwenden Sie keine
Topfkratzer oder sonstige, raue Tücher.
Garantiebestimmungen
Ihr Kassenzettel oder Ihre Rechnung sind Ihre einzigen gültigen Garantiebel-
ege. Bewahren Sie sie daher sorgfältig auf. Falls Ihre Armatur einen Mangel
aufweist, wenden Sie sich bitte an Ihren Händler. Die Garantie für Ihre
Armatur gilt für Produktionsfehler. Schäden oder mangelhafte Funktionsweise
durch schlechte Wasserqualität (Kalk, Sand, Metalle, ...) stellen keinen Garan-
tieanspruch dar. Verwenden Sie einen Filter und/oder ein Entkalkungsgerät.
Bei falscher Verwendung oder fehlerhafter Installation übernimmt der
Hersteller keine Haftung und es verfällt jegliche Garantie. Die Garantie
bezieht sich in Ihrem Fachgeschäft. Die Ware wird weder bei Ihnen abgeholt,
noch erfolgt ein Kundendienst vor Ort.
Gefeliciteerd met uw keuze voor een Blaufoss kwaliteitsproduct.
Alle Blaufoss kranen worden uitvoerig getest en gecontroleerd
op gebreken. Blaufoss kan dan ook een kraan van hoge kwali-
teit garanderen. Om maximaal van uw Blaufoss kraan te kunnen
genieten, adviseren wij u om onderstaande aanbevelingen in acht te
nemen.
Nous vous félicitons d’avoir choisi un produit de qualité Blaufoss. Tous
les robinets Blaufoss sont soumis à des tests approfondis et sévèrement
contrôlés. Blaufoss peut donc garantir la haute qualité de ses robinets.
A n de pro ter au mieux de votre mitigeur Blaufos, nous vous conseil-
lons d’observer les recommandations suivantes.
Herzlichen Glückwunsch zu Ihrem Qualitätsprodukt von Blaufoss.
Sämtliche Armaturen von Blaufoss werden ausführlich getestet und
auf Mängel kontrolliert. Daher kann Blaufoss für die hohe Qualität
seiner Armaturen garantieren. Damit Sie stets Freude an Ihrer Armatur
von Blaufoss haben, bitten wir Sie, die folgendenden Empfehlungen zu
beachten.
Congratulations on choosing a quality Blaufoss product. All Blaufoss
taps are thoroughly tested and checked for defects. This means Blaufoss
can guarantee a high quality tap. To get the best out of your Blaufoss tap,
we recommend that you follow the recommendations below.
Eleganza 44129

Eleganza
Installation requirements
Installatie vereisten
Exigences d’installation
Installationsanforderungen
EN
NL
FR
DU
A rim-mounted bath faucet must be accessible for
inspection / maintenance. You can achieve this by
placing the bath tap on the outer side of the bath
housing and to install a inspection hatch (1).
When you choose to install the bath tap on the
wall side of the bath-housing, a inspection hatch
in an adjacent room can provide acces to the bath
faucet components (2).
Les robinets placés sur le bord de la
baignoire doivent toujours être accessibles pour
l’inspection/l’entretien. Pour ce faire, vous pouvez
placer le robinet de la baignoire sur le côté
extérieur du tablier de la baignoire et prévoir une
trappe d’inspection (1).
Si vous décidez d’installer le robinet de la
baignoire contre le mur, vous pouvez prévoir une
trappe d’inspection du même type dans une pièce
adjacente (2).
Een badrandkraan dient voor inspectie/on-
derhoud steeds bereikbaar te zijn. Dit kunt u
realiseren door de badkraan langs buitenkant van
de badomkasting te plaatsen en deze te voorzien
van een inspectieluik. (1).
Wanneer u opteert voor de plaatsing van de
badkraan tegen de muur kunt u in een aanpalend
vertrek een gelijkaardig inspectieluik voorzien.(2).
Eine Armatur auf dem Badewannenrand muss für
eine Inspektion/Wartung stets zugänglich sein.
Zu diesem Zweck wird der Zulauf der Badewan-
nenarmatur am besten an der Außenseite der
Badewanne installiert und mit einer Revision-
sklappe versehen. (1).
Wenn der Zulauf an der Wand platziert wird,
sollten Sie versuchen, an der anderen Seite der
Wand einen entsprechenden Zugang mit einer
Revisionsklappe einzurichten. (2).
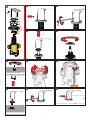
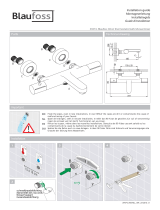
1
Parts list
Lijst van onderdelen
Liste des piéces
Teile
0
1
2
A B
D
58 57
44129_INSTALL_INT_ver2017.1.1
C
E
48
56
59
60
Detail parts p4 Detail parts p5Detail parts p4
Detail parts p6
2

Installation on mounting plate
Installatie op montageplaat
Installation sur plaque de montage
Installation auf Montageplatte
EN FR
DU
2
Het gebruik van een montageplaat biedt het
voordeel dat voor de fi nale afwerking de kraan-
opstelling gemonteerd én getest kan worden.
Bij controle van de fl exibele leidingen (10jaar)
kunt u dan de siliconevoeg doorbreken en de
inspectie vlot verrichten zonder uw badombouw
volledig te moeten demonteren.
De diepte van de plaat is de afstand afgewerkte
muur tot aan de badrand verminderd met 2 x
3mm.
De breedte is afhankelijk van de afwerkingsmeth-
ode, maar eenzelfde voegbreedte van 2 x 3mm
aanhouden.
Volgens de soort van bovenplaatafwerking zijn er
2 scenario’s die u kan volgen :
1. De bovenplaat van de badombouw is voorzien
in één geheel ; de breedte van de badrandkraan,
vermeerderd met +/- 10 cm aan weerszijden. Er
dient dan een uitsparing voorzien te worden in
het bovenblad ter grootte van de montageplaat.
Wanneer u echter met natuursteen werkt kunt u
opteren om het bovenblad in 4 delen te maken
zodoende dat de aansluitvoegen dan de maat
van de montageplaat bepalen.
2. De bovenplaat zal betegeld worden; de
montageplaat afwerken met een veelvoud van
de tegelgrootte, u kunt de betegelde montage-
plaat dan gewoon afwerken zoals de rest van
de badombouw, de te voorziene voeg tussen
montageplaat en badombouw dicht u dan af met
een silicone in dezelfde kleur van de voeg.
NL
Using an assembly plate gives you the advantage
of being to fi t and test the set-up of the faucet
before the fi nishing touches.
When inspecting fl exible pipes (10 years), you
can simply pierce the silicone seal and quickly
carry out the inspection without having to disas-
semble the bath surround.
The depth of the plate is the distance between the
fi nished wall to the bath edge, minus 2 x 3mm.
The width depends on the fi nishing method, but
you should maintain the same joint width of 2 x
3mm.
There are two scenarios you can follow depend-
ing on the type of fi nish used for the cover plate:
1. The cover plate of the bath housing comes as
one unit: the width of the bath taps increased +/-
10 cm on either side. In this case you should cre-
ate a recess in the top plate that is the size of the
assembly plate. However, when you are working
with natural stone, you can opt to create the top
plate in 4 sections so that the connecting joints
determine the dimensions of the assembly plate.
2. The top plate will be tiled: fi nish the assembly
plate with a multiple of the tile size; you can then
fi nish the tiled assembly plate in the same way as
the remainder of the bath housing and seal the
joint to be provided between the assembly plate
and the bath housing using silicone in the same
colour as the joint.
L’utilisation d’une plaque de montage offre
l’avantage de permettre le montage et le test du
robinet avant la fi nition. Dans le cadre du contrôle
des conduites fl exibles (dix ans), vous pouvez
casser le joint en silicone et exécuter rapidement
l’inspection sans démonter complètement le
cadre de la baignoire.
La profondeur de la plaque correspond à la dis-
tance entre le mur fi ni et le bord de la baignoire
moins de 2 x 3 mm.
La largeur dépend du mode de fi nition, il faut
cependant conserver une largeur de joint de 2 x
3 mm.
Selon le type de fi nition de la plaque supérieure,
deux scénarios sont possibles :
1. La plaque supérieure du cadre de la baignoire
forme un ensemble : largeur du robinet sur le
bord de la baignoire plus environ 10 cm des deux
côtés. Un évidement doit être prévu dans le pla-
teau à hauteur de la plaque de montage. Si vous
travaillez avec de la pierre naturelle, vous pouvez
cependant décider de séparer le plateau en qua-
tre, les joints déterminent alors les dimensions de
la plaque de montage.
2. La plaque supérieure sera carrelée : fi nition de
la plaque de montage avec plusieurs tailles de
carreaux. Vous pouvez alors assurer la fi nition
de la plaque de montage carrelée de la même
manière que le reste du cadre de la baignoire.
Pour le joint entre la plaque de montage et le
cadre de la baignoire, utilisez un silicone de la
même couleur que le joint.
Die Verwendung einer Montageklappe bietet den
Vorteil, dass bei den Abschlussarbeiten der Ar-
matureninstallation ein Test durchgeführt werden
kann. Zur Kontrolle der fl exiblen Leitungen (alle
10 Jahre) können Sie dazu das Silikon aufschnei-
den und die Inspektion schnell durchführen, ohne
größere Arbeiten im Bad vornehmen zu müssen.
Die Tiefe der Klappe entspricht dem Abstand von
der fertigen Mauer bis zum Wannenrand minus 2
x 3 mm.
Die Breite hängt von der Verarbeitungsmethode
ab. Es sollte jedoch ebenfalls dieselbe Fugenbre-
ite von 2 x 3 mm eingehalten werden.
Je nach Verarbeitung der Oberkante der Bade-
wanne sind 2 Szenarien möglich:
1. Die Oberkante der Badewanne ist in einem
ganzen verarbeitet; der Breite der Badewanne-
narmatur werden +/- 10 cm hinzugefügt. Dabei
muss in der Oberkante eine Aussparung in Größe
der Montageklappe vorgesehen werden. Bei Ver-
arbeitung von Naturstein kann beispielsweise die
Oberkante in 4 Teilen verarbeitet werden, wobei
die Anschlussfugen die Größe der Montageplatte
bestimmen.
2. Die Oberkante soll gefl iest werden. Die
Montageklappe wird dann mit einigen Fliesen
verarbeitet, sodass sie wie die anderen Fliesen
in die Oberkante der Badewanne eingesetzt wird.
Der Zwischenraum zwischen der Montageplatte
und den Fliesen an der Oberkante wird mit Silikon
abgedichtet, welches dieselbe Farbe wie die
Fugen haben sollte.
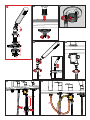
3

Technical information en connection diagram
Technische informatie en connectieschema
Information technique et schéma de raccordement
Technische Informationen und Anschluss Schema
4
Breng in de toevoerleidingen stopkranen aan
van 1/2”. Plaats deze bij voorkeur buiten de
badombouw. Indien dit niet mogelijk is dienen de
afsluitkranen gemakkelijk bereikbaar te zijn bij de
verwijdering van de montageplaat.
Spoel de leidingen, zelfs in nieuwe installaties.
In méér dan 90 % van de gevallen zijn vuil of
verontreinigingen de oorzaak van het slecht func-
tioneren van uw kraan.
Connection requirements
Aansluitvereisten
Conditions de raccordement
Verbindungsanforderungen
EN FR
DU
3
NL
!
Install check valves (1/2”) on the water supply
lines. Place them preferably outside the bath
construction, If this is not possible, the stopcocks
should be easy to access when removing the
assembly plate.
Flush the pipes, even in new installations. In over
90% of the cases are dirt or contaminants the
cause of malfunctioning of your faucet.
12
3
Setzen Sie die Absperrhähne für die Zuleitungen
mit 1/2” ein. Platzieren Sie diese vorzugsweise
außerhalb der Badewanne. Sollte dies nicht
möglich sein, müssen die Absperrhähne zumind-
est durch Erweiterung der Montageklappe leicht
zugänglich sein.
Spülen Sie die Rohre auch in neue Anlagen. In
über 90 % der Fälle sind Schmutz und Verun-
reinigungen die Ursache der Störung Ihres Was-
serhahn.
Installez des robinets d’arrêt de 1/2” dans les
conduites d’alimentation. Placez-les de préfé-
rence à l’extérieur du cadre de la baignoire. Si
ce n’est pas possible, les robinets d’arrêt doivent
être facilement accessibles une fois la plaque de
montage retirée.
Rincer les tuyaux, même dans les nouvelles
installations. Dans plus de 90 % des cas sont
saleté ou les contaminants de la cause du dys-
fonctionnement de votre robinet.
A
3
9
10
8
B
19
22
23
24
25
26
21
20
59
11
4
1

C
29 27
30
31
32
34
35
36
11
5
7
6
4
8 10
12
11
9
13
34
35
34
35
58
5

± 25 cm
19 20
16
17
18
D
53
14 15
E
32
51
50
49
52
11
56
57
48
6

23 24
25
21 22
59
59
26
7
27
60
-
 1
1
-
 2
2
-
 3
3
-
 4
4
-
 5
5
-
 6
6
-
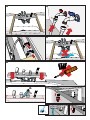 7
7


dans d''autres langues
- English: Blaufoss 44129 Installation guide
- Deutsch: Blaufoss 44129 Installationsanleitung
- Nederlands: Blaufoss 44129 Installatie gids
Documents connexes
-
 Blaufoss 23519 Guide d'installation
-
 Blaufoss 29234 Guide d'installation
-
 Blaufoss 35675 Guide d'installation
-
 Blaufoss 39474 Guide d'installation
-
 Blaufoss 39617 Guide d'installation
-
 Blaufoss 200539 Guide d'installation
-
 Blaufoss 22760 Guide d'installation
-
 Blaufoss 1610 Guide d'installation
-
 Blaufoss 19344 Guide d'installation
-
 Blaufoss 37864 Guide d'installation


