
DCR-PJ6/SX22
4-437-569-41(1)
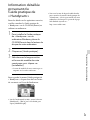
Operating Guide US
Mode d’emploi FR
Digital Video Camera
Recorder/
Caméscope numérique

2
US

3
US
Owner’s Record
The model and serial numbers are located
on the bottom. Record the serial number
in the space provided below. Refer to these
numbers whenever you call your Sony
dealer regarding this product.
Model No. DCR-
Serial No.
Model No. AC-
Serial No.
WARNING
To reduce fire or shock hazard, do not
expose the unit to rain or moisture.
Do not expose the batteries to
excessive heat such as sunshine, fire or
the like.
US

4
US
Read this first
Before operating the unit, please read this
manual thoroughly, and retain it for future
reference.
CAUTION
Battery pack
If the battery pack is mishandled, the
battery pack can burst, cause a fire or even
chemical burns. Observe the following
cautions.
Do not disassemble.
Do not crush and do not expose the battery
pack to any shock or force such as hammering,
dropping or stepping on it.
Do not short circuit and do not allow metal
objects to come into contact with the battery
terminals.
Do not expose to high temperature above 60°C
(140 °F) such as in direct sunlight or in a car
parked in the sun.
Do not incinerate or dispose of in fire.
Do not handle damaged or leaking lithium ion
batteries.
Be sure to charge the battery pack using a
genuine Sony battery charger or a device that
can charge the battery pack.
Keep the battery pack out of the reach of small
children.
Keep the battery pack dry.
Replace only with the same or equivalent type
recommended by Sony.
Dispose of used battery packs promptly as
described in the instructions.
Replace the battery with the specified type
only. Otherwise, fire or injury may result.
AC Adaptor
Do not use the AC Adaptor placed in a
narrow space, such as between a wall and
furniture.
Use the nearby wall outlet (wall socket)
when using the AC Adaptor. Disconnect
the AC Adaptor from the wall outlet (wall
socket) immediately if any malfunction
occurs while using your camcorder.
Even if your camcorder is turned off, AC
power source (mains) is still supplied to
it while connected to the wall outlet (wall
socket) via the AC Adaptor.
For customers in the U.S.A. and CANADA
RECYCLING LITHIUM-ION BATTERIES
Lithium-Ion batteries are
recyclable.
You can help preserve our
environment by returning
your used rechargeable
batteries to the collection and
recycling location nearest you.
For more information
regarding recycling of
rechargeable batteries, call toll
free 1-800-822- 8837, or visit
http://www.rbrc.org/
Caution: Do not handle
damaged or leaking Lithium-
Ion batteries.
Battery pack
CAN ICES-3 B/NMB-3 B

5
US
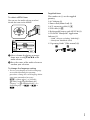
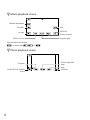
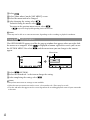
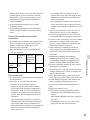
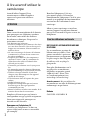
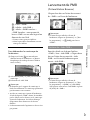
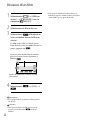
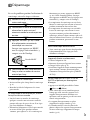
To select a MENU item
You can use the multi-selector to select/
decide the items in the MENU.
Select a button by placing an orange
frame over it using /// of the
multi-selector.
Press the center of the multi-selector to
confirm your selection.
To change the language setting
The on-screen displays in each local language
are used for illustrating the operating
procedures. Change the screen language before
using your camcorder if necessary.
[Show others] [CLOCK/
LANG] (under [GENERAL SET]
category) [
LANGUAGE SET] a
desired language
.
Supplied items
The numbers in ( ) are the supplied
quantity.
AC Adaptor (1)
Power cord (Mains lead) (1)
A/V connecting cable (1)
USB cable (1)
Rechargeable battery pack NP-FV30 (1)
CD-ROM “Handycam” Application
Software (1)
“PMB” (software, including “PMB Help”)
“Handycam” Handbook (PDF)
“Operating Guide” (This manual) (1)


8
US
Table of contents
Read this first . . . . . . . . . . . . . . . . . . . . . . . . . . . . . . . . . . . . . . . . . . . . . . . . . . . . . . . . . . . . . . . . . . . . . . . . . . . . . . . . . . . . . . . . . 4
Everyday as unforgettable moment with “Handycam” . . . . . . . . . . . . . . . . . . . . . . . . . . . . . . . . . . . . . . 6
Preparation
Charging . . . . . . . . . . . . . . . . . . . . . . . . . . . . . . . . . . . . . . . . . . . . . . . . . . . . . . . . . . . . . . . . . . . . . . . . . . . . . . . . . . . . . . . . . . . . . . 9
Setting . . . . . . . . . . . . . . . . . . . . . . . . . . . . . . . . . . . . . . . . . . . . . . . . . . . . . . . . . . . . . . . . . . . . . . . . . . . . . . . . . . . . . . . . . . . . . . . 10
Recording/Playback
Recording . . . . . . . . . . . . . . . . . . . . . . . . . . . . . . . . . . . . . . . . . . . . . . . . . . . . . . . . . . . . . . . . . . . . . . . . . . . . . . . . . . . . . . . . . . . 11
Playback on the camcorder . . . . . . . . . . . . . . . . . . . . . . . . . . . . . . . . . . . . . . . . . . . . . . . . . . . . . . . . . . . . . . . . . . . . . 13
Deleting movies and photos . . . . . . . . . . . . . . . . . . . . . . . . . . . . . . . . . . . . . . . . . . . . . . . . . . . . . . . . . . . . . . . . . . . . 15
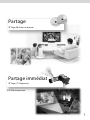
Playing back images through the built-in projector (DCR-PJ6) . . . . . . . . . . . . . . . . . . . . . . . . . . 17
Playing images on a TV . . . . . . . . . . . . . . . . . . . . . . . . . . . . . . . . . . . . . . . . . . . . . . . . . . . . . . . . . . . . . . . . . . . . . . . . . . 19
Saving movies and photos
Saving images on a disc . . . . . . . . . . . . . . . . . . . . . . . . . . . . . . . . . . . . . . . . . . . . . . . . . . . . . . . . . . . . . . . . . . . . . . . . . 20
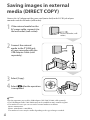
Saving images in external media (DIRECT COPY) . . . . . . . . . . . . . . . . . . . . . . . . . . . . . . . . . . . . . . . . . . . 22
Using a computer
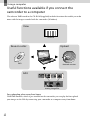
Useful functions available if you connect the camcorder to a computer . . . . . . . . . . . . . . 24
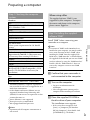
Preparing a computer . . . . . . . . . . . . . . . . . . . . . . . . . . . . . . . . . . . . . . . . . . . . . . . . . . . . . . . . . . . . . . . . . . . . . . . . . . . . 25
Starting PMB (Picture Motion Browser) . . . . . . . . . . . . . . . . . . . . . . . . . . . . . . . . . . . . . . . . . . . . . . . . . . . . . . . 27
Using “PMB Portable” . . . . . . . . . . . . . . . . . . . . . . . . . . . . . . . . . . . . . . . . . . . . . . . . . . . . . . . . . . . . . . . . . . . . . . . . . . . . . 28
Customizing your camcorder
Using menus . . . . . . . . . . . . . . . . . . . . . . . . . . . . . . . . . . . . . . . . . . . . . . . . . . . . . . . . . . . . . . . . . . . . . . . . . . . . . . . . . . . . . . . 29
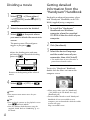
Dividing a movie . . . . . . . . . . . . . . . . . . . . . . . . . . . . . . . . . . . . . . . . . . . . . . . . . . . . . . . . . . . . . . . . . . . . . . . . . . . . . . . . . . 34
Getting detailed information from the “Handycam” Handbook . . . . . . . . . . . . . . . . . . . . . . . . . 34
Additional Information
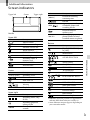
Screen indicators . . . . . . . . . . . . . . . . . . . . . . . . . . . . . . . . . . . . . . . . . . . . . . . . . . . . . . . . . . . . . . . . . . . . . . . . . . . . . . . . . . 35
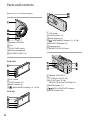
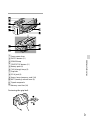
Parts and controls . . . . . . . . . . . . . . . . . . . . . . . . . . . . . . . . . . . . . . . . . . . . . . . . . . . . . . . . . . . . . . . . . . . . . . . . . . . . . . . . . 36
Troubleshooting . . . . . . . . . . . . . . . . . . . . . . . . . . . . . . . . . . . . . . . . . . . . . . . . . . . . . . . . . . . . . . . . . . . . . . . . . . . . . . . 38
Specifications . . . . . . . . . . . . . . . . . . . . . . . . . . . . . . . . . . . . . . . . . . . . . . . . . . . . . . . . . . . . . . . . . . . . . . . . . . . . . . . . . . . . . . 40
Precautions . . . . . . . . . . . . . . . . . . . . . . . . . . . . . . . . . . . . . . . . . . . . . . . . . . . . . . . . . . . . . . . . . . . . . . . . . . . . . . . . . . . . . . . . . 42
Index . . . . . . . . . . . . . . . . . . . . . . . . . . . . . . . . . . . . . . . . . . . . . . . . . . . . . . . . . . . . . . . . . . . . . . . . . . . . . . . . . . . . . . . . . . . . . . . . . 47

9
US
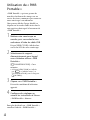
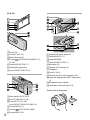
Preparation
Preparation
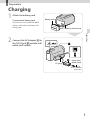
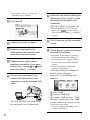
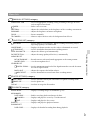
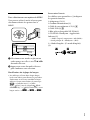
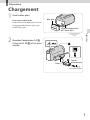
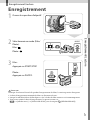
Charging
1
Attach the battery pack.
To remove the battery pack
Close the LCD screen. Slide the BATT
(battery) release lever and remove the
battery pack.
2
Connect the AC Adaptor to
the DC IN jack and the wall
outlet (wall socket).
Battery pack
BATT (battery) release lever
To the wall outlet
(wall socket)
DC plug
Power cord
(Mains lead)

10
US
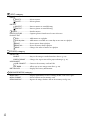
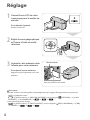
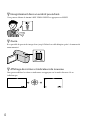
Setting
1
Open the LCD screen to turn
on your camcorder.
To turn off the power
Close the LCD screen.
2
Set the geographical area and
the time using the multi-
selector.
3
Insert the memory card into
the memory card slot.
To eject the memory card
Lightly push the memory card in once.
Notes
The date and time are automatically recorded on the recording media, and can be displayed during
playback.
[Show others] [PLAYBACK SET] (under [PLAYBACK] category) [DATA CODE]
[DATE/TIME]
.
You can turn off the operation beeps.
[Show others] [SOUND/DISP SET] (under [GENERAL SET] category) [BEEP]
[OFF]
.
Access lamp
Note direction of notched corner.

11
US
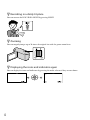
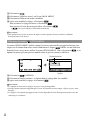
Recording/Playback
Recording/Playback
Recording
1
Open the lens cover.
2
Select a mode (Movie/Photo).
Movie:
Photo:
3
Movie:
Press START/STOP.
Photo:
Press PHOTO.
Notes
If you close the LCD screen while recording movies, the camcorder stops recording.
The maximum continuous recordable time of movies is about 13 hours.
When a movie file exceeds 2 GB, the next movie file is created automatically.
You can check the recordable time, estimated remaining capacity, etc.
[Show others] [MEDIA INFO] (under [MANAGE MEDIA] category).
MODE

12
US
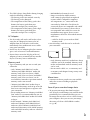
Recording in a dimly-lit place
You can turn on the LED VIDEO LIGHT by pressing LIGHT.
Zooming
You can magnify images up to 70 times the original size with the power zoom lever.
Displaying the icons and indicators again
You can display the icons and indicators by pressing the multi-selector if they are not shown.

13
US
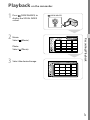
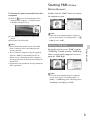
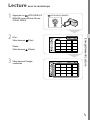
Recording/Playback
Playback on the camcorder
1
Press (VIEW IMAGES) to
display the VISUAL INDEX
screen.
2
Movie:
Select
(Movie).
Photo:
Select
(Photo).
3
Select the desired image.
(VIEW IMAGES)

14
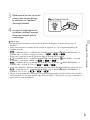
US
Movie playback screen
You can adjust the volume.
adjust with / .
Photo playback screen
Previous
To start/stop slide
show
To the VISUAL INDEX
screen
Next
OPTION
Volume adjustment
Previous
To stop
To fast-reverse
Next
OPTION
To fast-forward
To pause/play

15
US
Recording/Playback
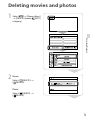
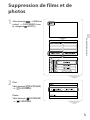
Deleting movies and photos
1
Select [Show others]
[DELETE] (under
[EDIT]
category).
EDIT
2
Movie:
Select [
DELETE]
[
DELETE].
Photo:
Select [
DELETE]
[
DELETE].

16
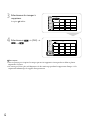
US
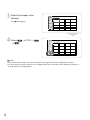
3
Select the images to be
deleted.
The mark appears.
4
Select [YES]
.
Notes
You cannot restore images once they are deleted. Save important movies and photos in advance.
Do not remove the battery pack or the AC Adaptor from your camcorder while deleting the images. It
may damage the recording media.

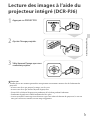
17
US
Recording/Playback
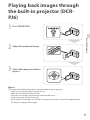
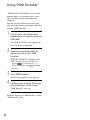
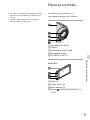
Playing back images through
the built-in projector (DCR-
PJ6)
1
Press PROJECTOR.
2
Adjust the projected image.
3
Select the image you want to
project.
Notes
Be careful of the following operations or situations while using the projector.
Make sure not to project images towards the eyes.
Make sure not to touch the projector lens.
The LCD screen and the projector lens become hot while in use.
Using the projector shortens battery life.
If you connect the camcorder to a TV and use the projector function, sound will be output from the
TV; however, no image will be output.

18
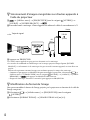
US
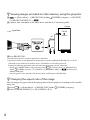
Viewing images recorded on other devices, using the projector
[Show others] [PROJECTOR] (under [OTHERS] category) [SOURCE]
[PROJECTOR INPUT]
.
Connect your camcorder to the other device with the A/V connecting cable.
Press PROJECTOR.
Sound of other devices cannot be input to the camcorder.
Operation buttons are not displayed on images projected when [PROJECTOR INPUT] is set. If the
camcorder is not connected to another device, a blank blue screen will be projected.
Perform the following operations when you want to project images on the camcorder.
Firstly, press PROJECTOR to stop projecting. Select
[Show others] [PROJECTOR]
(under
[OTHERS] category) [SOURCE] [MEMORY CARD] , and then press
PROJECTOR again.
Turn the power of the camcorder off, then on again, and then press PROJECTOR.
Changing the aspect ratio of the image
You can change the aspect ratio of the image projected by the projector according to the recorded
image size.
Select [Show others] [PROJECTOR] (under [OTHERS] category).
S
elect [SCREEN FORMAT] [16:9 WIDE] or [4:3].
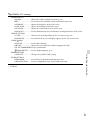
Output
Signal flow
IN
VIDEO
(Yellow)

19
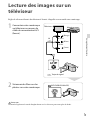
US
Recording/Playback
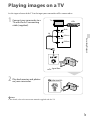
Playing images on a TV
Set the input selector of the TV to the input your camcorder will be connected to.
1
Connect your camcorder to a
TV with the A/V connecting
cable (supplied).
2
Play back movies and photos
on your camcorder.
Notes
For details, refer to the instruction manuals supplied with the TV.
(VIEW IMAGES)
(Red)
TVs
VCRs
IN
AUDIO
(White)
VIDEO
(Yellow)
Signal flow

20
US
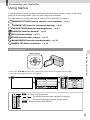
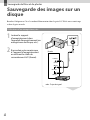
Saving movies and photos
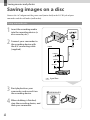
Saving images on a disc
Connect the AC Adaptor and the power cord (mains lead) to the DC IN jack of your
camcorder and the wall outlet (wall socket).
Using a recorder, etc.
1
Insert the recording media
into the recording device (a
disc recorder, etc.).
2
Connect your camcorder to
the recording device with
the A/V connecting cable
(supplied).
3
Start playback on your
camcorder, and record it on
the recording device.
4
When dubbing is finished,
stop the recording device, and
then your camcorder.
(VIEW IMAGES)
Input
VIDEO
(Yellow)
(White)
AUDIO
(Red)
Signal flow
La page est en cours de chargement...
La page est en cours de chargement...
La page est en cours de chargement...
La page est en cours de chargement...
La page est en cours de chargement...
La page est en cours de chargement...
La page est en cours de chargement...
La page est en cours de chargement...
La page est en cours de chargement...
La page est en cours de chargement...
La page est en cours de chargement...
La page est en cours de chargement...
La page est en cours de chargement...
La page est en cours de chargement...
La page est en cours de chargement...
La page est en cours de chargement...
La page est en cours de chargement...
La page est en cours de chargement...
La page est en cours de chargement...
La page est en cours de chargement...
La page est en cours de chargement...
La page est en cours de chargement...
La page est en cours de chargement...
La page est en cours de chargement...
La page est en cours de chargement...
La page est en cours de chargement...
La page est en cours de chargement...
La page est en cours de chargement...
La page est en cours de chargement...
La page est en cours de chargement...
La page est en cours de chargement...
La page est en cours de chargement...
La page est en cours de chargement...
La page est en cours de chargement...
La page est en cours de chargement...
La page est en cours de chargement...
La page est en cours de chargement...
La page est en cours de chargement...
La page est en cours de chargement...
La page est en cours de chargement...
La page est en cours de chargement...
La page est en cours de chargement...
La page est en cours de chargement...
La page est en cours de chargement...
La page est en cours de chargement...
La page est en cours de chargement...
La page est en cours de chargement...
La page est en cours de chargement...
La page est en cours de chargement...
La page est en cours de chargement...
La page est en cours de chargement...
La page est en cours de chargement...
La page est en cours de chargement...
La page est en cours de chargement...
La page est en cours de chargement...
La page est en cours de chargement...
La page est en cours de chargement...
La page est en cours de chargement...
La page est en cours de chargement...
La page est en cours de chargement...
La page est en cours de chargement...
La page est en cours de chargement...
La page est en cours de chargement...
La page est en cours de chargement...
La page est en cours de chargement...
La page est en cours de chargement...
La page est en cours de chargement...
La page est en cours de chargement...
La page est en cours de chargement...
La page est en cours de chargement...
La page est en cours de chargement...
La page est en cours de chargement...
La page est en cours de chargement...
La page est en cours de chargement...
La page est en cours de chargement...
La page est en cours de chargement...
-
 1
1
-
 2
2
-
 3
3
-
 4
4
-
 5
5
-
 6
6
-
 7
7
-
 8
8
-
 9
9
-
 10
10
-
 11
11
-
 12
12
-
 13
13
-
 14
14
-
 15
15
-
 16
16
-
 17
17
-
 18
18
-
 19
19
-
 20
20
-
 21
21
-
 22
22
-
 23
23
-
 24
24
-
 25
25
-
 26
26
-
 27
27
-
 28
28
-
 29
29
-
 30
30
-
 31
31
-
 32
32
-
 33
33
-
 34
34
-
 35
35
-
 36
36
-
 37
37
-
 38
38
-
 39
39
-
 40
40
-
 41
41
-
 42
42
-
 43
43
-
 44
44
-
 45
45
-
 46
46
-
 47
47
-
 48
48
-
 49
49
-
 50
50
-
 51
51
-
 52
52
-
 53
53
-
 54
54
-
 55
55
-
 56
56
-
 57
57
-
 58
58
-
 59
59
-
 60
60
-
 61
61
-
 62
62
-
 63
63
-
 64
64
-
 65
65
-
 66
66
-
 67
67
-
 68
68
-
 69
69
-
 70
70
-
 71
71
-
 72
72
-
 73
73
-
 74
74
-
 75
75
-
 76
76
-
 77
77
-
 78
78
-
 79
79
-
 80
80
-
 81
81
-
 82
82
-
 83
83
-
 84
84
-
 85
85
-
 86
86
-
 87
87
-
 88
88
-
 89
89
-
 90
90
-
 91
91
-
 92
92
-
 93
93
-
 94
94
-
 95
95
-
 96
96


dans d''autres langues
- English: Sony DCR-SX22 Operating instructions
Documents connexes
-
Sony DCR SR21E Le manuel du propriétaire
-
Sony DCR-PJ5 Mode d'emploi
-
Sony DCR PJ6E Le manuel du propriétaire
-
Sony DCR SX15E Le manuel du propriétaire
-
Sony DCR-SX45 Handycam® Mode d'emploi
-
-
-
Sony HDR-CX300 Mode d'emploi
-
Sony HDR-PJ10 Mode d'emploi
-
Sony HDR-CX130 Mode d'emploi