Geemarc iLOOP V3 Mode d'emploi
- Catégorie
- Casques mobiles
- Taper
- Mode d'emploi
Ce manuel convient également à

Neck Loop
Boucle Magnétique
Induktionsschleife
English P1
Français P10
Deutsch P18

1

2
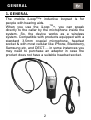
1. GENERAL
The mobile iLoop
TM
+ inductive loopset is for
people with hearing aids.
When you use the iLoop
TM
+, you can speak
directly to the caller by the microphone inside the
system. So, the device works as a wireless
system. Compatible with products equipped with a
standard 3.5mm coaxial microphone, headset
socket & with most cellular like iPhone, Blackberry,
Samsung etc, and DECT.... in some instances you
may need to purchase an adaptor in case the
product does not have a suitable headset socket.
GENERAL

3
NOTE:
1. Don't forget to switch your hearing aid to T
mode.
2. iLOOP
TM
+ can be charged by connecting the
USB cable to a PC or standard USB charger.
3. Place the power ON/OFF switch on the side of
the unit to OFF position
when not in use to
avoid discharging the
batteries. The batteries
can charge when the
switch is in OFF
position.
4. Any interference or echo when using your
iLoop
TM
+ could be due to interference from your
telephone's headset socket. In this case please
use the jack adapter that is included in the box.
5. With the device connected to a mobile phone,
pressing the ‘Hook
On/Off’ button allows
you to answer an
incoming call.
GENERAL

4
NOTE:
● OFF: LED is off
● ON: LED is Green
● Low battery: LED is Red
● Battery Charging: LED is Blue
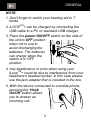
GENERAL
Microphone
Charging, ON/OFF,
low batter
y
indicato
r
Loop
Volume
adjustment
Plug for the
telephone
connection
(Φ3.5mm)
Breakout
connector
Hook
ON/OFF
Power
ON/OFF
switch
Charging
micro
USB
socket

5
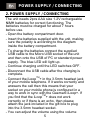
2. POWER SUPPLY / CONNECTING
The unit needs 2pcs AAA size 1.2V rechargeable
NiMH batteries for correct functioning. The
batteries must be charged for about 7 hours
before use.
- Open the battery compartment door.
- Insert the batteries supplied with the unit, making
sure the polarity is according to the diagram
inside the battery compartment.
- To charge the batteries connect the supplied
USB cable to the Micro USB socket of the unit
and then onto the USB of PC or standard power
supply. The blue LED will light up.
- Continue charging until the LED switches OFF.
- Disconnect the USB cable after the charging is
complete.
- Connect the iLoop
TM
+ in the 3.5mm headset jack
of your mobile telephone. If it works correctly and
answers the call then this means that your
socket on your mobile phone is configured in a
way to work in sync with the Geemarc iLoop+. If
you find that the iLoop
TM
+ does not work
correctly or if there is an echo, then please
attach the jack included in the gift box to plug
into the 3.5mm headset socket.
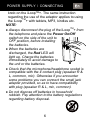
- You can adjust the volume using the volume
POWER SUPPLY / CONNECTING

6
knob on the iLoop
TM
+. The same instruction
regarding the use of the adaptor applies to using
the iLoop
TM
+ with tablets, MP3, kindles etc.
NOTE:
● Always disconnect the plug of the iLoop
TM
+ from
the telephone and place the Power On/Off
switch on the side of the unit to
OFF position, before installing
the batteries.
● When the batteries are
discharged, the Red LED will
light up. Charge the batteries
immediately to avoid damage to
the unit or the batteries.
● Check that the microphone/headphone socket is
compatible with the 4 contact plug (speaker R &
L, common, mic). Otherwise if you encounter
some problems you can connect the small jack
adapter provided, so as to have compatibility
with plug (speaker R & L, mic, common).
● Do not dispose off batteries in household
rubbish. Pay attention to the battery regulations
regarding battery disposal.
POWER SUPPLY / CONNECTING

7
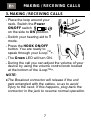
3. MAKING / RECEIVING CALLS
- Place the loop around your
neck. Switch the Power
ON/OFF switch
on the side to ON position.
- Switch your hearing aid to T
mode.
- Press the HOOK ON/OFF
button. You are ready to
speak through your iLoop
TM
+.
- The Green LED will turn ON.
- During the call you can adjust the volume of your
device by using the volume control knob located
at the bottom of the iLoop
TM
+.
NOTE:
●The Breakout connector will release if the unit
gets entangled with the cables, so as to avoid
injury to the neck. If this happens, plug back the
connector in the jack to resume normal operation.
MAKING / RECEIVING CALLS

8
4. GUARANTEE
From the moment your Geemarc product is
purchased, Geemarc guarantee it for the period of
two years. During this time, all repairs or
replacements (at our option) are free of
charge.Should you experience a problem then
contact our helpline or visit our website at
www.geemarc.com. The guarantee does not
cover accidents, negligence or breakages to any
parts. The product must not be tampered with or
taken apart by anyone who is not an authorised
Geemarc representative. The Geemarc guarantee
in no way limits your legal rights.
IMPORTANT: YOUR RECEIPT IS PART OF
YOUR GUARANTEE AND MUST BE RETAINED
AND PRODUCED IN THE EVENT OF A
WARRANTY CLAIM.
DECLARATION : Geemarc Telecom SA
hereby declares that this product is in
compliance with the essential
requirements and other relevant provisions of the
Radio and Telecommunications Terminal
Equipment Directive 2014/53/UE.
The declaration of conformity may be consulted at
www.geemarc.com
The guarantee applies to the United Kingdom only.
GUARANTEE

9
5. RECYCLING DIRECTIVES
Recycling directives: The WEEE (Waste
Electrical and Electronic Equipment) Directive has
been put in place so that products at the end of life
are recycled in the best way.
When this product is out of order, please do not
put it in your domestic waste bin. Please use one
of the following disposal options:
- Remove the batteries and deposit them in an
appropriate WEEE skip. Deposit the product in
an appropriate WEEE skip.
- Or hand the old product to the retailer. If you
purchase a new one, they should accept it.
Thus if you respect these instructions you ensure
human health andenvironmental protection.
For product support and help visit our website at
www.geemarc.com
Telephone: +44 (0)1707 387602
or Fax +44 (0)1707 832529
RECYCLING DIRECTIVES

10
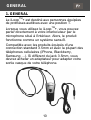
1. GENERAL
Le iLoop
TM
+ est destiné aux personnes équipées
de prothèses auditives avec une position T.
Lorsque vous utilisez le iLoop
TM
+, vous pouvez
parler directement à votre interlocuteur par le
microphone situé à l'intérieur. Alors, le produit
fonctionne comme un système sans-fil.
Compatible avec les produits équipés d’une
connection standard 3.5mm et avec la plupart des
téléphones cellulaires (iPhone, Blackberry,
Samsung …). Si différent du jack 3.5mm, vous
devrez acheter un adaptateur pour adapter votre
sortie casque de votre téléphone.
GENERAL

11
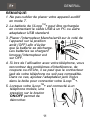
REMARQUE:
1. Ne pas oublier de placer votre appareil auditif
en mode T.
2. La batterie de l’iLoop
TM
+ peut être rechargée
en connectant le câble USB à un PC ou autre
adaptateur USB standard.
3. Placer l’interrupteur Marche/arrêt sur le coté de
l’appareil sur la position
arrêt (OFF) afin d’éviter
que la batterie se décharge.
Les batteries se chargent
lorsque l’interrupteur est
sur OFF.
4. Si lors de l’utilisation avec votre téléphone, vous
rencontrez des problèmes d’interférence, de
coupure ou d’Echo, il se peut que le connecteur
jack de votre téléphone ne soit pas compatible.
Dans ce cas, ajoutez l’adaptateur jack inclus
dans la boite pour connecter votre iLoop
TM
+.
5. Lorsque votre iLoop
TM
+ est connecté à un
téléphone mobile, une
pression sur le bouton
ON/OFF permet de
décrocher.
GENERAL

12
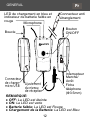
REMARQUE:
● OFF: La LED est éteinte
● ON: La LED est verte
● Batterie faible: La LED est Rouge
● Chargement de la Batterie: La LED est Bleu
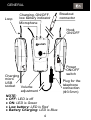
GENERAL
Microphone
LED de chargement en bleu et
indicateur de batterie faible en
rou
g
e
Boucle
A
justement
du niveau
de réception
Connecteur
de charge
micro USB
Fiche
téléphone
(Φ3.5mm)
Connecteur anti
étranglement
Bouton
ON/OFF
Interrupteur
Marche/
A
rrêt

13
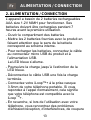
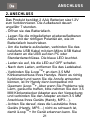
2. ALIMENTATION / CONNECTION
L’appareil a besoin de 2 batteries rechargeables
AAA size 1.2V NiMH pour fonctionner. Ses
batteries doivent être rechargées pendant 7
heures avant la première utilisation.
- Ouvrir le compartiment des batteries
- Mettre les 2 batteries fournies avec le produit en
faisant attention que le sens de la batterie
correspond au schèma interne.
- Pour recharger les batteries, connectez le câble
au connecteur micro USB du produit et à
l’alimentation USB.
La LED bleue s’allume.
- Poursuivre la charge jusqu’à l’extinction de la
LED bleue.
- Déconnectez le câble USB une fois la charge
terminée.
- Connectez votre iLoop
TM
+ à la prise casque
3.5mm de votre téléphone portable. Si vous
repondez à l’appel normalement, cela signifie
que votre téléphone est compatible avec le
iLoop
TM
+.
- En revanche, si lors de l’utilisation avec votre
téléphone, vous rencontrez des problèmes
d’émission/réception, d’interférences, de coupure
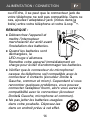
ALIMENTATION / CONNECTION

14
ou d’Echo, il se peut que le connecteur jack de
votre téléphone ne soit pas compatible. Dans ce
cas, ajoutez l’adaptateur jack (inclus dans la
boite) entre votre téléphone et votre iLoop
TM
+.
REMARQUE :
● Débranchez l'appareil et
mettre l’interrupteur
marche/arrêt sur arrêt avant
l'installation des batteries.
● Quand les batteries sont
déchargées, la
LED rouge s’allumera.
Remettre votre appareil immédiatement en
charge pour éviter d’endommager les batteries.
● Vérifier que le connecteur du microphone/
casque du téléphone soit compatible avec le
connecteur 4 contacts (écouteur Droite &
Gauche, commun et micro). Cependant si vous
rencontrer quelques problèmes, vous pouvez
connecter l’adapteur fourni, alors vous aurez la
compatibilité avec le connecteur (écouteur
Droite& Gauche, microphone et commun).
● Ne pas jetter les batteries usagées
dans votre poubelle. Déposez-les
dans un endroit prévu à cet effet.
ALIMENTATION / CONNECTION

15
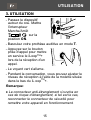
3. UTILISATION
- Passez le dispositif
autour du cou. Mettre
l’interrupteur
Marche/Arrêt
sur la
position ON.
- Basculez votre prothèse auditive en mode T.
- Appuyez sur le bouton
prise d‘appel pour mettre
en service le iLoop
TM
+
lors de la réception d’un
appel.
- Le voyant vert s'allume.
- Pendant la conversation, vous pouvez ajuster le
niveau de réception à l'aide de la molette située
dans le bas du iL oop
TM
+.
Remarque:
● Le connecteur anti-étranglement s’ouvrira en
cas de risque d’étranglement, si tel est le cas,
reconnecter le connecteur de sécurité pour
remettre votre appareil en fonctionnement.
UTILISATION

16
4. GARANTIE
Geemarc garantit cet appareil pour une durée de
deux ans pièces et main-d'oeuvre à partir de la
date d'achat. Pendant cette période, Geemarc
réparera (ou remplacera si nécessaire) votre
appareil gratuitement. En cas de problème,
n’hésitez pas à contacter notre service client ou à
consulter notre site Internet sur
www.geemarc.com.
La garantie ne couvre pas les accidents, les
pièces cassées, les problèmes causés par l'orage,
par les liquides renversés, ni par la négligence de
l'utilisateur. Seuls les techniciens agréés Geemarc
sont autorisés à intervenir sur votre appareil.
La garantie Geemarc ne limite en aucun cas les
droits que vous accorde la loi.
Important : VOTRE FACTURE D'ACHAT EST
UN ÉLÉMENT ESSENTIEL DE VOTRE
GARANTIE. ELLE VOUS SERA DEMANDÉE EN
CAS D'INTERVENTION SOUS GARANTIE.
Remarque: La garantie s'applique uniquement en
France.
Ce produit respecte les exigences de compatibilité
électro-magnétique et de sécurité électrique
demandées par la directive européenne RTTE
2014/53/UE.
Vous pouvez consulter la déclaration de
conformité sur www.geemarc.com.fr
GARANTIE

17
5. RECYCLAGE
Recommandations pour le recyclage : La
directive DEEE (Déchet d'Equipement Electrique
et Electronique) a été mise en place dans le but
d'assurer la collecte sélective en vue de la
valorisation, réutilisation ou recyclage des produits
en fin de vie.
Lorsque votre produit ne fonctionne plus, ne le
jetez pas dans votre poubelle ménagère.
Suivez l'une des procédures décrites ci-dessous:
- Déposez les piles et votre ancien appareil dans
un lieu de collecte approprié.
- Ou rapportez votre ancien appareil chez le
distributeur qui vous vendra le nouveau. Il devra
l'accepter.
Ainsi, si vous respectez ces instructions vous
faites un geste pour l'environnement et vous
contribuez à la préservation des ressources
naturelles et à la protection de la santé humaine.
Si vous avez besoin d'aide ou de soutien technique,
consultez notre site Internet: www.geemarc.com
Téléphone +33 (0)3 28 58 75 99
Ou Fax +33 (0)3 28 58 75 76
RECYCLAGE

18
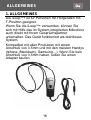
1. ALLGEMEINES
Die iLoop
TM
+ ist für Personen mit Hörgeräten mit
T-Position geeignet.
Wenn Sie die iLoop
TM
+ verwenden, können Sie
sich mit Hilfe des im System integrierten Mikrofons
auch direkt mit Ihrem Gesprächspartner
unterhalten. Das Gerät funktioniert als drahtloses
System.
Kompatibel mit allen Produkten mit einem
Anschluß von 3.5mm und mit den meisten Handys
(Iphone, Blackberry, Samsung…). Wenn Sie kein
Anschluß von 3.5mm haben, sollen Sie einen
Adapter kaufen.
ALLGEMEINES

19
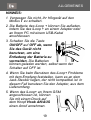
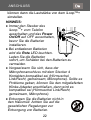
HINWEIS:
1. Vergessen Sie nicht, Ihr Hörgerät auf den
Modus T zu schalten.
2. Die Batterie des iLoop + können Sie aufladen,
indem Sie das iLoop + an einem Adapter oder
an Ihrem PC mit einem USB-Kabel
anschliessen.
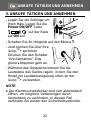
3. Schalten Sie die Taste
ON/OFF auf OFF ab, wenn
Sie das Gerät nicht
benutzen, um eine
Entladung der Batterie zu
vermeiden. Die Batterien
können geladen werden, selbst wenn der
Schalter auf OFF ist.
4. Wenn Sie beim Benutzen des iLoop+ Probleme
mit dem Empfang feststellen, kann es an dem
Jack-Stecker liegen, der nicht kompatibel ist. In
diesem Fall benutzen Sie den Adapter, aus dem
Lieferumfang.
5. Wenn das iLoop+ an Ihrem GSM
angeschlossen ist, können
Sie mit einem Druck auf
dem Knopf Hook AN/AUS
einen Anruf annehmen.
ALLGEMEINES
La page charge ...
La page charge ...
La page charge ...
La page charge ...
La page charge ...
La page charge ...
La page charge ...
La page charge ...
-
 1
1
-
 2
2
-
 3
3
-
 4
4
-
 5
5
-
 6
6
-
 7
7
-
 8
8
-
 9
9
-
 10
10
-
 11
11
-
 12
12
-
 13
13
-
 14
14
-
 15
15
-
 16
16
-
 17
17
-
 18
18
-
 19
19
-
 20
20
-
 21
21
-
 22
22
-
 23
23
-
 24
24
-
 25
25
-
 26
26
-
 27
27
-
 28
28


Geemarc iLOOP V3 Mode d'emploi
- Catégorie
- Casques mobiles
- Taper
- Mode d'emploi
- Ce manuel convient également à
dans d''autres langues
- English: Geemarc iLOOP V3 User guide
- Deutsch: Geemarc iLOOP V3 Benutzerhandbuch
Documents connexes
-
Geemarc iLOOP + V2 Mode d'emploi
-
-
-
Geemarc LH102 Mode d'emploi
-
-
-
-
-
-