Ooni Karu 12 Gas Burner Manuel utilisateur
- Catégorie
- Micro-ondes
- Taper
- Manuel utilisateur

Gas Burner
for Ooni Karu 12
EU37
Manual


Gas Burner
for Ooni Karu 12
EN ....................................................... 2
DE ..................................................... 14
ES ......................................................26
FR ......................................................38
IT .......................................................50
PT ...................................................... 62
Contents
1

EN
Safety Legal Disclaimer: Must be read in full prior to use.
Please read the present legal disclaimer fully before assembling, installing and using/servicing your Ooni Gas Burner for Ooni Karu 12
attachment part in connection with your Ooni Karu 12 oven. Failure to comply with all the provisions of the present legal disclaimer
could result in property damage, serious bodily injury or even death, or in a fire causing damage to property.
1. When using Ooni Karu 12 oven together with your Ooni Gas Burner for Ooni Karu 12 attachment part, bear in mind that (1) the
Ooni Gas Burner for Ooni Karu 12 attachment part shall only be used with your Ooni which excludes any other appliance, and
(2) the entirety of the provisions of the Ooni Karu 12 oven’s Safety Legal Disclaimer also apply to the use of the your Ooni Gas
Burner for Ooni Karu 12 attachment part in addition to the provisions of the present safety legal disclaimer. You are strongly
advised to not use your Ooni Karu 12 oven with the Ooni Gas Burner for Ooni Karu 12 attachment part until your Ooni Karu 12
oven has been thoroughly and properly gas leak-tested.
2. Combustion by-products, produced when using the Ooni Karu 12 oven with your Ooni Gas Burner for Ooni Karu 12 attachment
part, contain carbon and carbon monoxide in the flue gas of Ooni Gas Burner for Ooni Karu 12; these substances, if inhaled
indoors or in any other unventilated area, are known as a possible cause of death through asphyxiation and/or carbon monoxide
poisoning.
3. If Ooni Gas Burner for Ooni Karu 12 does not light, turn knobs OFF, wait 5 minutes, and try again. Always close the gas valve
during the 5 minute waiting period. If Ooni Gas Burner for Ooni Karu 12 does not ignite with the valve open, gas will continue to
flow out of Ooni Gas Burner for Ooni Karu 12 and could accidentally ignite with risk of injury.
4. If a gas leak is detected at any time, STOP and call the fire department. Leaking propane may result in explosion, fire, severe
personal injury, or death. If you smell gas (1) shut o gas to the appliance, (2) extinguish any open flame, and (3) If odour
continues, keep away from your Ooni Karu 12 oven and immediately call your gas supplier or your fire department. If you cannot
stop a gas leak, immediately close LPG (propane) valve and call LP gas supplier or your fire department. If “growing” bubbles
appear in the cylinder do not use or move the LPG (propane). Contact an LP gas supplier or your fire department.
5. Do not store or use gasoline or other flammable liquids or vapours in the vicinity of your Ooni Karu 12 oven or any other
appliance. Do not insert any tool or foreign object into the valve outlet or safety relief valve. You may damage the valve and
cause a leak. Never attempt to attach your Ooni Gas Burner for Ooni Karu 12 to the self-contained LP gas system of a camper
trailer or motor home. Never operate your Ooni Karu 12 oven with LPG (propane) in any other position other than that specified
in assembly instructions. Always close LPG (propane) valve before moving LPG (propane) from specified operation position. Turn
controls and gas source or tank OFF when not in use.
6. Use the Ooni Gas Burner for Ooni Karu 12, as purchased, only with LPG (propane) and the regulator/valve assembly
supplied. Do not attempt to repair or alter the hose/valve/regulator for any “assumed” defect. Any modification to this assembly
will create the risk of a gas leak and fire. Use only authorized replacement parts supplied by Ooni Limited. NEVER store a spare
LPG (propane) under or near your Ooni Karu 12 oven or in an enclosed area. An LPG (propane) not connected for use shall not
be stored in the vicinity of your Ooni Karu 12 oven or any other appliance.
7. You shall use your Ooni Gas Burner for Ooni Karu 12 attachment part, in connection with your Ooni Karu 12 oven, only with
pre-bottled LPG (propane).
An improperly stored LPG (propane) is a hazard due to possible gas release from the safety relief valve. This could cause an intense
fire with risk of property damage, serious injury or death. If you see, smell or hear gas escaping, immediately move away from the
LPG (propane)/appliance and call your fire department.
OONI LIMITED, OONI INC OR OONI GMBH DOES NOT ACCEPT ANY RESPONSIBILITY, LEGAL OR OTHERWISE, FOR THE
INCIDENTAL OR CONSEQUENTIAL DAMAGE TO PROPERTY OR PERSONS RESULTING FROM THE USE OF YOUR OONI GAS
BURNER FOR OONI KARU 12 ATTACHMENT PART WHICH DOES/DID NOT COMPLY WITH ANY OF THE PROVISIONS OF THE
PRESENT LEGAL DISCLAIMER.
OONI LIMITED, OONI INC OR OONI GMBH SHALL IN NO EVENT BE LIABLE FOR ANY SPECIAL, INDIRECT, CONSEQUENTIAL OR
OTHER DAMAGES OF ANY NATURE WHATSOEVER IN EXCESS OF THE ORIGINAL PURCHASE PRICE OF YOUR OONI GAS BURNER
FOR OONI KARU 12 ATTACHMENT PART.
Some states or countries do not allow the exclusion or limitation of incidental or consequential damages, therefore such limitations
or exclusions may not apply to you.
2

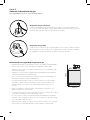
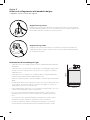
Safety Information
• Read instructions before using the appliance.
• Only to be used outdoors.
• Warning! Accessible parts may be very hot. Keep young children away.
• Warning! Make sure the legs on Ooni Karu 12 are fully extended before use
• Warning! To prevent shock, do not to touch the electrode tip when igniting the burner.
• Warning! Do not adjust the chimney bae during use.
• Warning! Keep away from hot exhaust gases coming from the chimney
• Warning! Please ensure there is a distance of at least 3.5” / 90mm between the edges of any of the oven legs and the edge of the
table surface.
• Keep young children away.
• Do not move the appliance during use.
• Turn o the gas supply at the gas cylinder after use.
• Do not modify the appliance.
• Parts sealed by the manufacturer or agent must not be manipulated by the user.
• Always use protective gloves when handling hot components.
• Storage of an appliance indoors is only permissible if the cylinder is disconnected and removed from the appliance. When the
appliance is not used for a period of time, it should be removed from the oven and stored in its original packaging in a dry dust
free environment.
• CAUTION: All cleaning and maintenance should be carried out when the oven is cool and with the fuel supply turned OFF at the
gas cylinder and disconnected.
• BEFORE USE CHECK APPLIANCE AND CONNECTIONS FOR LEAKS: Never check for leaks with a naked flame, always use a soapy
water solution. Leak testing: Leak test each time a new gas tank is connected or after a long period without having used the
appliance. Make sure that the valve is in correct alignment with the venturi. Make sure that the hose has no cracking or splitting.
IMPORTANT: if you cannot stop a gas leak, turn o the gas tank valve and call your local gas tank dealer or fire department.
• The appliance must be kept away from any flammable materials during use.
• When changing the gas canister, ensure that the Ooni Gas Burner for Ooni Karu 12 knob is turned to the o position, disconnect
the regulator from the gas canister and remove the canister. Throughout this process, ensure that the canister is kept a minimum
of 1 meter away from the oven to avoid ignition risks.
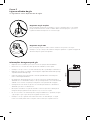
Gas regulator supplied may not be suitable for use in your territory or region, please refer to your local
regulations for more information.
Stand to side when relighting - never look directly into the oven or at the flame.
3

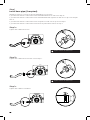
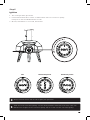
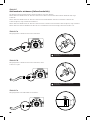
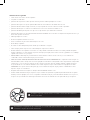
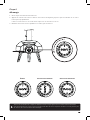
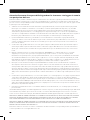
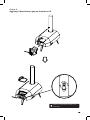
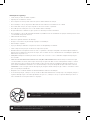
Step 1
Install hose pipe (if required)
Step 1a
Tighten with suitable wrenches
Step 1b
Tighten with suitable wrenches then follow Step 1c.
Step 1c
Tighten with suitable screwdriver.
Regulators and hose connections will vary depending on your region.
If your Ooni Gas Burner for Ooni Karu 12 has a threaded female hose end follow Step 1a.
If your Ooni Gas Burner for Ooni Karu 12 has a threaded barb and regular hose with a hose clip follow Step 1b
then 1c.
If your Ooni Gas Burner for Ooni Karu 12 has a regular hose with a hose clip follow Step 1c.
If your Ooni Gas Burner for Ooni Karu 12 has the hose preinstalled continue to Step 2.
Tighten counter-clockwise in EU.
Tighten counter-clockwise in EU.
4

A
A A
B B
C C
D D
E E
F F
G G
H H
J J
K K
L L
M M
16
16
15
15
14
14
13
13
12
12
11
11
10
10
9
9
8
8
7
7
6
6
5
5
4
4
3
3
2
2
1
1
DRAWN
CHK'D
APPV'D
MFG
Q.A
UNLESS OTHERWISE SPECIFIED:
DIMENSIONS ARE IN MILLIMETERS
SURFACE FINISH:
TOLERANCES:
LINEAR:
ANGULAR:
FINISH:
DEBURR AND
BREAK SHARP
EDGES
NAME
SIGNATURE
DATE
MATERIAL:
DO NOT SCALE DRAWING
REVISION
TITLE:
DWG NO.
SCALE:1:10
SHEET 1 OF 1
A1
WEIGHT:
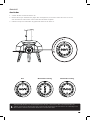
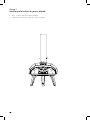
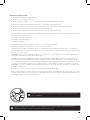
Karu 12 exploded with new fuel tray
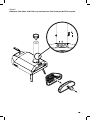
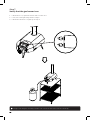
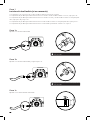
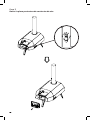
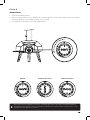
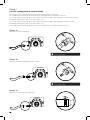
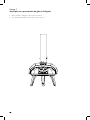
Step 2
Remove the door and fuel tray and ensure the chimney baffle is open
5

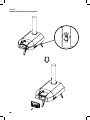
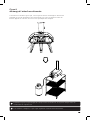
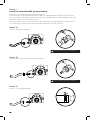
Step 3
Remove draft defender plate
6

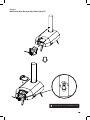
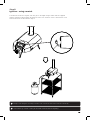
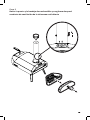
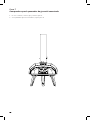
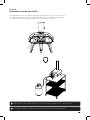
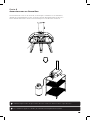
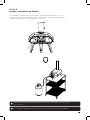
Step 4
Add Ooni Gas Burner for Ooni Karu 12
Secure but do not over-tighten screws
7

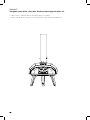
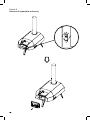
315mm
580mm
Step 5
Connect to gas canister
Regulators will vary depending on region.
Patio gas regulator
This is a push-on gas fitting. Ensure that the black switch is in the horizontal position. Depress
the button located below the black switch and press the regulator on to the tank valve until it
locks into place.
POL gas regulator
This is an anticlockwise threaded gas fitting. Ensure the tank is fully turned off and screw the
regulator on to the gas tank valve fitting until tight.
Gas Safety Information
• The appliance must be installed at least 1 meter (3.5 ft) from any flammable materials.
• The oven should be placed on a non-flammable, stable and flat surface.
• Make sure your oven is placed in an area that will not be aected by adverse weather.
• Appliance only to be used with Propane LPG. Minimum cylinder capacity 4kg
maximum cylinder capacity 13kg.
• Use a suitable provided regulator certified to EN 16129 and a flexible hose certified to
EN 16436.
• The length of the hose must be no more than 1.5 meters. Worn or damaged hose
must be replaced. Ensure that the hose is not obstructed, kinked, or in contact with
any part of the oven other than at its connection.
• The gas supply hose should be checked periodically and should replaced if damaged
and at least every two years.
• Your country’s national requirements will advise you how often to replace the hose.
Regularly review these requirements for your country.
• In the case of blocked venturi immediately turn o burner unit, turn o gas supply,
disconnect gas supply and wait until cooled to removed from oven.
• Ensure the appliance is clear of debris before every use. If any debris does build up
use a brush to remove this when appliance has cooled.
8

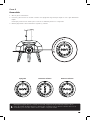
1. Turn on the gas at the gas canister.
2. Push in and turn the button counter-clockwise until it clicks. Do not turn too quickly.
From press to click should take about 3 seconds
3. One lit, hold in button for 5 seconds, then release.
Step 6
Ignition
Maximum power Minimum powerOff
Stand clear of the oven when igniting - ensure nobody is within 1 metres (3ft) of the front of the oven.
Maintain arm’s length from the oven when igniting, and do not lean over the oven when igniting.
Always remove the hatch and door when lighting the gas burner
9

1. If the burner is on, replace the hatch and close the door.
2. If not, turn o the gas and go back to Step 6.
3. If the burner still does not ignite go to Step 8.
Step 7
Verify that the gas burner is on
Always route the gas hose away from the oven. The hose must not touch the oven body
10

If the burner still does not ignite; turn the gas on and light using a match and the supplied
match holder through the hatch at the back of the oven. Hold it in front of the burners. Press
and turn the knob as described in Step 6.
Step 8
Ignition – using a match
If the flames go out turn off the gas and wait 5 minutes before reigniting
Always route the gas hose away from the oven. The hose must not touch the oven body
11

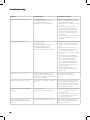
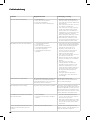
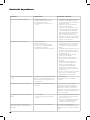
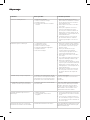
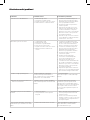
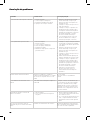
TroubleshootingTroubleshooting
Problem Possible cause Prevention / Solution
My oven isn’t getting hot enough 1. Empty gas bottle
2. Cracking or leaking on the hose
3. Regulator improperly fixed
4. Operation in extreme conditions
1. Check the gas bottle is full, even a
bottle with little gas inside may aect
the gas burner performance
2. Ensure there is no cracking or leaking
on the hose
3. Ensure the regulator is properly
fixed to the gas bottle and the hose
is firmly attached to the gas burner
tightened using appropriate sized
wrenches as outlined in the instruc-
tion manual
4 Your gas burner and oven should not
be used in extreme conditions (eg
high wind)
My gas burner will not ignite 1. Improper set-up
2. Empty gas bottle
3. Cracking or leaking from the hose
4. Improper lighting technique.
5. Regulator improperly fixed
6. Improper alignment of the sparker
1. Ensure the chimney cap is removed
and the ceiling vents and chimney
vent are open. The door should be
open.
2. Check the gas bottle is full, even a
bottle with little gas inside may aect
the gas burner performance
3. Ensure there is no cracking or leaking
on the hose
4. Turning the dial too quickly may
prevent the gas burner from lighting.
5. Ensure the regulator is properly
fixed to the gas bottle and the
hose is firmly attached to the gas
burner tightened using appropriate
sized wrenches as outlined in the
instruction manual
6. Reposition the sparker tip so it is
2-3 mm away from the front of the
burner cap.
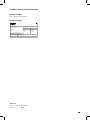
My flame is too yellow / too blue Variation in the environment, the food
you cook, ambient temperature and
condition of your Ooni oven may eect
the colour of your flame
The colour of your flame will
not aect the taste or quality of
your food.
My FSD is not functioning correctly There may be soot build up on my FSD
probe
Ensure the gas burner and gas supply is
switched o, wait for the burner to cool
down, gently clean the probe and burner
holes with damp cloth, leave the burner
to fully dry before re-lighting.
Gas burner for Ooni will not maintain
its flame
1. Lack of oxygen
2. Oven placed on an uneven surface
1. Open the chimney vent of your Ooni
Pro to encourage better airflow
through the oven
2. If your Ooni is on a slant when set up,
the oxygen will not flow as well. Try
to set up on a flat surface.
I can hear a ‘roaring sound’ coming
from the Gas burner and my flames are
very weak
Flame is burning within the ventures Switch o the gas supply and the gas
burner immediately, wait 5 minutes and
relight the gas burner.
12

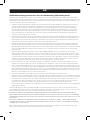
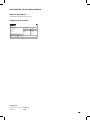
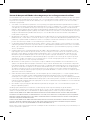
2531-22
2531DM-0002
8504-22
8504DN-0077
Butane Propane
Butan Propan
Butano Propano
I3+ (28-30/37)
Ooni Karu 12 Gas Burner
Ooni Limited,
189 West Main Street,
Broxburn,
Scotland,
EH52 5LH
BE, CH, ES, FR, GB, IE, IT, LU, PT
5.3 kW, 386g/h 0.81 mm * 2
SN
PA-A00359
28-30 mbar 37 mbar
Injectors
Injector marking: 0.81 mm
Marking: 0.81
Product technical information
Model number
Ooni Karu 12 Gas Burner
Product Label
13

DE
Sicherheitshaftungsausschluss: Vor der Verwendung vollständig lesen!
Bitte lies dir den vorliegenden Haftungsausschluss vollständig durch, bevor du dein Aufsatzteil für den Ooni Gasbrenner für Ooni
Karu 12 in Verbindung mit deinem Ooni Karu 12 Ofen zusammenbaust, installierst und benutzt bzw. wartest. Das Nichtbeachten der
Bestimmungen dieses Haftungsausschlusses kann zu Sachschäden, schweren Körperverletzungen oder sogar zum Tod führen oder
ein Feuer verursachen, das zu Sachschäden führt.
1. 1. Wenn du den Ooni Karu 12 Ofen zusammen mit deinem Aufsatzteil für den Ooni Gasbrenner für Ooni Karu 12 verwendest,
beachte, dass (1) das Ooni Karu 12 Gasbrenner-Aufsatzteil nur mit deinem Ooni verwendet werden darf, was jedes andere
Gerät ausschließt, und (2) die Gesamtheit der Bestimmungen des Sicherheitshaftungsausschlusses des Ooni Karu 12 Ofens
auch für die Verwendung deines Ooni Karu 12 Gasbrenner-Aufsatzteils zusätzlich zu den Bestimmungen des vorliegenden
Sicherheitshaftungsausschlusses gilt. Es wird dringend empfohlen, deinen Ooni Karu 12 Ofen erst dann mit dem Aufsatzteil
für den Ooni Gasbrenner für Ooni Karu 12 zu verwenden, nachdem dein Ooni Gasbrenner für Ooni Karu 12 gründlich und
ordnungsgemäß auf Gaslecks getestet wurde.
2. Verbrennungsnebenprodukte, die bei der Verwendung des Ooni Karu 12 Ofens mit deinem Aufsatzteil für den Ooni Gasbrenner
für Ooni Karu 12 entstehen, enthalten Kohlensto und Kohlenmonoxid und befinden sich im Rauchgas des Ooni Gasbrenners
für Ooni Karu 12; diese Stoe können, wenn sie in Innenräumen oder in anderen unbelüfteten Bereichen eingeatmet werden,
möglicherweise zum Tod durch Ersticken und/oder Kohlenmonoxidvergiftung führen.
3. Wenn der Ooni Gasbrenner für Ooni Karu 12 nicht angeht, bringe die Knöpfe in AUS-Stellung, nimm die Brennstoklappe ab
und öne die Tür, warte fünf Minuten, und versuche es erneut. Schließe während der Wartezeit von fünf Minuten immer das
Gasventil. Wenn der Ooni Gasbrenner für Ooni Karu 12 sich nicht anzünden lässt und das Ventil geönet ist, entweicht weiterhin
Gas aus dem Ooni Gasbrenner für Ooni Karu 12 und könnte sich versehentlich entzünden, was mit einer Verletzungsgefahr
verbunden wäre.
4. Wenn zu irgendeinem Zeitpunkt ein Gasleck erkannt wird, SOFORT STOPPEN und die Feuerwehr anrufen. Austretendes
Propangas kann zu Explosionen, Bränden, schweren Personenschäden oder zum Tod führen. Wenn du Gas riechst, (1) schalte
das Gerät ab, (2) lösche oene Flammen und (3) wenn der Geruch anhält, halte dich von deinem Ooni Karu 12 Ofen fern und ruf
sofort deinen Gaslieferanten oder die Feuerwehr an. Wenn du ein Gasleck nicht stoppen kannst, schließe sofort das LPG-Ventil
(Propan) und ruf den LP-Gaslieferanten oder die Feuerwehr an. Wenn „wachsende“ Blasen im Zylinder erscheinen, verwende
oder bewege das LPG (Propan) nicht. Wende dich an einen LP-Gaslieferanten oder die Feuerwehr.
5. Bewahre kein Benzin oder andere brennbare Flüssigkeiten oder Dämpfe in der Nähe deines Ooni Karu 12 Ofens oder seines
Zubehörs auf. Stecke kein Werkzeug und keine Fremdkörper in den Ventilauslass oder in das Sicherheitsentlastungsventil. Du
könntest das Ventil beschädigen und ein Leck verursachen. Versuche niemals, deinen Ooni Gasbrenner für Ooni Karu 12 an das
in sich geschlossene LP-Gassystem eines Wohnmobilanhängers oder Wohnmobils anzuschließen. Betreibe deinen Ooni Karu 12
Ofen niemals mit LPG (Propan) in einer anderen Position als der in den Montageanweisungen angegebenen. Schließe immer das
LPG-Ventil (Propan), bevor du das LPG (Propan) aus der angegebenen Betriebsposition bewegst. Schalte die Steuerung und die
Gasquelle oder den Tank aus, wenn sie nicht verwendet werden.
6. Verwende den Ooni Gasbrenner für Ooni Karu 12 wie gekauft, nur mit LPG (Propan oder Butan) und der
mitgelieferten Regler-/Ventilbaugruppe. Versuche nicht, den Schlauch/das Ventil/den Regler bei einem „vermutlichen“ Defekt zu
reparieren oder zu ändern. Jede Änderung an dieser Baugruppe ist mit der Gefahr eines Gaslecks oder eines Brandes verbunden.
Verwende nur autorisierte Ersatzteile, die von Ooni Limited geliefert werden. Bewahre niemals LPG (Propan) unter dem oder
in der Nähe deines Ooni Karu 12 Ofens oder in einem geschlossenen Bereich auf. LPG (Propan), das nicht zur Verwendung
angeschlossen ist, darf nicht in der Nähe deines Ooni Karu 12 Ofens oder eines anderen Geräts gelagert werden.
7. Du darfst dein Gasbrenner-Aufsatzteil für den Ooni Karu 12 in Verbindung mit deinem Ooni Karu 12 Ofen nur mit vorabgefülltem
LPG (Propan) verwenden.
Unsachgemäß gelagertes LPG (Propan) birgt die Gefahr einer möglichen Gasfreisetzung aus dem Sicherheitsventil. Dies kann zu
einem heftigen Brand mit der Gefahr von Sachschäden, schweren Verletzungen oder Tod führen. Wenn du siehst, riechst oder hörst,
dass Gas entweicht, entferne dich sofort vom LPG (Propan)/Gerät und ruf die Feuerwehr an.
OONI LIMITED, OONI INC UND OONI GMBH ÜBERNEHMEN KEINE RECHTLICHE ODER SONSTIGE VERANTWORTUNG FÜR
NEBEN ODER FOLGESCHÄDEN AN EIGENTUM ODER PERSONEN, DIE AUS EINER NUTZUNG DES AUFSATZTEILS FÜR DEN OONI
GASBRENNER FÜR OONI KARU 12 ENTSTEHEN, DIE EINER DER BESTIMMUNGEN DIESES RECHTLICHEN HAFTUNGSAUSSCHLUSSES
WIDERSPRICHT.
OONI LIMITED, OONI INC UND OONI GMBH HAFTEN IN KEINEM FALL FÜR INDIREKTE, SONDER, FOLGE ODER SONSTIGE
SCHÄDEN JEGLICHER ART, DIE ÜBER DEN URSPRÜNGLICHEN KAUFPREIS DEINES AUFSATZTEILS FÜR DEN OONI GASBRENNER
FÜR OONI KARU 12 HINAUSGEHEN.
Manche Bundesstaaten oder Länder erlauben den Ausschluss oder die Begrenzung von Neben- oder Folgeschäden nicht, daher
gelten solche Einschränkungen oder Ausschlüsse möglicherweise nicht für dich.
14

Sicherheitsinformationen
• Lies dir die Bedienungsanleitung vollständig durch, bevor du das Gerät benutzt.
• Nur für den Einsatz im Freien.
• Warnung! Zugängliche Teile können sehr heiß werden. Halte kleine Kinder fern.
• Warnung! Vergewissere dich vor Gebrauch, dass die Beine des Ooni Karu 12 vollständig ausgefahren sind.
• Warnung! Zum Vermeiden elektrischer Stromschläge darf die Spitze der Elektrode beim Zünden des Brenners nicht berührt
werden.
• Warnung! Deckenluftauslass und Kaminabzug während des Gebrauchs nicht verstellen.
• Warnung! Von heißer Abluft aus dem Kamin fernhalten.
• Warnung! Bitte sorge dafür, dass der Abstand zwischen den Kanten der Ofenbeine und der Kante der Tischoberfläche stets
mindestens 3,5 Zoll / 90 mm beträgt.
• Halte kleine Kinder fern.
• Verschiebe das Gerät während der Verwendung nicht.
• Schalte die Gaszufuhr nach Gebrauch an der Gasflasche aus.
• Ändere nichts am Gerät.
• Vom Hersteller oder Händler versiegelte Teile dürfen vom Anwender nicht manipuliert werden.
• Verwende beim Umgang mit heißen Komponenten immer Schutzhandschuhe.
• Die Lagerung eines Gerätes im Innenbereich ist nur zulässig, wenn der Zylinder abgetrennt und vom Gerät entfernt wird. Wenn
das Gerät über einen bestimmten Zeitraum nicht verwendet wird, sollte es vom Ofen entfernt und in seiner Originalverpackung in
einer trockenen staubfreien Umgebung gelagert werden.
• VORSICHT: Jegliche Reinigungs- und Wartungsarbeiten sollten nur dann durchgeführt werden, wenn der Ofen kühl ist und die
Brennstozufuhr an der Gasflasche ausgeschaltet und diese abgetrennt ist.
• PRÜFE VOR DER BENUTZUNG DAS GERÄT UND DIE VERBINDUNGEN AUF LECKS: Führe die Überprüfung auf Lecks niemals mit
einer oenen Flamme aus; verwende immer eine Seifenwasserlösung. Prüfung auf Lecks: Bei jedem Anschluss oder wenn das
Gerät längere Zeit nicht verwendet wurde, sollte eine Dichtheitsprüfung durchgeführt werden. Stelle sicher, dass das Ventil in der
richtigen Ausrichtung mit dem Venturi ist. Stelle sicher, dass der Schlauch keine Risse oder Kerben hat. WICHTIG: Wenn du ein
Gasleck nicht stoppen kannst, schalte das Gastankventil aus und ruf deinen örtlichen Gastankhändler oder die Feuerwehr an.
• Das Gerät muss während des Gebrauchs von brennbaren Materialien ferngehalten werden.
• Achte beim Wechsel der Gasflasche darauf, dass der Knopf des Ooni Gasbrenners für Ooni Karu 12 in die AUS-Position gedreht
wird. Trenne den Regler von der Gasflasche und entferne die Flasche. Stelle während dieses Vorgangs sicher, dass die Gasflasche
mindestens einen Meter vom Ofen entfernt bleibt, um eine Entzündungsgefahr zu vermeiden.
Der mitgelieferte Gasregler ist möglicherweise nicht für den Einsatz in deinem Gebiet oder deiner Region
geeignet. Weitere Informationen findest du in deinen örtlichen Vorschriften.
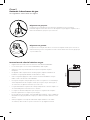
Stehe beim Anzünden auf der Seite – schau niemals direkt in den Ofen oder auf
die Flamme.
15

Schritt 1
Schlauchrohr einbauen (falls erforderlich)
Schritt 1a
Mit geeigneten Schraubenschlüsseln festziehen.
Schritt 1b
Mit geeigneten Schraubenschlüsseln festziehen, dann
Schritt1c folgen.
Schritt 1c
Mit geeignetem Schraubendreher festziehen.
Die Regler und Schlauchanschlüsse unterscheiden sich je nach Region.
Wenn dein Ooni Gasbrenner für den Ooni Karu 12 ein oenes Schlauchende mit einem Gewinde hat, folge
Schritt1a.
Wenn dein Ooni Gasbrenner für den Ooni Karu 12 eine Gewindetülle und einen normalen Schlauch mit
Schlauchclip hat, folge Schritt1b und dann 1c.
Wenn dein Ooni Gasbrenner für den Ooni Karu 12 einen normalen Schlauch mit Schlauchclip hat, folge Schritt1c.
Wenn dein Ooni Karu 12 Gasbrenner über einen vorinstallierten Schlauch verfügt, fahre mit Schritt2 fort.
In der EU gegen den Uhrzeigersinn
festdrehen.
In der EU gegen den Uhrzeigersinn
festdrehen.
16

A
A A
B B
C C
D D
E E
F F
G G
H H
J J
K K
L L
M M
16
16
15
15
14
14
13
13
12
12
11
11
10
10
9
9
8
8
7
7
6
6
5
5
4
4
3
3
2
2
1
1
DRAWN
CHK'D
APPV'D
MFG
Q.A
UNLESS OTHERWISE SPECIFIED:
DIMENSIONS ARE IN MILLIMETERS
SURFACE FINISH:
TOLERANCES:
LINEAR:
ANGULAR:
FINISH:
DEBURR AND
BREAK SHARP
EDGES
NAME
SIGNATURE
DATE
MATERIAL:
DO NOT SCALE DRAWING
REVISION
TITLE:
DWG NO.
SCALE:1:10
SHEET 1 OF 1
A1
WEIGHT:
Karu 12 exploded with new fuel tray
Schritt2
Entferne die Tür und die Brennstoffschale und stelle sicher,
dass die Kaminklappe geöffnet ist.
17

Schritt3
Entferne die Luftzugschutzklappe.
18
La page est en cours de chargement...
La page est en cours de chargement...
La page est en cours de chargement...
La page est en cours de chargement...
La page est en cours de chargement...
La page est en cours de chargement...
La page est en cours de chargement...
La page est en cours de chargement...
La page est en cours de chargement...
La page est en cours de chargement...
La page est en cours de chargement...
La page est en cours de chargement...
La page est en cours de chargement...
La page est en cours de chargement...
La page est en cours de chargement...
La page est en cours de chargement...
La page est en cours de chargement...
La page est en cours de chargement...
La page est en cours de chargement...
La page est en cours de chargement...
La page est en cours de chargement...
La page est en cours de chargement...
La page est en cours de chargement...
La page est en cours de chargement...
La page est en cours de chargement...
La page est en cours de chargement...
La page est en cours de chargement...
La page est en cours de chargement...
La page est en cours de chargement...
La page est en cours de chargement...
La page est en cours de chargement...
La page est en cours de chargement...
La page est en cours de chargement...
La page est en cours de chargement...
La page est en cours de chargement...
La page est en cours de chargement...
La page est en cours de chargement...
La page est en cours de chargement...
La page est en cours de chargement...
La page est en cours de chargement...
La page est en cours de chargement...
La page est en cours de chargement...
La page est en cours de chargement...
La page est en cours de chargement...
La page est en cours de chargement...
La page est en cours de chargement...
La page est en cours de chargement...
La page est en cours de chargement...
La page est en cours de chargement...
La page est en cours de chargement...
La page est en cours de chargement...
La page est en cours de chargement...
La page est en cours de chargement...
La page est en cours de chargement...
La page est en cours de chargement...
La page est en cours de chargement...
La page est en cours de chargement...
La page est en cours de chargement...
La page est en cours de chargement...
La page est en cours de chargement...
-
 1
1
-
 2
2
-
 3
3
-
 4
4
-
 5
5
-
 6
6
-
 7
7
-
 8
8
-
 9
9
-
 10
10
-
 11
11
-
 12
12
-
 13
13
-
 14
14
-
 15
15
-
 16
16
-
 17
17
-
 18
18
-
 19
19
-
 20
20
-
 21
21
-
 22
22
-
 23
23
-
 24
24
-
 25
25
-
 26
26
-
 27
27
-
 28
28
-
 29
29
-
 30
30
-
 31
31
-
 32
32
-
 33
33
-
 34
34
-
 35
35
-
 36
36
-
 37
37
-
 38
38
-
 39
39
-
 40
40
-
 41
41
-
 42
42
-
 43
43
-
 44
44
-
 45
45
-
 46
46
-
 47
47
-
 48
48
-
 49
49
-
 50
50
-
 51
51
-
 52
52
-
 53
53
-
 54
54
-
 55
55
-
 56
56
-
 57
57
-
 58
58
-
 59
59
-
 60
60
-
 61
61
-
 62
62
-
 63
63
-
 64
64
-
 65
65
-
 66
66
-
 67
67
-
 68
68
-
 69
69
-
 70
70
-
 71
71
-
 72
72
-
 73
73
-
 74
74
-
 75
75
-
 76
76
-
 77
77
-
 78
78
-
 79
79
-
 80
80


Ooni Karu 12 Gas Burner Manuel utilisateur
- Catégorie
- Micro-ondes
- Taper
- Manuel utilisateur
dans d''autres langues
- italiano: Ooni Karu 12 Gas Burner Manuale utente
- English: Ooni Karu 12 Gas Burner User manual
- español: Ooni Karu 12 Gas Burner Manual de usuario
- Deutsch: Ooni Karu 12 Gas Burner Benutzerhandbuch
- português: Ooni Karu 12 Gas Burner Manual do usuário