Haier HW70-B14266 Manuel utilisateur
- Catégorie
- Machines à laver
- Taper
- Manuel utilisateur

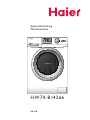
HW70-B14266
负载
夜 洗
防皱浸泡
1400
不甩干
400
600
800
1000
1200
常温
90
20
30
60
40
70
预约时间剩余时间
加速洗
超净洗
加漂洗
高水位
1 2 3
Rinse
Anti crease
Speed up
Intense
Soak
Temp.
M emo
Function Selection Spin Delay
Express 15'
Baby Care
Mix
Sport
Jeans
Self Clean
Spin/Drain
Hand Wash
DelicateUnderwear
Ultra White
Wool
Daily Wash
Hygienic
Synthetic
Cotton
M
M
M
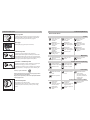
User Manual
Washing Machine

2
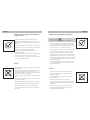
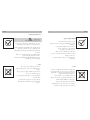
Yes
No
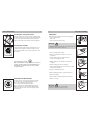
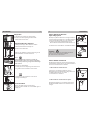
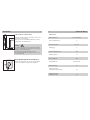
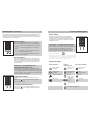
General information and tips
Warning! Important safety information!
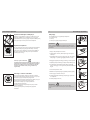
Environmental information
The presence of this symbol on the product,
accessories or materials that goes with this in-
formation indicates that at the end of its useful
life the product or its electronic accessories
(e.g. cable, Aqua Stop hose) should not be dis-
posed with other household waste. To prevent
possible damage to the environment or human
health from uncontrolled waste disposal, please
separate these items from other types of was-
te and recycle them. This will promote the sus-
tainable reuse of material resources. Household
users should contact either the retailer where
they purchased the product or relevant local
authorities to fi nd out how they can take this
item for environmentally safe recycling and safety.
Business users should contact their supplier and
check the conditions of the purchase. This pro-
duct and its electronic accessories should not
be mixed with other commercial waste.
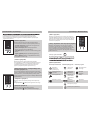
Disposal
Legend
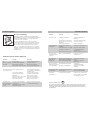
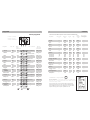
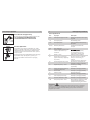
Thank you for purchasing a Haier product
Please read these instructions carefully before using this appliance. It contains impor-
tant information which will help you get the best out of your appliance and ensure safe
and proper installation, use, care and cleaning.
Keep this manual in a convenient place so you can always refer to it for safe and
proper use.
If you sell the appliance, give it away, or leave it behind when you move, make sure you
also pass on this manual so that the new owner can become familiar with all features
and safety warnings.
3
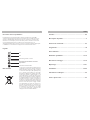
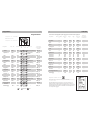
Index
Safety........................................................................................... 4-5
Product description....................................................................... 6
Control panel.............................................................................. 7-9
Programmes................................................................................. 10
Consumption................................................................................ 11
Daily use................................................................................... 12-15
Care and cleaning.................................................................. 16-18
Troubleshooting...................................................................... 19-21
Installation............................................................................... 22-24
Technical data ............................................................................. 25
After sales service....................................................................... 26

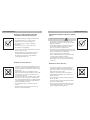
4
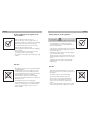
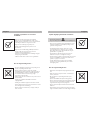
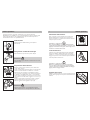
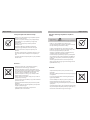
Safety
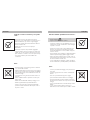
Before switching on the appliance for
the first time...
...make sure all transport bolts are removed.
...make sure the power cord is not caught under or in
the appliance and there is no damage or risk for damaging.
...make sure the power circuit fuse is rated for15A.
...use a separate earthed socket for the power supply.
...make sure the plug is always accessible.
...hold the plug and not the electric cable when unplugging
the power supply.
...check that hose joints and connections are firm and
by opening tap check for any waterleakage.
...do not switch on the appliance until everything is properly
installed!
Do not …
...allow children or infirm persons to play with the appliance
or packing materials.
...install the appliance outdoors in a damp place, or in an
area which may be prone to water leaks such as under
or near a sink unit. In the event of a water leak cut power
supply and allow the machine to dry naturally.
...expose machine to any frost, heat or direct sunlight.
...touch or use the appliance when barefoot or with wet or
damp hands or feet.
...use flammable detergent or dry cleaning agent.
...use any flammable sprays in close vicinity to the appliance.
...remove or insert the plug in presence of flammable gas.
...place the appliance directly on a carpet, or close to
a wall or furniture.
5
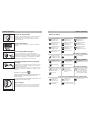
Safety
During daily use of the appliance...
...supervise children.
Ensure that they don’t play with the appliance and its packaging.
...ensure that appliance is not used by people with
reduced physical, sensory or mental capabilities, lack of
experience and knowledge.
...pull up zips, fix loose threads and take care for small items
to prevent laundry from being entangled. If necessary, use
an appropriate bag or net.
...switch off at the wall socket after each wash programme
to save electricity and for safety.
...keep the lower part of the porthole clean and open door
and detergent drawer if appliance is not in use to prevent
odours.
...a damaged power cord is only to be replaced by the
manufacturer, his service agent or other specifically
qualified people.
Do not ...
...touch the door during the washing process, it gets hot.
...place heavy objects or sources of heat or damp on top of
the appliance.
...hot wash from rubber or sponge-like materials.
...open detergent drawer during any wash cycle.
...force the door to open, it is fitted with a self-lock
device and will open shortly after wash cycle end.
...open the door if the water level is visibly over the
porthole.
...cover or encase the appliance during operation or after
wards to allow any moisture or dampness to evaporate.

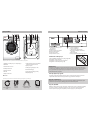
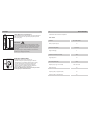
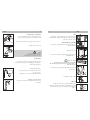
6
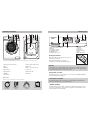
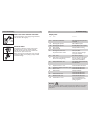
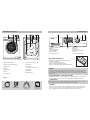
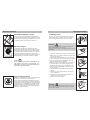
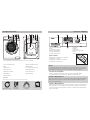
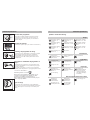
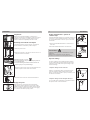
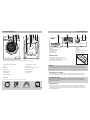
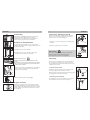
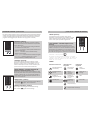
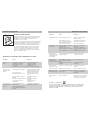
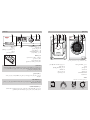
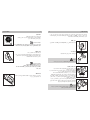
Product description
1 Detergent / Softener drawer
2 Door
3 Worktop
4 Door handle
5 Control panel
6 On/Off
7 Service fl ap
1 Transportation bolts (T1-T4)
2 Back cover
3 Back cover screws (S1-S4)
4 Power cord
5 Water inlet valve
6 Drain hose
Accessories
1x Inlet hose
assembly
4x Blanking
plugs
1x Drain hose
bracket
1x User manual
This drawing may be slightly different from the layout of the washing machine you have just purchased.
Check the accessories and literature in accordance with this list.
7
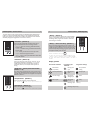
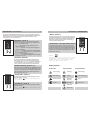
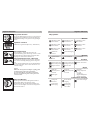
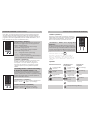
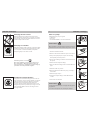
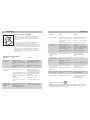
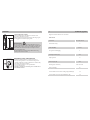
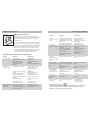
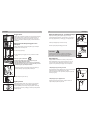
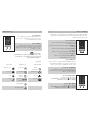
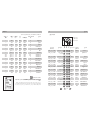
Control panel
1 Detergent / Softener drawer
2 Display
3 Programme selector
4 “Start/Pause“ button
5 “On/Off“ button
6 Function button (a-f)
a Function
b Selection
c. Temperature
d. Spin Speed (rpm)
e. Memo
f. Delay (Start time)
Detergent drawer
Open the drawer, three compartments can be seen:
Compartment 1: Prewash
Compartment 2: Detergent for program
Compartment 3: Softener, Conditioning agent etc.
Display
If the appliance is on display will light up the actual status on six different sections (see
next pages). During operation display will be deactivated after a while (Energy saving
mode) until programme selector is turned at random.
Programme selector
By turning the knob one of 16 programmes can be selected, related LED will light up
its default settings will be displayed.
“Start/Pause” button
Press this button gently to start or interrupt the currently displayed programme. During
operation its symbol is shining, or if interrupted blinking.
“On/Off” button
Touch this button gently to switch on, the display is shining. Touch it again for about
2 seconds to switch off. If no panel element or programme is activated after a while
machine will shut down automatically.
负载
夜 洗
防皱浸泡
1400
不甩干
400
600
800
1000
1200
常温
90
20
30
60
40
70
预约时间剩余时间
加速洗
超净洗
加漂洗
高水位
1 2 3
Rinse
Anti crease
Speed up
Intense
Soak
Temp.
M emo
Function Selection Spin Delay
Express 15'
Baby Care
Mix
Sport
Jeans
Self Clean
Spin/Drain
Hand Wash
DelicateUnderwear
Ultra White
Wool
Daily Wash
Hygienic
Synthetic
Cotton
M
M
M
6
a-f
1
2 3
4 5
T1
T2
S1
S2
S4
S3
T4
T3
负载
夜 洗
防皱浸泡
1400
不甩干
400
600
800
1000
1200
常温
90
20
30
60
40
70
预约时间剩余时间
加速洗
超净洗
加漂洗
高水位
1 2 3
Rinse
Anti crease
Speed up
Intense
Soak
Temp.
M emo
Function Selection Spin Delay
Express 15'
Baby Care
Mix
Sport
Jeans
Self Clean
Spin/Drain
Hand Wash
DelicateUnderwear
Ultra White
Wool
Daily Wash
Hygienic
Synthetic
Cotton
M
M
M
1 5 6
7
2 3 4

8
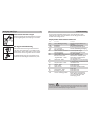
Control panel -
function buttons
“Function“ (button a)
Touch it to select sequentially required functions and set-
tings. The related function name and setting will shine.
- “Speed up“: Saves time and energy. Preferable if laundry
is slightly soiled.
- “Intense“: Intensifies cleaning results. Preferable if laundry
is heavily soiled.
- “Soak“: Laundry will remain in last rinse cycle water.
- “Signal“: Activates the signal tone mode .
-
“Rinse+“
: Adds 1-3 rinse cycles. Preferable to better flush
out possible residues
“Selection“ (button b)
Touch it to confirm the current shining “Function“, its sym-
bol is blinking. Additionally a “checkmark“, or a “1“/“2“/“3“
will light up. Function will be activated after 3 seconds or
if “Function“(button a) is touched, all related symbols are
shining.
“Child lock“ - control panel lock function
(button a + b)
This option blocks all panel elements against activation. After
starting, press simultaneously “Function“+“Selection“ for about
3 seconds. Panel lock symbol is now displayed. Next repetition
deblocks any function.
“Temperature“ (button c)
Touch it to adapt maximum of water temperature.
Note: Display
of
“
“ stands for
“
no operational
heating“.
“Spin Speed” (button d)
Touch it to adapt speed of centrifugation.
Note: Display of “ “ stands for “no operational spinning“.
.
To get best results in each programme Haier has well defined specific default settings.
If there is no special requirement default settings are recommended. Accordingly to
these factory settings many programme parameters and additional functions could be
individually changed (see “programmes“ and “function“ buttons).
9
function buttons -
Control panel
“Memo” (button e)
Touch it for 2 seconds to memorize all currently displayed
settings as to-be default settings. Two signal tones confirm
that change. When programme is started or chosen next
these settings are activated.
“Delay“ – Start time delay (button f)
Touch it to increase programme start time in steps of 30
minutes from 0,5-24h. Related symbol and current start time
will light up. During operation at first countd own of delay
time and subsequently remaining programme cycle time will
be displayed. Related symbol will shine.
General information and tips:
To cancel any actual setting change programme or press
”On/Off” about 3 seconds. To cancel a running program-
me touch “Start/Pause“ and then ”On/Off” for about 3
seconds.
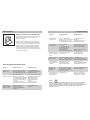
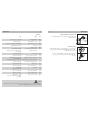
Door is locked Running wash No operational
(in operation) cycle heating
Control panel locked Running rinse No spin cycle
cycle
No water supply Running spin/ Memo
drainage cycle
Door is open Time display Delay
(1 or 2)
Remaining operation time (1)
Remaining delay time (2)
Rinse
Anti crease
Speed up
Intense
Soak
Temp.
M emo
Function Selection
Spin Speed
Delay
a b
Rinse
Anti crease
Speed up
Intense
Soak
Temp.
M emo
Function Selection
Spin Speed
Delay
c d
Rinse
Anti crease
Speed up
Intense
Soak
Temp.
M emo
Function Selection
Spin Speed
Delay
e f
Display symbols
Basic status indication Programme cycle Programme settings
indication
“

1110
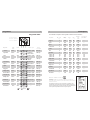
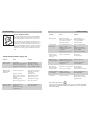
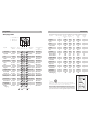
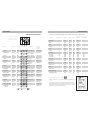
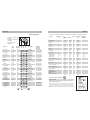
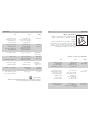
ConsumptionProgrammes
1 Cotton 0-90°C 40°C Cotton /Synth 1200 rpm
2 Synthetic 0-60°C 30°C Chemical 1000 rpm
fibre fabrics
3 Mix 0-60°C 40°C Cotton /Synth. 1000 rpm
4 Wool 0-40°C --- Woolen 600 rpm
fabrics
5 Underwear 0-60°C 40°C Underwear 1000 rpm
6 Sport 0-40°C 30°C Sports Wear 1000 rpm
7 Jeans 0-60°C 40°C Jeans 1000 rpm
8 Hygienic 0-90°C 90°C Cotton /Synth. 1000 rpm
9 Daily Wash 0-40°C 40°C Cotton fabrics 1000 rpm
10 Ultra White 0-60°C 40°C Cotton /Synth 1000 rpm
11 Express 15 0-30°C 20°C Cotton /Synth 1000 rpm
12 Baby Care 0-90°C 90°C Cotton /Synth 1000 rpm
13 Delicate 0-40°C 30°C Silk or wool 600 rpm
14 Hand Wash 0-40°C 30°C Cotton fabrics 800 rpm
15 Spin/Drain --- --- --- 1200 rpm
16 Self Clean 90°C 90°C --- 1000 rpm
Programme
Temp.
Fibre Type
Max
.
Spin Speed
Spin Speed
Programme table
OptionalYes No
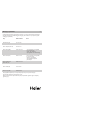
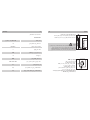
*General information and tips:
Standard programme for the Energy Labelling according to
2010/30EU:
Cotton 60°C/40°C with max. spin speed setting and activated
intensive function
The standard 60°C and 40°C cotton programmes are suitable to clean
normally soiled cotton laundry. They are the most efficient programmes in
terms of combined energy and water consumption for cotton laundry.Used
water temperature may differ from declared cycle temperature.
140
50
dB
70
dB
A
B
CDEFG
kWh/annum
9240
HW70-B14266
7,0
kg
2010/1061
A
+++
A
++
A
A
B
C
D
+
A
+++
ENERG
kg
ENER
· N P EIA
ENERGIJA·ENERGY·ENERGIE
ENERGI
L/annum
1 Prewash compartment
2 Detergent compartment
3 Softener compartment
Programme
Energy
Water
Washing
time
Spin drying
performance
Temp.
Max. load
kg
kWh
L
°C
h:min
%
Hygenic 2 2,00 36,0 90 2:03 ---
Jeans 4 0,56 40,0 40 1:27 ---
Sport 2 0,26 35,0 30 0:47 ---
Underwear 4 0,50 40,0 40 1:01 ---
Wool 1 0,10 50,0 --- 0:37 ---
Mix 4 0,56 34,0 40 Auto ---
Synthetic 4 0,25 46,0 30 Auto ---
Cotton 40* 3,5 0,48 30,0 40 Auto <53
Cotton 60* 3,5 0,66 31,0 60 Auto <53
Cotton 60* 7 0,65 39,0 60 Auto <53
Daily Wash 4 0,58 46,0 40 1:20 ---
Ultra White 2 0,60 45,0 40 1:25 ---
Express 15’ 1 0,20 20,0 20 0:15 ---
Baby Care 4 2,00 67,5 90 2:03 ---
Delicate 1 0,25 50,0 30 0:46 ---
Hand Wash 2 0,25 36,0 30 0:48 ---
Spin/Drain 7 0,10 --- --- 0:10 ---
Self Clean --- 1,80 15,0 90 1:20 ---
The indicated consumption values may differ in addiction of local conditions.
2 3 1
Preset
Preset

1312
Daily useDaily use
Power supply
Connect the washing machine to the power supply (220V to
240V~/50Hz).
Water connection
Turn on the tap. The water must be clean and clear.
Warning!
Before use, turn tap on and check for any leackage.
Preparing laundry
Sort out clothes according to fabric (cotton, synthetics, wool
or silk) and to how dirty they are.
Separate white clothes from coloured ones. Wash coloured
textiles fi rst by hand to check if they fade or run.
Garments without hems, delicates and fi nely woven textile
such as fi ne curtains are to be put into a wash bag to care
this delicate laundry (hand or dry cleaning would be better).
Close zippers and hooks, make sure the buttons are sewn
on tightly and place small items such as socks, belts, bras, etc.
in a wash bag.
Unfold large pieces of fabric such as bed sheets, bedspreads
etc.Turn clothes inside out. Empty pockets (keys, coins, etc.)
and remove harder decorative objects (e.g. brooches).
Warning!
Non-textile, as well as small, loose or sharp-edged items may cause
malfunctions and damage of clothes and appliance.
This appliance is only for domestic use inside the house. If it is used for commercial,
industrial or not intended purposes any Haier guarantee will not be valid anymore.
Consider anytime instructions of each garment label and wash only machine-washable
laundry.
Loading the appliance
Open the door and put in the laundry piece by piece.
Close the door carefully. Don‘t overload. Check if you can
put a hand upright on top of load.
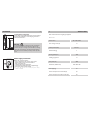
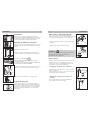
General information and tips:
After each installation or longer down time run at fi rst
programme “Self Clean“ with no load and added deter-
gent in washing agent compartment (2) to remove possib-
ly corruptive residues.
Selecting detergent
Washing effi ciency and performance is determined by
used detergent quality. Use only machine wash approved
detergent and if needed specifi c detergents, e.g. for synthe-
tic and woolen fabric. Mind always detergent manufacturer
recommendations.
General information and tips:
Remove detergent residues before next wash cycle.
Please follow given detergent dosage recommendation
from detergent package. Using “Prewash“ add half of the
nominal dosage.
Adding detergent
Slide out the detergent drawer and put the required che-
micals into corresponding compartments. Push back the
drawer gently.
负载
夜 洗
防皱浸泡
1400
不甩干
400
600
800
1000
1200
常温
90
20
30
60
40
70
预约时间剩余时间
加速洗
超净洗
加漂洗
高水位
12 3
Rinse
Anti crease
Speed up
Intense
Soak
Temp.
M emo
FunctionSelection Spin Delay
Express 15'
Baby Care
Mix
Sport
Jeans
Self Clean
Spin/Drain
Hand Wash
DelicateUnderwear
Ultra White
Wool
Daily Wash
Hygienic
Synthetic
Cotton
M
M
M
Please note instructions
on the drawer!

1514
Daily use Daily use
Select a programme
To get the best washing results, select a programme which
fi ts the degree of soiling and sort of laundry type. Please
turn the programme knob to select the right programme.
Select options
Select required options (refer to “Control Panel“).
Start wash programme
Touch “Start/Pause“ button to start. Appliance operates
according to present settings. Changes are only possible by
cancelling wash programme. At programme cycle end
“
End“
is displayed, afterwards machine will shut off automatically.
Interrupt - cancel wash programme
To interrupt a running programme press gently “Start/Pause“
button. Press it again to resume operation.
To cancel a running programme and all its individual set-
tings activate “Start/Pause“ and then “On/Off“ for about 3
seconds.
General information and tips:
Choose programme settings carefully refering to icons on
each laundry label and “Care chart“.
Removing laundry promptly at cycle end will be gently and
minimize wrinkling.
After washing
Turn off the water supply and unplug the power cord.
Open the door to prevent formation of moisture and
odours. Let it open while not used.
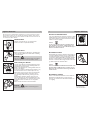
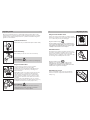
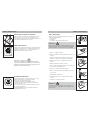
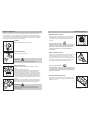
Care chart
Maximum washing Maximum washing Maximum washing
temperature 95°C - temperature 60°C - temperature 60°C
normal process normal process mild process
Maximum washing Maximum washing Maximum washing
temperature 40°C - temperature 40°C - temperature 40°C -
normal process mild process very mild process
Maximum washing Maximum washing Maximum washing
temperature 30°C - temperature 30°C - temperature 30°C -
normal process mild process very mild process
Wash by hand Do not wash
max. temp. 40° C
Any bleaching agent Only oxygen / Do not bleach
allowed non-chlorine
bleach allowed
Tumble drying possible Tumble drying possible Do not tumble dry
normal temperature lower temperature
Line drying Flat drying
Iron at a maximum Iron at a maximum Iron at a maximum
sole-plate temperature sole-plate temperature sole-plate temperature
of 200°C of 150°C of 110°C
without steam
Do not iron (steam ironing may cause
irreversible damage)
Professional dry cleaning Professional dry cleaning Do not dry clean
in tetrachloroethene in hydrocarbons
Professional Do not professional
wet clean wet clean
Washing Process
Bleaching Process
Tumble Drying Process
Ironing Process
Professional Textile Care Process
Cotton
Daily Wash
Ultra White
Express 15
Baby Care
Delicate
Hand Wash
Spin/Drain
Self Clean
Synthetic
Mix
Wool
Sport
Jeans
Hygenic 95°c
M1
M2
M3
Under-
wear
Rinse
Anti crease
Speed up
Intense
Soak
Temp.
M emo
Function Selection
Spin Speed
Delay
Cotton
Daily Wash
Ultra White
Express 15
Baby Care
Delicate
Hand Wash
Spin/Drain
Self Clean
Synthetic
Mix
Wool
Sport
Jeans
Hygenic 95°c
M1
M2
M3
Under-
wear
Cotton
Daily Wash
Ultra White
Express 15
Baby Care
Delicate
Hand Wash
Spin/Drain
Self Clean
Synthetic
Mix
Wool
Sport
Jeans
Hygenic 95°c
M1
M2
M3
Under-
wear
Express 15
Baby Care
Mix
Sport
Jeans
Self Clean
Spin/Drain
Hand Wash
Delicate
Ultra White
Under
wear
Wool
Daily Wash
Hygienic
Mix
Synthetic
Cotton
M
M
M
Rinse
Anti crease
Speed up
Intense
Soak
Temp.
M emo
Function Selection
Spin Speed
Delay

1716
Care and cleaningCare and cleaning
Cleaning the detergent drawer
Clean the drawer from detergent residues regularly Pull out
the drawer until it stops (1) and press the release button (2)
to remove the drawer. Then fl ush the drawer with water
until it is clean and insert the drawer back in the appliance.
Cleaning the machine
Unplug the machine during cleaning and maintenace. Use a
soft cloth with soap liquid to clean the machine case and
rubber components. Do not use organic chemicals or corro-
sive solvents.
General information and tips:
After each installation or longer downtime run at fi rst pro-
gramme
“
Self Clean“ with no load and added detergent
in washing agent compartment (2) to remove possibly
corruptive residues.
Environmental information
To achieve best use of energy, water, detergent and time
you should use the recommended maximum load size.
Do not exceed indicated chemical dosages.
Choose always lowest washing temperature.
Modern detergents are cleaning effi ciently below 60°C.
Only due to heavy soil raise accordingly default settings.
Using afterwards a domestic dryer max. spinning speed is
recommended.
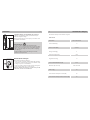
Pump fi lter
Please check the pump fi lter for instance if the appliance
- doesn´t drain the water,
- doesn´t spin,
- cause unusual noise while running.
Warning!
Scalding Risk! Water in the pump fi lter can be very hot! Before any
action please ensure water has cooled down.
1. Turn off and unplug the machine.
2. Open service fl ap. You can either use a coin or a
screwdriver.
3. Provide a fl at container to catch leach water.
There could be bigger amounts!
4. Pull the drainhose out and hold its end above the
container.
5. Take the sealing plug out of the drainhose.
6. After complete drainage, unscrew and remove counter
clockwise the pump fi lter.
7. Remove contaminants and dirt.
8. Clean carefully pump fi lter, e.g. using running water.
9. Refi x it thoroughly.
10. Close drainhose and push it back into the machine.
11. Close service fl ap
Warning!
Pump fi lter sealing has to be clean and unhurt.
If the lid is not full tightened, water can escape.
负载
夜 洗
防皱浸泡
1400
不甩干
400
600
800
1000
1200
常温
90
20
30
60
40
70
预约时间剩余时间
加速洗
超净洗
加漂洗
高水位
12 3
Rinse
Anti crease
Speed up
Intense
Soak
Temp.
M emo
FunctionSelection Spin Delay
Express 15'
Baby Care
Mix
Sport
Jeans
Self Clean
Spin/Drain
Hand Wash
DelicateUnderwear
Ultra White
Wool
Daily Wash
Hygienic
Synthetic
Cotton
M
M
M
1
2

1918
TroubleshootingCare and cleaning
Water inlet valve and inlet valve
filter
To prevent blockage of water supply by foreign substances,
clean inlet valve filter regularly.
Period of disuse
If the appliance is left idle for a longer period, pull out
the electrical plug (1) and turn off water supply (2).
Open the door to prevent formation of moisture and
odours. Let door open while not used.
Before next usage check carefully power cord, water inlet
and drain hose. Make sure everything is properly installed
and without leackage.
Display code
Code Cause Solution
Auto Automatic load detection. Wait until programme cycle time
is displayed.
1:25 Remaining wash cycle time. Refer to additional symbol.
19:30 Remaining wash cycle time. End is likely delayed - refer to symbol.
Lock Door is locked. Wait, operational door locking.
End End of wash cycle.
E1 Drainage error, water is not Clean pump filter.
fully drained within 6 minutes. Check drain hose for blockage
and proper installation.
E2 Lock - error. Shut the door properly,
F3 Temperature sensor - error. Contact the After sales service.
E4 Water level not reached after 8 minutes. Make sure that tap is fully opened
Drain hose is self-syphoning. and water pressure is normal.
Check drain hose installati
on.
F4 Heating error (Appears at the end of a cycle). Contact the After sales service.
F7 Motor - error. Contact the After sales service.
E8 Water protective level - error. Auto released
otherwise contact the
after sales service.
Fb Water overflow . Close tap immediately.
Contact the After sales service.
FA Water level sensor error. Contact the After sales service.
FC Electronic control - error. Contact the After sales service.
Unb Unbalanced load - error. Cut power supply. Check and
balance laundry load. Try to run a
spinning programme
Warning!
Code Fb: Water-overflow protection is placed on deepest part of appliance. In case of leacka -
ge all functions will be shut do
wn automatically except drain pump which will be activated for
safety reasons.
2

2120
TroubleshootingTroubleshooting
Troubleshooting without display code
Problem Cause Solution
Washing machine Power failure. Check power supply.
fails to operate. Machine has not been switched on. Switch the machine on.
Door is not properly closed. Close the door properly.
Programme is not yet started. Press “Start/Pause“ button.
Washing machine No chosen programme. Set programme and start it.
will not be filled Water tap is closed. Turn
with water. on water tap.
Inlet hose is kniked. Check inlet hose.
Inlet hose filter is blocked. Unblock inlet hose filter.
Water pressure is less than Check water pressure.
0,03 MPa.
Water supply failure. Ensure the water supply.
Door is not properly closed. Close door properly.
Machine is draining Height of drain hose is Make sure that drain hose
while being filled below 80 cm. is properly installed.
Drain hose end could
reach into water.
In case of power failure
The current programme and its setting will be saved. When
power supply is restored operation will be resumed. To can-
cel it, touch “Start/Pause“ and then “Power“ for about 3 sec.
If a power failure cuts an operating wash programme door
opening is mechanically blocked. To get out any laundry water
level should not be seen in the glassy porthole of the door. -
Danger of burns! Water level has to be lowered as described
in “Pump filter“. Not till then pull lever beneath service flap
until door is unlocked by a gentle click. Afterwards refix all
parts.
Drainage failure Drain hose is blocked. Unblock drain hose.
Drain hose end is higher than Make sure that drain hose
100 cm above floor level. is properly installed.
Pump filter is blocked. Clean pump filter.
Strong vibration Not all transportation bolts Remove all transportation
while spinning have been removed. bolts.
Washing machine is located Make sure that washing
on an uneven surface or is machine is on an even sur-
not levelled. face and levelled.
Machine load is not correct.. Adapt amount of laundry.
Operation stops Water or electric failure. Check power
before completing and water supply.
wash cycle
Operation stops Appliance displays error code. Consider error code.
for a period of time Problem due to load pattern.
Programme performs If it seems appropriate
soaking cycle? cancel operation.
Excessive foam Detergent is not a appropriate. Check detergent
floats drum and/or recommendations.
detergent drawer Excessive use of detergent. Reduce amount of detergent
Automatic adjustment Washing programme This is normal and doesn‘t
of washing time duration will be adjusted. affect functionality.
Spinning fails Unbalance of laundry. Check machine load and
laundry and run a spinning
programme again.
Problem Cause Solution
General information and tips:
If too much foam is inspected during spin cycle, motor stops and drain pump will be
activated for 90 seconds. If that elimination of foam fails up to 3 times, programme
ends without spinning.
lever

2322
InstallationInstallation
Inlet hose - Aqua control System
The Aqua Stop inlet hose is an important element for safety
and over all control. Its valves are controlling water supply
and will interrupt it if the hose is leaking
1. Connect the nut on the inlet hose to the connector
on the water valve.
2. Apply inlet hose to a water tap.
Warning!
Appliance is only qualified for cold water supply!
Use the hose-set supplied with the appliance.
Old hose-sets should not be reused.
Drain hose
Drainage could be installed in different ways. Nevertheless,
level of drain hose has to reach at one point 80-100 cm.
If possible keep always drain hose fixed to the clip at the
appliance back.
1. Drain hose to sink
Use the drain hose bracket to keep drain hose end retained
and out of any water level.
Fix the bracket sufficiently to avoid dropping down due to
operational movements.
2. Drain hose to sink siphon
Connection has to be securely sealed and fixed to corres-
pondig adapter above the siphoning part!
Preparation
Remove all packaging material including polystyrene base.
While opening the package, water drops may be seen on
plastic bag and porthole. This normal phenomenon results
from water tests in the factory.
Dismantle the transportation bolts
The transportation bolts are designed for clamping anti-
vibration components inside the appliance during transpor-
tation.
1. Remove the back cover.
2. Remove bolts on the rear side and take out
plastic spacers
from inner side of the machine.
General information and tips:
Keep the transportation bolts in a safe place for later use.
If the machine is to be moved to another location, replace
transportation bolts contrariwise to prevent damage.
3. Replace back cover by inserting it in the two gaps its con-
vexity is facing outside
4. Fill left holes with blanking plugs.
Adjusting the feet
Adjust all feets to achieve a complete level position.This will
minimize vibrations and thus noise during use. It will also
reduce wear and tear. We recommend to use a spirit level
for adjustment. Floor should be as stable and flat as possible.
2
.
1
.
3.
4
.
3.
4
.
3.
2.
80 - 100 cm

25
Technical data
24
Installation
3. Drain hose to sewage pipe
Use the drain hose bracket to keep drain hose end retained.
Fix the bracket sufficiently to avoid dropping down due to
operational movements.
Warning!
The drain hose should not be submerged in water and should be
securely fixed and leak-free. If the drain hose is placed on the
ground or if the pipe is at a height of less than 80cm, the washing
machine will continuously drain while being filled (self-siphoning).
Drain hose is not to be extended. If necessary contact after sales
service.
Power supply connection
Before each connection check if:
- socket is adequate for the maximum power of the
appliance (safety power circuit fuse should be
rated not less than 15A).
- voltage should meet the requirement.
- power outlet should be appropriate to appliance plug.
- used power socket has to be earthed.
Note - only UK: The fuse in a UK 13A plug must comply
to BS1362 standard.
Basic technical information regarding the appliance
Power source 220 - 240V~/50Hz
Max. working current (A) 10
Water pressure (MPa) 0.03≤P ≤1
Nominal load (kg) 7
Spinning speed (rpm) 1400
Washing programmes 16
Max. power (W) 2000
Dimensions (HxDxW mm) 840 x 600 x 595
Net. weight (kg) 67
Power consumption of the off-mode (W) 0,2
Power consumption of the left-on mode (W) 0,2
HW70-B14266

26
After sales service
In case of trouble, please check the trouble-shooting section of this manual. If required
please check your warranty card for after sales service information.
Country Phone number Costs
Haier Italy (IT) 199-100 912
Haier Spain (ES and PT) 902 509 123
Haier Germany (DE) 0180 5 39 39 99 - 14 Ct/Min Landline
- max 42 Ct/Min Mobile
Haier Austria (AT) 0820 001 205 - 14,53 Ct/Min Landline
- max 20 Ct/Min all others
Haier United Kingdom (UK) 0845 025 30 25
Haier Republic of Ireland (IE) 01 431 1342
Haier France (FR) 0980 406 409
For other countries please refer to: www.haier.com service and support area.
You can find FAQs and can activate service claim.

HW70-B14266
DE / EN
负载
夜 洗
防皱浸泡
1400
不甩干
400
600
800
1000
1200
常温
90
20
30
60
40
70
预约时间剩余时间
加速洗
超净洗
加漂洗
高水位
1 2 3
Express 15'
Baby Care
Mix
Sport
Jeans
M
M
M
Baumwolle
Synthetik
Unter-
wäsche
Hygiene
Selbstreinigung
Schleudern/
Abpumpen
Hand-
wäsche
Fein-
wäsche
Ultra Weiß
Tägliche Wäsche
Wolle
Auswahl Optionen Temp.
Schleudern M emo
Zeitvorwahl
Gebrauchsanleitung
Waschmaschine

2 3
Danke, dass Sie sich für ein Haier Produkt entschieden haben.
Bitte lesen Sie diese Gebrauchsanleitung sehr sorgfältig bevor Sie das Gerät in Betrieb
nehmen. Sie enthält wichtige Informationen, damit Sie viel Freude an Ihrem Gerät
haben und ein sicherer und sauberer Betrieb gewährleistet ist.
Bewahren Sie dieses Handbuch gut auf, damit Sie bei Bedarf immer wieder darauf
zurückgreifen können.
Wenn Sie die Maschine verkaufen, abgeben oder bei einem Umzug zurücklassen,
geben Sie bitte die Gebrauchsanleitung dazu, damit der neue Besitzer sich mit den
Anweisungen zur Benutzung und zum sicheren Betrieb vertraut machen kann.
Inhalt
Ja
Nein
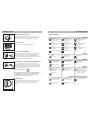
Allgemeine Hinweise und Tipps
Achtung! Unbedingt lesen!
Wichtige Hinweise zur Sicherheit von Personen
und zur Vermeidung von Sachschäden.
Umwelt-Tipps
Legende
Elektrogeräte nicht in den Hausmüll geben, son-
dern getrennt entsorgen. Wenden Sie sich an
Ihren Abfallwirtschaftsbetrieb für genauere
Informationen über die Möglichkeiten zur Ent-
sorgung. Wenn Elektrogeräte auf Mülldeponien
oder Schuttabladeplätzen entsorgt werden, kön-
nen gefährliche Substanzen ins Grundwasser und
dadurch in die Nahrungskette gelangen, was zu
gesundheitlichen Beeinträchtigungen führen kann.
Wenn Sie ein altes Gerät durch ein neues erset-
zen, ist der Verkäufer rechtlich dazu verpfl ichtet,
das alte zur kostenlosen fachgerechten Entsor-
gung zurückzunehmen.
Entsorgung
Sicherheitshinweise.................................................................... 4-5
Produktbeschreibung.................................................................... 6
Bedienblende.............................................................................. 7-9
Programme.................................................................................. 10
Verbrauch..................................................................................... 11
Täglicher Gebrauch................................................................ 12-15
Reinigung und Pfl ege..............................................................16-18
Fehlerbehebung...................................................................... 19-21
Installation............................................................................... 22-24
Technische Daten ....................................................................... 25
Kundendienst............................................................................... 26

4 5
SicherheitshinweiseSicherheitshinweise
Bevor Sie das Gerät zum ersten Mal
anschalten achten Sie darauf, dass...
... alle Transportsicherungen ordnungsgemäß entfernt sind.
... das Stromkabel nicht in oder unter dem Gerät
eingeklemmt oder sonstwie beschädigt wird.
... die Steckdose mit einer 16-Ampere-Sicherung
abgesichert ist.
...das Gerät eine separate geerdete Steckdose hat.
... die Steckdose stets zugänglich ist.
... man am Stecker und nicht am Kabel zieht, um das Gerät
vom Stromnetz zu trennen.
... die Wasserschläuche fest angeschlossen sind und bei
geöffnetem Wasserhahn nirgends Wasser austritt.
... Sie das Gerät nur benutzen, wenn alle Anschlüsse
ordnungsgemäß installiert sind.
Denken Sie daran, dass Sie …
... keine Kinder oder nicht zurechnungsfähige Personen mit
dem Gerät oder dem Verpackungsmaterial spielen lassen.
... das Gerät weder Frost noch Hitze oder direktem Sonnen-
licht aussetzen.
... das Gerät keiner Nässe oder Feuchtigkeit aussetzen.
Falls das Gerät aus irgendeinem Grund nass werden sollte,
unterbrechen Sie die Stromversorung und lassen Sie es
von selbst wieder trocknen.
... das Gerät nicht anfassen oder benutzen, wenn Sie barfuß
sind oder nasse oder feuchte Hände oder Füße haben.
... keine leicht entflammbaren Wasch- oder Reinigungsmittel,
oder mit entzündlichen Stoffen verunreinigte Wäsche im
Umfeld der Maschine aufbewahren.
... keine entzündlichen Sprays in der Nähe des Geräts
benutzen.
... das Gerät nicht auf einen Teppich oder zu nah an eine
Wand oder ein Möbelstück stellen.
Im täglichen Gebrauch achten Sie darauf,
dass …
... Kinder nicht mit dem Gerät spielen!
... das Gerät nicht von Personen bedient wird, die dazu
körperlich oder geistig nicht in der Lage sind oder keine
Erfahrung damit haben.
... Reißverschlüsse geschlossen sind und lose Teile fixiert
werden, damit die Wäsche keinen Schaden nimmt.
Falls nötig, verwenden Sie ein Wäschenetz.
... Sie das Gerät nach jedem Waschgang ausschalten und den
Netzstecker ziehen. Dies dient sowohl Ihrer Sicherheit als
auch der Senkung Ihres Energie-Verbrauchs.
... Sie den unteren Teil der Tür trocken wischen.
... die Tür bei Nichtbenutzung leicht geöffnet bleibt, damit
sich keine unangenehmen Gerüche bilden.
... ein beschädigtes Stromkabel nur vom Hersteller, dem
Kundendienst oder einem entsprechenden Fachmann
ersetzt wird.
Denken Sie daran, dass Sie ...
... das Gerät nicht abdecken oder zustellen. Im Betrieb
entstehende Feuchtigkeit muss abtrocknen können!
... keine schweren, heißen oder feuchten Gegenstände oder
Hitzequellen auf das Gerät stellen.
... Schwämme oder Ähnliches nicht zu heiß waschen.
... nicht die Waschmittelschublade öffnen, während der
Waschvorgang läuft.
... nicht die Tür anfassen, solange der Waschvorgang läuft.
Die Tür wird heiß!
... nicht die Tür öffnen, solange der Wasserstand sichtbar
oberhalb der Türöffnung steht.
... die Tür des Geräts nicht mit Gewalt öffnen. Ein Sicher-
heitsmechanismus gibt die Tür erst eine gewisse Zeit
nach Beendigung des Waschvorgangs frei.

6 7
BedienblendeProduktbeschreibung
Zubehör
1x Einlaufschlauch 4x Abdeckkappen 1x Ablaufschlauch-
halterung
1x Bedienungs-
anleitung
Aufgrund technischer Änderungen kann diese Zeichnung ev. von dem von Ihnen erworbenen Modell abweichen
.
Waschmittelschublade
Beim Öffnen der Waschmittelschublade werden
drei Kammern sichtbar:
Kammer 1: Waschmittel Vorwäsche
Kammer 2: Waschmittel für Programme
Kammer 3: Weichspüler, Pfl egemittel, Duftstoffe usw.
Display
Ist das Gerät eingeschaltet, zeigt das Display zu jeder Zeit den aktuellen Gerätestatus
auf sechs unterschiedlichen Feldern an. (s. „nächste Seiten“). Im Programmablauf er-
lischt das Display nach einiger Zeit (Energiesparmodus). Ein Dreh am Programmwähler
reaktiviert es.
Programmwähler + Waschprogramme
Durch Drehen wird eines der 16 Programme (s. „Waschprogramme“) ausgewählt, die
Programm LED am Wähler und die Grundeinstellungen im Display leuchten auf.
„Start/Pause”
Drücken startet bzw. unterbricht das aktuell angezeigte Programm. Während des Pro-
grammablaufs leuchtet das Symbol, bzw. blinkt bei Unterbrechung.
„Ein/Aus”
Zum Einschalten Taste kurz betätigen, das Display leuchtet. Um Auszuschalten ist die
Taste länger (ca. 2 Sekunden) zu drücken. Läuft kein Programm, bzw. wird kein Pro-
gramm angewählt, schaltet sich das Gerät nach einiger Zeit automatisch ab.
1 Waschmittelschublade
2 Waschmaschinentür (Bullauge)
3 Abdeckplatte
4 Türgriff
5 Bedienblende
6 Ein/Aus
7 Serviceklappe
1 Transportsicherung (T1-T4)
2 Rückwand
3 Schrauben
hintere Abdeckung (S1-S4)
4 Stromkabel
5 Zulaufventil
6 Ablaufschlauch
1 Waschmittelschublade
2 Display
3 Programmwähler
4 Taste „Start/Pause“
5 Taste „Ein/Aus“
6 Funktionstasten a-f
a Optionen
b Auswahl
c Temperatur
d Schleudern (Drehzahl)
e Memo
f Zeitvorwahl (Startzeit)
负载
夜 洗
防皱浸泡
1400
不甩干
400
600
800
1000
1200
常温
90
20
30
60
40
70
预约时间剩余时间
加速洗
超净洗
加漂洗
高水位
1 2 3
Express 15'
Baby Care
Mix
Sport
Jeans
M
M
M
Baumwolle
Synthetik
Unter-
wäsche
Hygiene
Selbstreinigung
Schleudern/
Abpumpen
Hand-
wäsche
Fein-
wäsche
Ultra Weiß
Tägliche Wäsche
Wolle
Auswahl Optionen Temp.
Schleudern M emo
Zeitvorwahl
1 3 5 6
7
2 4
负载
夜 洗
防皱浸泡
1400
不甩干
400
600
800
1000
1200
常温
90
20
30
60
40
70
预约时间剩余时间
加速洗
超净洗
加漂洗
高水位
1 2 3
Express 15'
Baby Care
Mix
Sport
Jeans
M
M
M
Baumwolle
Synthetik
Unter-
wäsche
Hygiene
Selbstreinigung
Schleudern/
Abpumpen
Hand-
wäsche
Fein-
wäsche
Ultra Weiß
Tägliche Wäsche
Wolle
Auswahl Optionen Temp.
Schleudern M emo
Zeitvorwahl
6
a-f
1
2 3
4 5
T1
T2
S1
S2
S4
S3
T4
T3

8 9
Funktionstasten -
BedienblendeBedienblende -
Funktionstasten
„Optionen“ (Taste a)
Durch Drücken dieser Taste wird die aktuell angewählte
Option für das Programm ausgewählt, ein „Häkchen“, bzw.
„1“/„2“/„3“-Symbol leuchtet auf.
- „Kurz“ : Spart Zeit und Energie. Geeignet für leicht
verschmutzte Wäsche.
- „Intensiv“ : Intensiviert die Hauptwäsche. Geeignet für
starke Verschmutzung.
- „Spülstop“ : Die Wäsche verbleibt im letzten Spülwasser.
- „Knitterschutz“: Die Wäsche wird vom Programmende
bis zur Entnahme bewegt.
- „Signal“ : Aktiviert den Signalton Modus.
- „Spülen+“ : 1-3 zusätzliche Spülgänge waschen mögliche
Rückstände besser aus.
„Auswahl“ (Taste b)
Durch Drücken dieser Taste wird die aktuell leuchtende
Option ausgewählt. Das Symbol blinkt, zusätzlich leuchtet
ein „Häkchen“, oder ein „1“/„2“/„3“-Symbol auf. Die Option
ist nach 3 Sekunden, oder durch Drücken von „Optionen“
(Taste a) aktiviert, alle entsprechenden Symbole leuchten.
„Kindersicherung“ (Taste a + b)
Diese Funktion sperrt die Betätigung der Bedienblende. Nach
dem Start
nach Programmstart werden gleichzeitig die Tasten
tionen“ und „Auswahl“ für ca. 3 Sekunden gedrückt, das
Sperrsymbol leuchtet auf. Erneutes gleichzeitiges Drücken
hebt die Sperrung wieder auf.
„Temperatur“ (Taste c)
Durch Drücken dieser Taste wird die angezeigte maximale
Waschtemperatur verändert.
Hinweis: Anzeige
„
“
bedeutet, dass das Waschwasser
nicht aufgeheizt wird.
„Schleudern” (Taste d)
Durch Drücken dieser Taste wird die angezeigte Schleuder-
drehzahl verändert.
Hinweis: Anzeige
„
“
bedeutet, dass die Wäsche nicht
geschleudert wird.
„Memo” (Taste e)
Durch Drücken dieser Taste für ca. 2 Sekunden werden die
aktuellen Einstellungen auch als künftige Standardeinstellung
gespeichert. Zwei Signaltöne bestätigen die Veränderung.
Wird das Programm gestartet, oder ein nächstes Mal ge-
wählt sind diese Einstellungen aktiv.
„Zeitvorwahl“ - Startzeitvorw
ahl (Taste f)
Durch Drücken dieser Taste wird das Programm jeweils
um 30 Minuten, im Bereich 0,5-24 Std., später gestartet. Es
leuchtet das Tastensymbol und die aktuelle Startzeit auf. Bei
Programmstart wird zuerst der Countdown für die Zeitvor-
wahl und dann für die Restlaufzeit angezeigt. Das entspre-
chende Symbol leuchtet.
Hinweis:
Die aktuelle Einstellung ist gelöscht, wenn ein anderes
Programm gewählt, oder die Taste „Ein/Aus” für ca. 3
Sekunden gedrückt wird. Im laufenden Betrieb muss
vorher „Start/Pause“ gedrückt werden.
Für optimale Waschresultate hat jedes Programm von Haier empfohlene, eigene Vor-
einstellungen und Grenzwerte. Im Rahmen dieser Werkseinstellungen können einzelne
Programmparameter und zusätzliche Funktionen individuell verändert werden
(s. „Programme“ und „Funktionstasten“).
Türverriegelung Waschgang Kaltwaschgang
Kindersicherung Spülgang Kein Schleudergang
Schleudern/
Abpumpen
Tür offen Zeitanzeige Zeitvorwahl
Restlaufzeit
Zeitvorwahl
Gerätestatus Programmstatus Programmfunktion
Display Symbole
Kein Wasserzulauf
Memo
Baumwolle
Auswahl Optionen
Temp.
Schleudern M emo
a b
Baumwolle
Auswahl Optionen
Temp.
Schleudern
M emo
c d
Baumwolle
Auswahl Optionen Temp.
Schleudern
M emo
e
e f
„Op

10 11
Programme
1 Baumwolle bis 90°C 40°C Baumwolle 1200 U/min
2 Synthetik bis 60°C 30°C Synthetik 1000 U/min
3 Mix bis 60°C 40°C Baumw./ Synth. 1000 U/min
4 Wolle bis 40°C --- Wolle 600 U/min
5 Unterwäsche bis 60°C 40°C Unterwäsche 1000 U/min
6 Sport bis 40°C 30°C Sportbekleidung 1000 U/min
7 Jeans bis 60°C 40°C Jeans 1000 U/min
8 Hygiene bis 90°C 90°C Baumw./ Synth. 1000 U/min
9 Tägliche Wäsche bis 40°C 40°C Baumwolle 1000 U/min
10 Ultra Weiß bis 60°C 40°C Baumw./ Synth. 1000 U/min
11 Express 15 bis 30°C 20°C Baumw./ Synth. 1000 U/min
12 Baby Care bis 90°C 90°C Baumw./ Synth. 1000 U/min
13 Feinwäsche bis 40°C 30°C Seide , Wolle 600 U/min
14 Handwäsche bis 40°C 30°C Baumwolle 800 U/min
15 Schleudern --- --- --- 1200 U/min
Abpumpen
16 Selbst- bis 90°C 90°C --- 1000 U/min
reinigung
Programm Temperatur Vorein-
Empfohlene Schleuderdreh-
Maximal stellung Wäsche zah
l
voreingestellt
2 3 1
Waschprogramme
1 Vorwaschmittel
2 Waschmittel
3 Weichspüler
Verbrauch
Programm Energie-
verbrauch
Wasser-
verbrauch
Programm-
Dauer
Temp.
Max. Beladung
Schleuder-
wirkung
%
kg
kWh
L
°C
h:min
*
Hinweis:
Prüfprogramm für die Energieetikettierung nach 2010/30EU:
Baumwolle 60°C/40°C mit max. Schleuderdrehzahl und aktivier-
ter Intensivfunktion (Stufe 3) ohne „Smart Dosing“.
Die Standard 60°C u. 40°C Baumwoll-Programme sind, bezogen auf den
Energie- und Wasserverbrauch, die effizientesten Programme zur Reinigung
normal verschmutzer Wäsche aus Baumwolle. Die tatsächliche Waschtem-
peratur kann dabei von der am Gerät eingestellten Temperatur abweichen.
Die Verbrauchsangaben sind Richtwerte und können in Abhängigkeit der örtlichen Gegebenheiten abweichen.
140
50
dB
70
dB
A
B
CDEFG
kWh/annum
9240
HW70-B14266
7,0
kg
2010/1061
A
+++
A
++
A
A
B
C
D
+
A
+++
ENERG
kg
ENER
· N P EIA
ENERGIJA·ENERGY·ENERGIE
ENERGI
L/annum
Hygiene 2 2,00 36,0 90 2:03 ---
Jeans 4 0,56 40,0 40 1:27 ---
Sport 2 0,26 35,0 30 0:47 ---
Unterwäsche 4 0,50 40,0 40 1:01 ---
Wolle 1 0,10 50,0 --- 0:37 ---
Mix 4 0,56 34,0 40 Auto ---
Synthetik 4 0,25 46,0 30 Auto ---
Baumwolle 40* 3,5 0,48 30,0 40 Auto <53
Baumwolle 60* 3,5 0,66 31,0 60 Auto <53
Baumwolle 60* 7 0,65 39,0 60 Auto <53
Tägliche Wäsche 4 0,58 46,0 40 1:20 ---
Ultra Weiß 2 0,60 45,0 40 1:25 ---
Express 15 1 0,20 20,0 20 0:15 ---
Baby Care 4 2,00 67,5 90 2:03 ---
Feinwäsche 1 0,25 50,0 30 0:46 ---
Handwäsche 2 0,25 36,0 30 0:48 ---
Schleudern 7 0,10 --- --- 0:10 ---
Abpumpen
Selbstreinigung --- 1,80 15,0 90 1:20 ---
OptionalJa Nein
La page est en cours de chargement...
La page est en cours de chargement...
La page est en cours de chargement...
La page est en cours de chargement...
La page est en cours de chargement...
La page est en cours de chargement...
La page est en cours de chargement...
La page est en cours de chargement...
La page est en cours de chargement...
La page est en cours de chargement...
La page est en cours de chargement...
La page est en cours de chargement...
La page est en cours de chargement...
La page est en cours de chargement...
La page est en cours de chargement...
La page est en cours de chargement...
La page est en cours de chargement...
La page est en cours de chargement...
La page est en cours de chargement...
La page est en cours de chargement...
La page est en cours de chargement...
La page est en cours de chargement...
La page est en cours de chargement...
La page est en cours de chargement...
La page est en cours de chargement...
La page est en cours de chargement...
La page est en cours de chargement...
La page est en cours de chargement...
La page est en cours de chargement...
La page est en cours de chargement...
La page est en cours de chargement...
La page est en cours de chargement...
La page est en cours de chargement...
La page est en cours de chargement...
La page est en cours de chargement...
La page est en cours de chargement...
La page est en cours de chargement...
La page est en cours de chargement...
La page est en cours de chargement...
La page est en cours de chargement...
La page est en cours de chargement...
La page est en cours de chargement...
La page est en cours de chargement...
La page est en cours de chargement...
La page est en cours de chargement...
La page est en cours de chargement...
La page est en cours de chargement...
La page est en cours de chargement...
La page est en cours de chargement...
La page est en cours de chargement...
La page est en cours de chargement...
La page est en cours de chargement...
La page est en cours de chargement...
La page est en cours de chargement...
La page est en cours de chargement...
La page est en cours de chargement...
La page est en cours de chargement...
La page est en cours de chargement...
La page est en cours de chargement...
La page est en cours de chargement...
La page est en cours de chargement...
La page est en cours de chargement...
La page est en cours de chargement...
La page est en cours de chargement...
La page est en cours de chargement...
La page est en cours de chargement...
La page est en cours de chargement...
La page est en cours de chargement...
La page est en cours de chargement...
La page est en cours de chargement...
La page est en cours de chargement...
La page est en cours de chargement...
La page est en cours de chargement...
La page est en cours de chargement...
La page est en cours de chargement...
La page est en cours de chargement...
La page est en cours de chargement...
La page est en cours de chargement...
La page est en cours de chargement...
La page est en cours de chargement...
-
 1
1
-
 2
2
-
 3
3
-
 4
4
-
 5
5
-
 6
6
-
 7
7
-
 8
8
-
 9
9
-
 10
10
-
 11
11
-
 12
12
-
 13
13
-
 14
14
-
 15
15
-
 16
16
-
 17
17
-
 18
18
-
 19
19
-
 20
20
-
 21
21
-
 22
22
-
 23
23
-
 24
24
-
 25
25
-
 26
26
-
 27
27
-
 28
28
-
 29
29
-
 30
30
-
 31
31
-
 32
32
-
 33
33
-
 34
34
-
 35
35
-
 36
36
-
 37
37
-
 38
38
-
 39
39
-
 40
40
-
 41
41
-
 42
42
-
 43
43
-
 44
44
-
 45
45
-
 46
46
-
 47
47
-
 48
48
-
 49
49
-
 50
50
-
 51
51
-
 52
52
-
 53
53
-
 54
54
-
 55
55
-
 56
56
-
 57
57
-
 58
58
-
 59
59
-
 60
60
-
 61
61
-
 62
62
-
 63
63
-
 64
64
-
 65
65
-
 66
66
-
 67
67
-
 68
68
-
 69
69
-
 70
70
-
 71
71
-
 72
72
-
 73
73
-
 74
74
-
 75
75
-
 76
76
-
 77
77
-
 78
78
-
 79
79
-
 80
80
-
 81
81
-
 82
82
-
 83
83
-
 84
84
-
 85
85
-
 86
86
-
 87
87
-
 88
88
-
 89
89
-
 90
90
-
 91
91
-
 92
92
-
 93
93
-
 94
94
-
 95
95
-
 96
96
-
 97
97
-
 98
98
-
 99
99
-
 100
100


Haier HW70-B14266 Manuel utilisateur
- Catégorie
- Machines à laver
- Taper
- Manuel utilisateur
dans d''autres langues
- italiano: Haier HW70-B14266 Manuale utente
- English: Haier HW70-B14266 User manual
- Deutsch: Haier HW70-B14266 Benutzerhandbuch
- Nederlands: Haier HW70-B14266 Handleiding
- polski: Haier HW70-B14266 Instrukcja obsługi
Documents connexes
-
Haier HW80-B14266 Manuel utilisateur
-
Haier HW80-BD1626 Manuel utilisateur
-
-
Haier HW80-B1486 Le manuel du propriétaire
-
-
Haier HW80-BP16636N Manuel utilisateur
-
Haier HW80-BP16636 Manuel utilisateur
-
Haier HW80-B14636N Manuel utilisateur
-
Haier HWD90-BP14636N Manuel utilisateur
-