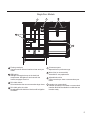
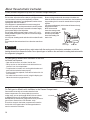
GE Appliances GFE24JGKWW Le manuel du propriétaire
- Catégorie
- Frigos
- Taper
- Le manuel du propriétaire

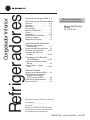
Ref r i g er a t o r s
Bottom Freezer
238C5511P001 Pub No. 49-60758 02-16 GE
Write the model and serial
numbers here:
Model # ____________________
Ser i a l # ____________________
Find t hese n um ber s on a label
on the left side, near the middle
of the refrigerator compartment.
Owner’s Manual and
Installation Instructions
GE, GE Pr o f i l e a n d GE Ca f é
Models 21, 24 & 25 cuft
Sa f et y I n s t r u c t i o n s . . . . . . . . . . . .2 , 3
Oper at ing Inst r uct ions
Feat ur es . . . . . . . . . . . . . . . . . . . . . . . . . .4, 5
Co nt r o l s . . . . . . . . . . . . . . . . . . . . . . . . . .6 , 7
Dispenser . . . . . . . . . . . . . . . . . . . . . . . . . . . 8
Water Filter . . . . . . . . . . . . . . . . . . . . . . . . . 9
Sh e lv e s a n d Bi n s ...................10
Pa ns . . . . . . . . . . . . . . . . . . . . . . . . . . . . . . .1 1
Freezer ........................12, 13
Aut omat ic Ice maker ...............14
Ca r e a n d Cl ea n i ng ................ 15
Re p la c i ng t h e Li g ht s ................16
Installation Instructions
Pr ep a r i ng t o In st a l l t h e
Re f r i g e r a t o r . . . . . . . . . . . . . . . . . . . . . . . . 1 7
Appliance Dimensions ..............18
Installing the Refrigerator . . . . . . . 19-32
Installing the Water Line . . . . . . . . 33-35
Tr oubleshoot i ng Tips . . . . . . 37, 38
Normal Operating Conditions . . . . . . .36
Se r v i c e - Tr u t h o r M y t h .........39, 40
Consu mer Suppor t
Warranty ..........................41
MWF Water Filter Cartridge Limited
Warranty ........................43
Per f or m a nc e Da t a Sheet ...........42
Co nsu m er Su p p or t ........Back Cover

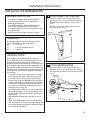
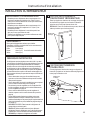
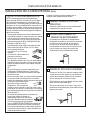
IMPORTANT SAFETY INFORMATION.
READ ALL IN STRUCTION S BEFORE USIN G.
2
GE Ap plia n ces w eb sit e
For m or e i nf or mat i on on your r ef ri ger at or ’s oper at i on, vi si t www.GEAp pl i a n ces.com or call
800.GECARES (800.432.2737). In Canada visit GEAppl iances.ca or call 800.561.3344.
Th i s i s t h e sa f et y a ler t sym b ol . Th i s sy m bo l a l er t s y ou t o p ot en t i a l h a za r ds t ha t c an ki l l o r h u r t yo u a nd o t h er s. Al l
safety messages will follow the safety alert symbol and the word “DANGER”, “WARNING”, or “CAUTION”. These words are
defined as:
Indicates a hazardous situation which, if not avoided, will result in death or serious injury.
Indicates a hazardous situation which, if not avoided, could result in death or serious injury.
Indicates a hazardous situation which, if not avoided, could result in minor or moderate injury.
REFRI GERATOR SAFETY I N FORMATI ON
SA FETY
WARNING
DANGER
CAUTION
IMPORTANT SAFETY INSTRUCTIONS
To reduce the risk of fire, explosion, electric shock, or injury when using your
refrigerator follow these basic safety precautions:
WARNING
Do not clean glass shelves or covers with warm water
when they are cold. Glass shelves and covers may break if
exposed to sudden temperature changes or impact, such
as bumping or dropping. Tempered glass is designed to
shatter into many small pieces if it breaks.
Keep fingers out of the “pinch point” areas; clearances
between the doors and between the doors and cabinet are
necessarily small. Be careful closing doors when children
are in the area.
Do not refreeze frozen foods which have thawed
completely.
Do not touch the cold surfaces in the freezer compartment
when hands are damp or wet, skin may stick to these
extremely cold surfaces.
In refrigerators with automatic icemakers, avoid contact
with the moving parts of the ejector mechanism, or with
the heating element that releases the cubes. Do not place
fingers or hands on the automatic ice making mechanism
while the refrigerator is plugged in.
Use a sturdy glass when dispensing ice (on models with ice
dispenser
To reduce the risk of injury when using your refrigerator, follow these basic
safety precautions.
This refrigerator must be properly installed and located in
accordance with the Installation Instructions before it is
used.
Unplug the refrigerator before making repairs, replacing a
light bulb, or cleaning.
Note: Power to the refrigerator cannot be disconnected by
any setting on the control panel.
Note: Rep a i r s m u s t b e p er f o r m ed b y a q u al i f i ed ser vi c e
professional.
Replace all parts and panels before operating.
Do not store or use gasoline or other flammable vapors and
liquids in the vicinity of this or any other appliance.
Because of potential safety hazards under certain
conditions, we strongly recommend against the use of an
extension cord. However, if you must use an extension cord,
it is absolutely necessary that it be a UL-listed (in the United
St a t es ) o r a CSA cer t i f ie d (i n Ca n a d a ), 3- w ir e g r o u n d i n g t yp e
appliance extension cord having a grounding type plug
and outlet and that the electrical rating of the cord be 15
amperes (minimum) and 120 volts.
To prevent suffocation and entrapment hazards to
children, remove the fresh food and freezer doors from any
refrigerator before disposing of it or discontinuing its use.
Do not allow children to climb, stand or hang on the door
handles or the shelves in the refrigerator. They could
seriously injure themselves.
CAUTION

IMPORTANT SAFETY INFORMATION.
READ ALL IN STRUCTION S BEFORE USIN G.
3
WARNING
Explosion Hazard.
Keep flammable materials and vapors, such as gasoline, away from refrigerat or. Failure t o do so can
result in fire, explosion, or death.
INSTALLATION
Do not, under any circumst ances, cut or remove the third (ground) prong from the power cord.
For per sonal saf et y, t hi s a ppl i an ce m u st b e p r oper l y g r oun ded .
Th e p o w e r c o r d o f t h i s a p p lian ce i s eq u ippe d wit h a
3-prong (grounding) plug which mates with a standard
3-prong (grounding) wall outlet to minimize the
possibility of electric shock hazard from this appliance.
Have the wall outlet and circuit checked by a qualified
electrician to make sure the outlet is properly
grounded.
Where a standard 2-prong wall outlet is encountered,
it is your personal responsibility and obligation to have
it replaced with a properly grounded 3-prong wall
outlet. Do not use an adapter.
Th e r e fr i g e r a t o r sho ul d a lw a y s be p l u g g e d i n t o i t s o w n
individual electrical outlet which has a voltage rating
that matches the rating plate.
A 115 Volt AC, 60 Hz, 15- or 20- amp fused, grounded
electrical supply is required. This provides the best
performance and also prevents overloading house
wiring circuits which could cause a fire hazard from
overheated wires.
Never unplug your refrigerator by pulling on the power
cord. Always grip plug firmly and pull straight out from
the outlet.
Rep a ir o r r e p l a ce i m m ed i a t el y a l l p o w er c o r ds t h a t
have become frayed or otherwise damaged. Do not
use a cord that shows cracks or abrasion damage
along its length or at either end.
When moving the refrigerator away from the wall, be
careful not to roll over or damage the power cord.
CONNECTING ELECTRICITY
WARNING
Electrical Shock Hazard.
Pl ug i nt o a gr o un d ed 3- p r on g ou t l et
Do not remove the ground prong
Do not use an adapter
Failur e t o f ollow t hese inst r uct ions can result in
death, fire, or electrical shock.
SA FETY (CONT.)
READ AN D FOL LOW TH IS SAFETY IN FORM ATION CAREFULL Y.
SAVE TH ESE I NSTRUCTI ONS
WARNING
Suffocation and child entrapment hazard.
Re m o v e f r es h - f o od an d f r e ez e r do or s f r om t h e r e f r i g e r a t o r , p r i o r t o d i s po s a l . Fa i lu r e t o d o s o c a n
result in child entrapment which can lead to death or brain damage.
Ch i l d e n t rap m e n t a n d su f focat i on a r e not p r obl e m s
of the past. Junked or abandoned refrigerators are
still dangerous even if they will sit for “just a few
days.” If you are getting rid of your old refrigerator,
please follow the instructions below to help prevent
accidents.
Bef or e You Thr ow Away Your Ol d Ref r i ger at or or
Fr eezer :
Take off the fresh food and freezer doors.
Leave the shelves in place so that children may
not easily climb inside.
Ref r i g er a n t s
All refrigeration products cont ain refrigerant s,
which under federal law must be removed prior
to product disposal. If you are getting rid of an old
refrigeration product, check with the company
handling the disposal about what to do.
PROPER DI SPOSAL OF YOUR OLD REFRIGERATOR
IMPORTANT:

Sp a c e - s a v i n g i c e m a k e r (o n so m e m o d e l s )
Ice maker and bin are located on the door creating
more usable storage space.
LED light ing
LED lights in the fresh food compartment are located
at the top center and on the left and right sides of
climate zone pans. LED lights are also located in the
freezer; see pages 12 and 13.
Full -wi dt h dr aw er
A full-width drawer that can accommodate larger
items is located at the bottom of the fresh food
compartment.
QuickSpace™ shelf (on some models)
Funct ions as a nor mal f ull -sized shelf w hen needed
and easily slides back to store tall items below.
Re m o v a b l e/ a d j u s t a b l e d o o r b i n s
Ca n b e m o ved u p o r do w n t o a c co m m o d a t e yo u r
needs.
Cl i ma t e zon e dr a wer s
Se p a r a t e p a n s f o r p r o d u c e st o r a g e .
Water filter
Accessible for easy replacement .
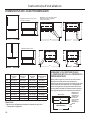
4
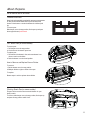
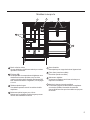
About t he feat ures.
French Door Models

Floating snack pan
Ca n b e m o ved t o d i f f e ren t l o c at i o ns t o b est ser v e yo u r
needs.
LED light ing
LED light is locat ed at t he top of t he fresh food
compartment. LED lights are also located in the
freezer; see pages 12 and 13.
Full -wi dt h shel ves
Full- w id t h shelves t hat can accom modat e larger it em s.
Full-width gallon door bins
Nonadjustable full-width door bins that will hold gallon
containers.
Cl i ma t e zon e pans
Se p a r a t e b i n s f o r p r o d u c e s t o r a g e .
Water filter (on some models)
Accessible for easy replacement .
Adjustable door bins
Ca n b e m o ved u p o r do w n t o a c co m m o d a t e yo u r
needs.
Icemaker (on some models)
Icemaker is located in the freezer on some models.
Icemaker Kit IM-4D is available for models that are
icemaker-ready.
5
Single Door Models

6
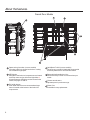
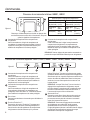
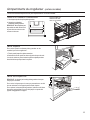
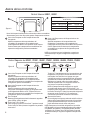
About t he cont rols.
Fi gur e A
Fi gur e B
Knob Position Temperature Guide
Re f r i g e r a t o r Fr e eze r
Co l dest 3 4° F (1 .1°C) Co l dest - 6 °F (- 2 1.1 °C)
Co l der 3 7° F (2 .8°C) Co l der 0 °F (- 1 7.8 °C)
Co l d 4 4° F (6 .7°C) Co l d 6 °F (- 1 4.4 °C)
Note: Do not block air outlet by placing food items
directly against it. Erratic temperatures may result.
Freezer Compartment Temperature Control
Adjust freezer compart ment t emperat ure. The freezer
temperature is preset in the factory at the Col der
position. Allow 24 hours for temperature to stabilize to
the preset recommended setting.
Fresh Food Compartment Temperature Control
Adjust fresh food compartment temperat ure. The fresh
food temperature is preset in the factory at the Colder
position. Allow 24 hours for temperature to stabilize to
the preset recommended setting.
NOTE: Pow e r t o t h e r e f r i g e r a t o r c a n n o t b e d i sc o n n ec t ed b y
any setting on the control panel.
Freezer Compartment Temperature Control
Adjust freezer compart ment t emperat ure. The freezer
temperature is preset in the factory at 0°F. Allow
24 hours for temperature to stabilize to the preset
recommended setting.
Fresh Food Compartment Temperature Control
Adjust fresh food compartment temperat ure. The fresh
food temperature is preset in the factory at 37°F. Allow
24 hours for temperature to stabilize to the preset
recommended setting.
Water Filter
Pr ess a nd h ol d 3 sec on d s t o r eset t h e Wa t er Fi lt er.
Turbo Cool
To s e t t h e Tur b oCo ol ™, press the Tur b o Cool pad for 3
seconds. The display will show tc.
Tur b oCool ™ rapidly cools the refrigerator compartment
in order to more quickly cool foods. Use Tu r boCo ol ™
when adding a large amount of the food to the
refrigerator compartment, putting away foods after
they have been sitting out at room temperature, or
when putting away warm leftovers. It can also be used if
the refrigerator has been without power for an extended
period.
NOTE: The r ef r i g er a t o r t em p er a t u r e c an n ot b e
changed during Tur bo Coo l ™. The freezer temperature
is not affected during Tu r bo Cool . When opening the
refrigerator door during Tu r bo Cool ™, the fans will
continue to run if they have cycled on.
Door Alarm
To s e t t h e al a r m , p r e s s t h e Door Alarm pad. This alarm
will sound if either door is open for more than 2 minutes.
Th e b eep i ng st op s w h en yo u c lo se t he d oo r.
NOTE: To p u t t h e r e f r i g e r a t o r c o n t r o l i n t h e OFF position,
simultaneously touch the words Fr eezer and Fr i dg e for 3
seconds. Po w er t o t h e r e f r i g er a t o r ca n n o t b e d i sc o n n ec t ed
by any setting on the control panel.
GBE21, ABE21 Internal Control
GDE21, PDE21, GNE21, PNE21, GDE25, GNE25, PNE25, CNE25 To p Con t r o l

NOTE: The refrigerator is shipped with protective film covering the temperature controls.
If this film was not removed during installation, remove it now.
Fi gur e C
7
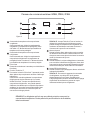
Freezer Compartment Temperature Control
Adjust freezer compart ment t emperat ure. The freezer
temperature is preset in the factory at 0°F. Allow
24 hours for temperature to stabilize to the preset
recommended setting.
Fresh Food Compartment Temperature Control
Adjust fresh food compartment temperat ure. The fresh
food temperature is preset in the factory at 37°F. Allow
24 hours for temperature to stabilize to the preset
recommended setting.
Water Filter
Pr ess a nd h ol d 3 sec on d s t o r eset t h e Wa t er Fi lt er.
Turbo Cool
To s e t t h e Tur b oCo ol ™, press the Alar m pad for 3
seconds. The display will show tc.
Tur b oCool ™ rapidly cools the refrigerator compartment
in order to more quickly cool foods. Use Tu r boCo ol ™
when adding a large amount of the food to the
refrigerator compartment, putting away foods after
they have been sitting out at room temperature, or
when putting away warm leftovers. It can also be used if
the refrigerator has been without power for an extended
period.
NOTE: The r ef r i g er a t o r t em p er a t u r e c an n ot b e
changed during Tur bo Coo l ™. The freezer temperature
is not affected during Tu r bo Cool . When opening the
refrigerator door during Tu r bo Cool ™, the fans will
continue to run if they have cycled on.
Alarm
Pr ess t he Alarm pad to toggle the door alarm between
off and on. The alarm will sound if either door is left open
for more than 2 minutes. The beeping stops when you
close the door.
Lock
Pr ess a nd h ol d t h e Lock pad for 3 seconds to lock out
ice and water dispenser and all other controls. Press and
hold to unlock the controls.
LED dispenser Light
Pr ess t he Light pad to turn your dispenser light on and
off.
NOTE: To p u t t h e r e f r i g e r a t o r c o n t r o l i n t h e OFF position,
simultaneously touch the words Fr eezer and Fr i dg e
for 3 seconds. Po w e r t o t h e r e f r i g e r a t o r c a n n o t b e
disconnected by any setting on the control panel.
GFE24, PFE24, CFE24 Ex t e r n a l Con t r o l

8
About t he dispenser. (on some models)
Pr e ss t h e g l a ss g en t l y a g a i n s t t h e d i s p ens er cr a d l e .
Th e s p i l l sh e l f i s n o t se l f - d r a i n i n g . To re d u c e w a t er sp o t t in g , t h e
shelf should be cleaned regularly.
If no water is dispensed when the refrigerator is first installed,
there may be air in the water line system. Press the dispenser
paddle for at least five minutes to remove trapped air from the
water line and to fill the water system. To flush out impurities in
the water line, throw away the first six full glasses of water.
WARNING
Laceration Hazard
Never put fingers or any other object into ice crusher
discharge opening. Doing so can result in contacting the ice
crushing blades and lead to serious injury or amputation
Use a sturdy glass when dispensing ice. A delicate glass may
break and result in personal injury.
To r em ove Di spenser Tr ay
Pull Dispenser Tray out.
To r ei nst al l Dispenser Tr a y
Push in until it is firmly in place.
Door Ice Bin
1. Open left fresh food door.
2. Pull down latch to release bin
door.
3. Using handhold, lift ice bucket
up and out to clear locators in
bottom of bin.
4. To replace the ice bucket, set
it on the guide brackets and
push until the ice bucket seats
properly.
5. If bucket cannot be replaced,
rotate the Ice Bucket Fork 1/4
turn clockwise.
Water & Ice Dispenser
(See About the controls)
Internal Water Dispenser
(on some models)
Th e w a t er d isp en ser i s l oc a t ed o n t he l ef t w a ll i nsi d e t h e
refrigerator compartment.
To di spen se w at er :
1. Hold the glass against the recess.
2. Push the water dispenser button.
3. Hold the glass underneath the dis-
penser for 2–3 seconds after releas-
ing the dispenser button. Water may
continue to dispense after the button
is released.
If no water is dispensed when the
refrigerator is first installed, there may be air in the water line
system. Press the dispenser button for at least 5 minutes to
remove trapped air from the water line and to fill the water
system. During this process, the dispenser noise may be loud
as the air is purged from the water line system. To flush out
impurities in the water line, throw away the first 6 glassfuls of
water.
NOTE: To a v o i d w a t er d e p o s i t s, t h e d i sp e n s er s h ou l d b e
cleaned periodically by wiping with a clean cloth or sponge.
Important Facts About Your Dispensers
Do not add ice from trays or bags to the door ice maker
bucket. It may not crush or dispense.
Avoid overfilling glass with ice and use of narrow glasses.
Backed-up ice can jam t he chut e or cause t he door in t he
chute to freeze shut. If ice is blocking the chute remove the ice
bucket, poke it through with a wooden spoon.
Beverages and foods should not be quick-chilled in the
door ice maker bin. Cans, bottles or food packages in the
storage drawer may cause the ice maker or auger to jam.
To keep dispensed ice from missing the glass, put the glass
close to, but not touching, the dispenser opening.
Some crushed ice may be dispensed even though you
selected CUBED I CE. Th i s happe n s o c c a si o nal l y w h e n a f ew
cubes accidentally get directed to the crusher.
After crushed ice is dispensed, some water may drip from the
chute.
Som et i m es a s m a l l m o u n d of s n ow w i l l f or m o n t h e d o o r i n t h e
ice chute. This condition is normal and usually occurs when you
have dispensed crushed ice repeatedly. The snow will eventually
evaporate.
Dispenser
Tray
Ice bucket
fork
Latch
Ice bucket

9
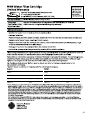
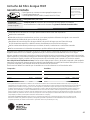
About t he GE Appliances
®
MWF water filter cartridge.
Water Filter Cartridge
Th e w a t er f i l t er ca r t r i d ge is lo ca t ed i n ba c k up p er r i g ht
corner of the refrigerator compartment.
When to replace the filter on models with a
replacement indicator light
Th er e i s a r ep la cem en t in d ic at or li g ht f o r t he w a t er f i lt er
cartridge on the dispenser. A red light will start blinking to tell
you that you need to replace the filter soon.
Th e f il t er ca r t r i d ge sh o ul d b e r ep l ac ed w h en t h e r ep l ac em en t
indicator light turns red or if the flow of water to the dispenser
or icemaker decreases.
When to replace the filter on models without a
replacement indicator light
Th e f il t er ca r t r i d ge sh o ul d b e r ep l ac ed ever y si x mo n t h s
or earlier if the flow of water to the dispenser or icemaker
decreases.
Removing the filter cartridge
If you are replacing the cartridge, first remove the old one by
slowly turning it to the left. Do not pull down on the cartridge.
A small amount of water may drip down.
NOTE: To reduce the risk associated with property damage
due to water leakage, read and follow instructions before
installation and use of this system. Installation and use MUST
comply with all sate and local plumbing codes.
CAUTION
If air has been trapped in the system,
the filter cartridge may be ejected as it is removed. Use
caution when removing.
Installing the Filter Cartridge
1. Fill the replacement cartridge with water from the tap to
allow for better flow from the dispenser immediately after
installation.
2. Line up the arrow on the cartridge and the cartridge holder.
Pl ac e t h e t o p o f t h e n ew ca r t r i dg e u p i nsi d e t h e h ol d er . Do
not push it up into the holder.
3. Slowly turn it to the right until the filter
cartridge stops. DO NOT OVERTIGHTEN. As
you turn the cartridge, it will automatically
raise itself into position. The cartridge will
move about a 1/2 turn.
4. Run water from the dispenser for 1-1/2
gallons (about three minutes) to clear the
system and prevent sputtering.
5. Press and hold the RESET WATER FILTER pad (on some
models) on the dispenser for three seconds.
NOTE: A newly inst alled wat er f ilt er cart ridge may cause wat er
to spurt from the dispenser.
Filter Bypass Plug
Yo u m u s t u s e t h e f i l t e r b y p a s s p l u g w h en a r e p l a c e m en t f i l t e r
cartridge is not available. The dispenser and the icemaker will
not operate without the filter or filter bypass plug.
WARNING
To reduce the risk associated with choking, do not allow children under 3 years of age to have access to small parts
during the installation of this product. Th e d i spo sa bl e f i lt er ca r t r i d ge sh o ul d b e r ep l ac ed ev er y 6 m o n t h s a t t h e r a t ed
capacity, or sooner if a noticeable reduction in flow rate occurs.
For t he maximum benef it of your f ilt r at ion syst em , GE r ecom mends t he use of GE- branded f ilt ers onl y. Using GE- branded
filters in GE and Hotpoint
®
refrigerators provides optimal performance and reliability. GE filters meet rigorous industry NSF
standards for safety and quality that are important for products that are filtering your water. GE has not qualified non-GE-
branded filters for use in GE and Hotpoint refrigerators and there is no assurance that non-GE-branded filters meet GE’s
standards for quality, performance and reliability.
If you have questions, or to order additional filter cartridges, visit our website at www.gewaterfilters.com or call
GE Parts and Accessories, 800.626.2002 (Canada 1.800.626.2002 or geappliances.ca/en/products/parts-filters-
accessories or call 1.800.661.1616).
Ca r t r i d ge
Holder
Filt er Bypass
Pl ug
Sm a r t W a t e r

Rea r r a n g i n g t h e Ref r i g er a t o r Sh el v es
Sh el ve s i n t h e r e f r i g er a t o r co m p a r t m en t a r e a d j u s t a b l e .
To r em ove t he shel ves:
1. Remove all items from the
shelf.
2. Tilt the shelf up at the front.
3. Lift the shelf up at the back
and bring the shelf out.
To r ep la ce t he shelves:
1. While tilting the shelf up, insert the top
hook at the back of the shelf in a slot on
the track.
2. Lower t he front of the shelf unt il the
bottom of the shelf locks into place.
Adjust able Door Bins (on some models)
To r em ove: Lift the bin st raight up; t hen pull out.
To r ep la ce: Engage the bin in the molded supports on the door
and push down to lock in place.
Non-Adjustable Ga l l o n Doo r Bi ns (on some models)
To r em ove: Lift the bin st raight up; t hen pull out.
To r ep la ce: Engage the bin in the molded supports on the door
and push down to lock in place.
10
About t he shelves and bins
Not all features are on all models.
Qui ck Spa ce Shelf (on some m odels)
Th i s she l f sp l i t s i n h al f
and slides under itself for
storage of tall items on the
shelf below.
Th i s she l f c a n b e r e m o v ed
and replaced or relocated.
NOTE: Th e bac k h a l f o f t h e
Qui ck Spa ce Sh el f is not
adjustable.

Cl i ma t e Zone Pa ns
Keep f ruit s and veget ables organized in separat e compart ment s
for easy access. Excess water that may accumulate in the
bottom of the drawers or under the drawers should be wiped
dry.
To r emove pan:
Sl i d e t h e p a n o u t t o t h e s t o p p os i t i on , l i f t t h e p a n u p a n d p a s t
the stop position and pull forward
Float i ng Snack Pan (on some models)
Th i s p a n c an b e m o v ed t o t h e m o st u sef u l l o cat i o n f o r y o u r
family’s needs.
To r emove, slide the pan out to the stop position, lift the pan up
and past the stop position and lift it out.
Full -Width Pan (on some models)
To r emove pan:
1. Pull the pan out to the stop position.
2. Lift the front of the drawer up and out.
To r eplace pan:
1. Place back of the drawer in first and rotate drawer front
down to seat it on the slides.
2. Push the drawer in to the closed position.
How t o Remove and Replace Drawer Divider
To r em ove:
1. Pull the drawer out to the stop position.
2. Slide pan divider to right to release it from pan.
To r ep la ce:
Rever se st ep s 1 a n d 2 t o r ep l a c e d r aw er d i v i d er .
11
About t he pans.
Not all features are on all models.

12
About t he freezer drawer. (on some m odel s)
FREEZER BASKETS
1. An ice bucket in the top basket
(on som e mo del s).
2. A top full-width basket.
3. A bottom full-width basket (with
divider - in some models).
NOTE: Do not fill baskets higher than
the rim of the basket. This may cause
baskets to stick or jam when opening
or closing.
Top Basket Removal
To r emove t he t op f ull-wi dt h basket on f reezer dr awer
models:
1. Pull the basket out to the stop location.
2. Lift basket up to release it from the slides.
When replacing the basket, make sure that the basket remains
mounted on the side rails and over the slides of the bottom
basket.
NOTE: Always be sure t o fully close t his basket .
Bot t om Basket Removal
To r emove t he bot t om f ul l-wi dt h basket on f reezer dr awer
models:
1. Open the bottom freezer drawer until it stops.
2. Remove the top freezer basket.
3. The bottom freezer basket rests on the inside tabs on the
drawer slides.
4. Lift the front of the basket and pull forward.
5. Release the pin from the slot to remove the basket.
When replacing the bottom full-width basket, tilt the basket
back and lower it into the drawer. Rotate the basket to a
horizontal position and press down. Make sure to place the pin
back into the slot.
NOTE: Always be sure that the basket is seated on the bracket
tabs before sliding the drawer back into the freezer.
Not all features are on all models.
Appearance and
features may vary
1
2
3
Ice Bucket
(on som e models)
LED lights are located
on both sides of the
freezer
To p Ba s k e t
Bottom
Basket

13
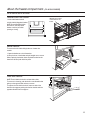
About t he freezer compart ment . (on som e m odel s)
FREEZER SHELF AND BASKET
1. A full-width fixed wire shelf
2. A full-width sliding plastic basket
NOTE: Do not fill baskets higher
than the rim. This may cause
basket to stick or jam when
opening or closing.
Basket Removal
To r emove t he full- widt h sl idi ng basket on f r eezer door
models:
1. Open the basket out to its full extension.
2. Lift up the front of the basket and pull straight out to remove.
When replacing the basket, insert the plastic basket into the
lower liner rails and push back into place.
Fixed Shelf Removal
NOTE: Th e f u l l- w i d t h w i r e sh e l f i s n o t i n t e n d e d t o sl i d e .
To r emove for cleani ng, push the shelf to one side while then
pull up on the opposite side and out to remove.
To r eplace t he full-widt h wir e shelf , insert one side of the
shelf into the supports, pushing the shelf to that side until the
opposite side will fit into its supports.
Not all features are on all models.
1
2
LED lights are located
on both sides of the
freezer

14
About t he aut omat ic ice maker.
A newly installed refrigerator may t ake 12 to 24 hours t o begin making ice.
Aut omat ic Ice maker (on some models)
Th e i c e m ak e r w i ll pr o duc e se v en c ube s p e r cy c le a p pr o x i m a t e l y
100–130 cubes in a 24-hour period, depending on freezer
compartment temperature, room temperature, number of door
openings and other use conditions.
If the refrigerator is operated before the water connection is
made to the ice maker, set the power switch in the OFF position.
When the refrigerator has been connected to the water supply,
set the power switch to the ON position.
Th e i c e m ak e r w i ll f i ll w it h w a t er w h e n i t c o o l s t o 1 5 ° F (–1 0 ° C).
A newly inst alled refrigerat or may t ake 12 t o 24 hours t o begin
making ice cubes.
Yo u m ay h ea r a b u zzi n g s o u n d ea c h t i m e t h e i c e m aker f il l s w i t h
water.
Th r o w a w ay t h e fir st fe w bat c h e s o f i c e t o allo w t h e w a t e r l i ne t o
clear.
Be sure not hing int erferes wit h t he sweep of t he feeler arm.
When the bin fills to the level of the feeler arm, the ice maker will
stop producing ice. It is normal for several cubes to be joined
together.
If ice is not used frequently, old ice cubes will become cloudy,
taste stale and shrink.
NOTE: In homes with
lower-than-average water
pressure, you may hear the
ice maker cycle multiple
times when making one
batch of ice.
For Ref r i ger at or Mod el s w i t h Ice Maker i n t he Door
Ice Bucket and Dispenser
• Open the ice box door on inside of the left door.
• Pull up and out on the ice bucket in the left hand door to
remove it from the compartment .
• To replace the ice bucket, set it on the guide brackets and
push until the ice bucket seats properly.
• If bucket cannot be replaced, rotate the ice bucket fork 1/4
turn clockwise.
• Ice maker can be turned on and off using this display (see
About the controls on pages 6 and 7.)
For Ref r i ger at or Mod el s w i t h Ice Maker i n t he Fr eezer Com par t m en t
So m e m o d e l s c o m e w i t h a n i c e m a k e r i n s t a l l e d i n t h e
freezer compartment. For those models that come ice-
maker ready, you can purchase Kit IM-4D. Visit our w ebsit e
at GEAp pl i ances.com or call GE Parts and Accessories,
800.626.2002 (in Canada visit geappliances.ca/en/products/
parts-filters-accessories or call 1.800.661.1616).
Th er e i s i ce st or a g e i n t he f r eezer c om p ar t m en t l o ca t ed o n
the left side of the upper basket. Pull the upper basket for-
ward to remove the ice bucket.
WARNING
To m i n i m i ze t h e r i sk of p e r so n a l i n j u r y, a v oi d c o n t a c t w i t h t h e m o v i n g p a r t s o f t h e ej ec t o r m e ch a n i sm , o r w i t h t h e
heating element that releases the cubes. Do not place fingers or hands on the automatic ice making mechanism while
the refrigerator is plugged in.
Ice bucket fork
Latch
Ice bucket
Ice maker
Feel er Ar m
Po w e r
Sw i t ch
Gr e en
Po w e r Li g ht
Ice bucket

15
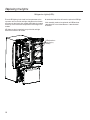
Ca r e a n d cl ea n i n g o f t h e r ef r i g er a t or .
Cleaning the Outside
The stainless steel panels, door handles and trim.
Do not use appliance wax, polish, bleach, or other products
containing chlorine on stainless steel.
St a i n l e ss s t ee l c a n b e c l e a n e d w i t h a c o m m er c i a l l y a v a i l a b l e
stainless steel cleaner. A spray-on stainless steel cleaner
works best.
Silver-accented plastic parts.
Wash parts with soap or other mild detergents. Wipe clean with
a sponge, damp cloth or paper towel.
Do not use scouring pads, powdered cleaners, bleach or
cleaners containing bleach because these products can
scratch and weaken the paint finish.
Sh o u l d s p i l l t r a y n e ed c l e a n i n g u s e l i m e r e m o v e r .
Cleaning the Inside
Unplug the refrigerator before cleaning.
If this is not practical, wring excess moisture out of sponge or
cloth when cleaning around switches, lights or controls.
Use an appliance wax polish on the inside surface between
the doors.
8VHZDUPZDWHUDQGEDNLQJVRGDVROXWLRQ³DERXWD
tablespoon (15 ml) of baking soda to a quart (1 liter) of water.
Th is b ot h c lea ns a n d n eu t r a l izes o do r s. Rin se a n d w i p e d r y .
Behind the Refrigerator
Be careful when moving t he refrigerat or away from t he w all. All
types of floor coverings can be damaged, particularly cushioned
coverings and those with embossed surfaces.
Ra i s e t h e l evel i n g l eg s l o c a t ed a t t h e b ot t o m f r o n t o f t h e
refrigerator.
Pu l l t h e r e f r i g e r a t o r st r aig h t o u t a n d r e t u r n it t o po s i t io n b y
pushing it straight in. Moving the refrigerator in a side direction
may result in damage to the floor covering or refrigerator.
Lower the leveling legs unt il they t ouch t he floor.
When pushing the refrigerator back, make sure you don’t
roll over the power cord or water supply line.
For l on g va ca t i on s or ab sen ces, r em o ve f ood a nd u np lu g t h e
refrigerator. Clean the interior with a baking soda solution of
one tablespoon (15 ml) of baking soda to one quart (1 liter) of
water. Leave the doors open.
If the temperature can drop below freezing, have a qualified
service technician drain the water supply system to prevent
serious property damage due to flooding.
1) Turn refrigerator off (pages 6 and 7) or unplug the refrigerator.
2) Empty ice bucket
3) Turn water supply off
If you cut the water supply off, turn off the ice maker (pg. 14).
Upon returning from vacation:
1) Replace the water filter.
2) Run 2 gallons of water through the cold water dispenser
(a bo ut 5 m i nu t es) t o f lu sh t he syst em .
Pr ep ar i n g f o r Va ca t i on
Pr ep ar i n g t o Move
Se c u r e a l l l oo s e i t e m s s u ch a s s h el v e s a n d d r aw e r s b y t a p i n g
them securely in place to prevent damage.
When using a hand truck to move the refrigerator, do not rest
the front or back of the refrigerator against the hand truck. This
could damage the refrigerator.
Handle only from the sides of the refrigerator.
Be sure the refrigerator stays in an upright position during
moving.
CAUTION
Do not clean glass shelves or covers
with warm water when they are cold. Glass shelves and
covers may break if exposed to sudden temperature changes
or impact such as bumping or dropping. Tempered glass is
designed to shatter into many small pieces if it breaks.

16
Rep l a c i ng t he l i gh t s
Ref r i g er a t o r Li g h t s (LEDs)
Th er e i s LED li g ht in g i n t h e f r esh f o od c om p a r t m en t a t t h e
top center and on the left and right sides above the climate
zone pans on the french door models. LED lighting is located
at the top of the fresh food compartment on the single door
models.
LED lights are also locat ed at t he top of t he left and right
sides of the freezer in all models.
An aut horized t echnician will need t o replace the LED light.
If this assembly needs to be replaced, call GE Service at
1.800.432.2737 in the United States or 1.800.561.3344
in Canada.
LEDs (locations
may vary by
model)

17
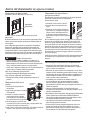
TOOLS YOU MAY NEED
Installation
Ref r i g er a t o r
Instructions
Quest ions? Call 800.GE.CARES (800.432.2737) or visit our Website at: GEAppliances.com
In Canada, call 1.800.561.3344 or visit our Website at: www.GEAppliances.ca
BEFORE YOU BEGIN
Re ad t h e s e i ns t r u c t i o n s com pl e t e l y a n d c a r e f ul l y .
•
IMPORTANT ³ Observe all governing codes
and ordinances. Save these instructions for local
inspector’s use.
•
Note to Installer – Be sure to leave these instructions
with the Consumer.
• Note to Consumer – Keep these instructions for
future reference.
• Skill level – Installation of this appliance requires
basic mechanical skills.
• Completion time – Refrigerator Installation
20 minutes
W a t e r L i n e I n s t a l l a t i o n
30 minutes
• Proper installation is the responsibility of the installer.
• Product failure due to improper installation is not
covered under the Warranty.
PREPARATION
MOVING THE REFRIGERATOR INDOORS
If the refrigerator will not fit through a doorway, the
refrigerator door and freezer drawer or door can be
removed.
• To remove the refrigerator door, see Step 1 in the
Re v e r s ing t he D o o r Sw i n g section.
• To remove the freezer drawer, see the Re mo vi ng t h e
Fr eezer Dr a w er section.
WATER SUPPLY TO THE ICE MAKER AND DISPENSER
If the refrigerator has an ice maker, it will have to be
connected to a cold water line. A GE water supply kit
(co nt ai ni ng t ub in g, sh ut of f va lv e, f i t t i ng s a nd in st r uc t i on s)
is available at extra cost from your dealer, by visiting our
website at GEAp p li a n c es.co m (in Canada at
www.GEAppliances.ca) o r f r o m Par t s an d Ac cessor i es,
800.626.2002 (in Canada 1.800.661.1616).
Adjust able Wrench
1/4” Outer Diameter
Co m p r e ssi o n Nu t
and Ferrule (sleeve)
(ice m aker m od el s only)
Ph il l ip s- Hea d Sc r ew d r i ver
Ȓµ and ȓµSo c k e t
Ra t c h et / D r i ve r
3/32”, 1/8” & 3/16” Allen
Wrenches
Pen c il
1/8” Drill Bit and
El e c t r i c o r H a n d D r i l l
Ta pe Mea su r e
1/4” Nut Driver
Wire Cutters
Level
To r x T20 , Dr i ver

18
Installation Instructions
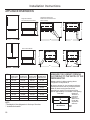
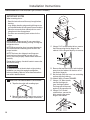
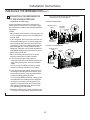
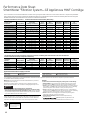
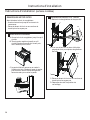
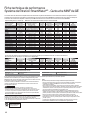
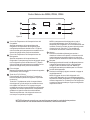
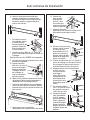
MEASURE THE CABINET OPENING
ACCORDING TO THE WIDTH OF THE
REFRI GERATOR
Measure width of cabinet opening where
refrigerator will be placed, B.
Be sure to account for any count ertop overhang,
baseboard thickness and any clearance desired.
Width, B, should not be less than 30”-33”
(dep ending on model). The r ef riger at or w ill be
placed approximately in the middle of this opening.
Back Wall
Front
Ri g h t
Si d e
REFRI GERATOR
B
Baseboard
Th ic kn ess o r
Co u nt er t o p
Overhang
(Wh ichever Is
Larger) Plus
Any Desired
Cl ea r a n c e
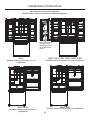
ITEM 21 cuft
models with
single door
21 cuft
models with
french doors
25 cuft
models with
single door
24/25 cuft
models with
french doors
A* 69- 7/ 8” 69- 7/ 8” 69- 7/ 8” 67- 7/ 8”
B30” 30” 33” 33”
C* * 3 6- 1/ 8 ” 36 - 3 / 8 ” 3 7- 3 / 8 ” 37-1/8”
D** - 54” 54-3/ 4” 54-3/ 4”
E55” 54-7/8”60-1/2”60-1/2”
F45-5/8” 37” 48” 38-3/4”
G33-7/8” 34-3/8” 34-7/8” 35-3/8”
H61” 45-7/8” 65” 48-3/8”
I** 33-1/2” 37-5/8” 36” 40-1/2”
NOTE:
* The height of the refrigerator to the top of the door.
** Includes the handle.
A
C
G
G
D
E
E
F
I
H
F
B
A
C
D
B
155Û
155Û
I
H
90Û
90Û
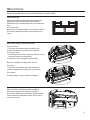
APPLIANCE DIMENSIONS
Single Door Models with
Fr esh Food an d Fr eezer Door s
(some models)
Single Door Models
with Drawer (some models)
French Door Models

Installation Instructions
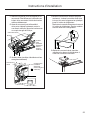
INSTALLING THE REFRIGERATOR
REFRI GERATOR LOCATI ON
• Do not install the refrigerator where the temperature will go
below 60°F (16°C) because it will not run often enough to
maintain proper temperatures.
• Do not install the refrigerator where the temperature will go
above 100°F (37°C) because it will not perform properly.
• Do not install the refrigerator in a location exposed to water (rain,
etc.) or direct sunlight.
• Install it on a floor strong enough to support it fully loaded.
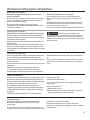
CLEARANCES
Allow t he following clearances for ease of inst allat ion, proper air
circulation and plumbing and electrical connections.
Si d es 1/ 8” (3 mm)
To p 1 ” (25 mm) Cabinet/Hinge Cover
Back 2” (50 mm)
19
IMPORTANT NOTES
Th i s r e f r i g e r a t o r w i t h o u t t h e h a n d l e s r a n g e s f r o m 3 4 ” t o
35-1/4” depending on your model (see dimension G on the
previous page). Doors and passageways leading to the
installation location must be at least
36”
in order to leave the
doors attached to the refrigerator while transporting it into
the installation location. If passageways are less than 36”, the
refrigerator doors can easily be scratched and damaged. The
doors can be removed to allow the refrigerator to be safely
moved indoors.
• If you need to remove the door and you have the french
door model, see Re movi n g t he Fr e n ch D oor s on page 20.
• If you need to remove the door and you have the single
fresh food door model, see Rev e r si ng t he D o o r on page 26.
• To r e m o v e t h e f r e ezer d o o r a n d y o u h av e t h e m o d e l w i t h a
freezer drawer see Re mo v i n g Fr e e z e r D r a w e r on page 24.
• If you have the model with the hinged freezer door see
Re v e r si n g t he D o or on page 26.
• If it is NOT necessary to remove doors, skip to Step 6. Leave
tape and all packaging on doors until the refrigerator is in
the final location. Once in place, install door handles (see
St e p s 1 a n d 2).
• SK I D REMO VA L : Ti l t r e fr i ge r a t o r t o ea c h si d e t o r e m o v e
skid.
• NOTE: Use a padded hand truck to move this refrigerator.
Pl a ce t he re f r ig e rat o r on t h e h a n d t r u ck w i t h a s i d e a g a i n s t
the truck. We strongly recommend that TWO PEOPLE move
and complete this installation.
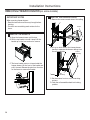
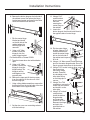
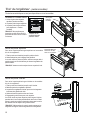
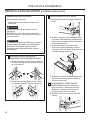
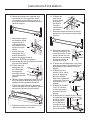
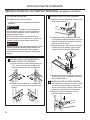
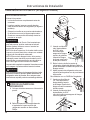
A T T A C H F R ESH F O O D H A N D L E( S)
Attach the handle to t he mount ing fasteners by
aligning the slots on the handle with the mounting
fasteners. Slide the handle down until you hear a
“click”.
NOTE: For Fr ench Door models, f ollow t he sam e
procedure for both doors.
1
ATTACH FREEZER HANDLE
Attach the handle to t he mount ing fasteners by
aligning the slots on the handle with the mounting
fasteners. Slide the handle to the right until you hear
a “click”.
2
Mounting
Fa st en er s
Mounting
Fa st en er s

20
Installation Instructions
IMPORTANT NOTES
When removing french doors:
• Re a d t h e i n s t r u c t i o n s a l l t h e w a y t h r o u g h b e f o r e
starting.
• H a n d l e s a r e i n c l u d e d i n s i d e t h e r e f r i g e r a t o r .
• P l a c e t h e s c r e w s b y t h e i r r e l a t e d p a r t s t o a v o i d
using them in the wrong places.
• P r o v i d e a n o n - s c r a t c h i n g w o r k s u r f a c e f o r t h e
doors.
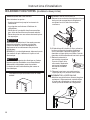
CAUTION
Lifting Hazard. Single person lift can cause injury.
Use assistance when handling, moving or lifting the
refrigerator doors.
NOTE: When moving door, to prevent damage to
door and electronics carefully place the door in a
proper location.
WARNING
To el i m in a t e t he r i sk o f e l ec t r i c sho c k o r i n ju r y d u r i n g
installation, you must first unplug the refrigerator
before proceeding. Failure to follow these instructions
can result in electrical shock.
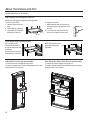
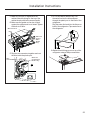
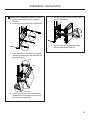
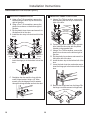
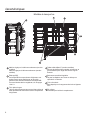
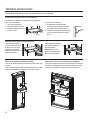
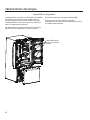
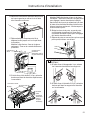
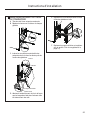
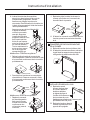
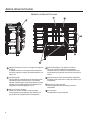
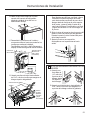
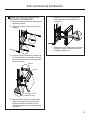
REMOVI NG FRENCH DOORS (on some models)
Ta pe t he d oo r s sh ut w i t h a dh esi ve t ap e.
1
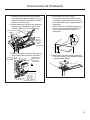
R E M O V I N G RI GHT DOOR
A. Re m o v e t h e h i n ge c o v er o n t o p o f t h e r i g ht
fresh food door by removing the screw using
a Phillips screwdriver.
B Using a 5/ 16” socket ratchet/ driver, remove
the bolts securing the top hinge to the cabinet.
Lift the hinge support st raight up to free the
hinge pin from the socket in the top of the
door.
C. Re m o v e t h e t a p e f r om t h e r i g ht d o o r a n d t i lt
the door away from the cabinet. Lift the door
off the center hinge pin.
D. Se t t he d o o r on a n o n - s c r a t c h i n g s u r f a c e w i t h
the inside up.
2
REMOVI N G LEFT DOOR
A. For Ice and Wat er Models Only: Unplug the
water line from the back of the refrigerator
and remove all tape that fixes the water line
to the refrigerator.
La page est en cours de chargement...
La page est en cours de chargement...
La page est en cours de chargement...
La page est en cours de chargement...
La page est en cours de chargement...
La page est en cours de chargement...
La page est en cours de chargement...
La page est en cours de chargement...
La page est en cours de chargement...
La page est en cours de chargement...
La page est en cours de chargement...
La page est en cours de chargement...
La page est en cours de chargement...
La page est en cours de chargement...
La page est en cours de chargement...
La page est en cours de chargement...
La page est en cours de chargement...
La page est en cours de chargement...
La page est en cours de chargement...
La page est en cours de chargement...
La page est en cours de chargement...
La page est en cours de chargement...
La page est en cours de chargement...
La page est en cours de chargement...
La page est en cours de chargement...
La page est en cours de chargement...
La page est en cours de chargement...
La page est en cours de chargement...
La page est en cours de chargement...
La page est en cours de chargement...
La page est en cours de chargement...
La page est en cours de chargement...
La page est en cours de chargement...
La page est en cours de chargement...
La page est en cours de chargement...
La page est en cours de chargement...
La page est en cours de chargement...
La page est en cours de chargement...
La page est en cours de chargement...
La page est en cours de chargement...
La page est en cours de chargement...
La page est en cours de chargement...
La page est en cours de chargement...
La page est en cours de chargement...
La page est en cours de chargement...
La page est en cours de chargement...
La page est en cours de chargement...
La page est en cours de chargement...
La page est en cours de chargement...
La page est en cours de chargement...
La page est en cours de chargement...
La page est en cours de chargement...
La page est en cours de chargement...
La page est en cours de chargement...
La page est en cours de chargement...
La page est en cours de chargement...
La page est en cours de chargement...
La page est en cours de chargement...
La page est en cours de chargement...
La page est en cours de chargement...
La page est en cours de chargement...
La page est en cours de chargement...
La page est en cours de chargement...
La page est en cours de chargement...
La page est en cours de chargement...
La page est en cours de chargement...
La page est en cours de chargement...
La page est en cours de chargement...
La page est en cours de chargement...
La page est en cours de chargement...
La page est en cours de chargement...
La page est en cours de chargement...
La page est en cours de chargement...
La page est en cours de chargement...
La page est en cours de chargement...
La page est en cours de chargement...
La page est en cours de chargement...
La page est en cours de chargement...
La page est en cours de chargement...
La page est en cours de chargement...
La page est en cours de chargement...
La page est en cours de chargement...
La page est en cours de chargement...
La page est en cours de chargement...
La page est en cours de chargement...
La page est en cours de chargement...
La page est en cours de chargement...
La page est en cours de chargement...
La page est en cours de chargement...
La page est en cours de chargement...
La page est en cours de chargement...
La page est en cours de chargement...
La page est en cours de chargement...
La page est en cours de chargement...
La page est en cours de chargement...
La page est en cours de chargement...
La page est en cours de chargement...
La page est en cours de chargement...
La page est en cours de chargement...
La page est en cours de chargement...
La page est en cours de chargement...
La page est en cours de chargement...
La page est en cours de chargement...
La page est en cours de chargement...
La page est en cours de chargement...
La page est en cours de chargement...
La page est en cours de chargement...
La page est en cours de chargement...
La page est en cours de chargement...
La page est en cours de chargement...
La page est en cours de chargement...
La page est en cours de chargement...
-
 1
1
-
 2
2
-
 3
3
-
 4
4
-
 5
5
-
 6
6
-
 7
7
-
 8
8
-
 9
9
-
 10
10
-
 11
11
-
 12
12
-
 13
13
-
 14
14
-
 15
15
-
 16
16
-
 17
17
-
 18
18
-
 19
19
-
 20
20
-
 21
21
-
 22
22
-
 23
23
-
 24
24
-
 25
25
-
 26
26
-
 27
27
-
 28
28
-
 29
29
-
 30
30
-
 31
31
-
 32
32
-
 33
33
-
 34
34
-
 35
35
-
 36
36
-
 37
37
-
 38
38
-
 39
39
-
 40
40
-
 41
41
-
 42
42
-
 43
43
-
 44
44
-
 45
45
-
 46
46
-
 47
47
-
 48
48
-
 49
49
-
 50
50
-
 51
51
-
 52
52
-
 53
53
-
 54
54
-
 55
55
-
 56
56
-
 57
57
-
 58
58
-
 59
59
-
 60
60
-
 61
61
-
 62
62
-
 63
63
-
 64
64
-
 65
65
-
 66
66
-
 67
67
-
 68
68
-
 69
69
-
 70
70
-
 71
71
-
 72
72
-
 73
73
-
 74
74
-
 75
75
-
 76
76
-
 77
77
-
 78
78
-
 79
79
-
 80
80
-
 81
81
-
 82
82
-
 83
83
-
 84
84
-
 85
85
-
 86
86
-
 87
87
-
 88
88
-
 89
89
-
 90
90
-
 91
91
-
 92
92
-
 93
93
-
 94
94
-
 95
95
-
 96
96
-
 97
97
-
 98
98
-
 99
99
-
 100
100
-
 101
101
-
 102
102
-
 103
103
-
 104
104
-
 105
105
-
 106
106
-
 107
107
-
 108
108
-
 109
109
-
 110
110
-
 111
111
-
 112
112
-
 113
113
-
 114
114
-
 115
115
-
 116
116
-
 117
117
-
 118
118
-
 119
119
-
 120
120
-
 121
121
-
 122
122
-
 123
123
-
 124
124
-
 125
125
-
 126
126
-
 127
127
-
 128
128
-
 129
129
-
 130
130
-
 131
131
-
 132
132


GE Appliances GFE24JGKWW Le manuel du propriétaire
- Catégorie
- Frigos
- Taper
- Le manuel du propriétaire
dans d''autres langues
Documents connexes
Autres documents
-
GE GWE19JMLES Manuel utilisateur
-
GE GFE24JMKES Guide d'installation
-
GE CFE26KP2NS1 Mode d'emploi
-
GE Profile PSB42YSKSS Dispatcher Owner’s Manual
-
-
-
-
-
GE Profile Series PGSS5 Le manuel du propriétaire
-
Cafe™ CXLB3H3PMBZ Mode d'emploi