
• Tile may be installed over most structurally sound
substrates.
• Make sure surface is clean, smooth, dry and free
of wax, soap scum and grease.
• Any damaged, loose or uneven areas must be
repaired, patched and leveled.
• Remove any moldings, trim, appliances or
anything that could interfere with installation.
1
WALL TILE INSTALLATION INSTRUCTIONS PAGE 1 of 4
• Find the center point of the wall, using a level to draw
a plumb line in the wall’s center.
• Lay out a row of loose tiles across the bottom of
the wall from the center line leaving uniform joints
between tiles.
NOTE: Tiles can be butted together leaving a
consistent 1/16 in. joint automatically.
TIP: If cuts leave tiles smaller than half to their
original size, adjust the center line a half tile closer to
the wall.
• Stack two tiles here. At the top, draw a horizontal line
on the wall and continue the line around all side walls
to be tiled.
Continued on next page
STEP 1:
SURFACE PREPARATION
Continued on next page
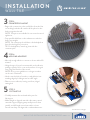
2
STEP 2:
LAYOUT
INSTALLATION
WALL TILE

Continued on next page
WALL TILE INSTALLATION INSTRUCTIONS PAGE 2 of 4
• Mix only enough adhesive or mortar to be use within 30
minutes.
• Using the type of trowel recommended on the adhesive
package, spread a 1/4 in. coat on the surface of one grid
area, using the flat side of the trowel.
NOTE: Do not cover guidelines or a larger area than
can be set in 15 minutes.
• Use the notched side of trowel to comb adhesive into
standing ridges by holding trowel at a 45° angle.
• Remove excess adhesive, leaving a uniform, ridged
setting bed.
• Begin with counter trim, then set full tiles from the first
row working back thus all cut tiles will be placed on the
back row against the wall.
NOTE: Trim pieces are available for use around recessed
appliances.
• Snap parallel chalk lines on the substrate as needed to
keep rows straight.
NOTE: Tile countertops should have a tile backsplash at
least 4 inches high for protection.
TIP: For backsplashes, match up joints with the
countertop tile.
4
3
• Carefully measure tiles and mark with a pencil or
felt-tip pen.
• Make straight or diagonal cuts with a tile cutter, curved
cuts with a nipper (chipping away small pieces for best
results), and full-length curved cuts with a rod saw.
Smooth out sharp-cut edges with a carborundum stone.
STEP 4:
APPLYING ADHESIVE
STEP 3:
COUNTERTOP LAYOUT
5
STEP 5:
CUTTING TILE
Continued on next page
INSTALLATION
WALL TILE

Continued on next page
WALL TILE INSTALLATION INSTRUCTIONS PAGE 3of 4
Continued on next page
• Install tiles in the center, one grid at a time. Finish each
grid before moving to the next. Start with the first tile in
the corner of the grid and work outward. Set tiles one at
a time using a slight twisting motion.
NOTE: Don’t slide tiles into place.
• Insert tile spacers, as each tile is set, or leave equal joints
between tiles.
• Fit perimeter tiles in each grid last, leaving 1/4 in. gap
between tile and wall.
• When finished, tap in all tiles with a rubber mallet or
hammer and wood block, to ensure a good bond and
level plane.
• Remove excess adhesive from joints with a putty knife,
and from tile with a damp sponge.
• Do not use surface of tiles until they are set
(usually in 24 hours).
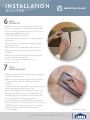
6
• Using the instructions on the package, make enough grout
touse in about 30 minutes.
• Remove tile spacers and spread grout on the tile surface,
forcing down into joints with a rubber grout float or
squeegee.
• Tilt the float at a 45° angle and remove excess grout from
surface immediately with the edge of float.
• Tilt it at a 90° angle and scrape it diagonally across tiles.
• Wait 15–20 minutes for grout to set slightly, then use
a damp sponge to clean grout residue from surface and
smooth the grout joints, rinsing sponge often.
• Let dry until grout is hard and haze forms on tile surface,
then polish with a soft cloth and wait 72 hours for heavy use.
NOTE: Don’t apply sealers or polishes for three weeks,
and then only in accordance with manufacturer’s
recommendations.
STEP 6:
SETTING TILE
7
STEP 7:
GROUTING JOINTS
INSTALLATION
WALL TILE

Continued on next page
• Back-butter spreading of a bond coat to the back of a ceramic tile before placing the tile to ensure a
strong bond with the thin-set mortar.
• Balanced cuts perimeter tile cut at equal size and installed on opposite sides of an area; also, equally sized
cuts on each side of a miter.
• Butt joint a plain square joint between two members with no grout joint.
• Grout a mix used for filling tile joints, commonly based
of cement.
• Mortar a mixture of cement paste and fine aggregate used to bond masonry together.
• Plumb perpendicular to true level.
• Substrate the underlying support for a ceramic tile installation
A
GLOSSARY
OF TERMS
WALL TILE INSTALLATION INSTRUCTIONS PAGE 4of 4
• The complete removal of grout and construction dirt after products have
been installed will improve daily maintenance.
• Clean successfully by scrubbing the installation with hot water and a pH
neutral liquid cleaner (soapless), followed by a thorough rinsing, then
remove the rinse water with a wet vacuum or dry toweling.
• If some residue remains, further cleaning will need to be done in
consultation with the grout manufacturer.
• For more aggressive cleaning, scrubbing machines equipped with nylon
pads or brushes should be used. Wet vacuuming of the suspended dirt and
grout is recommended.
8
STEP 8:
INITIAL CLEANING
INSTALLATION
WALL TILE
ATTENTION / ATENCIÓN / ATTENTION
Do not dry cut using motorized equipment due to the potential for exposure
to harmful silica dust. Use a wet saw or a score and snap tool when cutting is
necessary during the installation process.
No corte en seco usando equipo motorizado debido a la posibilidad de
exposición a polvo dañino de sílice. En caso de que sea necesario cortar durante
el proceso de instalación, usar una sierra de corte en húmedo o una herramienta
cortadora manual.
Ne pas couper à sec à l’aide d’un équipement motorisé en raison du risque
d’exposition à la poussière de silice nuisible. Utiliser une scie à eau ou un outil à
inciser et rompre lorsqu’il faut couper pendant le processus d’installation.
-
 1
1
-
 2
2
-
 3
3
-
 4
4


American Olean SA93582HERRMS1P Guide d'installation
- Taper
- Guide d'installation
- Ce manuel convient également à
dans d''autres langues
Autres documents
-
MARAZZI ZL07441P Guide d'installation
-
Unbranded RE15416WAVHD1P2 Guide d'installation
-
daltile 0000HDCHIPML63 Guide d'installation
-
TrafficMASTER PT011818HD1PV Guide d'installation
-
MARAZZI ULNM Guide d'installation
-
Unbranded SL8322MS1P2 Mode d'emploi
-
 SAVOGRAN 6559 Manuel utilisateur
-
Bondera Waterproof Seam Tape Guide d'installation
-
 The Tile Doctor C.00 - 5kg Manuel utilisateur
-
LAMONA WOH9804 Mode d'emploi

