
DM
™
302 Owner’s manual
300 Series
La page est en cours de chargement...

1
INTRODUCTION
Thank you for purchasing B&W DM300 Series
speakers.
Since its foundation in 1966, the continuing
philosophy of B&W has been the quest for
perfect sound reproduction. Inspired by the
company’s founder, the late John Bowers, this
quest has entailed not only high investment in
audio technology and innovation but also an
abiding appreciation of music to ensure that the
technology is put to maximum effect.
It is also our policy to make sure the advanced
features pioneered on one product are
incorporated into others we manufacture.
The rear panel of the DM™302 cabinet is
formed into a wedge pattern similar to the
interior of an anechoic chamber. This greatly
helps to break up the regular internal cabinet
volume that would otherwise encourage
coloration from internal standing waves.
Homogeneous fibre cone bass/midrange
drive units are used for minimum coloration
and maximum definition. The DM™302 also
features a soft dome tweeter with magnetic
fluid cooling to ensure good definition to the
limits of audibility and maintain dynamics to
high sound levels.
However, no matter how good the speakers
themselves, they must work well into the listening
room and time spent on the installation process
will reap the reward of many hours listening
pleasure. Please read through this manual fully.
It will help you optimise the performance of your
audio system.
B&W distribute to over 50 countries world-wide
and maintain a network of dedicated distributors
who will be able to help should you have any
problems your dealer cannot resolve.
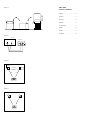
UNPACKING
(figure 1)
• Fold the top carton flaps right back and
invert the carton and contents.
• Lift the carton clear of the contents.
• Remove the inner packing from the product.
We suggest you retain the packaging for
future use.
CONNECTIONS
(figure 2)
All connections should be made with the
equipment turned off.
Connect the positive terminal on the speaker
(marked + and coloured red) to the positive
terminal on the power amplifier and negative
(-, black) to negative (figure 2). Failure to
observe correct polarity will result in poor
sound balance and image focusing.
Always make sure all the terminal caps are
screwed down tight, as otherwise they
may rattle.
When choosing cable, keep the total electrical
impedance (out and back) below the maximum
recommended in the specification. In particular,
the cable to the tweeter should have low
inductance, otherwise the very high frequencies
will be attenuated. Ask your dealer for advice,
as the optimum cable will depend on the length
required.
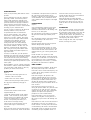
POSITIONING
(figure 3)
Some experimentation with the position of the
speakers is well worthwhile to optimise the
interaction between them and the listening room.
However, as an initial guide:
Place the speakers on firm stands or bookshelves
that place the tweeters approximately at ear
level.
Place the speakers and the centre of the listening
area approximately at the corners of an
equilateral triangle.
Keep the speakers at least 1.5m (5ft) apart to
maintain left-right stereo separation.
Keep the speaker baffles at least 0.5m (20in)
clear of walls. Having the speakers too close to
walls increases the level of bass relative to the
midrange and may give a boomy quality to the
sound.
NOTE: The DM™302 produces a static
magnetic field that extends outside the cabinet
boundary. As such The DM™302 should not be
placed within 0.5m (20in) of equipment that
may be affected by such a field, e.g. Cathode
Ray Tubes in TVs and Personal Computers.
FINE TUNING
Before fine tuning the installation, double check
the polarity and security of the connections.
If the level of bass is uneven with frequency, this
is usually due to strong excitation of resonance
modes in the room.
Even small changes in the position of the
speakers within the listening room can have a
profound effect on the perceived sound quality
by altering the excitation of these modes. Try
mounting the speakers along a different wall.
Even moving large pieces of furniture about can
have an effect.
If the general level of bass is too high, try
moving the speakers further away from the walls.
Conversely, if you need more bass, move the
speakers closer to the walls. Space behind the
speakers also improves the impression of
perspective on well recorded material.
If the central image is poor, try moving the
speakers closer together or toeing them in so
they point at or just in front of the listening area
(figure 4).
If the sound is too harsh, increase the amount of
soft furnishing in the room. For example, use
heavier curtains. Conversely reduce the amount
of soft furnishing if the sound is dull and lifeless.
Test for flutter echoes by clapping your hands
and listening for rapid repetitions. These can
smear the sound, but may be reduced by
irregular shaped surfaces such as bookshelves
and large pieces of furniture.
Ensure the speakers are firmly supported.
Speaker stands should be regarded as part of
the speaker and chosen with care. Ask your
dealer for advice on the best stands for your
needs.
AFTERCARE
The vinyl veneers normally only require dusting.
If you wish to use an aerosol cleaner, remove
the grille first by gently pulling it away from the
cabinet. Spray onto the cleaning cloth, not
directly onto the cabinet. The grille fabric may
be cleaned with a normal clothes brush after
removing the grille from the cabinet.
Avoid touching the drive units, especially the
tweeter, as damage may result.
La page est en cours de chargement...
La page est en cours de chargement...

ESPAÑOL
INTRODUCCION
Gracias por adquirir cajas acústicas de la Serie
DM300 de B&W.
Desde su fundación en 1966, la filosofía de
B&W no ha sido otra que la búsqueda de la
perfecta reproducción del sonido. Inspirada por
el fundador de la compañía, John Bowers, esta
búsqueda ha conllevado no solamente una
elevada inversión en investigación y tecnología
en el campo del audio sino también una
renovada apreciación de la música con el fin de
asegurar que dicha tecnología sea aprovechada
al máximo.
Es igualmente nuestra política asegurarnos de
que las innovaciones desarrolladas para un
producto específico se incorporen a otros
también fabricados por nosotros.
El panel posterior del recinto de la DM™302
está formada por una estructura de piezas
terminadas en cuña muy similar al interior de
una cámara anecoica. De esta manera, se
contribuye en gran medida a romper la
regularidad del volumen interno de la caja que
de otro modo facilitaría la coloración del sonido
como consecuencia de las ondas estacionarias
generadas en su interior. Se utilizan altavoces de
medios/graves con cono de fibra homogénea
para conseguir la máxima definición y la mínima
coloración, así como un tweeter de cúpula
blanda refrigerado por ferrofluido para asegurar
una excelente definición hasta los límites de la
gama audible y mantener la dinámica incluso en
los niveles de presión sonora más elevados.
Sin embargo, independientemente de lo buenas
que sean las propias cajas acústicas, es
esencial que trabajen en condiciones adecuadas
dentro de la sala de escucha, por lo que el
tiempo invertido en el proceso de instalación
tendrá como recompensa el disfrute de muchas
horas de escucha. Por favor, lea
cuidadosamente la totalidad del presente
manual. Le ayudará a optimizar las prestaciones
de su equipo de Alta Fidelidad.
B&W exporta sus productos a más de 50 países
y mantiene una red de distribuidores altamente
cualificados que le ayudarán a solucionar
cualquier problema que su detallista no pueda
resolver.
DESEMBALAJE
(figura 1)
• Doble hacia atrás las cubiertas superiores de
cartón e invierta la posición de la caja.
• Levante cuidadosamente la caja para dejar a
la vista el contenido de la misma.
• Quite el embalaje interno del producto.
Le recomendamos que guarde el embalaje en
previsión de cualquier uso del mismo en el
futuro.
CONEXIONES
(figura 2)
Todas las conexiones deberían efectuarse con el
equipo desconectado.
Conecte el terminal positivo de la caja acústica
(marcado “+” y de color rojo) al terminal
positivo de su amplificador y el negativo de la
primera (“–”, negro) al negativo de este último
(figura 2). Cualquier error en el respeto de la
polaridad correcta redundará en un
empeoramiento del balance tonal y la
focalización de la imagen sonora.
Asegúrese siempre de que los terminales de
conexión estén herméticamente fijados.
En el momento de la elección de los cables de
conexión, procure que la impedancia eléctrica
total sea inferior al valor máximo especificado
en las características técnicas de las cajas.
Pregunte al respecto a su detallista ya que la
solución óptima dependerá en buena parte de
la longitud de cable que necesite.
COLOCACION
(Figura 3)
Siempre resulta interesante realizar algunos
experimentos con la colocación de las cajas a
fin de optimizar la interacción de las mismas
con la sala de escucha. De todos modos, en
líneas generales debería considerar lo siguiente:
Coloque las cajas sobre soportes firmes o
estanterías de tal modo que los tweeters se
sitúen aproximadamente a la altura de sus
oídos.
Coloque las cajas de manera que las mismas y
el centro de la posición de escucha sean los
vértices de un triángulo equilátero.
Separe las cajas entre sí al menos 1’5 metros
con el fin de mantener una buena separación
entre los canales izquierdo y derecho.
Separe las cajas un mínimo de 0’5 metros de
las paredes adyacentes (posterior y lateral). Un
acercamiento excesivo incrementará el nivel
relativo de las frecuencias bajas con respecto a
las medias, pudiendo colorear perjudicialmente
el sonido reproducido.
ADVERTENCIA: Las DM™302 generan un
campo magnético estático que se extiende más
allá de los límites de la caja, por lo que no
deberían situarse a menos de 0’5 metros de
equipos susceptibles de ser afectados por dicho
campo, como por ejemplo los tubos de rayos
catódicos utilizados en televisores y ordenadores
personales.
AJUSTE FINO
Antes de proceder al ajuste fino de la
instalación, compruebe la polaridad y la
correcta ejecución de las conexiones.
Si el nivel de graves no se corresponde con la
frecuencia reproducida significa que se está
produciendo una fuerte excitación de los modos
propios (resonancias) de la habitación.
Incluso pequeños cambios en la posición de las
cajas en la sala de escucha pueden tener un
profundo efecto en la calidad del sonido
percibido al alterar la excitación de los citados
modos. Intente colocar las cajas acústicas a lo
largo de una pared diferente. También pueden
percibirse diferencias cambiando de lugar
muebles de gran tamaño.
Si el nivel global de graves es demasiado alto,
intente separar un poco más las cajas de las
paredes. Por el contrario, si quiere más graves,
proceda del modo inverso, es decir acercando
las cajas a la pared. El espacio situado detrás
de cada caja contribuye favorablemente a la
impresión de perspectiva sonora generada por
las grabaciones de alta calidad.
Si la imagen central es pobre, intente acercar un
poco las cajas entre sí u orientarlas de modo
que apunten al área de escucha (figura 4).
Si el sonido es demasiado áspero, incremente el
número de materiales fonoabsorbentes presentes
en la sala. Por ejemplo, use cortinas más
pesadas y de mayor espesor. Por el contrario,
reduzca la presencia de dichos materiales en
caso de que el sonido suene apagado y sin
vida.
Compruebe la presencia de ecos flotantes
efectuando aplausos enérgicos y a continuación
escuche atentamente para percibir la presencia
de repeticiones (ecos) de los mismos. Dichas
repeticiones pueden colorear el sonido aunque
la presencia de superficies de forma irregular
(estanterías repletas de libros, muebles de
grandes dimensiones) puede reducirlas en gran
medida.
Asegúrese de que las cajas acústicas estén
colocadas sobre una base firme. Los soportes
deberían ser considerados como parte integrante
de la propia caja, por lo que su elección debe
llevarse a cabo con mucho cuidado. Consulte a
su detallista para obtener consejo sobre el
soporte que mejor se adapte a sus necesidades.
CUIDADO Y MANTENIMIENTO
Por lo general, la parte externa de la caja sólo
requiere que se le quite el polvo periódicamente
para mantenerse en perfectas condiciones. Si
quiere utilizar un limpiador de tipo aerosol, quite
en primer lugar la rejilla protectora y a
continuación dirija el chorro a la gamuza (nunca
directamente al recinto). La tela de la rejilla
puede limpiarse con un cepillo normal y
corriente una vez extríoda esta última.
Evite tocar los altavoces, en particular el tweeter,
ya que podría dañarlos.
4
La page est en cours de chargement...
La page est en cours de chargement...
La page est en cours de chargement...
La page est en cours de chargement...
La page est en cours de chargement...

Description
Drive units
Frequency range
Frequency response
Dispersion
Sensitivity
Harmonic distortion
Nominal impedance
Crossover frequency
Recommended
amplifier power
Max. Recommended
Cable impedance
Dimensions
Net weight
DM™302
B&W Loudspeakers Ltd. reserves the right to amend specifications without notice in line with technical developments. Copyright © B&W Loudspeakers Ltd.
B&W Loudspeakers Ltd, Meadow Road, Worthing, BN11 2RX, England Tel: +44 (0) 1903 524801 Fax: +44 (0) 1903 524725.
B&W Loudspeakers of America, 54 Concord Street, North Reading, MA 01864-2699 Tel: (1978) 664 2870 Fax: (1978) 664 4109.
B&W Loudspeakers (Asia) Ltd, Flat U, 11F Camelpaint, Building Block 111, 60 Hoi Yuen Road, Kwun Tong, Kowloon, Hong Kong.
Tel: (8522) 790 8903 Fax: (8522) 341 2777. http://www.bwspeakers.com Printed in England.
2-way 4th-order vented-box system
1x 125mm (5in) Homogeneous fibre bass/mid
1x 26mm (1in) soft dome high-frequency
-6dB at 60Hz and 22kHz
72Hz – 20kHz ±3dB on reference axis
Within 2dB of response on reference axis
Horizontal: over 40° arc
Vertical: over 10° arc
91dB spl (2.83V, 1m)
2nd & 3rd harmonics <1% 92Hz – 20kHz (90dB spl, 1m)
8Ω (minimum 3.2Ω)
3kHz
25W –100W continuous into 8Ω on unclipped programme.
0.2Ω
Height: 320mm (12.6in)
Width: 185mm (7.3in)
Depth: 208mm (8.2in)
4.1kg (9 lb)
I I 04634 Issue 3
-
 1
1
-
 2
2
-
 3
3
-
 4
4
-
 5
5
-
 6
6
-
 7
7
-
 8
8
-
 9
9
-
 10
10
-
 11
11
-
 12
12


B&W 300 Series Le manuel du propriétaire
- Catégorie
- Haut-parleurs
- Taper
- Le manuel du propriétaire
dans d''autres langues
- italiano: B&W 300 Series Manuale del proprietario
- English: B&W 300 Series Owner's manual
- español: B&W 300 Series El manual del propietario
- Deutsch: B&W 300 Series Bedienungsanleitung
- Nederlands: B&W 300 Series de handleiding
- português: B&W 300 Series Manual do proprietário
- dansk: B&W 300 Series Brugervejledning
Documents connexes
-
 Bowers & Wilkins CD7 SE Manuel utilisateur
-
 Bowers & Wilkins 300 Series Le manuel du propriétaire
-
B&W DM 601 Le manuel du propriétaire
-
-
Bowers & Wilkins LCR 60 S3 Le manuel du propriétaire
-
-
 Bowers & Wilkins DM560 Le manuel du propriétaire
-
 Bowers & Wilkins CC3 Manuel utilisateur
-
 Bowers & Wilkins 203I Le manuel du propriétaire


