
Components
CAUTION
Proceed to STEP 4 of the ‘Stacking Kit Installation
Instructions’ provided with the SKK-8K stacking
kit. Then, on the back of the washer, assemble the
provided ASSY BRACKET STACKING on the right
side, and assemble the REAR BRACKET (provided
with the SKK-8K stacking kit) on the left side. Use
the screws provided with the SKK-8K stacking kit to
fasten both brackets.
ASSY BRACKET STACKING (1) /
ENSEMBLE DU KIT DE SUPERPOSITION (1) /
MONTAJE DE LA MÉNSULA DE APILAMIENTO (1)
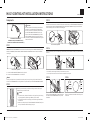
STEP 1.
DO NOT TIGHTEN SCREWS COMPLETELY.
LOOSELY fasten two REAR BRACKETS at the back of the washer using the two SCREWS-HEX HEAD (6002-
001431) and WASHERS (DC60-00044A). SCREWS-HEX HEAD and WASHERS are included in the SKK-8K
stacking kit.
Left / Gauche / Izquierda Right / Droite / Derecha
1. Fasten the ASSY BRACKET STACKING on the right-side.
2. Fasten the other REAR BRACKET on the left-side.
NOTE
In case you already have a dryer stacked to a washer, and you are replacing the dryer with the new one,
remove the old REAR BRACKET on the right side and replace with the provided ASSY BRACKET STACKING.
STEP 2.
Put the dryer on the washer, as shown in the figure. Leave a little space
between the dryer and the bracket.
CAUTION
• To prevent noise, make sure the washer is level, and the dryer’s leveling
legs are tightened up. (Stacking Kit: SKK-8K, for 27” models)
• For detailed instructions on stacking, see the “Stacking Kit Installation
Instructions”.
• Make sure to keep the wire (of the ASSY BRACKET STACKING) away from
the top of the washer before stacking the dryer.
STEP 3.
Follow the STEP 7 ~ STEP 10 of the ‘Stacking Kit Installation Instructions’ provided with the SKK-8K to
assemble the bracket on the rear side of the washer. Assemble the provided ASSY BRACKET STACKING on
the right side and assemble the REAR BRACKET (provided with the SKK-8K stacking kit) on the left side.
All the necessary parts are included in the stacking kit.
Left / Gauche / Izquierda Right / Droite / Derecha
STEP 4.
Open the connector port cover on the dryer and the washer, connect the wire on both ports, and then close
the cover.
• Be careful not to damage the wire by the connector port cover.
• Do not pull the wire too hard to remove the connector from the port.
STEP 5. STEP 6.
There are two HOLDER WIRE pre-assembled to the
wire. Attach each HOLDER WIRE to the dryer and
the washer.
Check and make sure the washer and the dryer are
connected.
MULTI-CONTROL KIT INSTALLATION INSTRUCTIONS
DC68-04277A-00
MultiControl Kit Guide_DC68-04277A_EN+CFR+MES.indd 1 2020-12-24 10:49:12

CONSIGNES D’INSTALLATION DU KIT
MULTI-CONTRÔLE
INSTRUCCIONES DE INSTALACIÓN DEL
KIT DE CONTROL MÚLTIPLE
Composants
ATTENTION
Passez à l’ÉTAPE 4 du document « Instructions
d’installation du kit de superposition », fourni
avec le kit de superposition SKK-8K. Ensuite, à
l’arrière du lave-linge, installez sur le côté droit
l’ENSEMBLE DU KIT DE SUPERPOSITION fourni,
puis installez sur le côté gauche le SUPPORT
ARRIÈRE (fourni avec le kit de superposition
SKK-8K). Utilisez les vis fournies avec le kit de
superposition SKK-8K pour fixer les deux supports.
ÉTAPE 1
NE SERREZ PAS COMPLÈTEMENT LES VIS.
SANS SERRER, fixez les deux SUPPORTS ARRIÈRE
à l’arrière du lave-linge à l’aide des deux VIS À
TÊTE HEXAGONALE (6002-001431) et RONDELLES
(DC60-00044A). Les VIS À TÊTE HEXAGONALE
et les RONDELLES sont fournies dans le kit de
superposition SKK-8K.
1. Fixez l’ENSEMBLE DU SUPPORT DE
SUPERPOSITION sur le côté droit.
2. Fixez l’autre SUPPORT ARRIÈRE sur le côté
gauche.
REMARQUE
Si vous avez déjà un sèche-linge superposé sur un
lave-linge et que vous remplacez le sèche-linge
par le nouveau, retirez l’ancien SUPPORT ARRIÈRE
sur le côté droit et remplacez-le par l’ENSEMBLE
DU KIT DE SUPERPOSITION fourni.
ÉTAPE 2
Placez le sèche-linge sur le lave-linge, comme
illustré. Laissez un peu de place entre le sèche-
linge et le support.
ATTENTION
• Pour éviter tout bruit, assurez-vous que le
lave-linge est de niveau et que les pieds de
mise à niveau du sèche-linge sont serrés en
position relevée. (Kit de superposition : SKK-8K
pour les modèles de 27”)
• Pour consulter les instructions détaillées
concernant la superposition, reportez-vous à
la section « Instructions d’installation du kit de
superposition ».
• Assurez-vous que le câble (de l’ENSEMBLE
DU KIT DE SUPERPOSITION) soit éloigné du
dessus du lave-linge avant de superposer le
sèche-linge.
ÉTAPE 3
Suivez les ÉTAPES 7 à 10 du document
« Instructions d’installation du kit de
superposition », fourni avec le kit SKK-8K, pour
installer le support à l’arrière du lave-linge.
Installez sur le côté droit l’ENSEMBLE DU KIT
DE SUPERPOSITION fourni, puis installez sur
le côté gauche le SUPPORT ARRIÈRE (fourni
avec le kit de superposition SKK-8K). Toutes les
pièces nécessaires sont fournies dans le kit de
superposition.
ÉTAPE 4
Ouvrez le cache de l’orifice du connecteur sur le
sèche-linge et le lave-linge, branchez le câble sur
les deux ports, puis refermez le cache.
• Faites attention à ne pas endommager le câble
avec le cache du port du connecteur.
• Ne tirez pas trop fort sur le câble pour retirer le
connecteur du port.
ÉTAPE 5
Deux SUPPORTS DE CÂBLE préinstallés sur le
câble. Attachez chaque SUPPORT DE CÂBLE sur le
sèche-linge et le lave-linge.
ÉTAPE 6
Vérifiez que le lave-linge et le sèche-linge sont
raccordés.
Componentes
PRECAUCIÓN
Continúe con el PASO 4 de las ‘Instrucciones de
instalación del kit de apilamiento’ provistas con
el kit de apilamiento SKK-8K. Luego, en la parte
posterior de la lavadora, ensamble el MONTAJE DE
LA MÉNSULA DE APILAMIENTO en el lado derecho
y la MÉNSULA TRASERA (provista con el kit de
apilamiento SKK-8K) en el lado izquierdo. Ajuste
ambas ménsulas con los tornillos provistos con el
kit de apilamiento SKK-8K.
PASO 1.
NO AJUSTE COMPLETAMENTE LOS TORNILLOS.
Ajuste SIN MUCHA PRESIÓN dos MÉNSULAS
TRASERAS en la parte posterior de la lavadora
con los dos TORNILLOS DE CABEZA HEXAGONAL
(6002-001431) y las ARANDELAS (DC60-00044A).
Los TORNILLOS DE CABEZA HEXAGONAL y las
ARANDELAS se incluyen en el kit de apilamiento
SKK-8K.
1. Ajuste el MONTAJE DE LA MÉNSULA DE
APILAMIENTO en el lado derecho.
2. Ajuste la otra MÉNSULA TRASERA en el lado
izquierdo.
NOTA
En caso de que ya tenga una secadora apilada en
una lavadora y esté reemplazando la secadora por
una nueva, retire la MÉNSULA TRASERA vieja del
lado derecho y reemplácela con el MONTAJE DE
LA MÉNSULA DE APILAMIENTO provisto.
PASO 2.
Coloque la secadora sobre la lavadora, como se
muestra en la imagen. Deje un poco de espacio
entre la secadora y la ménsula.
PRECAUCIÓN
• Para evitar ruidos, asegúrese de que la
lavadora esté nivelada y que las patas
niveladoras de la secadora estén bien
ajustadas. (Kit de apilamiento: SKK-8K, para
modelos de 27”)
• Para obtener instrucciones detalladas sobre
el apilamiento, consulte las “Instrucciones de
instalación del kit de apilamiento”.
• Asegúrese de mantener el cable (del MONTAJE
DE LA MÉNSULA DE APILAMIENTO) alejado de
la parte superior de la lavadora antes de apilar
la secadora.
PASO 3.
Siga los PASOS 7 a 10 de las ‘Instrucciones de
instalación del kit de apilamiento’ provistas con
el kit de apilamiento SKK-8K para ensamblar
la ménsula en la parte posterior de la lavadora.
Ensamble el MONTAJE DE LA MÉNSULA DE
APILAMIENTO en el lado derecho y la MÉNSULA
TRASERA (provista con el kit de apilamiento SKK-
8K) en el lado izquierdo. Todos los componentes
necesarios se incluyen en el kit de apilamiento.
PASO 4.
Abra la tapa del puerto de conexión en la secadora
y la lavadora, conecte el cable en ambos puertos y,
luego, cierre la tapa.
• Tenga cuidado de no dañar el cable con la tapa
del puerto de conexión.
• No jale el cable con demasiada fuerza para
quitar el conector del puerto.
PASO 5.
Hay dos SOPORTES DE CABLE pre-ensamblados al
cable. Fije cada SOPORTE DE CABLE a la secadora
y la lavadora.
PASO 6.
Verifique y asegúrese de que la lavadora y la
secadora estén conectadas.
MultiControl Kit Guide_DC68-04277A_EN+CFR+MES.indd 2 2020-12-24 10:49:12
-
 1
1
-
 2
2


dans d''autres langues
- English: Samsung DV-MCK/A1 Installation guide
- español: Samsung DV-MCK/A1 Guía de instalación
Documents connexes
-
Samsung SKK-8MC Manuel utilisateur
-
-
Samsung SK-DH Guide d'installation
-
Samsung SKK-9MC Guide d'installation
-
Samsung SKK-9MCG Guide d'installation
-
Samsung DVE45T6100C/AC Manuel utilisateur
-
Samsung Dryer Manuel utilisateur
-
Samsung DVE45T6000W/A3 Manuel utilisateur
-
-
Samsung DVG45T6200W Manuel utilisateur