
DI-070-47605-20A
Installation Instructions Directives d'installation Instrucciones de Instalación
Mini DC Power Supply
Minibloc d’alimentation c.c.
Pequeña Fuente de
Alimentación de CC
47605-PSB
Mini DC Power Supply
DESCRIPTION
The Mini DC Power Supply provides power to up to three 12 VDC devices,
accommodating North American and International voltages. Designed to easily fit
inside Leviton's Structured Media™ enclosure, the Mini DC Power Supply provides a
central location for all your power needs.
SPECIFICATIONS
Input AC Voltage Rating: 90-264V AC
Input AC Current: 1 Amp, max
DC Power Output Rating: 10 Watts, approximate
Source Frequency: 47/63 Hz
DC Outputs: 3 Outputs at 12V DC ± 10%; Max current = 833 mAs
(total)
Inrush Current: < 20 Amp @ 115 VAC
< 40 Amp @ 230 VAC
Efficiency: >75% Typical
LED: One green LED; indicates DC Power is available
Short Circuit Protection: Continuous
Agency Listings: cULus (UL 1950 and CSA Equivalent), IEC 60950,
ACA (CTICK), NOM
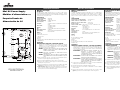
Figure 1:
A. Screws (x6)
B. Cable Clamp, not provided
C. Cable Knockout
D. Housing
E. Romex
F. Opening in base of Structured Media™ Enclosure (enclosure) for Power Module
G. Wiring Nuts (x3)
INSTALLATION
IMPORTANT SAFETY INSTRUCTIONS––READ BEFORE INSTALLING
Carefully read all installation instructions before beginning your intended
installation. If you do not understand any part of them, consult a qualified
electrician. This unit must be installed and/or used in accordance with
appropriate electrical codes and regulations.
WARNING:
TO AVOID FIRE, SHOCK, OR DEATH: TURN OFF POWER AT CIRCUIT
BREAKERS OR FUSES. TEST CIRCUIT TO MAKE SURE THAT THE
POWER IS OFF BEFORE WIRING!
WARNING:
THIS DEVICE IS INTENDED FOR SINGLE BRANCH CIRCUIT
INSTALLATIONS ONLY.
WARNING:
USE THIS DEVICE ONLY WITH COPPER OR COPPER-CLAD WIRE!
WITH ALUMINUM WIRE, USE ONLY DEVICES MARKED CO/ALR OR
CU/AL.
1. When positioning the enclosure on the wall, ensure that adequate space is
provided for the power supply and any associated wiring.
2. Remove the small rectangular knockout in the bottom of the enclosure.
3. Remove the two screws in the power supply cover, then lift its internal circuit
assembly out of the junction box.
4. Remove the small knockout on the junction box bottom, install the cable clamp
(Figure 1) and position the box into the smaller opening of the enclosure.
5. Verify the power is off and feed electrical wire through the hole in the bottom
panel of the power supply. An independent 15 amp circuit should be used to
provide power to the enclosure’s Mini Power Supply.
Minibloc d’alimentation c.c.
DESCRIPTION
Ce minibloc peut alimenter jusqu’à trois dispositifs de 12 V c.c., suivant diverses
normes de courant tant nord-américaines qu’internationales. Conçu pour s'adapter
aisément aux centres Structured Media
MC
(centre médias structurés, ou CMS) de
Leviton, il offre une solution centralisée à tous les besoins en matière de courant
continu.
FICHE TECHNIQUE
Tension d’entrée en courant alternatif : de 90 à 264 V c.a.
Intensité d’entrée en courant alternatif : 1 A, max.
Puissance de sortie en courant continu : environ 10 W
Fréquence d’entrée : de 47 à 63 Hz
Sorties en courant continu : 3 prises à 12 V c.c. ± 10 %; courant max. de 0 à
833 mA (en tout)
Courant d’appel : < 20 A à 115 V c.a.
< 40 A à 230 V c.a.
Rendement : > 75 % (normale)
Témoin : un vert indiquant la présence de courant continu
Protection contre les
courts-circuits : continue
Homologations : cULus (UL 1950 et norme CSA équivalente), CEI
60950 et ACA (CTICK), NOM
Figure 1:
A. Vis (x6)
B. Collier de câble (non compris)
C. Débouchure de câble
D. Boîtier
E. Câble romex
F. Ouverture au bas du CMS pour le module d’alimentation
G. Marettes (x3)
INSTALLATION
IMPORTANTES CONSIGNES DE SÉCURITÉ – À LIRE AVANT DE COMMENCER
On doit lire attentivement ces directives dans leur ensemble avant de procéder;
à défaut de bien les comprendre, en tout ou en partie, on doit faire appel à un
électricien qualifié. Ce dispositif doit être installé ou utilisé conformément aux
codes de l’électricité en vigueur.
AVERTISSEMENT :
POUR ÉVITER LES RISQUES D’INCENDIE, DE CHOC
ÉLECTRIQUE OU D'ÉLECTROCUTION, COUPER LE
COURANT AU FUSIBLE OU AU DISJONCTEUR ET
S’ASSURER QUE LE CIRCUIT SOIT BIEN COUPÉ AVANT DE
PROCÉDER À L’INSTALLATION!
AVERTISSEMENT :
CE DISPOSITIF EST EXCLUSIVEMENT CONÇU POUR LES
INSTALLATIONS À UNE SEULE DÉRIVATION.
AVERTISSEMENT :
N’UTILISER CE DISPOSITIF QU’AVEC DU FIL DE CUIVRE OU
PLAQUÉ CUIVRE! EN PRÉSENCE DE FIL D’ALUMINIUM,
UTILISER SEULEMENT LES DISPOSITIFS PORTANT LA
MARQUE CU/AL OU CO/ALR.
1. Lorsqu’on place le logement (CMS) contre un mur, on doit prévoir suffisamment
d’espace pour le bloc d’alimentation et son câblage.
2. Retirer la petite débouchure rectangulaire au bas du logement.
3. Retirer les deux vis du couvercle du bloc d’alimentation et soulever le câblage
interne du boîtier.
4. Retirer la petite débouchure du dessous du boîtier, fixer un collier de câble
(figure 1) et positionner le boîtier dans la petite ouverture du logement.
Pequeña Fuente de Alimentación de CC
DESCRIPCIÓN
La Pequeña Fuente de Alimentación de CC provee energía a hasta 3 artefactos que
requieran 12Vcc y opera en cualquier parte del mundo. Esta fuente de alimentación
provee energía desde un punto central y fue diseñado para calzar fácilmente en las
cajas Structured Media de Leviton.
ESPECIFICACIONES
Voltaje de Entrada: 90-264 Vca
Corriente de Entrada: 1 A, máximo
Potencia de Salida: 10 W, aproximados
Frecuencia de Fuente: 47-63 Hz
Salidas de Vcc: 3 Salidas de 12 Vcc ± 10%; Corriente Máx. = 0 –
833 mA (total)
Corriente de Entrada: < 20 A @ 115 Vca
< 40 A @ 230 Vca
Rendimiento: > 75% (típico)
Luz Indicadora LED: Una verde; indica la disponibilidad de Vcc
Protección de Corto Circuito: Continua
Agencias Reguladoras: cULus (UL 1950 y Equivalente de CSA), IEC 60950,
ACA (CTICK), NOM
Ilustración 1:
A. Tornillos (6 unidades)
B. Abrazadera para Cables, no está incluida
C. Tapa Removible de Cable
D. Caja
E. Romex
F. Apertura en la base de la Caja Structured Media
MR
para el Módulo de
Alimentación
G. Unidores de Cables (3 unidades)
INSTALACIÓN
INSTRUCCIONES IMPORTANTES PARA SU SEGURIDAD – LEALAS ANTES DE
COMENZAR LA INSTALACION
Lea detalladamente todas las instrucciones de instalación antes de
comenzar. Si no comprende alguna sección, consulte a un electricista
profesional. Esta unidad debe ser instalada y/u operada respetando todas las
regulaciones y códigos eléctricos locales.
ADVERTENCIA:
¡PARA EVITAR INCENDIO, ELECTROCUCIÓN, O MUERTE:
DESCONECTE LOS CORTA CIRCUITO Y ANTES DE
COMENZAR EL CABLEADO, PRUEBE EL CIRCUITO PARA
CONFIRMAR QUE NO ESTE ENERGIZADO!
ADVERTENCIA:
ESTE ARTEFACTO ESTA DISEÑADO PARA INSTALAR SOLO EN
CIRCUITOS INDEPENDIENTES.
ADVERTENCIA:
¡CON ESTE ARTEFACTO UTILICE SOLO CABLES DE COBRE O
CON GANCHOS DE COBRE!
1. Al instalar la caja sobre la pared, deje suficiente espacio para la Fuente de
Alimentación Universal y sus cables.
2. Retire la tapa removible rectangular que se encuentra en la base de la caja.
3. Retire los dos tornillos de la tapa de la fuente de alimentación y saque el
circuito interno de la caja de unión.
4. Retire la pequeña tapa removible que se encuentra debajo de la caja de unión,
instale la abrazadera para cables (Ilustración 1) y coloque la caja en la
pequeña apertura.
A Division of Leviton Manufacturing Co.,Inc.
Technical Support: 800-648-3332
www.levitonvoicedata.com
1
E
D
A
C
B
G
F

IMPORTANT INSTRUCTIONS
1.
Read and understand all instructions. Follow all warnings and instructions marked on the product.
2.
Do not use this product near water—e.g., near a tub, wash basin, kitchen sink or laundry tub, in a
wet basement, or near a swimming pool.
3.
Never push objects of any kind into this product through openings, as they may touch dangerous
voltages.
4.
SAVE THESE INSTRU
CTIONS.
SAFETY INFORMATION
1.
Never install communications wiring or components during a lightning storm.
2.
Never install communications components in wet locations unless the components are designed
specifically for use in wet locations.
3.
Never touch uninsulated wires or terminals unless the wiring has been disconnected at the network
interface.
4.
Use caution when installing or modifying communications wiring or components.
DIRECTIVES IMPORTANTES
1.
Lire les présentes directives et s’assurer de bien les comprendre; observer tous les
avertissements et directives apparaissant sur le dispositif.
2.
Ne pas installer ce dispositif à proximité d’une source d’eau – comme une baignoire, un bac à
laver, une cuve à lessive ou un évier de cuisine –, dans un sous-sol humide ni près d’une piscine.
3.
Ne jamais insérer quelque objet que ce soit dans les ouvertures de ce dispositif; il pourrait entrer
en contact avec des tensions dangereuses.
4.
CONSERVER LES PRÉSENTES DIRECTIVES.
CONSIGNES DE SÉCURITÉ
1.
Ne jamais effectuer l’installation de câblage ou de composants de communication pendant un
orage.
2.
Ne jamais installer de composants de communication dans des endroits mouillés à moins qu’il
s’agisse de dispositifs conçus spécialement pour cet usage.
3.
Ne jamais toucher des bornes de raccordement ni du fil non isolés, à moins que le circuit ne soit
pas relié à l’interface réseau.
4.
On doit prendre toutes les précautions requises lorsqu’on installe ou modifie du câblage ou des
composants de télécommunication.
INSTRUCCIONES IMPORTANTES
1.
Lea y comprenda perfectamente todas las instrucciones. Siga todas las instrucciones y
advertencias marcadas sobre el producto.
2.
No utilice estos productos cerca del agua, por ejemplo, cerca de bañeras, tinas, lavaderos
o lavabos, fregaderos de cocina, tinas para lavandería, dentro de sótanos húmedos, o
cerca de piscinas.
3.
Nunca introduzca objetos de ningún tipo a través de las aberturas de estos productos,
ya que pueden hacer contacto con voltajes peligrosos.
4.
CONSERVE ESTAS INSTRUCCIONES.
INFORMACIÓN SOBRE SEGURIDAD
1.
Nunca instale cableado o componentes de comunicaciones durante una tormenta
eléctrica.
2.
Nunca instale componentes de comunicaciones en un local mojado, a menos que los
componentes hayan sido diseñados especificamente para uso en locales mojados.
3.
Nunca toque alambres o terminales sin su cubierta, a menos que el cableado haya sido
desconectado en el interfaz de la red
.
4.
Use precaución cuando esté instalando o modificando cableado o componentes de
comunicaciones.
DI-070-47605-20A
Using the provided wire nuts and the wires connected to the internal circuitry:
a. Connect the NEUTRAL conductor to the WHITE neutral wire.
b. Connect the POWER (live/main) conductor to the BLACK line wire.
c. Connect the BARE (ground/earthed) wire to the GREEN ground wire.
6. Position the junction box in the enclosure opening and secure the cover/power
supply circuit assembly to it using two of the provided screws. Then secure the
entire power supply to the enclosure with the remaining four screws. (Figure 1)
NOTE: Restore power to the power service wiring for the power supply.
OPERATION
1. During normal operation, the Green LED on the power supply should be
illuminated.
2. If the LED is not illuminated, verify that the AC power input to the supply is
present.
If AC power is present and the Green LED is off, check for an overload condition
by removing selected DC output cables. If the LED remains off, then the power
supply is not working properly and it should be replaced immediately.
For technical support regarding the DC Mini Power Supply, please contact Power
Quality at 1-800-648-3332 (US); or, for technical assistance regarding the Structured
Media Center, please contact technical support at Leviton Voice and Data: 1-800-
824-3005.
5. S’assurer que le courant soit bien coupé et insérer le fil électrique dans la
débouchure inférieure du bloc d’alimentation. Ce dernier devrait être alimenté par
un circuit indépendant de 15 ampères.
En utilisant les marettes fournies, effectuer les connexions suivantes :
a. raccorder le fil de circuit NEUTRE au fil de sortie BLANC du bloc
d’alimentation;
b. raccorder le fil de circuit ACTIF (ligne) au fil de sortie NOIR du bloc
d’alimentation;
c. raccorder le fil de circuit DÉNUDÉ (terre) au fil de sortie VERT du bloc
d’alimentation.
6. Fixer le couvercle/boîtier du bloc d’alimentation au logement du CMS au moyen
de deux des vis fournies. Assujettir ensuite le bloc lui-même en utilisant les
quatre vis restantes (figure 1).
REMARQUE : rétablir le courant au fusible ou au disjoncteur.
FONCTIONNEMENT
1. En fonctionnement normal, le témoin vert du bloc d’alimentation devrait être
allumé.
2. Si le témoin ne s’allume pas, s’assurer que le bloc soit bien alimenté en courant
alternatif.
Si le témoin ne s’allume pas alors que l’alimentation c.a. est adéquate, on doit
vérifier s’il y a surcharge en retirant un à un les câbles de sortie c.c.; si le témoin
ne s’allume toujours pas une fois les câbles déconnectés, le bloc est
probablement défectueux et doit être remplacé sans délai.
Pour obtenir de l’assistance technique relativement à ce minibloc d’alimentation c.c.,
prière de communiquer avec la division de la Qualité de l’alimentation en composant
le 1 800 648-3332 (É.-U.); pour obtenir de l’aide concernant les centres médias
structurés (Structured Media), on doit plutôt composer le numéro du soutien
technique de la division Voix et données, soit le 1 800 824-3005 (services en anglais
seulement).
5. Verifique que la alimentación está apagada y coloque cable a través del
hueco en la parte inferior del panel de la Fuente de Alimentación. Un
circuito independiente de 15A debe ser utilizado para alimentar la caja de
la Pequeña Fuente de Alimentación.
Utlizando los empalmadores de cables y los cables conectados al circuito
interno:
a. Conecte el conductor NEUTRAL al cable neutral BLANCO.
b. Conecte la LINEA (POWER) al cable de línea NEGRO.
c. Conecte el conductor de COBRE (TIERRA) al cable de tierra VERDE.
6. Coloque la caja de unión en la apertura y fije la tapa/fuente de alimentación
con los dos tornillos incluidos. Luego fije toda la fuente a la caja con los
otros cuatro tornillos. (Ilustración 1)
AVISO: Conecte la energía eléctrica a la fuente de alimentación.
OPERACION
1. La luz indicadora verde (LED) en al fuente de alimentación (cerca del
fusible) debe estar encendida.
2. Si la luz indicadora se encuentra apagada, verifique que existe alimentación
de Vca a la fuente.
Si la alimentación a la fuente es la correcta y la luz verde LED permanece
apagada, revise si se ha sobrecargado el circuito desconectando algunos
de los cables de salida de Vcc. Si la luz continua apagada, la fuente de
alimentación no está funcionando correctamente y debe ser reemplazada
inmediatamente.
Para recibir asistencia técnica para la Pequeña Fuente de Alimentación
Universal, en EE.UU. contacte a Power Quality al 1-800-648-3332. Para recibir
asistencia técnica para el Centro Structured Media, favor de contactar en
EE.UU. a Leviton Voice and Data al 1-800-824-3005. Si se encuentra fuera de
EE.UU., favor de contactar a su representante local.
2222 - 222nd Street SE
Bothell, WA 98021, USA
Phone: (425) 485-4288
F ax: (425) 483-5270
www.levitonvoicedata.com
-
 1
1
-
 2
2

