
BC-TRV
4-289-689-22(1)
Battery Charger
Chargeur de Batterie
Operating Instructions
Mode d’emploi
Manual de instrucciones
Bedienungsanleitung
Gebruiksaanwijzing
Bruksanvisning
Istruzioni per l’uso
Manual de instruções
© 2010 Sony Corporation Printed in China
1
2
3
4
5
6
7
8
ank you for purchasing the Sony Battery charger.
Before operating this Battery charger, please read this manual
thoroughly and retain it for future reference.
e BC-TRV battery charger can only be used to charge ˎ
“InfoLITHIUM” battery packs (V series, H series and P series).
“InfoLITHIUM” V series, H series and P series battery packs have ˎ
the , and marks, respectively.
is unit cannot be used to charge a nickel cadmium type or nickel ˎ
metal hydride type battery pack.
“InfoLITHIUM” is a trademark of Sony Corporation. ˎ
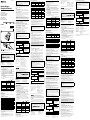
Identifying the parts
1 Charging status indicator lamp
2 CHARGE lamp
3 Charger mark
4 AC input terminal
5 Battery pack
6 Battery mark
7 Power cord (Mains lead)
8 to wall outlet (wall socket)
To Charge the Battery Pack
e battery pack is charged by attaching it to this unit.
* e battery pack illustrated is V series.
1 Attach the battery pack.
Align the battery mark in the direction of the charger mark and
insert it in the direction of the arrow (See illustration ).
2 Connect the power cord (mains lead) to this unit and then
to a wall outlet (wall socket) (See Illustration ).
e CHARGE lamp (orange) lights up and charging begins.
When the CHARGE lamp goes out, normal charging is completed
(Normal charge).
For a full charge, which allows you to use the battery pack longer
than usual, leave the battery pack in place for approximately another
one hour (Full charge).
You can check the charging status in more detail with the charging
status indicator lamp.
, ... O, , ... Lit up
Charging status
indidator lamp
CHARGE lamp
Immediately aer
attaching the battery
pack - 30 %
30 % - 60 %
60 % -
Normal charge
Normal charge -
Full charge
Aer full charge
To remove the battery pack
Remove the battery pack by sliding it in the opposite direction to when
you attached it.
Charging time
e following table shows the charging time for a battery pack that is
completely discharged.
“InfoLITHIUM” battery pack V series
Battery pack NP-FV100 NP-FV70 NP-FV50
Full charging time 680 385 225
Normal charging time (620) (325) (165)
“InfoLITHIUM” battery pack H series
Battery pack NP-FH100 NP-FH70 NP-FH50
Full charging time 680 350 210
Normal charging time (620) (290) (150)
“InfoLITHIUM” battery pack P series
Battery pack NP-FP90 NP-FP71 NP-FP50
Full charging time 525 355 190
Normal charging time (465) (295) (130)
Approximate number of minutes to fully charge an empty battery ˎ
pack (Full charging time).
Numbers in parentheses indicate the time to charge normally ˎ
(Normal charging time).
For more about the battery life, see the instruction manual of your ˎ
video camera.
e charging time may dier depending on the condition of the ˎ
battery pack or the ambient temperature.
e times shown are for charging an empty battery pack which has ˎ
been run down with a video camera, using this unit at an ambient
temperature of 25 °C (77 °F).
Charging temperature
e temperature range for charging is 0 °C to 40 °C (32 °F to 104 °F).
For maximum battery eciency, the recommended temperature
range when charging is 10 °C to 30 °C (50 °F to 86 °F).
To use the battery pack quickly
You can remove the battery pack from this unit and use it even if
charging is not completed. However, the charging time aects the time
that the battery pack can be used.
Notes
If the CHARGE lamp does not light up, check if the battery pack is ˎ
rmly attached to this unit.
When a fully charged battery pack is installed, the CHARGE lamp ˎ
lights up once and then goes out.
A battery pack that has not been used for a long time may take longer ˎ
than usual to charge.
Unplug this unit from the wall outlet (wall socket) aer use. To ˎ
disconnect the power cord (mains lead), pull it out by the plug. Never
pull the power cord (mains lead) itself.
is unit supports worldwide voltages 100 V to 240 V.
Do not use an electronic voltage transformer, as this may cause a
malfunction.
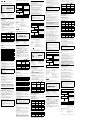
Troubleshooting
When the CHARGE lamp blinks, check through the following chart.
The CHARGE lamp blinks in two ways.
Blinks slowly: Turns on and o repeatedly every 1.5 seconds
Blinks quickly: Turns on and o repeatedly every 0.15 seconds
e action to be taken depends on the way the CHARGE lamp blinks.
When the CHARGE lamp keeps blinking slowly
Charging is pausing. is unit is in the standby state.
If the room temperature is out of the appropriate temperature range,
charging stops automatically.
When the room temperature returns to the appropriate range, the
CHARGE lamp lights up and charging restarts.
We recommend charging the battery pack at 10 °C to 30 °C.
When the CHARGE lamp keeps blinking quickly
When charging the battery pack for the rst time in one of the
following situations, the CHARGE lamp may blink quickly.
If this happens, remove the battery pack from this unit, reattach it
and charge it again.
When the battery pack is le for a long time
When the battery pack is le installed in the camera for a long time
Immediately aer purchase
If the CHARGE lamp keeps blinking quickly, check through the
following chart.
Please contact your nearest Sony dealer in connection with the product that may
have a problem.
Remove the battery pack that is being charged and then rmly attach the same
battery pack again.
The CHARGE lamp blinks again:
Install another battery pack.
The CHARGE lamp lights up and
does not blink again:
If the CHARGE lamp goes out
because the charging time has
passed, there is no problem.
The CHARGE lamp blinks again:
e problem is with this unit.
The CHARGE lamp lights up and
does not blink again:
If the CHARGE lamp goes out
because the charging time has
passed, the problem is with the
battery pack rst installed.
Specications
Input rating 100 V - 240 V AC 50 Hz/60 Hz
7 VA - 12 VA 6 W
Output rating Battery charge terminal:
8.4 V DC 400 mA
Operating temperature 0 °C to 40 °C (32 °F to 104 °F)
Storage temperature –20 °C to +60 °C (–4 °F to +140 °F)
Dimensions (Approx.) 42 mm × 32 mm × 76 mm (w/h/d)
(1 11/16 in. × 1 5/16 in. × 3 in.)
Mass Approx. 57 g (2.1 oz)
Included items Battery Charger (BC-TRV) (1)
AC Power cord (mains lead) (1)
Set of printed documentation
Design and specications are subject to change without notice.
Merci pour l’achat de ce chargeur de batterie Sony.
Avant d’utiliser ce chargeur de batterie, veuillez lire attentivement ce
manuel et le conserver pour toute référence future.
Le chargeur de batterie BC-TRV ne peut être utilisé que pour ˎ
charger les batteries « InfoLITHIUM » (série V, série H et série P).
Les batteries « InfoLITHIUM » (série V, série H et série P) portent ˎ
respectivement les marques , et .
Cet appareil ne peut pas être utilisé pour charger une batterie ˎ
rechargeable nickel-cadmium ou nickel-hydrure métallique.
« InfoLITHIUM » est une marque commerciale de Sony Corporation. ˎ
Identication des éléments
1 Témoin d’état de charge
2 Témoin CHARGE
3 Repère du chargeur
4 Borne d’entrée CA
5 Batterie rechargeable
6 Repère de la batterie
7 Cordon d’alimentation
8 À une prise murale
Pour charger la batterie
rechargeable
La batterie rechargeable se charge lorsqu’elle est insérée dans cet
appareil.
* La batterie illustrée est une batterie de série V.
1 Insérez la batterie rechargeable.
Alignez le repère de la batterie dans la direction du repère
du chargeur et insérez la batterie dans le sens de la èche (Voir
l’illustration ).
2 Raccordez le cordon d’alimentation à cet appareil puis à
une prise murale (Voir l’illustration ).
Le témoin CHARGE (orange) s’allume et la recharge commence.
Lorsque le témoin CHARGE s’éteint, la charge normale est terminée
(Charge normale).
Pour une charge complète, qui permet d’utiliser la batterie
rechargeable plus longtemps que la normale, laissez la batterie
rechargeable en place pendant encore une heure environ (Charge
complète).
Vous pouvez avoir un aperçu plus exact de l’état de charge grâce au
témoin de charge.
, ... Éteint, , ... Éclairé
Témoin d’état de
charge
Témoin CHARGE
Immédiatement
après l’installation de
la batterie - 30%
30 % - 60 %
60 % -
Charge normale
Charge normale -
Charge complète
Après une charge
complète
Pour retirer la batterie rechargeable
Retirez la batterie en la faisant glisser dans le sens opposé de l’insertion.
Temps de charge
Le tableau suivant montre le temps de charge pour une batterie
rechargeable complètement déchargée.
Batterie « InfoLITHIUM » série V
Batterie rechargeable NP-FV100 NP-FV70 NP-FV50
Temps de charge
complète
680 385 225
Temps de charge
normale
(620) (325) (165)
Batterie « InfoLITHIUM » série H
Batterie rechargeable NP-FH100 NP-FH70 NP-FH50
Temps de charge
complète
680 350 210
Temps de charge
normale
(620) (290) (150)
Batterie « InfoLITHIUM » série P
Batterie rechargeable NP-FP90 NP-FP71 NP-FP50
Temps de charge
complète
525 355 190
Temps de charge
normale
(465) (295) (130)
Nombre approximatif de minutes pour charger complètement une ˎ
batterie rechargeable vide (Temps de charge complète).
Les nombres entre parenthèses indiquent le temps pour une charge ˎ
normale (Temps de charge normale).
Pour de plus amples informations sur l’autonomie de la batterie, ˎ
reportez-vous au mode d’emploi de votre caméscope.
Le temps de charge peut être diérent selon l’état de la batterie ˎ
rechargeable ou la température ambiante.
Les temps indiqués correspondent à la charge d’une batterie ˎ
rechargeable vide, usée sur un caméscope, avec cet appareil à une
température ambiante de 25 °C.
Température de charge
La température doit se situer entre 0 °C et 40 °C pour la charge.
Pour une ecacité maximale de la batterie, la température
conseillée pour la charge est de 10 °C à 30 °C.
Pour utiliser rapidement la batterie rechargeable
Vous pouvez retirer la batterie rechargeable de cet appareil et l’utiliser
même si la charge n’est pas terminée. Cependant, le temps de charge a
une inuence sur l’autonomie de la batterie rechargeable.
Remarques
Si le témoin CHARGE ne s’allume pas, vériez si la batterie ˎ
rechargeable est bien insérée dans cet appareil.
Lorsqu’une batterie chargée est installée, le témoin CHARGE s’allume ˎ
une fois puis s’éteint.
Une batterie rechargeable qui n’a pas été utilisée pendant longtemps ˎ
peut être plus longue à charger que la normale.
Débranchez cet appareil de la prise murale après utilisation. Pour ˎ
débrancher le cordon d’alimentation, tirez sur la che. Ne tirez jamais
sur le cordon d’alimentation proprement dit.
Cet appareil supporte les tensions du monde entier, de 100 V à 240 V.
N’utilisez pas un transformateur électronique de tension car ceci
pourrait provoquer un dysfonctionnement.
En cas de problème
Lorsque le témoin CHARGE clignote, vériez les points du tableau
suivant.
Le témoin CHARGE clignote de deux façons.
Clignotement lent : S’allume et s’éteint toutes les 1,5 secondes de
façon répétée.
Clignotement rapide : S’allume et s’éteint toutes les 0,15 secondes de
façon répétée.
La mesure à prendre dépend de la façon dont le témoin CHARGE
clignote.
Lorsque le témoin CHARGE continue de clignoter lentement
La charge est en pause. Cet appareil est en attente.
Si la température de la pièce est hors de la plage de températures
appropriée, la charge s’arrête automatiquement.
Lorsque la température de la pièce revient dans la plage appropriée, le
témoin CHARGE s’allume et la charge redémarre.
Il est conseillé de charger la batterie rechargeable entre 10 °C et 30 °C.
Lorsque le témoin CHARGE continue de clignoter rapidement
La première fois que vous chargez la batterie dans une des situations
suivantes, le témoin CHARGE peut clignoter rapidement.
Dans ce cas, retirez la batterie de cet appareil puis réinsérez-la et
chargez-la de nouveau.
Si la batterie est restée longtemps inutilisée
Si la batterie est restée longtemps dans l’appareil photo
Immédiatement après l’achat
Si le témoin CHARGE continue de clignoter rapidement, vériez les
points du tableau suivant.
Veuillez contacter le revendeur Sony le plus proche du produit présentant
éventuellement un problème.
Retirez la batterie rechargeable qui a été chargée et insérez-la de nouveau
fermement dans le chargeur.
Le témoin CHARGE clignote de
nouveau :
Installez une autre batterie.
Le témoin CHARGE s’allume et ne
clignote plus :
Si le témoin CHARGE s’éteint parce
que le temps de charge est dépassé, il
n’y a aucun problème.
Le témoin CHARGE clignote de
nouveau :
Le problème vient de cet appareil.
Le témoin CHARGE s’allume et ne
clignote plus :
Si le témoin CHARGE s’éteint parce
que le temps de charge est dépassé, le
problème vient de la première
batterie installée.
Spécications
Puissance nominale d’entrée 100 V - 240 V CA 50 Hz/60 Hz
7 VA - 12 VA 6 W
Puissance nominale de sortie Borne de charge de la batterie :
8,4 V CC 400 mA
Température de fonctionnement 0 °C à 40 °C
Température d’entreposage –20 °C à +60 °C
Dimensions (environ) 42 mm × 32 mm × 76 mm (l/h/p)
Poids environ 57 g
Articles inclus Chargeur de batterie (BC-TRV) (1)
Cordon d’alimentation secteur (1)
Jeu de documents imprimés
La conception et les spécications peuvent être modiées sans préavis.
POR FAVOR LEA DETALLADAMENTE ESTE MANUAL DE
INSTRUCCIONES ANTES DE CONECTAR Y OPERAR ESTE EQUIPO.
RECUERDE QUE UN MAL USO DE SU APARATO PODRÍA ANULAR
LA GARANTÍA.
Muchas gracias por la adquisición del cargador de baterías Sony.
Antes de poner en funcionamiento este cargador de baterías, lea
detalladamente todo este manual y guárdelo para poderlo consultar en
el futuro.
El cargador de baterías BC-TRV solamente podrá utilizarse para ˎ
cargar baterías “InfoLITHIUM” (serie V, serie H, y serie P).
Las baterías “InfoLITHIUM” de la V, serie H, y serie P poseen las ˎ
marcas , , y , respectivamente.
Esta unidad no podrá utilizarse para cargar baterías de tipo níquel- ˎ
cadmio ni de hidruro de metal de níquel.
“InfoLITHIUM” es marca comercial de Sony Corporation. ˎ
Identicación de las partes
1 Lámpara indicadora de estado de
carga
2 Lámpara CHARGE
3 Marca del cargador
4 Terminal de entrada de ca
5 Batería
6 Marca de la batería
7 Cable de alimentación
8 a la toma de corriente de la
pared
Para cargar la batería
La batería se carga jándola a esta unidad.
* La batería de la ilustración es de la serie V.
1 Fije la batería.
Alinee la mara de la batería en el sentido de la marca del
cargador, e inserte la batería en el sentido de la echa (Consulte la
ilustración ).
2 Conecte el cable de alimentación a esta unidad y
después a una toma de corriente de la pared (Consulte la
ilustración ).
La lámpara CHARGE (naranja) se encenderá y se iniciará la carga.
Cuando se apague la lámpara CHARGE, habrá nalizado la carga
normal (Carga normal).
Para una carga completa, que le permitirá utilizar la batería más de
lo normal, deje la batería como está durante aproximadamente otra
hora (Carga completa).
Usted podrá comprobar el estado de carga con más detalle con la
lámpara indicadora de estado de carga.
, ... Apagada, , ... Encendida
Lámpara indicadora
de estado de carga
Lámpara CHARGE
Inmediatamente
después de haber
jado la batería -30 %
30 % - 60 %
60 % - Carga normal
Carga normal - Carga
completa
Después de la carga
completa
Para retirar la batería
Retire la batería deslizándola en sentido opuesto al de su jación.
Tiempo de carga
En la tabla siguiente se muestra el tiempo de carga de una batería
completamente descargada.
Batería “InfoLITHIUM” de la serie V
Batería NP-FV100 NP-FV70 NP-FV50
Tiempo de carga
completa
680 385 225
Tiempo de carga normal (620) (325) (165)
Batería “InfoLITHIUM” de la serie H
Batería NP-FH100 NP-FH70 NP-FH50
Tiempo de carga
completa
680 350 210
Tiempo de carga normal (620) (290) (150)
Batería “InfoLITHIUM” de la serie P
Batería NP-FP90 NP-FP71 NP-FP50
Tiempo de carga
completa
525 355 190
Tiempo de carga normal (465) (295) (130)
Número aproximado de minutos para cargar completamente una ˎ
batería descargada (Tiempo de carga completa).
Los números entre paréntesis indican el tiempo para cargar ˎ
normalmente (Tiempo de carga normal).
Para más detalles acerca de la duración de la batería, consulte el ˎ
manual de instrucciones de su videocámara.
El tiempo de carga puede diferir dependiendo de la condición de la ˎ
batería o de la temperatura ambiental.
Los tiempos mostrados son para carga de una batería vacía que se ˎ
haya agotado con una videocámara, utilizando esta unidad en una
temperatura ambiental de 25 °C
Temperatura de carga
El margen de temperaturas para carga es de 0 °C a 40 °C
Para obtener el máximo rendimiento de una batería, el margen de
temperaturas recomendado es de 10 °C a 30 °C
Para utilizar rápidamente la batería
Puede retirar la batería de esta unidad y utilizarla incluso aunque no
haya nalizado la carga. Sin embargo, el tiempo de carga afectará el
tiempo que podrá utilizarse la batería.
Notas
Si la lámpara CHARGE no se enciende, compruebe si la batería está ˎ
rmemente jada a esta unidad.
Cuando instale una batería completamente cargada, la lámpara ˎ
CHARGE se encenderá una vez, y después se apagará.
Una batería que no se haya utilizado durante mucho tiempo, puede ˎ
tardar más de lo normal en cargarse.
Después de haber utilizado esta unidad, desenchúfela de la toma de ˎ
corriente de la pared. Para desconectar el cable de alimentación, tire
del enchufe. No tire nunca del propio cable de alimentación.
Esta unidad es compatible con las tensiones de todo el mundo de
100 V a 240 V.
No utilice un transformador de voltaje electrónico, porque es
posible que ocasione un mal funcionamiento.
Solución de problemas
Cuando la lámpara CHARGE parpadee, compruebe lo siguiente.
La lámpara CHARGE parpadea de dos formas.
Parpadeo lento: Se enciende y apaga repetidamente cada 1,5 segundos
Parpadeo rápido: Se enciende y apaga repetidamente cada 0,15 segundos
La acción a tomarse dependerá de la forma en la que parpadee la
lámpara CHARGE.
La lámpara CHARGE permanece parpadeando lentamente
La carga está en pausa. Esta unidad está en estado de espera.
Si la temperatura ambiental sale fuera del margen apropiado, la carga se
parará automáticamente.
Cuando la temperatura ambiental vuelva al margen apropiado, la
lámpara CHARGE se encenderá una vez y se reiniciará la carga.
Recomendamos cargar la batería de 10 °C a 30 °C
Cuando la lámpara CHARGE continúe parpadeando rápidamente
Cuando cargue la batería por primera vez en una de las situaciones
siguientes, la lámpara CHARGE puede parpadear rápidamente.
Cuando suceda esto, retire la batería de esta unidad, vuelva a jarla
y cárguela.
Cuando la batería que no se haya utilizado durante mucho tiempo.
Cuando la batería se haya dejado instalada en la cámara durante
mucho tiempo.
Inmediatamente después de la adquisición
Si la lámpara CHARGE continúa parpadeando rápidamente,
compruebe la tabla siguiente.
Póngase en contacto con su proveedor Sony más cercano con respecto al producto
que pueda tener el problema.
Extraiga la batería que esté cargando y vuelva a jarla rmemente.
La lámpara CHARGE vuelve a
parpadear:
Instale otra batería.
La lámpara CHARGE se enciende
y no vuelve a parpadear:
Si la lámpara CHARGE se apaga
debido a que haya transcurrido el
tiempo de carga, no habrá ningún
problema.
La lámpara CHARGE vuelve a
parpadear:
El problema se encuentra en esta
unidad.
La lámpara CHARGE se enciende
y no vuelve a parpadear:
Si la lámpara CHARGE se apaga
debido a que haya transcurrido el
tiempo de carga, el problema se
encuentra en la primera batería
instalada.
Especicaciones
Tensión de entrada ca 100 V - 240 V 50 Hz/60 Hz
7 VA - 12 VA 6 W
Tensión de salida Terminales de carga de la batería:
cc 8,4 V 400 mA
Temperatura de funcionamiento 0 °C a 40 °C
Temperatura de almacenamiento –20 °C a +60 °C
Dimensiones (Aprox.) 42 mm × 32 mm × 76 mm (an/al/prf)
Peso Aprox. 57 g
Elementos incluidos Cargador de baterías (BC-TRV) (1)
Cable de alimentación de ca (1)
Juego de documentación impresa
El diseño y las especicaciones están sujetos a cambios sin previo aviso.
Herzlichen Glückwunsch zum Kauf dieses Sony-Akkuladegeräts.
Lesen Sie vor dem Betrieb dieses Akkuladegeräts die
Bedienungsanleitung gründlich durch und bewahren Sie sie dann zum
Nachschlagen auf.
Das Akkuladegerät BC-TRV kann nur verwendet werden, um ˎ
„InfoLITHIUM“ -Akkus (V-Serie, H-Serie und P-Serie) aufzuladen.
„InfoLITHIUM“ -Akkus der V-Serie, H-Serie und P-Serie tragen ˎ
jeweils die Kennzeichnungen , und .
Das Gerät kann nicht zum Laden von Nickel-Kadmium- oder ˎ
Nickel-Metallhydrid-Akkus verwendet werden.
„InfoLITHIUM“ ist ein Warenzeichen der Sony Corporation. ˎ
Identikation der Teile
1 Ladezustand- Anzeigelämpchen
2 CHARGE-Lampe
3 Markierung am Ladegerät
4 Netzkabelbuchse
5 Akku
6 Markierung am Akku
7 Netzkabel
8 zur Netzsteckdose
Laden des Akkus
Der Akku wird zum Laden an diesem Gerät angebracht.
* Die Abbildung zeigt den Akku der V-Serie.
1 Bringen Sie den Akku an.
Richten Sie die Markierung am Akku auf die Markierung am
Ladegerät aus, und setzen Sie den Akku in Pfeilrichtung ein. (Siehe
Abbildung .)
2 Schließen Sie das Netzkabel zunächst an dieses Gerät und
dann an die Wandsteckdose an. (Siehe Abbildung .)
Die CHARGE-Lampe (orange) leuchtet auf, und der Ladevorgang
setzt ein.
Wenn die CHARGE-Lampe erlischt, ist der normale Ladevorgang
beendet (Normale Ladung).
Für eine vollständige Ladung, die eine längere Betriebszeit
ermöglicht, lassen Sie den Akku noch ungefähr eine weitere Stunde
lang angebracht (Vollständige Ladung).
Sie können den Ladezustand detaillierter mit dem Ladezustand-
Anzeigelämpchen prüfen.
, ... Aus, , ... Leuchtet auf
Ladezustand-
Anzeigelämpchen
CHARGE-Lampe
Sofort nach dem
anbringen des Akkus
- 30%
30% - 60%
60% -
Normale Ladung
Normale Ladung -
Vollständige Ladung
Nach vollständiger
Ladung
Abnehmen des Akkus
Nehmen Sie den Akku ab, indem Sie ihn in die entgegengesetzte
Richtung des Anbringens schieben.
Ladezeit
Die folgende Tabelle zeigt die Ladezeit für einen ganz leeren Akku.
„InfoLITHIUM”-Akku V-Serie
Akku NP-FV100 NP-FV70 NP-FV50
Zeit zum vollständigen
Laden
680 385 225
Zeit zum normalen
Laden
(620) (325) (165)
„InfoLITHIUM”-Akku H-Serie
Akku NP-FH100 NP-FH70 NP-FH50
Zeit zum vollständigen
Laden
680 350 210
Zeit zum normalen
Laden
(620) (290) (150)
„InfoLITHIUM”-Akku P-Serie
Akku NP-FP90 NP-FP71 NP-FP50
Zeit zum vollständigen
Laden
525 355 190
Zeit zum normalen
Laden
(465) (295) (130)
Ungefähre Zeit zum vollständigen Laden eines leeren Akkus in ˎ
Minuten (Zeit zum vollständigen Laden).
Bei den Angaben in Klammern handelt es sich um die Zeit, die zum ˎ
normalen Laden benötigt wird (Zeit zum normalen Laden).
Weitere Einzelheiten zur Akkulebensdauer schlagen Sie bitte in der ˎ
Bedienungsanleitung Ihrer Videokamera nach.
Die Ladezeit kann je nach Zustand des Akkus und ˎ
Umgebungstemperatur variieren.
Die angegebenen Zeiten beziehen sich auf das Laden eines leeren ˎ
Akkus, der beim Gebrauch mit einer Videokamera usw. entleert
wurde, wobei dieses Gerät bei einer Umgebungstemperatur von 25 °C
verwendet wurde.
Umgebungstemperatur beim Laden
Ein Laden ist bei Temperaturen von 0 °C bis 40 °C möglich. Der
empfohlene Temperaturbereich für eine optimale Akkuleistung geht
von 10 °C bis 30 °C.
Vorzeitiges Abbrechen des Ladevorgangs
Sie brauchen das Ende des Ladevorgangs nicht abzuwarten, sondern
können den Akku auch frühzeitig aus diesem Gerät nehmen
und verwenden. Die tatsächliche Ladezeit bestimmt jedoch die
Betriebsdauer des Akkus.
Hinweise
Wenn die CHARGE-Lampe nicht aueuchtet, überprüfen Sie, ob der ˎ
Akku richtig an diesem Gerät angebracht wurde.
Wenn ein noch voller Akku angebracht wird, leuchtet die CHARGE- ˎ
Lampe kurz auf und erlischt dann wieder.
Bei einem Akku, der lange Zeit nicht verwendet wurde, dauert das ˎ
Laden möglicherweise länger als gewöhnlich.
Trennen Sie dieses Gerät nach Gebrauch von der Wandsteckdose ab. ˎ
Ziehen Sie beim Abtrennen des Netzkabels immer am Stecker. Ziehen
Sie nicht am Netzkabel selbst.
Dieses Gerät unterstützt weltweite Spannungen von 100 V bis 240 V.
Verwenden Sie keinen elektronischen Spannungswandler, da dies
eine Fehlfunktion verursachen kann.
Fehlersuche
Wenn die CHARGE-Lampe blinkt, gehen Sie das nachstehende
Ablaufdiagramm durch.
Es gibt zwei Blinkschemas für die CHARGE-Lampe.
Langsames Blinken: Die Lampe geht alle 1,5 Sekunden wiederholt an
und aus.
Schnelles Blinken: Die Lampe geht alle 0,15 Sekunden wiederholt an
und aus.
Die zu ergreifende Abhilfemaßnahme hängt vom Blinkschema der
CHARGE-Lampe ab.
Bei langsamem Blinken der CHARGE-Lampe
Der Ladevorgang wurde vorübergehend unterbrochen. Das Gerät
bendet sich um Bereitschaszustand.
Der Ladevorgang stoppt automatisch, wenn die Raumtemperatur nicht
mehr im vorgeschriebenen Temperaturbereich liegt.
Sobald wieder eine geeignete Raumtemperatur vorliegt, leuchtet die
CHARGE-Lampe wieder, und der Ladevorgang wird fortgesetzt.
Wir empfehlen, den Akku bei 10 °C bis 30 °C zu laden.
Bei schnellem Blinken der CHARGE-Lampe
Beim ersten Laden dieses Akkus in einer der folgenden Situationen
kann das CHARGE-Lämpchen schnell blinken.
In diesem Fall nehmen Sie den Akku aus dem Gerät, bringen ihn
erneut an und laden ihn erneut.
Wenn der Akku längere Zeit nicht gebraucht wird
Wenn der Akku längere Zeit in der Kamera eingesetzt gelassen
bleibt
Sofort nach dem Kauf
Wenn das CHARGE-Lämpchen schnell blinkt, gehen Sie das folgende
Ablaufdiagramm durch.
Wenden Sie sich mit dem defekten Produkt an den nächsten Sony-Händler.
Nehmen Sie den Akkus heraus und bringen Sie ihn dann wieder fest an.
Die CHARGE-Lampe blinkt
wieder:
Legen Sie einen anderen Akku ein.
Die CHARGE-Lampe leuchtet auf
und blinkt nicht mehr:
Wenn die CHARGE-Lampe
erloschen ist, weil die Ladezeit
abgelaufen ist, liegt kein Problem vor.
Die CHARGE-Lampe blinkt
wieder:
Das Problem ist auf dieses Gerät
zurückzuführen.
Die CHARGE-Lampe leuchtet auf
und blinkt nicht mehr:
Wenn die CHARGE-Lampe
erloschen ist, weil die Ladezeit
abgelaufen ist, liegt das Problem am
zuerst eingelegten Akku.
Technische Daten
Eingangsspannung 100 V - 240 V AC 50 Hz/60 Hz
7 VA - 12 VA 6 W
Ausgangsspannung Akkuladekontakte:
8,4 V Gleichspannung 400 mA
Betriebstemperatur 0 °C bis 40 °C
Lagertemperatur –20 °C bis +60 °C
Abmessungen (ca.) 42 mm × 32 mm × 76 mm (B × H × T)
Gewicht ca. 57 g
Mitgeliefertes Zubehör Akkuladegerät (BC-TRV) (1)
Netzkabel (1)
Anleitungen
Änderungen bei Design und technischen Daten bleiben ohne vorherige
Ankündigung vorbehalten.
La page est en cours de chargement...
-
 1
1
-
 2
2


dans d''autres langues
- italiano: Sony BC-TRV Manuale del proprietario
- English: Sony BC-TRV Owner's manual
- español: Sony BC-TRV El manual del propietario
- Deutsch: Sony BC-TRV Bedienungsanleitung
- Nederlands: Sony BC-TRV de handleiding
- português: Sony BC-TRV Manual do proprietário
- svenska: Sony BC-TRV Bruksanvisning