
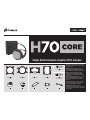
High-Performance Hydro CPU Cooler
INTEL 115x/1366
LGA2011
A
AMD AM2/AM3
B
AMD AM2/AM3
C
INTEL 115x/1366
D
x4 • INTEL 1155/1156
& AMD AM2/AM3
F
x4
G
x4
H
x2
I
x4
J
x4
K
x4 • INTEL LGA 2011
E
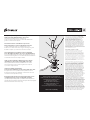
NOTE: In most cases it is necessary to remove
the motherboard from the case before installing
a new CPU cooler.
REMARQUE : Dans la plupart des cas, il est
nécessaire de retirer la carte mère du boîtier
avant d'installer un refroidisseur d'unité centrale.
HINWEIS: In den meisten Fällen muss das
Motherboard aus dem Gehäuse genommen
werden, bevor ein neuer CPU-Lüfter installiert
werden kann.
NOTA: nella maggior parte dei casi è necessario
rimuovere la scheda madre dalla struttura
esterna prima di installare un nuovo dissipatore
per la CPU.
NOTA: en la mayoría de los casos es necesario
extraer la placa madre de la carcasa antes de
instalar un nuevo ventilador de la CPU.
ПРИМЕЧАНИЕ: В большинстве случаев это
необходимо сделать при удалении системной платы
из упаковки перед установкой нового охлаждающего
вентилятора ЦП.
La page est en cours de chargement...

3
Remove adhesive backing.
Retirez la protection adhésive.
Ziehen Sie den Schutzfilm
von der Klebefläche ab.
Rimuovere lo strato adesivo.
Retire la cubierta del adhesivo.
Удалите клейкое покрытие.
1
Installez la plaque arrière
Rückwand installieren
Installare la piastra posteriore
Instale la placa de soporte
Установка опорной пластины
Install the backplate
2
Installez l'anneau de retenue
Halterungsring installieren
Installare l'anello di sicurezza
Instale la anilla de retención
Установка крепежного кольца
Install the retention ring
CPU
½
Install the cold plate/pump unit
3
Installez la plaque froide et la pompe
Kühlfläche/-pumpe installieren
Installare la piastra di
rareddamento/unità di pompaggio
Instale la unidad de bomba/placa fría
Установка охлаждающей пластины/насоса
Carefully remove the plastic shell and insert the cold plate/pump unit into
retention ring, turning clockwise to secure.
Retirez soigneusement l'enveloppe en plastique et insérez la plaque froide
et la pompe dans l'anneau de retenue, en tournant dans le sens des aiguilles
d'une montre pour les fixer.
Nehmen Sie die Plastikabdeckung vorsichtig ab und stecken Sie die
Kühlfläche/-pumpe in den Halterungsring. Arretieren Sie sie durch
Drehen im Uhrzeigersinn.
Rimuovere attentamente l'involucro di plastica e inserire la piastra di
rareddamento/unità di pompaggio all'interno dell'anello di sicurezza,
ruotando in senso orario per bloccare.
Extraiga la carcasa de plástico con cuidado e introduzca la placa fría en
la anilla de sujeción; a continuación, gire en el sentido de las agujas del
reloj para fijarla.
Осторожно удалив пластиковое покрытие, вставьте охлаждающую пластину/
насос в крепежное кольцо и закрепите, повернув по часовой стрелке.
Install the assembled backplate on the back of the motherboard
behind the CPU socket. Not required for Intel LGA 2011.
Installez la plaque arrière assemblée au dos de la carte mère, derrière
le socket de processeur. Non requis pour LGA 2011 d'Intel.
Installieren Sie die Rückwand an der Rückseite der Hauptplatine
hinter dem Prozessorsockel. Nicht benötigt für Intel LGA 2011.
Installare la piastra posteriore assemblata sul retro della scheda
madre dietro alla presa CPU. Non necessario per Intel LGA 2011.
Instale la placa de soporte (ensamblada) en la parte trasera de la
placa base, detrás de la ranura de la CPU. No es necesario para los
Intel LGA 2011.
Собранную опорную пластину установите с обратной стороны материнской
платы напротив слота для ЦП. Не требуется для Intel LGA 2011.
C D
J
I

4
Tighten screws on retention ring
4
Serrez les vis sur l'anneau de retenue
Schrauben am Halterungsring festziehen
Avvitare le viti dell'anello di sicurezza
Apriete los tornillos de la anilla de retención
Затяжка винтов на крепежном кольце
Install the radiator
Installez le radiateur
Kühler installieren
Installare il radiatore
Instale el radiador
Установка радиатора
5
6
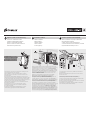
Connect power to fan and pump
Reliez les ventilateurs et la pompe à l'alimentation
Lüfter und Pumpe anschließen
Collegare ventole e pompa all'alimentazione
Conecte la alimentación de los ventiladores y la bomba
Подключение питания вентиляторов и насоса
Turn each screw 2 to 3 times, in the order shown, repeating until each
screw is fully tightened. Do not overtighten.
Tournez chaque vis 2 ou 3 fois, dans l'ordre indiqué, en répétant
la procédure jusqu'à ce que chaque vis soit serrée à fond. Ne serrez
pas excessivement.
Gehen Sie dazu in der abgebildeten Reihenfolge vor. Ziehen Sie jede
Schraube fest, indem Sie sie zwei- bis dreimal drehen, und fahren Sie dann
mit der nächsten Schraube fort. Wiederholen Sie diesen Vorgang, bis alle
Schrauben fest angezogen sind Ziehen Sie die Schrauben nicht zu fest an.
Avvitare ogni vite 2 o 3 volte, nell'ordine mostrato, ripetendo
l'operazione fino a quando tutte le viti sono completamente avvitate.
Non avvitare eccessivamente.
Gire cada tornillo 2 ó 3 veces, en el orden mostrado, y repita el
procedimiento hasta que todos estén completamente apretados.
No los apriete demasiado.
Поочередно (в указанном порядке) затягивайте винты на 2-3 оборота,
пока все винты не будут затянуты. Не затягивайте слишком сильно.
Attach the radiator and fans as shown. NOTE: BOTH FANS MUST POINT
THE SAME DIRECTION. For the best cooling performance, we recommend
mounting the fans as an air-intake to your PC case. Fans not included.
Attachez le radiateur et les ventilateurs, comme illustré. NOTE : LES DEUX
VENTILATEURS DOIVENT ÊTRE MONTÉS DANS LE MÊME SENS. Pour des
performances de refroidissement optimales, nous vous recommandons
d'installer les ventilateurs comme une entrée d'air sur la tour de votre
ordinateur. Ventilateurs non fournis.
Befestigen Sie wie abgebildet den Kühler und die Lüfter. HINWEIS:
BEIDE LÜFTER MÜSSEN IN DIESELBE RICHTUNG ZEIGEN. Für
bestmögliche Kühlleistung empfehlen wir, die Lüfter als Lufteinlass des
PC-Gehäuses zu montieren. Lüfter nicht im Lieferumfang.
Collegare il radiatore e le ventole come illustrato. NOTA: ENTRAMBE LE
VENTOLE DEVONO ESSERE RIVOLTE VERSO LA STESSA DIREZIONE. Per
ottenere le prestazioni di rareddamento migliori, si consiglia di montare
le ventole come aspiratori d'aria al case del PC. Ventole non incluse.
Fije el radiador y los ventiladores tal como se muestra. NOTA: AMBOS
VENTILADORES DEBEN ESTAR DIRIGIDOS EN LA MISMA DIRECCIÓN. Para
una refrigeración óptima, recomendamos montar los ventiladores como
entradas de aire en la carcasa del PC. Ventiladores no están incluidos.
Установите радиатор и вентиляторы, как показано на рисунке. ПРИМЕЧАНИЕ. ОБА
ВЕНТИЛЯТОРА ДОЛЖНЫ БЫТЬ ОРИЕНТИРОВАНЫ В ОДНОМ НАПРАВЛЕНИИ. Для более
эффективного охлаждения рекомендуется установить вентиляторы таким образом,
чтобы они нагнетали воздух внутрь корпуса. Вентиляторы не входят в комплект.
Connect pump power connector to any available 3-pin fan header on
the motherboard.
Branchez le fil d'alimentation de la pompe à une fiche à trois broches
libre sur la carte mère.
Verbinden Sie den Stecker der Pumpe mit einem beliebigen,
freien dreipoligen Lüfteranschluss auf der Hauptplatine.
Collegare il connettore di alimentazione della pompa a qualsiasi header
per ventola a 3 pin disponibile sulla scheda madre.
Enchufe el conector de alimentación de la bomba a uno de los cabezales
de ventilador de 3 pines de la placa base.
Разъем питания насоса подключите к любому из имеющихся на материнской
плате 3-контактных разъемов питания вентилятора.
Airflow
1
3
2
4
K
La page est en cours de chargement...
-
 1
1
-
 2
2
-
 3
3
-
 4
4
-
 5
5


Corsair Hydro H70 Guide d'installation
- Taper
- Guide d'installation
- Ce manuel convient également à
dans d''autres langues
- italiano: Corsair Hydro H70 Guida d'installazione
- English: Corsair Hydro H70 Installation guide
Documents connexes
-
Corsair CWCH50 Le manuel du propriétaire
-
Corsair CW-9060031-WW Manuel utilisateur
-
-
-
-
-
-
-
-