Bosch 12-25 Manuel utilisateur
- Catégorie
- Aspirateurs
- Taper
- Manuel utilisateur

Robert Bosch Power Tools GmbH
70538 Stuttgart
GERMANY
www.bosch-pt.com
1 609 92A 7GW (2022.07) PS / 106
en Original instructions
fr Notice originale
pt Manual original
es Manual original
pt Manual de instruções original
zh 正本使用明
zh 原始使用說明書
th
id Petunjuk-Petunjuk untuk
Penggunaan Orisinal
vi Bn gc hng dn s dng
ar
fa
1 609 92A 7GW
GAS Professional
12-25 | 12-25 PL

2 |
English ...................................................Page 8
Français..................................................Page 16
Português .............................................. Página 24
Español ................................................ Página 32
Português do Brasil..................................... Página 41
....................................................... 49
.................................................. 56
...................................................... 63
Bahasa Indonesia..................................... Halaman 72
Ting Vit............................................... Trang 80
.................................................. 89
.................................................. 97
1 609 92A 7GW | (05.07.2022) Bosch Power Tools

| 3
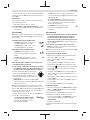
(1)
(1)
(2)
GAS 12-25 PL
(3)
(5)
GAS 12-25
(6) (7) (8)
(9)
(10)
(11)
(12)
(11)
(13)
(14)
(4)
Bosch Power Tools 1 609 92A 7GW | (05.07.2022)

4 |
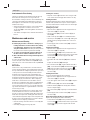
click!
A
(15)
(19)
(16)
(17)
(18)
(20) (21)
(24)
(23) (25) (26)
(22)
(17)
(16)
(27)
(15)
1 609 92A 7GW | (05.07.2022) Bosch Power Tools

| 5
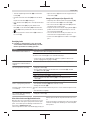
B1
B2
D1
C
D2
(34)(15)
(3) (13)
(10)
(9)
(22)
(22)
(3)
(28)
Bosch Power Tools 1 609 92A 7GW | (05.07.2022)

6 |
E1
F2
G1
(21)
(30)
(20)
(3)
E2
F1
G2
(29)
(20)
(20) (21)
(32) (19)
(31)
(19)
(30)
(29)
1 609 92A 7GW | (05.07.2022) Bosch Power Tools

| 7
G3
I
(22)
H
(19)
(23) (24)
(25)
(26)
(33)
(15)
J1
J2
(12)
(16)
(1)
(2)
(15)
(11)
(26)
(14) (4)
GAS 12-25 PL
Bosch Power Tools 1 609 92A 7GW | (05.07.2022)

8 | English
English
Safety information for vacuum
cleaners
Read all the safety information and instruc-
tions. Failure to observe the safety informa-
tion and follow instructions may result in elec-
tric shock, fire and/or serious injury.
Save all warnings and instructions for future reference.
uThis vacuum cleaner is not inten-
ded for use by children or persons
with physical, sensory or mental
impairments. It should not be used
by persons who have insufficient
experience and knowledge. Other-
wise, there is a risk of operating er-
rors and injuries.
uSupervise children. This will ensure
that children do not play with the va-
cuum cleaner.
uDo not vacuum beech or oak wood dust, rock dust or
asbestos. These substances are considered carcino-
genic.
WARNING Only use the vacuum cleaner if you
have been adequately informed
about the use of the equipment, the substances to be va-
cuumed and how to dispose of these safely. Thorough in-
struction on how to use the equipment prevents accidental
misuse and injuries.
WARNING The vacuum cleaner is suitable for
vacuuming dry substances, and
can also be used to vacuum liquids when taking appropri-
ate measures. The penetration of liquids increases the risk
of an electric shock.
uDo not use the vacuum cleaner to vacuum combustible
or explosive liquids, such as petrol, oil, alcohol or
solvents. Do not vacuum hot, burning or explosive
dust. Do not operate the vacuum cleaner in areas sub-
ject to explosion hazards. Dust, vapours and liquids can
ignite or explode.
WARNING Only use the socket for the pur-
pose stipulated in the operating
manual.
WARNING If you notice a foam or water leak,
switch off the vacuum cleaner im-
mediately and empty the container. Otherwise, the va-
cuum cleaner can become damaged.
uNOTE: The vacuum cleaner must only be stored in-
doors.
uNOTE: Clean the float regularly and check whether it
is damaged. Otherwise, the equipment may not function
properly.
uIf operating the vacuum cleaner in a damp location is
unavoidable, use a residual current device (RCD). Use
of an RCD reduces the risk of electric shock.
uAlways check the vacuum cleaner, cable and plug be-
fore use. Do not use the vacuum cleaner if you dis-
cover any damage. Do not open the vacuum cleaner
yourself. It should be repaired exclusively by a quali-
fied professional using only genuine spare parts. Dam-
aged vacuum cleaners, cables and plugs increase the risk
of electric shock.
uDo not crush the cable or run the device over it. Do not
pull on the power cable to pull the plug out of the
socket or to move the vacuum cleaner. Damaged
cables increase the risk of an electric shock.
uPull the plug out of the socket before cleaning or per-
forming maintenance on the vacuum cleaner, making
tool adjustments, changing accessories or putting
away the vacuum cleaner. This safety measure prevents
the vacuum cleaner from being started accidentally.
uEnsure that the workplace is well ventilated.
uThe vacuum cleaner should be repaired exclusively by
a qualified professional using only genuine spare
parts. This will ensure that the safety of the vacuum
cleaner is maintained.
WARNING The dust extractor contains dust
particles that pose a risk to health.
Emptying and maintenance procedures, including the
disposal of dust containers, should only be carried out by
professionals. Suitable protective equipment is re-
quired. Do not operate the vacuum cleaner unless the
complete filter system is correctly inserted. Otherwise,
you are putting your health at risk.
uBefore using the equipment for the first time, check
that the vacuum hose is in perfect condition. Leave
the vacuum hose fitted to the vacuum cleaner while
doing this so that no dust escapes accidentally. Other-
wise, you may end up inhaling dust particles.
uDo not sit on the vacuum cleaner. You can damage the
vacuum cleaner this way.
uTake care when using the power cable and the vacuum
hose. Improper use of these can put other people at risk.
uDo not clean the vacuum cleaner by spraying a jet of
water directly at it. Water entering the top of the va-
cuum cleaner will increase the risk of electric shock.
Products sold in GB only:
Your product is fitted with an BS 1363/A approved electric
plug with internal fuse (ASTA approved to BS 1362).
If the plug is not suitable for your socket outlets, it should be
cut off and an appropriate plug fitted in its place by an au-
thorised customer service agent. The replacement plug
should have the same fuse rating as the original plug.
1 609 92A 7GW | (05.07.2022) Bosch Power Tools

English | 9
The severed plug must be disposed of to avoid a possible
shock hazard and should never be inserted into a mains
socket elsewhere.
Symbols
The following symbols may provide you with important in-
formation pertaining to the use of your dust extractor. Please
take note of these symbols and their meaning. Knowing what
these symbols mean will help you to use your extractor more
effectively and more safely.
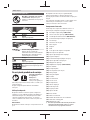
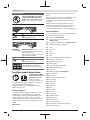
Symbols and their meaning
WARNING! Read all the safety and gen-
eral instructions. Failure to observe the
safety and general instructions may res-
ult in electric shock, fire and/or serious
injury.
GAS12-25PL: Dust extractor from dust
class L in accordance with IEC/EN
60335-2-69 for the dry extraction of
harmful dusts with an exposure limit
of>1mg/m³
Do not hang the dust extractor on a
crane hook, e.g. in order to transport
it. The dust extractor is not suitable for
moving with a crane. There is a risk of in-
jury and damage if you do this.
Do not sit or stand on the dust ex-
tractor. The dust extractor may tip over
and become damaged if you do this. This
poses a risk of injury.
GAS12-25
Switching Off
Extraction
Extracting dust deposits
GAS12-25PL
Automatic start/stop
Extracting dust that accumulates from
Symbols and their meaning
working power tools
The dust extractor switches on automat-
ically and off again with a time delay
Switching Off
Extraction
Extracting dust deposits
Permitted connected load of the connec-
ted power tool (country-specific)
Product Description and
Specifications
Read all the safety and
general instructions. Fail-
ure to observe the safety
and general instructions
may result in electric shock,
fire and/or serious injury.
Please observe the illustrations at the beginning of this oper-
ating manual.
Intended Use
The tool is intended for collecting, vacuuming, conveying
and separating non-flammable dry dust types, non-flam-
mable liquids and a mixture of water and air. It is suitable for
the increased demands in professional use, e.g. in trade, in-
dustry and workshops, as well as for household/domestic
use.
GAS12-25PL:
The dust extraction capability of the dust extractor has been
tested and corresponds to dust class L.
Dust extractors from dust class L in accordance with IEC/EN
60335-2-69 may only be used to vacuum and extract harm-
ful dust with an exposure limit of >1mg/m3.
Only use the dust extractor if you can fully evaluate all func-
tions and carry them out without restrictions, or if you have
received corresponding instructions.
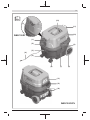
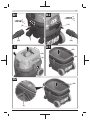
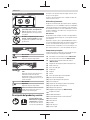
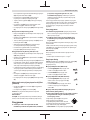
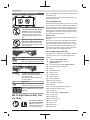
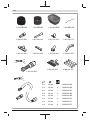
Product features
The numbering of the product features refers to the repres-
entation of the vacuum cleaner on the graphic pages.
(1) On/off switch (GAS12-25)
(1) Mode selector switch (GAS12-25PL)
(2) Socket for power tool (GAS12-25PL)
(3) Hose connection piece (dust extraction function)
(4) Pull strap
(5) Castor brake
(6) Castor
(7) Container
(8) Wheel
Bosch Power Tools 1 609 92A 7GW | (05.07.2022)

10 | English
(9) Catch for top part of dust extractor
(10) Top part of dust extractor
(11) Holder for vacuum hose
(12) Carrying handle
(13) Hose connection piece (blowing function)
(14) Holder for suction tubes
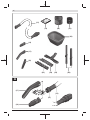
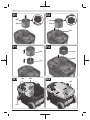
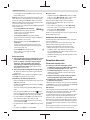
(15) Vacuum hose
(16) Extraction adapter (GAS12-25PL)
(17) Curved nozzle
(18) Crevice nozzle
(19) Plastic bag/dust baga)
(20) Main filter
(21) Wet filter
(22) Pre-filter
(23) Rubber lip
(24) Brush inserts
(25) Floor nozzle
(26) Suction tube
(27) Snap fastener
(28) Pre-filter handle
(29) Filter holder
(30) Filter basket
(31) Intake port
(32) Clips for securing the plastic bag
(33) False air intake
(34) Blowing hosea)
a) Accessories shown or described are not included with the
product as standard. You can find the complete selection of
accessories in our accessories range.
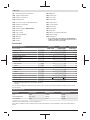
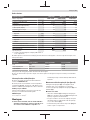
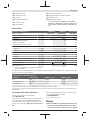
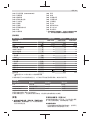
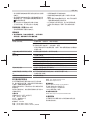
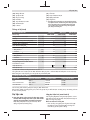
Technical data
Wet/dry dust extractor GAS12-25 GAS12-25 GAS12-25PL
Article number 3601J7C0.. 3601J7C0C. 3601J7C1..
Rated power input W 1250 1000 1250
Frequency Hz 50–60 50–60 50–60
Container volume (gross) l 25 25 25
Net volume (liquid) l 15 15 15
Dust bag volume l 20 20 20
Max. vacuumA)
– Dust extractor kPa 19 17 19
– Turbine kPa 20 19 20
Max. flow rateA)
– Dust extractor l/s 36 33 36
– Turbine l/s 65 60 65
Automatic start/stop – – ●
Weight according to EPTA-Procedure 01:2014 kg 8.6 8.6 9
Protection class / II / II / I
Protection rating IPX4 IPX4 IPX4
A) Measured using a vacuum hose 3 m long and 35 mm in
diameter
The specifications apply to a rated voltage [U] of 230 V. These specifications may vary at different voltages and in country-
specific models.
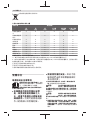
Automatic start/stop
3 601 J7C ... Rated voltage Maximum power Minimum power
1L0 240 V 1700 W 100 W
1K0/100/1E0/1H0 220–230 V 2050 W 100 W
1F0/180/1N0 220 V 950 W 100 W
Permitted connected load of the connected power tool.
These values can differ for other country-specific models. Please take note of the information on the socket of the dust ex-
tractor.
1 609 92A 7GW | (05.07.2022) Bosch Power Tools

English | 11
Noise/Vibration Information
Noise emission values determined according to
EN60335-2-69.
Typically the A-weighted sound pressure level of the dust ex-
tractor is 76dB(A). Uncertainty K=2dB. The noise level
when working can exceed the volume stated. Wear hearing
protection!
Vibration total values ah (triax vector sum) and uncertainty K
determined according to EN60335-2-69:
ah<2.5m/s2, K=1.5 m/s2.
Assembly
uPull the plug out of the socket before cleaning or per-
forming maintenance on the vacuum cleaner, making
tool adjustments, changing accessories or putting
away the vacuum cleaner. This safety measure prevents
the vacuum cleaner from being started accidentally.
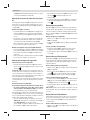
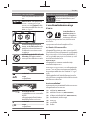
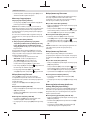
Fitting the vacuuming accessories (see figure A)
The vacuum hose (15) is equipped with a clip system which
can be used to connect vacuuming accessories (dust extrac-
tion adapter (16), curved nozzle (17)).
Fitting the nozzles and tubes
– Push the curved nozzle (17) onto the vacuum hose (15)
until you hear both snap fasteners (27) on the vacuum
hose engage.
– Then attach the required extraction accessory (floor
nozzle, crevice nozzle, suction tube, etc.) firmly to the
curved nozzle (17).
– To remove the accessory, press the snap fasteners (27)
inwards and pull apart the components.
Fitting the dust extraction adapter (GAS12-25PL)
– Push the dust extraction adapter (16) onto the vacuum
hose (15) until you hear both snap fasteners (27) on the
vacuum hose engage.
– To remove the adapter, press the snap fasteners (27) in-
wards and pull apart the components.
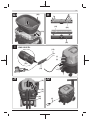
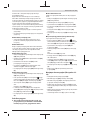
Fitting the vacuum hose
Vacuuming function (see figure B1)
– Push the vacuum hose (15) into the hose connection
piece (3) and turn it as far as possible in the direction of
rotation .
Note: The friction generated by the dust in the vacuum hose
and accessory during extraction causes an electrostatic
charge that the user may experience as static discharge (de-
pending on environmental factors and their physiological
state).
Bosch generally recommends using an anti-static vacuum
hose (accessory) to vacuum up fine dust and dry materials.
Blowing function (see figure B2)
uThe vacuum cleaner has a blowing function. Do not
blow exhaust air out into the open air. Only use the
blowing function with a clean hose. Dust can be hazard-
ous to health.
For the blowing function, only insert the blowing hose(34)
(accessory) with the appropriate attachment, as illustrated
here. The vacuum hose supplied must not be used for blow-
ing.
– Switch on the vacuum cleaner for at least 5seconds
(GAS12-25: On/off switch (1) to "on"; GAS12-25PL:
Mode selector switch (1) to the "vacuuming" symbol) to
clean the vacuum hose (15) of dust deposits.
– Turn the vacuum hose (15) as far as possible in the direc-
tion of rotation and pull it out of the hose connection
piece (3).
– Push the blowing hose(34) into the hose connection
piece(13) and turn it as far as possible in the direction of
rotation .
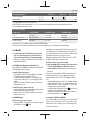
Removing/Inserting the Pre-filter
The pre-filter (22) prevents coarse dirt from getting through
and consequently extends the lifetime of the main filter. The
pre-filter must be removed from the container if you intend
to carry out wet vacuuming or to clean the main filter.
Grasp the pre-filter(22) by the handle(28) for easy re-
moval.
Removing the Pre-filter (see figure D1)
– Open the catches (9) and remove the top part of the va-
cuum cleaner (10) (see figure C).
– Take the pre-filter(22) out of the container(7) by its
handle(28).
Inserting the Pre-filter (see figure D2)
– Insert the pre-filter(22) in the container(7), making sure
that the arrow is pointing towards the hose connection
piece(3).
– Put the top part of the vacuum cleaner (10) on and close
the catches (9).
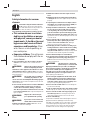
Removing/Inserting the Main Filter
The main filter (20) is a HEPA pleated filter with extremely
high filtration performance for cleaning exhaust air. You
need to remove the main filter from the container if you in-
tend to carry out wet vacuuming.
Removing the Main Filter (see figure E1)
– Open the catches (9) and remove the top part of the va-
cuum cleaner (10) (see figure C).
– Turn the filter holder (29) as far as possible in the direc-
tion of rotation and take the filter holder, together with
the main filter (20), out of the top part of the vacuum
cleaner (10).
Inserting the Main Filter (see figure E2)
– Place the filter holder(29), together with the main
filter(20), over the filter basket(30) and turn the filter
holder(29) as far as possible in the direction of rotation
.
Bosch Power Tools 1 609 92A 7GW | (05.07.2022)

12 | English
– Put the top part of the vacuum cleaner (10) on and close
the catches (9).
Note: Ensure that the filter is always fitted correctly. This is
particularly important when vacuuming hazardous dust.
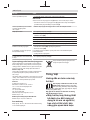
Removing/Inserting the Wet Filter
To make disposal easier when vacuuming water-solid mix-
tures, the vacuum cleaner has a wet filter (21) that separ-
ates the liquid from the solids.
Removing the wet filter (see figure F1)
– Open the catches (9) and remove the top part of the va-
cuum cleaner (10) (see figure C).
– Turn the filter holder(29) as far as possible in the direc-
tion of rotation and take the filter holder, together with
the main filter(20), out of the top part of the dust
extractor(10).
– Pull the wet filter (21) out of the filter basket (30).
Inserting the wet filter (see figure F2)
– Place the wet filter (21) completely over the filter basket
(30).
– Put the top part of the vacuum cleaner (10) on and close
the catches (9).
Inserting/removing the plastic bag or dust bag
(dry vacuuming)
For dry vacuuming, you can insert a plastic bag (19) or a
dust bag (accessory) into the container (7). This makes it
easier to dispose of coarse dirt.
Inserting the plastic bag (see figures G1–G3)
– Open the catches (9) and remove the top part of the va-
cuum cleaner (10) (see figure C).
– Take the pre-filter(22) out of the container(7) by its
handle(28).
– Insert the plastic bag (19) into the container (7) with the
inlet facing upwards. Secure the plastic bag under the
suction hole (31) using the clips (32).
– Make sure that the plastic bag (19) touches all the inside
walls of the container (7).
– Fold the rest of the plastic bag (19) over the edge of the
container (7).
– Insert the pre-filter(22) in the container(7), making sure
that the arrow is pointing towards the hose connection
piece(3).
– Put the top part of the vacuum cleaner (10) on and close
the catches (9).
Removing and sealing the plastic bag
– Open the catches (9) and remove the top part of the va-
cuum cleaner (10) (see figure C).
– Take the pre-filter(22) out of the container(7) by its
handle(28).
– Pull the edge of the full plastic bag (19) backwards out of
the clips (32).
– Carefully take the plastic bag (19) out of the container
(7) without damaging it.
– When doing so, make sure that the plastic bag does not
scrape against the intake port (31) or other sharp ob-
jects.
Changing/inserting the dust bag (accessory)
– Open the catches (9) and remove the top part of the va-
cuum cleaner (10) (see figure C).
– Take the pre-filter(22) out of the container(7) by its
handle(28).
– Pull the full dust bag (19) backwards off the connection
flange. Close the opening of the dust bag by folding the lid
over. Take the closed dust bag out of the container (7).
– Place the new dust bag over the vacuum cleaner's con-
nection flange. Make sure that the entire length of the
dust bag touches the inside wall of the container (7).
– Insert the pre-filter(22) in the container(7), making sure
that the arrow is pointing towards the hose connection
piece(3).
– Put the top part of the vacuum cleaner (10) on and close
the catches (9).
Fitting the rubber lip (wet extraction) (see figure
H)
– Use a suitable tool to lift the brush inserts (24) out of the
floor nozzle (25).
– Place the rubber lips (23) in the floor nozzle (25).
Note: The textured side of the rubber lips must be facing
outwards.
GAS12-25PL :
Note: The requirements for the degree of penetration (dust
class L) have only been verified for dry vacuuming.
Operation
uPull the plug out of the socket before cleaning or per-
forming maintenance on the vacuum cleaner, making
tool adjustments, changing accessories or putting
away the vacuum cleaner. This safety measure prevents
the vacuum cleaner from being started accidentally.
When operating the dust extractor, ensure that the lockable
castors on the dust extractor are blocked to prevent the dust
extractor from rolling away unintentionally. Test the correct
functioning of the castors on the relevant surface before op-
eration.
Start-up
uPay attention to the mains voltage. The voltage of the
power source must correspond with the data on the type
plate of the vacuum cleaner.
uMake sure you inform yourself about the applicable
regulations/laws on how to handle harmful types of
dust in your country.
The dust extractor must categorically not be used in poten-
tially explosive areas.
1 609 92A 7GW | (05.07.2022) Bosch Power Tools

English | 13
To ensure optimum suction power, you must always fully un-
wind the vacuum hose (15) from the top part of the dust ex-
tractor (10).
GAS12-25PL :
The dust extractor may be used for vacuuming and extract-
ing the following materials:
– Dusts with an exposure limit of >1mg/m3
uProducts that are only sold in AUS and NZ: Use a resid-
ual current device (RCD) with a nominal residual current
of 30 mA or less.
Dry vacuuming
Note: When carrying out dry extraction, ensure that both the
pre-filter(22) and the main filter(20) are inserted into the
dust extractor.
Vacuuming up dust deposits (GAS12-25)
– To switch on the vacuum cleaner, set the
on/off switch (1) to the "on" symbol.
– To switch off the vacuum cleaner, set the
on/off switch (1) to the "off" symbol.
Extracting dust deposits (GAS12-25PL)
– To switch on the dust extractor, set the
mode selector switch(1) to the "extraction"
symbol.
– To switch off the dust extractor, set the
mode selector switch(1) to the "switch off"
symbol.
Extracting dust that accumulates from working power
tools (GAS12-25PL) (see figure I)
uThere must be a sufficient air exchange rate (L) in the
room when the exhaust air comes back into the room.
Be aware of the corresponding national regulations.
The dust extractor has a plug socket with a pro-
tective earth contact(2) that can be used to
connect an external power tool. Observe the
maximum permitted connected load of the con-
nected power tool.
–GAS12-25PL: Fit the extraction adapter(16) .
– Insert the dust extraction adapter(16) into the extraction
outlet of the power tool.
Note: When working with power tools that have a low air
feed into the vacuum hose (e.g. jigsaws, sanders, etc.), the
false air intake(33) of the dust extraction adapter(16) must
be opened. This will ensure that the semi-automatic filter
cleaning function works correctly.
To do this, turn the ring above the false air intake(33) until
the opening is at its maximum size.
– To activate the automatic start/stop
function of the dust extractor, set the
mode selector switch(1) to the "auto-
matic start/stop" symbol.
– To start the dust extractor, switch on the power tool
connected to the plug socket(2). The dust extractor will
start automatically.
– To stop dust extraction, switch the power tool off.
The automatic start/stop run-on function will run for up
to 6 seconds longer in order to extract the remaining
dust from the vacuum hose.
– To switch off the dust extractor, set the
mode selector switch(1) to the "switch
off" symbol.
Wet vacuuming
uDo not use the vacuum cleaner to vacuum combustible
or explosive liquids, such as petrol, oil, alcohol or
solvents. Do not vacuum hot, burning or explosive
dust. Do not operate the vacuum cleaner in areas sub-
ject to explosion hazards. Dust, vapours and liquids can
ignite or explode.
uThe vacuum cleaner must not be used as a water
pump. The vacuum cleaner is designed for vacuuming air
and vacuuming water mixtures.
Note: When wet vacuuming, ensure that the main filter (20)
is removed from the vacuum cleaner.
Steps to Take Before Wet Vacuuming
– Open the catches (9) and remove the top part of the va-
cuum cleaner (10) (see figure C).
– Take the pre-filter(22) out of the container(7) by its
handle(28).
– Remove the plastic bag (19) or dust bag if necessary.
– Turn the filter holder (29) as far as possible in the direc-
tion of rotation and take the filter holder, together with
the main filter (20), out of the top part of the vacuum
cleaner (10).
– Insert the pre-filter(22) back in the container(7), mak-
ing sure that the arrow is pointing towards the hose con-
nection piece(3).
Ensure that the wet filter(21) lies completely over the fil-
ter basket(30).
– Put the top part of the vacuum cleaner (10) on and close
the catches (9).
– Place the rubber lip (23) in the floor nozzle (25).
Vacuuming up liquids
– Switch the vacuum cleaner on (GAS12-25: On/off switch
(1) to "on"; GAS12-25PL: Mode selector switch (1) to
the "vacuuming" symbol).
The dust extractor is equipped with a float. Extraction is
stopped when the maximum filling level is reached.
– Set the on/off switch (1) to "off" (GAS12-25) or set the
mode selector switch (1) to the "switch off" symbol
(GAS12-25PL).
– Empty the container (7).
To prevent mould growth after wet vacuuming: Cleaning the
wet filter
Bosch Power Tools 1 609 92A 7GW | (05.07.2022)

14 | English
Semi-automatic filter cleaning
The filter cleaning function should be activated at the very
latest when the suction power is no longer sufficient.
How often filter cleaning needs to be carried out will depend
on the type and quantity of dust that has been extracted.
With regular use, the maximum conveying capacity will be
maintained for longer.
– Switch the dust extractor off for 6–10 seconds and then
on again. Repeat this several times in succession.
The pre-filter(22) is cleaned using blasts of air when it is
switched off.
– To work after cleaning the filter, switch the dust extractor
back on.
Maintenance and service
Maintenance and Cleaning
uPull the plug out of the socket before cleaning or per-
forming maintenance on the vacuum cleaner, making
tool adjustments, changing accessories or putting
away the vacuum cleaner. This safety measure prevents
the vacuum cleaner from being started accidentally.
uTo ensure safe and efficient operation, always keep
the dust extractor and the ventilation slots clean.
uWear a dust mask when servicing and cleaning the va-
cuum cleaner.
In order to avoid safety hazards, if the power supply cord
needs to be replaced, this must be done by Bosch or by an
after-sales service centre that is authorised to repair Bosch
power tools.
GAS12-25PL
For the user to carry out maintenance, the dust extractor
needs to be disassembled, cleaned and maintained as far as
this is possible without endangering maintenance personnel
or other persons. Before disassembly, the dust extractor
should be cleaned to prevent any potential hazards. The
room/enclosure in which the dust extractor is disassembled
should be well ventilated. Wear personal protective equip-
ment while carrying out maintenance. After completing
maintenance, the maintenance area should be cleaned.
An inspection regarding the dust extraction capability must
be carried out at least once a year by the manufacturer or
someone who has been trained, e.g. to check for filter dam-
age, that the dust extractor is tight and that the control unit
is functioning correctly.
Class L dust extractors which were located in dirty environ-
ments should have their exteriors, as well as all their com-
ponents, cleaned or treated with sealant. When performing
maintenance and repair work, all dirty parts that cannot be
cleaned satisfactorily must be disposed of. Such parts must
be disposed of in impermeable bags in accordance with the
valid provisions for disposing of such waste.
– Clean the housing of the dust extractor occasionally with
a damp cloth.
– Clean dirty charging pins using a dry cloth.
Cleaning the container
– Wipe the container (7) from time to time using a non-ab-
rasive off-the-shelf cleaning product and leave it to dry.
Cleaning the Filters
Regularly emptying the dust container and cleaning the fil-
ters will ensure optimum suction power. If suction power is
not achieved after that, the vacuum cleaner is to be brought
to the after-sales service.
Cleaning the pre-filter
– Open the catches (9) and remove the top part of the va-
cuum cleaner (10) (see figure C).
– Take the pre-filter(22) out of the container(7) by its
handle(28).
– Shake out the pre-filter (22) over a suitable waste bin.
– Insert the pre-filter(22) in the container(7), making sure
that the arrow is pointing towards the hose connection
piece(3).
– Put the top part of the vacuum cleaner (10) on and close
the catches (9).
Cleaning the main filter
– Open the catches (9) and remove the top part of the va-
cuum cleaner (10) (see figure C).
– Turn the filter holder(29) as far as possible in the direc-
tion of rotation and take the filter holder, together with
the main filter(20), out of the top part of the dust
extractor(10).
– Brush the folds of the main filter (20) with a soft brush.
or
Replace the main filter (20) if damaged.
– Place the filter holder (29), together with the main filter
(20), over the filter basket (30) and turn the filter holder
(29) as far as possible in the direction of rotation .
– Put the top part of the vacuum cleaner (10) on and close
the catches (9).
Cleaning the wet filter
To prevent mould growth after wet vacuuming:
– Open the catches (9) and remove the top part of the va-
cuum cleaner (10) (see figure C).
– Leave the top part of the vacuum cleaner (10) to dry thor-
oughly.
– Pull the wet filter (21) out of the filter basket (30).
– Wash the wet filter (21) under running water and then
leave it to dry thoroughly.
– Place the wet filter (21) completely over the filter basket
(30).
– Put the top part of the vacuum cleaner (10) on and close
the catches (9).
Removing/changing the filter (see figures E1–E2)
Replace the damaged pleated filter immediately.
– Turn the filter holder (29) as far as possible in the direc-
tion of rotation and take the filter holder, together with
the main filter (20), out of the top part of the vacuum
cleaner (10).
1 609 92A 7GW | (05.07.2022) Bosch Power Tools

English | 15
– Take the dirty/damaged main filter (20) out of the filter
holder (29).
– Brush the folds of the main filter (20) with a soft brush.
or
Replace the main filter (20) if damaged.
– Place the filter holder (29) on the cleaned/new main filter
(20).
– Place the filter holder(29), together with the main
filter(20), over the filter basket(30) and turn the filter
holder(29) as far as possible in the direction of rotation
.
– Put the top part of the vacuum cleaner (10) on and close
the catches (9).
– Open the catches (9) and remove the top part of the va-
cuum cleaner (10).
Storage and Transport (see figure J1–J2)
– Wrap the power cable around the carrying handle (12).
– Place the suction tubes (26) in the holders (14).
– Place the vacuum hose (15) in the holder (11) around
the top part of the vacuum cleaner.
– Carry the vacuum cleaner by the carrying handle (12) or
pull the vacuum cleaner along behind you on even sur-
faces using the pull strap (4).
– Store the vacuum cleaner in a dry room and secure it so
that it cannot be used by unauthorised persons.
– Put the castor brake (5) down to hold the castors (6) in
place.
Rectifying faults
uIf a fault (e.g. a filter damage) occurs, the vacuum
cleaner must be switched off immediately. The fault
must be repaired before resuming operation.
Problem Corrective measures
Suction turbine will not switch on. – Check the mains cable, mains plug, fuse and socket.
GAS12-25PL:
The mode selector switch(1) is set to "automatic start/stop".
– Set the mode selector switch(1) to the "extraction" symbol or switch on the
power tool plugged into the plug socket(2).
The suction turbine will not switch on
again after the container has been
emptied.
– Switch the dust extractor off and wait 5 seconds before switching it back on.
The suction power is decreasing. – Empty the container(7).
– Remove any blockages from the vacuum nozzle, suction tube(26), vacuum
hose(15) or main filter(20).
– Change the plastic bag(19) or dust bag.
– Make sure the filter holder(29) is engaged correctly.
– Place the top part of the dust extractor(10) on correctly and close the
catches(9).
– Change the pre-filter(22), main filter(20) or wet filter(21).
Dust is escaping during extraction – Check that the main filter(20) has been fitted correctly.
– Change the main filter(20).
Automatic switch-off (wet extraction)
is not working.
Automatic switch-off will not work in the presence of non-conductive liquids or foam-
ing.
– Check the fill level regularly.
The semi-automatic filter cleaning
function is not working.
– Empty the container(7).
After-Sales Service and Application Service
Our after-sales service responds to your questions concern-
ing maintenance and repair of your product as well as spare
parts. You can find explosion drawings and information on
spare parts at: www.bosch-pt.com
The Bosch product use advice team will be happy to help you
with any questions about our products and their accessor-
ies.
In all correspondence and spare parts orders, please always
include the 10‑digit article number given on the nameplate
of the product.
Bosch Power Tools 1 609 92A 7GW | (05.07.2022)

16 | Français
Malaysia
Robert Bosch Sdn. Bhd.(220975-V) PT/SMY
No. 8A, Jalan 13/6
46200 Petaling Jaya
Selangor
Tel.: (03) 79663194
Toll-Free: 1800 880188
Fax: (03) 79583838
E-Mail: [email protected]
www.bosch-pt.com.my
You can find further service addresses at:
www.bosch-pt.com/serviceaddresses
Disposal
The vacuum cleaner, its accessories and packaging should
be recycled in an environmentally friendly manner.
Do not dispose of the vacuum cleaner along
with household waste.
Français
Consignes de sécurité pour les
aspirateurs
Lisez attentivement toutes les instructions
et consignes de sécurité. Le non-respect des
instructions et consignes de sécurité peut pro-
voquer un choc électrique, un incendie et/ou
entraîner de graves blessures.
Conservez tous les avertissements et toutes les instruc-
tions pour pouvoir s’y reporter ultérieurement.
uCet aspirateur n’est pas conçu
pour être utilisé par des enfants ni
par des personnes souffrant d’un
handicap physique, sensoriel ou
mental ou manquant d’expérience
ou de connaissances. Il y a sinon
risque de blessures et d’utilisation
inappropriée.
uNe laissez pas les enfants sans sur-
veillance. Faites en sorte que les en-
fants ne jouent pas avec l’aspirateur.
uN’aspirez pas des poussières de hêtre ou de chêne, ni
des poussières minérales ou d’amiante. Ces matières
sont considérées comme cancérogènes.
AVERTISSE-
MENT
Ne mettez en marche l’aspirateur
qu’après vous être suffisamment
informé sur son utilisation, sur la
nature des matières à aspirer et sur la façon de les élimi-
ner en toute sécurité. Une initiation approfondie sur son
utilisation réduit le risque de mauvaise manipulation et de
blessure.
AVERTISSE-
MENT
L’aspirateur est conçu pour l’aspi-
ration de matières sèches et aussi
de liquides, moyennant certaines
mesures. La pénétration de liquides dans l’appareil ou tout
contact avec des liquides augmente le risque de choc élec-
trique.
uN’utilisez pas cet aspirateur pour aspirer des liquides
inflammables ou explosifs, tels que essence, huiles,
alcool, solvants. N’aspirez pas de poussières très
chaudes, incandescentes ou explosives. N’utilisez pas
l’aspirateur dans des locaux à atmosphère explosive.
Les poussières, vapeurs ou liquides risquent de s’enflam-
mer ou d’exploser.
AVERTISSE-
MENT
N’utilisez la prise de courant que
pour les usages mentionnés dans
la présente notice.
AVERTISSE-
MENT
Arrêtez immédiatement l’aspira-
teur dès que de la mousse ou de
l’eau en ressort et videz la cuve.
L’aspirateur risque sinon d’être endommagé.
uATTENTION! Ne rangez l’aspirateur qu’en intérieur.
uATTENTION ! Nettoyez régulièrement le flotteur et vé-
rifiez alors qu’il n’est pas endommagé. Il y a sinon
risque de dysfonctionnement.
uSi l’utilisation de l’aspirateur dans un environnement
humide ne peut pas être évitée, utilisez un disjoncteur
différentiel. L’utilisation d’un disjoncteur différentiel ré-
duit le risque de choc électrique.
uAvant chaque utilisation, vérifiez l’état de l’aspira-
teur, de la fiche et du cordon d’alimentation. N’utilisez
pas l’aspirateur si des défauts sont constatés. N’ou-
vrez pas l’aspirateur vous-même. Confiez-le pour ré-
paration à un professionnel qualifié utilisant seule-
ment des pièces de rechange d’origine. Un aspirateur,
un câble et/ou une fiche endommagés augmentent le
risque d’un choc électrique.
uVeillez à ne pas écraser ou coincer le câble. Ne tirez
pas sur le câble pour l’extraire de la prise électrique
ou pour déplacer l’aspirateur. Un câble endommagé
augmente le risque de choc électrique.
uDébranchez le cordon de la prise électrique avant de
nettoyer l’aspirateur, d’effectuer des réglages, de
changer d’accessoire ou de ranger l’aspirateur. Cette
mesure de précaution prévient toute mise en marche in-
tempestive de l’aspirateur.
uVeillez à bien aérer la zone de travail.
uNe confiez la réparation de l’aspirateur qu’à un profes-
sionnel qualifié utilisant seulement des pièces de re-
1 609 92A 7GW | (05.07.2022) Bosch Power Tools

Français | 17
change d’origine. Ceci est indispensable pour préserver
la sécurité de fonctionnement de l’aspirateur.
AVERTISSE-
MENT
L’aspirateur contient des pous-
sières nuisibles à la santé. Confiez
son vidage, son entretien et le re-
trait du bac collecteur de poussière à un professionnel
qualifié. Le port d’équipements de protection appropriés
est obligatoire. N’utilisez l’aspirateur qu’avec le système
de filtration complet et bien en place. Vous mettriez sinon
votre santé en danger.
uAvant de mettre en marche l’aspirateur, assurez-vous
du bon état du tuyau d’aspiration. Laissez alors le
tuyau d’aspiration raccordé à l’aspirateur pour éviter
que de la poussière ne sorte involontairement. Vous
risqueriez sinon d’aspirer de la poussière.
uNe vous asseyez jamais sur l’aspirateur. Vous risque-
riez d’endommager l’aspirateur.
uSoyez prudent lors de l’utilisation du cordon d’alimen-
tation et du tuyau d’aspiration. Vous pourriez sinon
mettre en danger d’autres personnes.
uNe dirigez jamais un jet d’eau directement sur l’aspira-
teur pour le nettoyer. Toute pénétration d’eau à l’inté-
rieur de la partie supérieure de l’aspirateur augmente le
risque de choc électrique.
Symboles
Les symboles suivants peuvent être importants pour l’utilisa-
tion de votre aspirateur. Veuillez mémoriser ces symboles et
leur signification. Une bonne connaissance des symboles
vous permettra d’utiliser l’aspirateur au mieux et en toute sé-
curité.
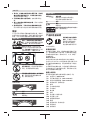
Symboles et leur signification
AVERTISSEMENT! Lisez attentivement
toutes les instructions et consignes de
sécurité. Le non-respect des instructions
et consignes de sécurité peut provoquer
un choc électrique, un incendie et/ou en-
traîner de graves blessures.
GAS12-25PL : aspirateur conforme à la
classe de filtration L selon CEI/EN
60335-2-69 conçu pour l’aspiration à
sec de poussières nuisibles à la santé
avec une valeur limite d’exposition
>1mg/m³
Symboles et leur signification
N’accrochez pas l’aspirateur à un pa-
lan, un crochet de grue ou autre pour le
transporter. L’aspirateur n’est pas gru-
table. Il y a alors risque de blessure et de
dommage matériel.
Ne vous asseyez jamais sur l’aspirateur
et ne l’utilisez pas comme marchepied
ou tabouret. L’aspirateur risque de bas-
culer et d’être endommagé. Il y a risque
de blessure.
GAS12-25
Arrêt
Aspiration
Aspiration de poussières qui se sont dé-
posées
GAS12-25PL
Mise en marche/arrêt automatique
Aspiration des poussières produites par
les outils électroportatifs pendant leur
utilisation
L’aspirateur se met en marche automati-
quement et s’arrête de façon différée
Arrêt
Aspiration
Aspiration de poussières qui se sont dé-
posées
Indication de la puissance maximale ad-
missible de l’outil électroportatif raccor-
dé (diffère selon les pays)
Description du produit et des
prestations
Lisez attentivement
toutes les instructions et
consignes de sécurité. Le
non-respect des instruc-
tions et consignes de sécu-
rité peut provoquer un choc électrique, un incendie et/ou en-
traîner de graves blessures.
Référez-vous aux illustrations qui se trouvent au début de la
notice d’utilisation.
Bosch Power Tools 1 609 92A 7GW | (05.07.2022)

18 | Français
Utilisation conforme
L’aspirateur est conçu pour l’aspiration, le soufflage et la sé-
paration de poussières sèches ininflammables, de liquides
ininflammables et de mélanges eau-air. Il est destiné aux ap-
plications professionnelles exigeantes (par ex. sur les chan-
tiers, dans l’industrie et dans les ateliers) ainsi qu’à une utili-
sation domestique chez des particuliers.
GAS12-25PL:
L’aspirateur a été contrôlé conformément aux prescriptions
relatives à l’aspiration de poussières et satisfait à la classe de
filtration L.
Les aspirateurs conformes à la classe de filtration L selon
IEC/EN 60335-2-69 ne doivent être utilisés que pour l’aspi-
ration à sec de poussières nuisibles à la santé avec une va-
leur limite d’exposition > 1 mg/m3.
N’utilisez l’aspirateur qu’après vous être familiarisé avec
toutes ses fonctions ou après avoir été initié à son utilisation.
Éléments constitutifs
La numérotation des éléments se réfère à la représentation
de l’aspirateur dans les pages graphiques.
(1) Interrupteur Marche/Arrêt (GAS12-25)
(1) Sélecteur de mode de fonctionnement
(GAS12-25PL)
(2) Prise électrique pour outil électroportatif
(GAS12-25PL)
(3) Raccord d’aspiration (fonction aspiration)
(4) Sangle
(5) Frein de roue pivotante
(6) Roue pivotante
(7) Cuve
(8) Roue fixe
(9) Patte de fermeture de la partie supérieure de l’aspira-
teur
(10) Partie supérieure de l’aspirateur
(11) Fixation pour tuyau d’aspiration
(12) Poignée de transport
(13) Raccord d’aspiration (fonction soufflage)
(14) Fixation pour tuyau d’aspiration
(15) Tuyau d’aspiration
(16) Adaptateur d’aspiration (GAS12-25PL)
(17) Coude d’aspiration
(18) Suceur droit
(19) Sac plastique/sac à poussières a)
(20) Filtre principal
(21) Filtre humide
(22) Préfiltre
(23) Lèvre d’étanchéité
(24) Bande à brosses
(25) Suceur pour sols
(26) Tube d’aspiration
(27) Bouton poussoir
(28) Poignée du préfiltre
(29) Support de filtre
(30) Panier de filtre
(31) Ouverture d’aspiration
(32) Agrafes pour la fixation du sac plastique
(33) Orifice d’air secondaire
(34) Tuyau de sortie d'aira)
a) Les accessoires décrits ou illustrés ne sont pas tous compris
dans la fourniture. Vous trouverez les accessoires complets
dans notre gamme d’accessoires.
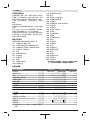
Caractéristiques techniques
Aspirateur eau et poussière GAS12-25 GAS12-25 GAS12-25PL
Référence 3601J7C0.. 3601J7C0C. 3601J7C1..
Puissance absorbée nominale W 1 250 1 000 1 250
Fréquence Hz 50–60 50–60 50–60
Contenance (brute) de la cuve l 25 25 25
Contenance nette de la cuve (liquides) l 15 15 15
Volume du sac à poussières l 20 20 20
Dépression maxiA)
– Aspirateur kPa 19 17 19
– Turbine kPa 20 19 20
Débit maxiA)
– Aspirateur l/s 36 33 36
– Turbine l/s 65 60 65
Mise en marche/arrêt automatique – – ●
Poids selon EPTA-Procedure 01:2014 kg 8,6 8,6 9
1 609 92A 7GW | (05.07.2022) Bosch Power Tools

Français | 19
Aspirateur eau et poussière GAS12-25 GAS12-25 GAS12-25PL
Indice de protection / II / II / I
Indice de protection IPX4 IPX4 IPX4
A) mesurée avec tuyau d’aspiration de Ø 35 mm et de 3 m
de longueur
Les données indiquées sont valables pour une tension nominale [U] de 230 V. Elles peuvent varier lorsque la tension diffère
de cette valeur et sur certaines versions destinées à certains pays.
Mise en marche/arrêt automatique
3 601 J7C ... Tension nominale Puissance maximale Puissance minimale
1L0 240V 1 700W 100W
1K0/100/1E0/1H0 220–230V 2 050W 100W
1F0/180/1N0 220V 950W 100W
Indication de la puissance maximale admissible de l’outil électroportatif raccordé.
Pour les modèles vendus dans d’autres pays, ces valeurs peuvent différer. Référez-vous aux indications qui se trouvent sur la
prise de l’aspirateur.
Informations sur le niveau sonore/les vibrations
Valeurs d’émissions sonores déterminées conformément
àEN60335-2-69.
Le niveau de pression acoustique en dB(A) typique de l'aspi-
rateur est de76dB(A). Incertitude K=2dB. Le niveau so-
nore peut dépasser les valeurs indiquées pendant l’utilisa-
tion de l’outil. Portez un casque antibruit!
Valeurs globales de vibration ah (somme vectorielle sur les
trois axes) et incertitude K conformément
àEN60335-2-69:
ah<2,5m/s2, K=1,5 m/s2.
Montage
uDébranchez le cordon de la prise électrique avant de
nettoyer l’aspirateur, d’effectuer des réglages, de
changer d’accessoire ou de ranger l’aspirateur. Cette
mesure de précaution prévient toute mise en marche in-
tempestive de l’aspirateur.
Montage des accessoires d’aspiration (voir
figure A)
Le tuyau d’aspiration (15) est pourvu d’un système de clip-
sage permettant le raccordement des accessoires d’aspira-
tion (adaptateur d’aspiration (16), coude d’aspiration (17)).
Montage des suceurs et des tubes
– Enfichez le suceur coudé (17) sur le flexible d’aspiration
(15) jusqu’au clic entre les deux boutons-pression (27).
– Emboîtez ensuite l’accessoire d’aspiration souhaité (su-
ceur pour sols, suceur droit, tube d’aspiration, etc.) sur le
coude d’aspiration (17).
– Pour retirer l’adaptateur ou le suceur, pressez les bou-
tons-pression (27) vers l’intérieur et tirez.
Montage de l’adaptateur d’aspiration (GAS12-25PL)
– Emboîtez l’adaptateur d’aspiration (16) sur le tuyau d’as-
piration (15) jusqu’à ce que les deux boutons-pression
(27) du tuyau d’aspiration s’enclenchent de manière au-
dible.
– Pour retirer l’adaptateur, pressez les boutons-pression
(27) vers l’intérieur et tirez.
Montage du tuyau d’aspiration
Fonction aspiration (voir figure B1)
– Positionnez le tuyau d’aspiration (15) sur le raccord d’as-
piration (3)et tournez-le jusqu’en butée dans le sens .
Remarque : Lors de l’aspiration, le frottement de la pous-
sière contre les parois du tuyau d’aspiration et de l’acces-
soire génère des charges électrostatiques pouvant donner
lieu à des décharges électrostatiques plus ou moins gê-
nantes pour l’utilisateur (dépend des conditions environ-
nantes et de la sensibilité corporelle de chacun).
Bosch recommande pour cette raison l’utilisation d’un tuyau
d’aspiration antistatique (accessoire) pour l’aspiration de
poussières fines et de matières sèches.
Fonction soufflage (voir figureB2)
uL’aspirateur est doté d’une fonction soufflage. Ne re-
jetez pas l’air évacué dans la pièce dans laquelle vous
vous trouvez. N’utilisez la fonction de soufflage
qu’avec un tuyau flexible propre. Les poussières
peuvent être nuisibles à la santé.
N’utilisez pour la fonction soufflage que le flexible de
soufflage(34) (accessoire) avec raccordement adapté qui
est représenté ici. Le flexible d’aspiration fourni avec l’aspi-
rateur ne convient pas pour le soufflage.
– Mettez en marche l’aspirateur pendant au moins 5s
(GAS12-25: interrupteur Marche/Arrêt(1) sur « On
» ;GAS12-25PL: sélecteur de mode de
fonctionnement(1) sur le symbole « Aspiration ») pour
débarrasser le tuyau d’aspiration(15) des poussières qui
se sont déposées.
– Tournez le flexible d’aspiration(15) jusqu’en butée dans
le sens et retirez-le du raccord d’aspiration(3).
Bosch Power Tools 1 609 92A 7GW | (05.07.2022)

20 | Français
– Positionnez le tuyau de sortie d'air(34) sur le raccord
d’aspiration(13) et tournez-le jusqu’en butée dans le
sens .
Retrait/mise en place du préfiltre
Le préfiltre(22) retient les saletés grossières et prolonge la
durée de vie du filtre principal. Vous devez retirer le préfiltre
avant d’aspirer des liquides ou pour nettoyer le filtre princi-
pal.
Saisissez le préfiltre(22) avec la poignée(28) pour le retirer
facilement.
Retrait du préfiltre (voir figure D1)
– Ouvrez les deux fermetures (9)et relevez la partie supé-
rieure de l’aspirateur (10) (voir figure C).
– Retirez le préfiltre(22) de la cuve(7)à l'aide de la
poignée(28).
Mise en place du préfiltre (voir figure D2)
– Insérez le préfiltre(22) dans la cuve(7) avec le flèche en
direction du raccord d’aspiration (3).
– Remettez en place la partie supérieure de l’aspirateur
(10) et fermez les fermetures (9).
Retrait/mise en place du filtre principal
Le filtre principal (20) est un filtre plissé HEPA à très haut
pouvoir filtrant destiné à purifier l’air évacué. Vous devez im-
pérativement retirer le filtre principal de la cuve avant d’aspi-
rer des liquides.
Retrait du filtre principal (voir figure E1)
– Ouvrez les deux fermetures (9)et relevez la partie supé-
rieure de l’aspirateur (10) (voir figure C).
– Tournez le support de filtre (29) jusqu’en butée dans le
sens et retirez-le avec le filtre principal (20) de la par-
tie supérieure de l’aspirateur (10).
Mise en place du filtre principal (voir figure E2)
– Glissez le support de filtre (29) avec le filtre principal
(20) au-dessus du panier de filtre (30) et tournez le sup-
port de filtre (29) jusqu’en butée dans le sens .
– Remettez en place la partie supérieure de l’aspirateur
(10) et fermez les fermetures (9).
Remarque : Vérifiez toujours que le filtre soit bien en place.
Cela est particulièrement important lors de l’aspiration de
poussières nuisibles à la santé.
Mise en place/retrait du filtre à liquides
Pour l’aspiration de mélanges eau-matières solides, l’aspira-
teur est doté d’un filtre à liquides (21) permettant de sépa-
rer le liquide des matières solides.
Retrait du filtre à liquides (voir figure F1)
– Ouvrez les deux fermetures (9)et relevez la partie supé-
rieure de l’aspirateur (10) (voir figure C).
– Tournez le support de filtre (29) jusqu’en butée dans le
sens et retirez-le avec le filtre principal (20) de la par-
tie supérieure de l’aspirateur (10).
– Retirez le filtre à liquides (21) du panier de filtre (30).
Mise en place du filtre à liquides (voir figure F2)
– Glissez complètement le filtre à liquides (21) au-dessus
du panier de filtre (30).
– Remettez en place la partie supérieure de l’aspirateur
(10) et fermez les fermetures (9).
Mise en place/retrait d’un sac plastique ou sac à
poussières (pour l’aspiration de matières
sèches)
Pour l’aspiration de matières sèches, vous pouvez placer
dans la cuve (7) soit un sac plastique (19), soit un sac à
poussières (accessoire). Cela facilite l’élimination des sale-
tés grossières.
Mise en place d’un sac plastique (voir figures G1–G3)
– Ouvrez les deux fermetures (9)et relevez la partie supé-
rieure de l’aspirateur (10) (voir figure C).
– Retirez le préfiltre(22) de la cuve(7)à l'aide de la
poignée(28).
– Insérez le sac plastique (19) dans la cuve (7) avec l’ou-
verture de remplissage orientée vers le haut. Fixez le sac
plastique sous l’ouverture d’aspiration (31) avec les
agrafes (32).
– Faites en sorte que le sac plastique (19) épouse bien tout
l’intérieur de la cuve (7).
– Rabattez le reste du sac plastique (19) au-dessus du bord
de la cuve (7).
– Insérez le préfiltre(22) dans la cuve(7) avec le flèche en
direction du raccord d’aspiration (3).
– Remettez en place la partie supérieure de l’aspirateur
(10) et fermez les fermetures (9).
Retrait et fermeture du sac plastique
– Ouvrez les deux fermetures (9)et relevez la partie supé-
rieure de l’aspirateur (10) (voir figure C).
– Retirez le préfiltre(22) de la cuve(7)à l'aide de la
poignée(28).
– Dégagez vers l’arrière le bord du sac plastique (19) des
agrafes (32).
– Retirez avec précaution le sac plastique (19) de la cuve
(7), sans l’endommager.
– Veillez ce faisant à ce que le sac plastique ne frotte pas
contre l’ouverture d’aspiration (31) ou contre d’autres
objets pro-éminents ou saillants.
Mise en place/remplacement d’un sac à poussières
(accessoire)
– Ouvrez les deux fermetures (9)et relevez la partie supé-
rieure de l’aspirateur (10) (voir figure C).
– Retirez le préfiltre(22) de la cuve(7)à l'aide de la
poignée(28).
– Dégagez vers l’arrière le sac à poussières plein (19) de la
bride. Fermez l’ouverture du sac à poussières en rabat-
tant le couvercle. Retirez le sac à poussières fermé de la
cuve (7).
1 609 92A 7GW | (05.07.2022) Bosch Power Tools
La page est en cours de chargement...
La page est en cours de chargement...
La page est en cours de chargement...
La page est en cours de chargement...
La page est en cours de chargement...
La page est en cours de chargement...
La page est en cours de chargement...
La page est en cours de chargement...
La page est en cours de chargement...
La page est en cours de chargement...
La page est en cours de chargement...
La page est en cours de chargement...
La page est en cours de chargement...
La page est en cours de chargement...
La page est en cours de chargement...
La page est en cours de chargement...
La page est en cours de chargement...
La page est en cours de chargement...
La page est en cours de chargement...
La page est en cours de chargement...
La page est en cours de chargement...
La page est en cours de chargement...
La page est en cours de chargement...
La page est en cours de chargement...
La page est en cours de chargement...
La page est en cours de chargement...
La page est en cours de chargement...
La page est en cours de chargement...
La page est en cours de chargement...
La page est en cours de chargement...
La page est en cours de chargement...
La page est en cours de chargement...
La page est en cours de chargement...
La page est en cours de chargement...
La page est en cours de chargement...
La page est en cours de chargement...
La page est en cours de chargement...
La page est en cours de chargement...
La page est en cours de chargement...
La page est en cours de chargement...
La page est en cours de chargement...
La page est en cours de chargement...
La page est en cours de chargement...
La page est en cours de chargement...
La page est en cours de chargement...
La page est en cours de chargement...
La page est en cours de chargement...
La page est en cours de chargement...
La page est en cours de chargement...
La page est en cours de chargement...
La page est en cours de chargement...
La page est en cours de chargement...
La page est en cours de chargement...
La page est en cours de chargement...
La page est en cours de chargement...
La page est en cours de chargement...
La page est en cours de chargement...
La page est en cours de chargement...
La page est en cours de chargement...
La page est en cours de chargement...
La page est en cours de chargement...
La page est en cours de chargement...
La page est en cours de chargement...
La page est en cours de chargement...
La page est en cours de chargement...
La page est en cours de chargement...
La page est en cours de chargement...
La page est en cours de chargement...
La page est en cours de chargement...
La page est en cours de chargement...
La page est en cours de chargement...
La page est en cours de chargement...
La page est en cours de chargement...
La page est en cours de chargement...
La page est en cours de chargement...
La page est en cours de chargement...
La page est en cours de chargement...
La page est en cours de chargement...
La page est en cours de chargement...
La page est en cours de chargement...
La page est en cours de chargement...
La page est en cours de chargement...
La page est en cours de chargement...
La page est en cours de chargement...
La page est en cours de chargement...
La page est en cours de chargement...
-
 1
1
-
 2
2
-
 3
3
-
 4
4
-
 5
5
-
 6
6
-
 7
7
-
 8
8
-
 9
9
-
 10
10
-
 11
11
-
 12
12
-
 13
13
-
 14
14
-
 15
15
-
 16
16
-
 17
17
-
 18
18
-
 19
19
-
 20
20
-
 21
21
-
 22
22
-
 23
23
-
 24
24
-
 25
25
-
 26
26
-
 27
27
-
 28
28
-
 29
29
-
 30
30
-
 31
31
-
 32
32
-
 33
33
-
 34
34
-
 35
35
-
 36
36
-
 37
37
-
 38
38
-
 39
39
-
 40
40
-
 41
41
-
 42
42
-
 43
43
-
 44
44
-
 45
45
-
 46
46
-
 47
47
-
 48
48
-
 49
49
-
 50
50
-
 51
51
-
 52
52
-
 53
53
-
 54
54
-
 55
55
-
 56
56
-
 57
57
-
 58
58
-
 59
59
-
 60
60
-
 61
61
-
 62
62
-
 63
63
-
 64
64
-
 65
65
-
 66
66
-
 67
67
-
 68
68
-
 69
69
-
 70
70
-
 71
71
-
 72
72
-
 73
73
-
 74
74
-
 75
75
-
 76
76
-
 77
77
-
 78
78
-
 79
79
-
 80
80
-
 81
81
-
 82
82
-
 83
83
-
 84
84
-
 85
85
-
 86
86
-
 87
87
-
 88
88
-
 89
89
-
 90
90
-
 91
91
-
 92
92
-
 93
93
-
 94
94
-
 95
95
-
 96
96
-
 97
97
-
 98
98
-
 99
99
-
 100
100
-
 101
101
-
 102
102
-
 103
103
-
 104
104
-
 105
105
-
 106
106


Bosch 12-25 Manuel utilisateur
- Catégorie
- Aspirateurs
- Taper
- Manuel utilisateur
dans d''autres langues
- español: Bosch 12-25 Manual de usuario
- português: Bosch 12-25 Manual do usuário
- 日本語: Bosch 12-25 ユーザーマニュアル