La page est en cours de chargement...

The following icons are used in this guide to
convey specific types of information:
Very important information
(can save you time!)
Get to Know Your Sensor,
Cont.
E
Get to Know Your Sensor
E
In the Box
C
You will immediately receive a welcome
email from [email protected] with
some helpful information. Please mark
the yosmart.com domain as safe, to
ensure you receive important messages
in the future.
Log in to the app using your new
username and password.
The app opens to the Favorite screen.
This is where your favorite devices and
scenes will be shown. You can organize
your devices by room, in the Rooms
screen, later.
Refer to the full user guide and online
support for instructions on the use of the
YoLink app.
Open the app and tap Sign up for an
account. You will be required to provide
a username and a password. Follow the
instructions, to set up a new account.
Allow notifications, when prompted.
Install the App
F
Install the App, Continued
F
If you are new to YoLink, please install
the app on your phone or tablet, if you
have not already. Otherwise, please
proceed to the next section
Scan the appropriate QR code below or
find the “YoLink app” on the appropriate
app store.
Apple phone/tablet
iOS 9.0 or higher
Android phone/
tablet 4.4 or higher
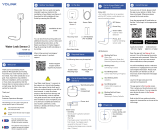
Water Level
Monitoring Sensor
Float Switch
Mounting Hook
The following items may be required:
Quick Start Guide
Required Items
D
Double-Sided
Mounting Tape
Cable Tie Mount
Rubbing Alcohol
Pads
Quick Start Guide
YS7904-UC
Water Level
Monitoring Sensor
Revision Apr. 03, 2023
Before You Begin
B
Installation & User
Guide
Product Support
Support produit
Soporte de producto
Your Water Level Monitoring Sensor
connects to the internet via a YoLink hub
(SpeakerHub or the original YoLink Hub),
and it does not connect directly to your
WiFi or local network. In order for
remote access to the device from the
app, and for full functionality, a hub is
required. This guide assumes the YoLink
app has been installed on your
smartphone, and a YoLink hub is
installed and online (or your location,
apartment, condo, etcetera, is already
served by a YoLink wireless network).
You can also find all current guides and
additional resources, such as videos and
troubleshooting instructions, on the
Water Level Monitoring Sensor Product
Support Page by scanning the QR code
below or by visiting:
https://shop.yosmart.com/pages/
water-level-monitoring-sensor-
product-support
Please note: this is a quick start guide,
intended to get you started on the
installation of your Water Level
Monitoring Sensor. Download the full
Installation & User Guide by scanning
this QR code:
2 x AAA Batteries
(Pre-Installed)
LED Behaviors
Blinking Red Once
Water Alert
Water Detected or Water Not
Detected (Depending on Mode)
Blinking Green
Connecting to Cloud
Fast Blinking Green
Control-D2D Pairing in Progress
Slow Blinking Green
Updating
Fast Blinking Red
Control-D2D Unpairing in
Progress
Blinking Red And Green
Alternately
Restoring to Factory Defaults
Welcome!
A
Thank you for purchasing YoLink
products! We appreciate you trusting
YoLink for your smart home &
automation needs. Your 100%
satisfaction is our goal. If you experience
any problems with your installation, with
our products or if you have any
questions that this manual does not
answer, please contact us right away.
See the Contact Us section for more info.
Thank you!
Eric Vanzo
Customer Experience Manager
Pour des instructions en
français, scannez les codes
QR dans la section suivante.
Para obtener instrucciones en
español, escanee los códigos
QR en la siguiente sección.
Fr
Es
Wall-Mounting Slot
Battery
Compartment
Alarm Tones
One Beep
Device power-up/button pressed
Two Beeps
Water Alert
(Two beeps every 2 seconds for the
first minute. Two beeps every 5
seconds for the next 12 hours.
Sustaining two beeps once a minute
after 12 hours)
Phono Jack
SET Button
Connector
3.5 mm
headphones/audio
type
Cable
Length: 71" (1.5
meters)
Stainless Steel
Washers
Float Switch
Float
(With integral
magnet)
C-Clip
Remove to change
float orientation
Status LED
* Not visible while there is no operation
with the SET button or while device is in
normal monitoring status
Add Your Sensor to the
App
G
2. Approve access to your phone’s
camera, if requested. A viewfinder will be
shown on the app.
3. Hold the phone over the QR code so
that the code appears in the viewfinder.If
successful, the Add Device screen will be
displayed.
4. Follow the instructions to add your
Water Level Monitoring Sensor to the
app.
1. Tap Add Device (if shown) or tap the
scanner icon:
Scanner icon
Cable Tie

Contact Us
J
We are here for you, if you ever need any
assistance installing, setting up or using
a YoLink app or product!
Need help? For fastest service, please
email us 24/7 at [email protected]
Or call us at 831-292-4831 (US phone
support hours: Monday - Friday, 9AM to
5PM Pacific)
You can also find additional support and
ways to contact us at:
www.yosmart.com/support-and-service
Or scan the QR code:
Finally, if you have any feedback or
suggestions for us, please email us at
Thank you for trusting YoLink!
Eric Vanzo
Customer Experience Manager
Support
Home Page
15375 Barranca Parkway
Ste. J-107 | Irvine, California 92618
© 2023 YOSMART, INC IRVINE,
CALIFORNIA
Press the SET
button, briefly, until
the LED blinks
green.
Power-Up
H
Installation
I
Installation, Continued
I
Sensor location considerations:
Before installing your Water Level
Monitoring Sensor, consider the
following important factors:
1. This device is intended for indoor use,
only. If used outdoors, the sensor body
should be protected from the elements,
in an environmental enclosure, for
example, and the environmental
conditions (temperature, humidity, etc.)
should be within the specified range for
the sensor (refer to online support
information for the full specifications for
this sensor). The sensor body should not
be installed where it may get wet
(indoors or outdoors).
2. The Water Level Monitoring Sensor
has an integral sounder alarm (piezo
sounder). Use of the sounder is optional,
can it can be disabled in the app
settings. Use of the sounder will reduce
the total battery life.
3. The Water Level Monitoring Sensor is
typically mounted on a wall or on a
stable vertical surface (e.g. post or
column).
4. If needed, you can add extension
cables between the float switch cable
and the sensor, to extend the total cable
distance. Use standard 3.5 mm
headphones type cables appropriate for
the application (e.g. outdoor
rated/waterproof)
The float switch has an internal reed
switch, and the small magnet inside the
float magnetically opens or closes the
reed switch, thereby opening or closing
the circuit to the Water Level Monitoring
Sensor. As shipped, your float switch
should be “closed” or “shorted” when the
float is in the high position and “open”
when the float is in the low position. If
you need to change this operation, you
can do so by removing the c-clip,
removing the float, and then reinstalling
the float upside-down, then reinstalling
the c-clip. The c-clip can be removed by
gently widening the opening of the “C”
shape, by hand or with a tool, like a
screwdriver. Push it back in place on the
float switch to install it, noting the slot
for the c-clip that is in the end of the
float switch. ��It may be helpful to have a
multimeter to test the float switch
configuration, but otherwise, after
connected to the sensor, the open/-
closed status can be checked.
Install the float switch
1. Before installing the float switch,
determine the method of securing the
cable.
2. Place the float switch at the desired
level in the tank/container, based on your
application (liquid detected is normal, or
no liquid detected is normal).
3. Secure the cable, while verifying the
height of the float switch is correct.
Install the mounting hook
1. Before installing the Water Level
Monitoring Sensor, check the length of
the cable, ensuring there is enough, for
the desired sensor location.
2. Clean the mounting surface with
rubbing alcohol or similar cleaner or
degreaser that will clean the surface
without leaving a residue that might
effect the adhesion of the mounting tape
on the bracket. The surface must be
clean, dry and free of dirt, oils, grease, or
other cleaning agent residue.
3. Remove the protective plastic from the
mounting tape on the back of the
mounting hook.
4. With the hook facing up, as shown,
press it firmly against the mounting
surface and maintain pressure for at
least 5 seconds.
Install and test the Water Level Monitor-
ing Sensor
1. Insert the float switch cable connector
into the Water Level Monitoring Sensor.
2. Using the slot on the back of the
sensor, hang the sensor on the mounting
hook. Ensure it is secure by gently
tugging on it.
3. It is important that you test your
sensor, to ensure it will work properly
when needed! To properly test it, you
may need to change settings in the app.
Refer to the full installation and user
guide and/or the product support page,
to complete the settings in the YoLink
app.
Float switch location & installation
considerations:
The float switch is designed for and
intended to be suspended into the tank,
container, etc. The stainless steel
washers installed on the float switch
have two purposes. The weight of the
washers will ensure that the float switch
hangs to the appropriate level in the
tank, and that the cable does not coil or
bend, resulting in undesired results from
the float switch. Also, the wider diameter
of the washers ensures the float switch
can be placed against a sidewall of the
tank/container, allowing the float switch
to move freely.
It is the responsibility of the installer to
secure the cable so that the float switch
position does not change later. For
example, use zip cords/tie wraps to
secure the cable to a fixed object.
Float switch configuration:
The float switch has two float positions
– high and low. When installed correctly
in a vertical position, if a liquid is
present, the float will rise to the high
position. If there is no liquid present, it
falls to the low position, by gravity. But
electrically, the float switch can give four
different outputs to the sensor:
Float high, closed circuit
Float high, open circuit
Float low, closed circuit
Float low, open circuit
Avoid damaging the cable when securing
it. If you use tie wraps, do not crimp or
smash the cable by overtightening the
tie wraps.
Sensor use considerations:
The Water Level Monitoring Sensor is a
variant of the Water Leak Sensor 2
(rope/cable style water sensor), which
also shares the main sensor body with
the Water Leak Sensor 3 (probe cable
type water sensor). All three sensors are
generally identical in the app, but
settings you make in the app determine
the behavior of the sensor.
When using this sensor with a float
switch, for monitoring the presence of
absence of a liquid with water, in the app,
you will define either liquid-detected, or
no-liquid-detected, as “normal”.
Depending on the mode you select, the
sensor will alert, and you will be notified
if the liquid level drops below the float
switch, OR if it rises to the float switch.
It is important to note, that even if you
define “no liquid detected” as an alert
(and therefore “liquid detected” as
normal), you can still create some
automations that will respond to the
change of state from liquid detected to
no liquid detected. An example of this
approach, is you want to receive a push
notification and SMS when no liquid is
detected (something is wrong), and you
want to receive a push notification, only,
when liquid is detected (normal; the level
of the liquid is good). You can create an
automation using the Notification
behavior, to receive a push notification
when liquid is detected again.
Cable Tie &
Cable Tie Mount
/