
EN FR
THIS INSTRUCTION BOOKLET CONTAINS IMPORTANT SAFETY INFORMATION. PLEASE READ AND KEEP FOR FUTURE REFERENCE.
Follow Costway
Please give us a chance to make it right and do better
Contact our friendly customer service department for help first.
Replacements for missing or damaged parts will be shipped ASAP!
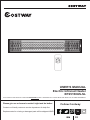
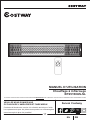
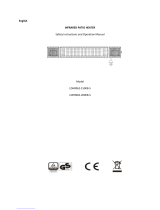
USER’S MANUAL
Electric Infrared Heater
EP25150US-SL

Contact Us!
Do NOT return this item.
Contact our friendly customer service department for help first.
E-mail
US: cs.us@costway.com
UK: cs.uk@costway.com
Before You StartBefore You Start
Please read all instructions carefully.
Retain instructions for future reference.
Separate and count all parts and hardware.
Read through each step carefully and follow the proper order.
We recommend that, where possible, all items are assembled near to the
area in which they will be placed in use, to avoid moving the product
unnecessarily once assembled.
Always place the product on a flat, steady and stable surface.
Keep all small parts and packaging materials for this product away from
babies and children as they potentially pose a serious choking hazard.
02

ASSEMBLY & OPERATION INSTRUCTION
Please read carefully and Save this instruction
THESE INSTRUCTIONS SHOULD BE READ CAREFULLY AND
RETAINED FOR FUTURE REFERENCE,
We cannot be liable for any damages caused by failure to observe these
instructions.
READ CAREFULLY-The infrared heater is designed for safe operation.
Nevertheless, installation, maintenance and operation of the heater can be
dangerous. Observing the following procedures will reduce the risk of
fire, electric shock, injury to persons and keep installation time to a
minimums. Save these instructions for future used.
1.Read all instruction before using this heater.
2.Remove the unit from it’s packaging and check to make sure it is in
good condition before using.
3.Do not let children play with parts of package (such as plastic bags).
4. Check the household voltage to ensure it matches the heater’s rated
specification.
5. Check the power cord and plug carefully before used, to make sure
that they are not damaged.
6. Before unplugging the power cord, be sure to turn off the power, when
energizing the unit, be sure your hands are dry to prevent from electric
shock.
7. Do not use flammable objects near or point the heater like furniture,
pillows. bedding, paper, clothes and curtains at least 3 feet (1meter) from
the front of the heater and keep them always the sides and rear.
8. Do not use near or in the immediate vicinity of a bath or swimming
pool or any source of liquid.
Warning
IMPORTANT SAFETY INSTRUCTIONS
03

9. To protect against electric shock, do not immerse cord or plug in water
or any other liquid.
10. Do not insert or allow foreign objects to enter any ventilation or
exhaust opening , as this may cause an electric shock, fire or damage to
the heater.
11.Always unplug the heater when not in use.
12. Do not allow cord to overhang the counter top where it can be easily
pulled by children.
13. Do not put fingers or foreign objects into the grill while in operation.
14. Do not leave the appliance unattended when in use.
15.This heater is not intended for use in bathrooms, laundry and similar
indoor locations, never located heater where it may fall into a bathtub or
other water container.
16.Non compliance with instructions or any other improper use or
mishandling may cause danger.
17. This appliance is not intended for use by persons (including children)
with reduces physical, sensory or mental capabilities or lack of
experience and knowledge unless they have been given supervision or
instruction concerning the use of the appliance by a person responsible
for their safety. Children and vulnerable people should be supervised to
ensure they do not play with the appliance.
18. If the supply cord is damaged in any way, it must be replaced by the
manufacturer or a similarly qualified person in order to avoid a hazard.
19. To prevent overheating of this appliance, keep the air inlets and
outlets clean and free of anything that may cause blockage. Check all
inlets and outlets from time to time to ensure it is clear of any dirt or dust
accumulation. DO NOT COVER.
20. Parts of the heater may exceed 200℃ , contact with the heating tube,
reflector, or metal parts near the heating tube, may cause severe BURNS
. To avoid burns, do not let bare skin touch hot surface.
04

21. NEVER place hands under the heating elements. ALWAYS allow
heating element to cool at least 10 minutes before touching the heating
tube or adjacent parts.
22. This product contains recyclable materials. Do not dispose this
product as unsorted municipal waste. Please contact your local
municipality for the nearest collection point.
This infrared heater produce instant and comfortable heat like the sun.
These robust and weatherproof heaters are designed for domestic and
commercial heating applications within indoor and outdoor areas.
Introduction
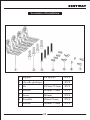
Model
Voltage(V)
Wattage(W)
Hertz(Hz)
Dimensions W×H×D(mm)
Weight N.W(KG)
SUNDEAR MOON
120V AC
1500
60
778×125×135
3.6
05

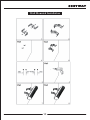
This heater is for use on 120 volts. The cord has a plug as shown at A in
Figure 68.1. An adapter as shown at C is available for connecting
three-blade grounding-type plugs to two-slot receptacles. The green
grounding lug extending from the adapter must be connected to a
permanent ground such as a properly grounded outlet box. The adapter
should not be used if a three-slot grounded receptacle is available.
06

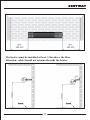
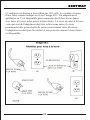
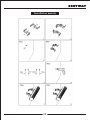
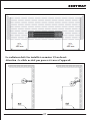
A wall mounting bracket is provide with the heater which has been
specifically designed to allow this product to be fitted to a wall or ceiling
before drilling the holders for the wall/ceiling is solid and that there are
no hidden water pipes or electric wires. The heater must be installed no
less than 16’’ from side walls and no less than 6”’ off the floor.
Important: Ensure that the supply cables is well mounted and that it
does not come into contact with reflector of the heater or that does not
trail into heated area, the supply cable can be fixed to the metal mounting
bracket behind heater with plastic zip ties.
1.This heater should be installed by a competent person, i.e. a qualified
electrician.
2.Always disconnected the heater from the electricity supply and allow it
to cool before installation.
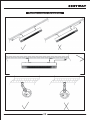
3.This heater can be mounted in a horizontal or vertical manner.
4.For both wall and ceiling mounting, the lowest part of the heater must
be located at or above a minimum height of 1.8m from ground level, so
that the heater can not be touched when in operation.
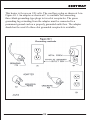
5.When mounting horizontally or to a ceiling, do not position the heater
at an angle more than 90°and less than 45°as shown in Fig. A and B.
6.The supply cable must be at the lower end of the heater if the heater is
installed at an angle or vertically.
7.Keep the supply cord away from the body of the heater which will get
hot during use.
8.Do not install the heater on an inflammable surface.
Tools Needed:
Warning
* Pencil *Hammer *Level
*Screw Driver *Power Drill and drill bits
07

9.Observe the minimum safe distance between the heater body and the
inflammable surfaces when mounted.
10.The heater should always have a minimum clearance of 0.5m from a
ceiling and adjacent walls.
11.If the heater is to be used outside, a weatherproof outlet is
recommended.
12.Before drilling ensure that there are no wires or water pipes in the area
where the heater is to be installed.
13.The heater must be installed on the mounting brackets provided.
14.Fasten the brackets securely to the mounting surface and the backside
of the heater using the nuts and screws supplied.
15.Fasten the heater securely on the brackets using the nuts and bolts
supplied.
16.The brackets can be used to adjust the direction of the heater, adjust
the heater angle by loosening the two bolts on the wall mounting bracket,
tighten the bolts again when the desired angle is reached.
08

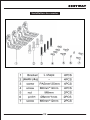
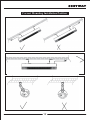
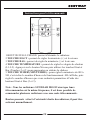
Installation Accessories
09

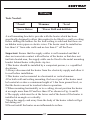
Wall Mounted Installation
10

Warning
IMPORTANT SAFETY INSTRUCTIONS
The heater must be installed at least 1.9m above the floor
Attention: cable should not passing thought the heater
11

Correct Mounting Installation Position
12

1.POWER BUTTON: Turn the heater off.
2.UP BUTTON: Increase timer and level.
3.DOWN BUTTON: Decrease timer and level.
4.LEVEL BUTTON: Use to adjust the heat levels(L1-L2). Press the
Level button then use the up and down buttons(buttons 2 and 3) to
increase or decrease the heating level.
5.TIMER BUTTON: To set the timer from 0H-9H, which is the number
of hours it will run. 0H will display and then adjust to the number of
hours you would like to set, using the up and down buttons(2 and 3).
Noted: All SUNDEAR MOON heaters and their remote controls
have the same frequency, so it is possible to control several heaters
with just one remote.
PUSH BUTTON: on the right end of heater, it could be manual
operated without remote control.
Remote Control Instructions
13

Inserting Batteries(not included)
Insert 2 AAA/ Alkaline type batteries into your remote control
1.Flip the backside of your remote control and pull out battery cover.
Insert the batteries in accordance with the instructions and polarity the
batteries.
2.Change the batteries in the same way depicted above.
NOTICE:
1.Replace the old batteries with the same type batteries. Otherwise, your
heater may not function well.
2.Pull out the batteries in case of long terms of disuse to prevent leakage
which may impair your remote control.
3.Do not allow water or liquid to get into the remote control.
Caution:
When the appliance is not operated for a long period of time, cleaning or
maintenance is conducted or when the location of the heater is changed,
the heater should be turned to OFF and unplugged from the electrical
connection.
Periodic inspection and removal of dirt and contaminants will ensure
that equipment can be operated safely.
Troubleshooting
1. Check if the power cord is plugged into an electrical outlet, if not, plug
in.
2. Check if electricity to the main fuse is working
E1 Error on Display: Control unit overheat. Check installation
clearances.
L1,2 shows in display, but no heat: Bulb is damaged. Arrange for
replacement bulb with local Dealer
14

Warning
Regular and careful cleaning helps your infrared heater operate
efficiently for many trouble free years. To clean your heater follow steps
below:
1.Unplug the power cord for your safety before cleaning your appliance.
2.Make sure the heater is cool before continuing.
3.To keep the heater clean, the outer shell maybe cleaned with a soft,
damp cloth. You may use a mild detergent if necessary. After cleaning,
dry the unit with a soft cloth. (CAUTION: DO NOT let liquids enter the
heater).
4.DO NOT use alcohol, gasoline, abrasive powders, furniture polish or
rough brushes to clean the heater. This may cause damage or
deterioration to the surface of the heater.
5.DO NOT immerse the heater in water
6.Wait until the heater is completely dry before use.
Storage: Store the heater in a cool, dry location when not in use to
prevent dust and dirt build up. Use packaging carton to store.
ATTENTION:
1.Always disconnect the heater from the electricity supply and allow it to
cool before attempting to work on it.
2.If the heater has collected dust or dirt inside the unit or around the
heating element, have to unit cleaned by a qualified service agent. Do not
operate the heater in this condition.
3.The only maintenance required is cleaning of the external surfaces of
the heater.
4.Do not touch the heating element with bare fingers, as residue from
your hand could affect the life of the lamp. If it is accidentally touched,
remove the finger marks with a soft cloth moistened with mentholated
spirit or alcohol.
CLEANING AND MAINTENANCE
15

5.Do not attempt to repair or adjust any electrical or mechanical
functions on this heater.
6.The heater contains no user serviceable parts. Should the product suffer
damage or breakdown, it must be repaired by a qualified technician.
7.Damaged supply cords to be replaced by the manufacturer or similarly
qualified person in order to avoid hazard.
RECYCLING
At the end of the electrical products useful life it should not be disposed
of with household waste.
Please recycle where facilities exist. Check with your Local Authority or
retailer for recycling advice in your country.
16

CE MANUEL D’INSTRUCTIONS CONTIENT DES INFORMATIONS IMPORTANTES SUR LA SÉCURITÉ. VEUILLEZ LIRE ET CONSERVER POUR LA RÉFÉRENCE FUTURE.
MANUEL D'UTILISATION
VEUILLEZ NOUS DONNER UNE
OCCASION DE L’AMELIORER ET FAIRE MIEUX
Contactez d’abord notre service à la clientèle amical pour l’aide.
Les replacements pour les pièces manquantes ou endommagées
seront envoyés le plus vite possible!
Suivez Costway
Chauffage à infrarouge
EP25150US-SL
EN FR
17

Contactez-nous !
Ne retournez pas cet article.
Contactez d’abord notre service à la clientèle amical pour l’aide.
E-mail
CA:service@costway.com
Avant de Commencer
Veuillez lire attentivement toutes les instructions.
Conservez les instructions pour la référence future.
Séparez et comptez toutes les pièces et les outils de matériel.
Lisez attentivement chaque étape et suivez le bon ordre.
Nous recommandons que, si possible, tous les éléments soient
assemblés à proximité de la zone dans laquelle ils seront utilisés, afin
d'éviter de déplacer inutilement le produit une fois assemblé.
Placez toujours le produit sur une surface plane, solide et stable.
Gardez toutes les petites pièces et le matériel d'emballage de ce produit
hors de portée des bébés et des enfants car ils pourraient provoquer un
risque grave d’étouffement.
18

INSTRUCTIONS DE MONTAGE ET D'UTILISATION
Veuillez lire attentivement cette notice et la conserver.
CES CONSIGNES DOIVENT ÊTRE LUES AVEC ATTENTION ET
CONSERVÉES POUR RÉFÉRENCE ULTÉRIEURE.
Nous ne pouvons être tenus responsables de tout dommage résultant du
non-respect de ces instructions.
LIRE ATTENTIVEMENT - Le radiateur infrarouge est conçu pour
fonctionner en toute sécurité. Néanmoins, l'installation, l'entretien et
l'utilisation de l'appareil peuvent constituer un danger. Le respect des
instructions suivantes permettra de limiter les risques d'incendie,
d'électrocution, de blessures et de réduire le temps d'installation. Veuillez
conserver cette notice pour consultation ultérieure.
1. Lisez toutes les instructions avant d'utiliser cet appareil.
2. Retirez l'appareil de son emballage et vérifiez qu'il est en bon état
avant de l'utiliser.
3. Ne laissez pas les enfants jouer avec des éléments de l'emballage
(comme les sacs en plastique).
4. Vérifiez la tension électrique de la maison pour vous assurer qu'elle
correspond aux caractéristiques techniques de l'appareil.
5. Vérifiez soigneusement le cordon d'alimentation et la fiche avant de
les utiliser, pour vous assurer qu'ils ne sont pas endommagés.
6. Avant de débrancher le cordon d'alimentation, assurez-vous de couper
le courant. Lorsque vous mettez l'appareil sous tension, assurez-vous
d'avoir les mains sèches pour éviter une électrocution.
7. N'utilisez pas d'objets inflammables à proximité ou en direction de
l'appareil tels que des meubles, des oreillers, de la literie, du papier, des
vêtements et des rideaux. Tenez-les à 0,9 mètre (3 pieds) minimum de
CONSIGNES DE SÉCURITÉ IMPORTANTES
Avertissement
19

l'avant de l'appareil et gardez-les toujours éloignés des côtés et de
l'arrière.
8. Ne pas utiliser près ou à proximité immédiate d'une baignoire, d'une
piscine ou de toute source de liquide.
9. Afin de prévenir les risques d'électrocution, ne pas immerger le cordon
ou la fiche dans l'eau ou tout autre liquide.
10. N'insérez pas ou ne laissez pas de corps étrangers pénétrer dans une
ventilation ou une bouche d'évacuation : cela pourrait provoquer une
électrocution, un incendie ou endommager l'appareil.
11. Débranchez systématiquement le radiateur lorsque vous ne l'utilisez
pas.
12. Ne laissez pas le cordon d'alimentation passer au-dessus de l'appareil
où il peut être facilement tiré par des enfants.
13. Ne mettez pas les doigts ou des corps étrangers dans la grille lorsqu'il
fonctionne.
14. Ne laissez pas l'appareil sans surveillance lorsqu'il est en marche.
15. Cet appareil n'est pas destiné à être utilisé dans une salle de bain, une
buanderie ou tout autre espace intérieur similaire. Ne placez jamais
l'appareil dans un emplacement où il pourrait tomber dans une baignoire
ou un autre contenant d'eau.
16. Le non-respect des consignes, toute autre utilisation inappropriée ou
mauvaise manipulation peut être source de danger.
17. Cet appareil n'est pas destiné à être utilisé par des personnes (y
compris les enfants) dont les capacités physiques, sensorielles ou
mentales sont réduites ou qui manquent d'expérience et de connaissances,
à moins qu'elles ne bénéficient d'une surveillance ou d'instructions
concernant l'utilisation de l'appareil par une personne responsable de leur
sécurité. Les enfants et les personnes vulnérables doivent être surveillés
pour s'assurer qu'ils ne jouent pas avec l'appareil.
18. En cas de cordon d'alimentation endommagé de quelque manière que
ce soit, il doit être remplacé par le fabricant ou par une personne qualifiée
afin d'éviter tout risque.
20
La page charge ...
La page charge ...
La page charge ...
La page charge ...
La page charge ...
La page charge ...
La page charge ...
La page charge ...
La page charge ...
La page charge ...
La page charge ...
La page charge ...
La page charge ...
-
 1
1
-
 2
2
-
 3
3
-
 4
4
-
 5
5
-
 6
6
-
 7
7
-
 8
8
-
 9
9
-
 10
10
-
 11
11
-
 12
12
-
 13
13
-
 14
14
-
 15
15
-
 16
16
-
 17
17
-
 18
18
-
 19
19
-
 20
20
-
 21
21
-
 22
22
-
 23
23
-
 24
24
-
 25
25
-
 26
26
-
 27
27
-
 28
28
-
 29
29
-
 30
30
-
 31
31
-
 32
32
-
 33
33


COSTWAY EP25150US-SL Electric Infrared Heater User Manual EP25150US-SL Manuel utilisateur
- Taper
- Manuel utilisateur
- Ce manuel convient également à
dans d''autres langues
Autres documents
-
Costway JV10381WH Manuel utilisateur
-
Costway ES10144US-WH Manuel utilisateur
-
Costway ES10116US-BK Manuel utilisateur
-
GYMAX AW10007YW Manuel utilisateur
-
 Warmfloor24 LDHR062-200KB-S Safety Instructions And Operation Manual
-
Dimplex DSHSTAND Le manuel du propriétaire
-
Herschel COLORADO 2500R Watts Manuel utilisateur
-
Comfort Glow QTH7100 Le manuel du propriétaire
-
World Marketing of America QTH6000 Le manuel du propriétaire
-
