
Xs
Installation advice
Einbauempfehlung
Inbouwadvies
Montagevejledning
Innbyggingsråd
Consejo para la instalación
Conselho de instalação
Consigli di montaggio
Conseils de montage
Zalecenia dotyczące wbudowania
UK
DE
NL
DK
NO
ES
PT
IT
FR
PL
INSTALLATION ADVICE
Z1, Z2, Z3, Z4

2 Xs
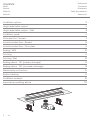
Installation options 3
Height adjustable support 4
Height adjustable support - Wall 5
Installation guide 6
Concrete loor | Screed 7
Joisted wooden loor | Screed 8
Joisted wooden loor | Floor plate 9
Sealing | WPS 10
Finishing 11
Finishing | Wall 13
Sealing advice - TAF (primary drainage) 14
Sealing advice - TAF (secondary drainage) 15
Maintenance instructions 16
Siphon cleaning 17
Installation example 18
Important assembling advice 20
CONTENTS Contenido
Inhalt Conteúdo
Inhoud Contenuto
Indhold Table des matières
Innhold Zawartość

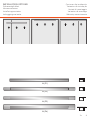
3 Xs
Xs (Z1)
Xs (Z2)
Xs (Z3)
Xs (Z4)
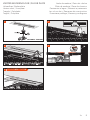
INSTALLATION OPTIONS Opciones de instalación
Einbaumöglichkeit Variantes de instalação
Inbouwvarianten Varianti di montaggio
Installeringsvarianter Variantes de montage
Innbyggingsvarianter Warianty wmontowania

4 Xs
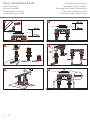
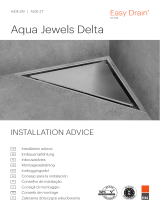
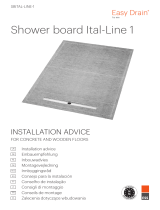
HEIGHT ADJUSTABLE SUPPORT Montaje del pie de ajuste
Stellfuß Montage Montagem do pé nivelador
Stelvoet montage Montaggio del piede di regolazione
Justering fod montering Socle de montage ajustable
Justeringsfot montering Montaż na regulowanej stopce
6
3
1 2
4
5

5 Xs
(cm)
(cm)
A
B - LOCK
6
3
12
4
5
7
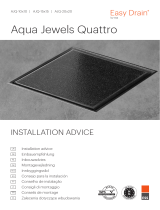
HEIGHT ADJUSTABLE SUPPORT WALL Montaje del pie de ajuste | Pared
Stellfuß Montage | Wand Montagem do pé nivelador | Parede
Stelvoet montage | Wand Montaggio del piede di regolazione | Parete
Justering fod montering | Væg Socle de montage ajustable | Mur
Justeringsfot montering | Vegg Montaż na regulowanej stopce | Ściana

6 Xs
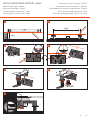
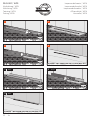
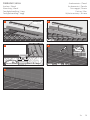
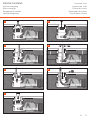
INSTALLATION GUIDE Manual de instalación
Einbauempfehlung Instruções de instalação
Inbouwhandleiding Istruzioni di montaggio
Montagevejledning Explications de montage
Innbyggingsveiledning Instrukcja wmontowania

7 Xs
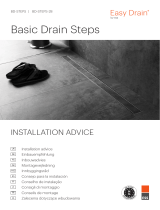
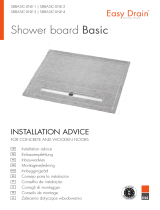
CONCRETE FLOOR SCREED Hormigón de cemento
Betonboden Chão de betão
Betonvloer Pavimento di cemento
Betongulv Sol en béton
Betonggulv Betonowa podłoga
1
3
2
SEALING WPS - PAGE 10
4

8 Xs
3 4
5 6 SEALING WPS - PAGE 10
1
OPTIONAL: VIGADAP
2
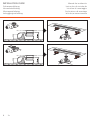
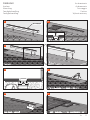
JOISTED WOODEN FLOOR SCREED Suelo de madera | Hormigón ino
Holzaubau | Estrich Chão de madeira | Betonilha
Houten vloer | Dekvloer Pavimento in legno | Massetto
Trægulv | Spartellag Les sols en bois | Chape
Tregulv | Avrettingsmasse Drewniana podłoga | Jastrych

9 Xs
2
3
1
4
5
EASY SILICON EDSIL 1, EASY COMPOUND ED2C
SEALING WPS - PAGE 10
OPTIONAL: VIGADAP
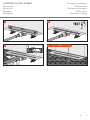
JOISTED WOODEN FLOOR FLOOR PLATE Suelo de madera | Platos de ducha
Holzaubau | Bodenplatte Chão de madeira | Placa de chuveiro
Houten vloer | Vloerplaat Pavimento in legno | Elementi a pavimento
Trægulv | Gulvplade Les sols en bois | Panneaux de construction
Tregulv | Gulvplate Drewniana podłoga | Elementy podłogowe

10 Xs
12
3
SEALING COMPOUND EASY2SEAL, EASY2SEAL 2K
OPTIONAL WET ROOM SEALING SYSTEM WPSSET
1 2
WALL WALL
OPTIONAL WET ROOM SEALING SYSTEM WPSSET
4
3WALL
SEALING COMPOUND EASY2SEAL, EASY2SEAL 2K
SEALING COMPOUND EASY2SEAL, EASY2SEAL 2K SEALING COMPOUND EASY2SEAL, EASY2SEAL 2K
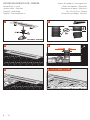
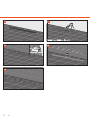
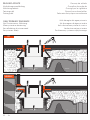
SEALING WPS Impermeabilizante | WPS
Abdichtung | WPS Impermeabilização | WPS
Afdichting | WPS Impermeabilizzante | WPS
Tætning | WPS d’Étanchéité | WPS
Tetting | WPS Uszczelka | WPS

11 Xs
9 10
11
13
12
14 15
OPTIONAL SEALING ADVICE: PAGE 14 & 15
FILL UP THE HOLLOW SPACES BENEATH THE FLANGES!
FLEX. TILE ADHESIVE
DESIGNSET
5 25 MM
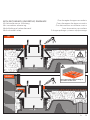
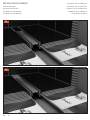
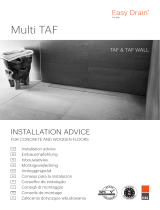
FINISHING Acabamiento
Ausbau Acabamento
Afwerking Finissaggio
Færdigbehandling Finition
Ferdigbehandling Wykończeniowy

12 Xs
16 17
18 19
SEALING ADVICE: PAGE 14 & 15
20

13 Xs
1 2
3 4
5
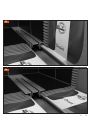
SEALING ADVICE: PAGE 14 & 15
FILL UP THE HOLLOW SPACES BENEATH THE FLANGES!
DESIGNSET
5 25 MM
FINISHING WALL Acabamiento | Pared
Ausbau | Wand Acabamento | Parede
Afwerking | Wand Finissaggio | Parete
Færdigbehandling | Væg Finition | Mur
Ferdigbehandling | Vegg Wykończeniowy | Ściana

14 Xs
XS WALL
XS
SEALING ADVICE Consejo de sellado
Abdichtungsempfehlung Conselho de vedação
Afdichtingsadvies Consigli per la sigillatura
Tætningsråd Conseil pour étanchéiier
Tetningsråd Zalecenia dotyczące uszczelniania
ONLY PRIMARY DRAINAGE Sólo desagüe de agua primario
Nur Primärwasser Ableitung Só drenagem da água primária
Alleen primaire afwatering Solo derivazione primario scarico
Kun aledning af primærvand Seule évacuation primaire
Kun primær avløp Podstawowy systemu odpływowego

15 Xs
Only apply with waterprooing of
the entire shower loor
XS WALL
XS
WITH SECONDARY UNDERTILE DRAINAGE Con desagüe de agua secundario
Mit Sekundärwasser Ableitung Com drenagem da água secunário
Met secundaire afwatering Con derivazione secondaria scarico
Med aledning af sekundærvand Avec évacuation secondaire
Med sekundær avløp Z drugorzędnego systemu odpływowego

16 Xs
UK
DE
NL
DK
NO
• Do not use abrasives and/or sharp/scraping objects to clean the Xs®.
• The siphon trap should be cleaned periodically to remove any dirt that may have collected.
• We recommend the use of EasyClean Set (EDSC) for daily maintenance and cleaning of your Xs®.
• Reinigen Sie den Xs® ohne Scheuermittel und/oder spitze oder scheuernde Gegenstände.
• Befreien Sie den Geruchsverschluss in regelmäßigen Abständen von eventuellen Verschmutzungen.
• Wir empfehlen die Verwendung von EasyClean Set (EDSC) für die tägliche Reinigung und Plege Ihrer Xs®.
• De Xs® reinigen zonder schuurmiddelen en/of scherpe of schurende voorwerpen.
• Periodiek het waterslot vrij maken van eventuele vervuilingen.
• Wij raden het gebruik van EasyClean Set (EDSC) aan voor dagelijks onderhoud en intensieve reiniging van uw Xs®.
• Rengøring af Xs® skal ske med rengøringsmidler uden slibemiddel, såvel som brugen af spidse eller slibende
rengøringsremedier frarådes.
• Vandlåsen rengøres med jævne mellemrum efter behov.
• Vi anbefaler anvendelsen af EasyClean Set (EDSC) til den daglige rengøring og pleje af Deres Xs®.
• Rengjør Xs® uten skuremidler og/eller skarpe eller skurende gjenstander.
• Rengjør med jevne mellomrom vannlåsen for eventuelle forurensninger.
• Vi anbefaler bruken av EasyClean Set (EDSC) for daglig vedlikehold og intensiv rengjøring av din Xs®.
ES
PT
IT
FR
PL
• Limpiar el Xs® sin utilizar productos corrosivos y/o materiales abrasivos.
• Limpiar periódicamente los posibles residuos del cierre hidráulico.
• Se recomienda el uso de EasyClean Set (EDSC) para el mantenimiento diario y limpieza intensiva de su Xs®.
• A Xs® não deve ser limpa com produtos abrasivos e/ou objectos aiados ou abrasivos.
• Periodicamente libertar o sifão de retenção de odores de eventuais sujidades .
• Recomendamos a utilização do kit de limpeza EasyClean Set (EDSC) para a manutenção diária e a limpeza intensiva
da sua Xs®.
• Pulire la Aqua Jewels® senza utilizzare sostanze abrasive e/o oggetti taglienti o abrasivi.
• Eliminare periodicamente le eventuali contaminazioni dal sifone antiodore.
• Consigliamo di utilizzare EasyClean Set (EDSC) per la manutenzione giornaliera e la pulizia approfondita della Aqua
Jewels®.
• N’utilisez pas de produit abrasifs ni d’objets coupants ou abrasifs pour le nettoyage du Xs®.
• Éliminez périodiquement les dépôts éventuels au niveau du coupe-odeur.
• Nous conseillons d’utiliser EasyClean Set (EDSC) pour la maintenance quotidienne et le nettoyage intensif du Xs®.
• Xs® czyścić bez użycia materiałów ściernych i/lub ostrych albo szorstkich przedmiotów.
• Okresowo należy usuwać ewentualne zanieczyszczenia z syfonu kanalizacyjnego.
• Zalecamy korzystanie z EasyClean Set (EDSC) do codziennych zabiegów pielęgnacyjnych oraz intensywnego
czyszczenia Xs®.
MAINTENANCE INSTRUCTIONS Instrucciones de mantenimiento
Plegehinweise Instruções de manutenção
Onderhoudsadviezen Istruzioni di manutenzione
Vedligeholdelsesinstruktioner Instructions d’entretien
Vedlikeholdsinstruks Instrukcja konserwacji

17 Xs
1 2
3 4
5 6
7
SIPHON CLEANING Limpieza sifon
Siphon reinigung Limpeza do sifão
Sifon reiniging Pulizia del sifone
Rengøring af vandlås Nettoyage du siphon
Vannlåsrengjøring Czyszczenie syfonu

18 Xs
Z1
Z2
INSTALLATION EXAMPLE Ejemplo de instalación
Einbaubeispiel Exemplo de instalação
Inbouwvoorbeeld Esempio di installazione
Installation eksempel Exemple d’installation
Installasjon eksempel Przykład instalacji

19 Xs
Z3
Z4

20 Xs
Typing and printing errors reserved. Easy Sanitary Solutions BV excludes all liability for any damages whatsoever associated
with the use and/or the installation of the drain. Easy Sanitary Solutions BV a priori excludes any liability whatsoever.
UK
Important assembling advice: Xs
Suitable for renovation work and new construction
• Please check the content of the package for
completeness and integrity before proceeding with
the assembly. Do not install the drain if any deviations
are noted. Should this be the case, please consult your
supplier.
• Prior to the assembly, the assembling advice and its
special characteristics should be discussed with the
tiler. After the assembly, please provide the tiler with the
complete assembling advice.
• If the drain is used for several showers, please check to
make sure that the drainage capacity is suicient. If you
are unsure, please consult the supplier for advice.
• If you are not using the second drainage level
(secondary water drainage), the joint between the
shower drain and the tile frame should be sealed with a
permanent sealer.
• We recommend taping or closing the drain opening
of the shower drain with a cement cap prior to the
assembly to prevent construction debris from getting
into the drainage pipe. To prevent damage to the tile
frame, it should be kept in the package until the inal
installation by the tiler.
• Make sure the drain is level all around.
• Install the sewage system in compliance with the
standards. Note: ensure that the sewage system is well
ventilated and that the gradient is suicient.
• Check the drainage system and the sewer system
connection for tightness.
• In order to prevent hollow spaces, the drain must be
fully lined and sealed with loor pavement to the upper
edge of the lange.
• The seal is applied in compliance with general standards
for indoor sealing of wet areas. If alternative seals
are used, please read the manufacturer’s product
information.
• When tiles are being itted, the gradient of the tiles
(min. 2% per linear metre) in the shower must always
be towards the drain. The tiles should be laid level or
1 mm higher than the top edge of the tile frame to
ensure good drainage toward the shower drain. Note:
the requirements with regard to the loor gradient may
be dierent for walk-in showers with glass walls. Please
consult your supplier in this respect.
• Once the tiles have been itted, the joint between the
tiled loor and the drain should be permanently sealed
with an elastic sealant (maintenance joint). The adhesion
surfaces should be free of mortar, adhesive and other
adhesion-reducing materials.
• The drain is only intended for use with waste water
common in households. Do not use other luids as
well as cleaning agents with the potential to damage
sanitary equipment, drainage equipment and raw
materials.
• If the drain is used for other purposes (e.g. swimming
pools), where it may come in contact with aggressive
cleaning agents or corrosive substances such as salt or
chlorine, please consult your supplier.
• Compliance with this installation advice is required for
any warranty claims based on our sale and delivery
terms.
Caution !
• Tile cleaning products often contain aggressive
chemicals that are abrasive in nature and may damage
the drain. Please ensure that the drain is thoroughly
lushed after using any tile and grout cleaning products.
Xs should only be installed by specialist companies in compliance with the building regulations.
To achieve the best possible result, please carefully read the installation guide. If you have any
questions, please consult your supplier.
La page est en cours de chargement...
La page est en cours de chargement...
La page est en cours de chargement...
La page est en cours de chargement...
La page est en cours de chargement...
La page est en cours de chargement...
La page est en cours de chargement...
La page est en cours de chargement...
La page est en cours de chargement...
La page est en cours de chargement...
La page est en cours de chargement...
La page est en cours de chargement...
-
 1
1
-
 2
2
-
 3
3
-
 4
4
-
 5
5
-
 6
6
-
 7
7
-
 8
8
-
 9
9
-
 10
10
-
 11
11
-
 12
12
-
 13
13
-
 14
14
-
 15
15
-
 16
16
-
 17
17
-
 18
18
-
 19
19
-
 20
20
-
 21
21
-
 22
22
-
 23
23
-
 24
24
-
 25
25
-
 26
26
-
 27
27
-
 28
28
-
 29
29
-
 30
30
-
 31
31
-
 32
32


dans d''autres langues
- italiano: ESS XS-Z3P-P-1100 Guida d'installazione
- English: ESS XS-Z3P-P-1100 Installation guide
- español: ESS XS-Z3P-P-1100 Guía de instalación
- Deutsch: ESS XS-Z3P-P-1100 Installationsanleitung
- Nederlands: ESS XS-Z3P-P-1100 Installatie gids
- português: ESS XS-Z3P-P-1100 Guia de instalação
- dansk: ESS XS-Z3P-P-1100 Installationsvejledning
- polski: ESS XS-Z3P-P-1100 Instrukcja instalacji
Documents connexes
-
ESS EDM2 500-35 Guide d'installation
-
-
 ESS AJXS-20-ZM Guide d'installation
-
 ESS AJDE-ZT Guide d'installation
-
 ESS BD-60-STEPS Guide d'installation
-
 ESS Multi TAF Wall Guide d'installation
-
 ESS EDCLEANCOMTAF-1000 Guide d'installation
-
 ESS SBITAL-LINE-1 Guide d'installation
-
 ESS AJQ-20x20-T Guide d'installation
-
 ESS SBBASIC-LINE-2 Guide d'installation


