Sapphire Audio EDGE-HD4 Mini PC Manuel utilisateur
- Taper
- Manuel utilisateur

EDGE‐HD4MiniPC
Sapphire EDGE-HD4 Mini PC
User Manual ............................................ 1
Benutzerhandbuch .............................. 10
Manual del usuario .............................. 19
Manuel de l'utilisateur ......................... 28
Manuale dell'utente ............................. 37
Руководство пользователя ............... 46

EDGE‐HD4MiniPC
- 1 -
EN
User Manual
EDGE-HD4 Mini PC
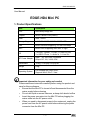
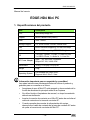
1. Product Specifications
Important information for your safety and comfort
Please read these instructions carefully before using the product and
save for future reference.
Ensure that the Mini-PC is turned off and disconnected from the
mains supply before cleaning
Do not use liquid or aerosol cleaners, a damp cloth should suffice
Insert the power connector into the Mini PC before plugging the
mains cable into the AC power outlet.
When you need to disconnect power to the equipment, unplug the
power cord from the AC power outlet before removing the power
connector from the Mini PC.
Item Description
CPU Intel Sandy Bridge 847
Chipset INTEL Panther Point (NM70)
RAM 4GB – DDR3
Storage Support 2.5'' SATA 250GB / 320GB / 500GB HDD
LAN Built-in Ethernet supporting 10/100/1000 Mbps
WIFI Built-in WIFI supporting IEEE 802.11 b/g/n
I/O
1 x VGA,1 x HDMI, 1 x RJ45, 1 x USB 3.0 Port,
3 x USB 2.0 Ports, 1 x Audio-In, 1 x Line Out
AC Power Adapter
Input: AC 100~240V, 50/60MHz
Output: DC 19V, 3.42A, 65W
Dimensions 19.3(L) X 14.8(W) X 2.2(H) cm
Weight 530g
Operating System
Pre-installed with FREE DOS;
Supports Win8 / Win7 / Vista

EDGE‐HD4MiniPC
- 2 -
EN
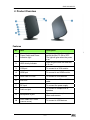
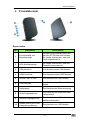
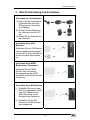
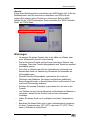
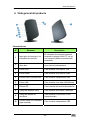
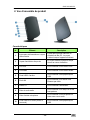
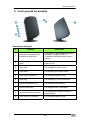
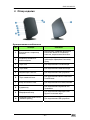
2. Product Overview
Features
No. Item Description
1
Power Switch and Power
Indication light
The power switch allows you to
switch the Mini PC ON or OFF.
The light will glow when the power
is on
2
HDD Activity Indicator
Light will glow when the hard disk
is in use
3
VGA port To connect to a VGA monitor
4
HDMI port To connect to an HDMI monitor
5
Rear USB 2.0 Ports To connect to USB devices
6
LAN Port
To connect to an Ethernet LAN
cable
7
DC Input To connect the power supply
8
Audio out jack
To connect to headphones or
speakers
9
Microphone in jack
To connect to a microphone or
other audio source
10
Front USB2.0/3.0 Ports
(remove cover)
To connect to USB devices.

EDGE‐HD4MiniPC
- 3 -
EN
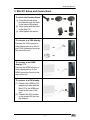
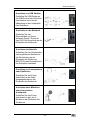
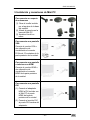
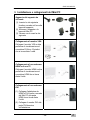
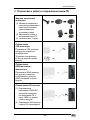
3. Mini PC Setup and Connections
To attach the Desktop Stand
(1). Feed the thumb screw
provided through the hole
in the base of the stand
(2). Align stand with the base
of the Mini PC
(3). Hand tighten the screw
To connect to a VGA display
Connect the VGA monitor or
other display device to the 15
pin D-Sub connector found on
the rear of the unit.
To connect to an HDMI
display / TV
Connect the HDMI monitor or
other display device to the
HDMI connector found on the
rear of the unit.
To connect to a DVI display
(1). Connect the HDMI to DVI
adapter included with the
Mini PC to the HDMI port
found at the rear of the
unit.
(2). Connect the DVI monitor
to the female DVI port on
the adapter.

EDGE‐HD4MiniPC
- 4 -
EN
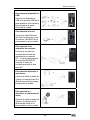
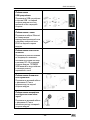
To connect USB devices
Connect USB devices to the
USB ports found both at the
rear of the unit and under the
cover on the front of the unit.
To connect to the network
Connect the Ethernet cable
from your network switch /
router to the RJ45 LAN
connector found at the back of
the unit.
To connect the power
adapter
Connect the power connector
from the supplied power
supply to the DC – In
connector found on the rear of
the unit BEFORE attaching the
mains power cable to an AC
outlet.
To connect speakers or
headphones
Connect the 3.5mm audio
cable to the Audio Out jack
found at the rear of the unit.
To connect a microphone or
other audio source
Connect the 3.5mm audio
cable to the Line In jack found
at the rear of the unit.

EDGE‐HD4MiniPC
- 5 -
EN
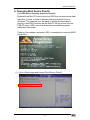
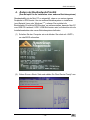
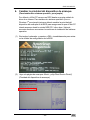
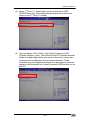
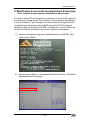
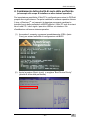
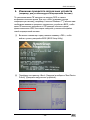
4. Changing Boot Device Priority
(To install another Operating System for example)
By default, the Mini PC is set to boot into DOS from its own internal hard
disk drive. In order to install a different operating system (Linux or
Windows 7
®
for example) you first need to change the boot device
priority in the BIOS to ensure that the Mini PC will try to boot from the
USB CD drive / HDD / pen drive where the new operating system
installation files reside.
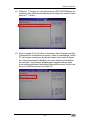
Power on the computer and press <DEL> immediately to enter the BIOS
setup utility.
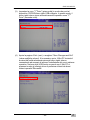
(1) Go to <Boot> page and choose “Boot Device Priority”

EDGE‐HD4MiniPC
- 6 -
EN
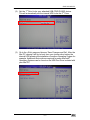
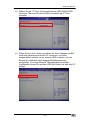
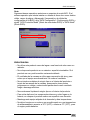
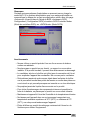
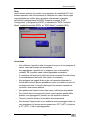
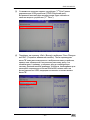
(2) Set the ‘1
st
Drive’ to be your attached USB CD/DVD/HDD device.
This will automatically set the internal HDD to be the 2
nd
Drive.
(3) Go to the <Exit> page and choose ‘Save Changes and Exit’. After the
Mini PC reboots it will try to boot from your chosen drive before the
internal HDD allowing the installation of another Operating System for
example. Additional device drivers required for some Microsoft
®
Operating Systems can be found on the USB Pen Drive included with
your Mini PC.

EDGE‐HD4MiniPC
- 7 -
EN
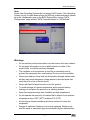
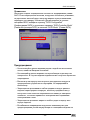
Note:
Some older Operating Systems do not support AHCI mode. If the Operating
System you try to install does not see the HDD as a valid destination, please
go to the <Advanced> page in the BIOS Setup Utility, choose “SATA
Configuration” page and set “SATA Controller Mode” to “SATA Mode”.
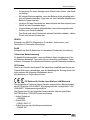
Warnings
Do not use this product near water or a heat source such as a radiator.
Do not place this product on an unstable stand or surface. If the
product falls, it could be seriously damaged.
The ventilator on the enclosure is used for air convection and to
prevent the equipment from overheating. Do not cover the ventilator
Never push objects of any kind into this product through cabinet slots
as they may touch dangerous voltage points or short-out parts that
could result in a fire or electric shock.
Never spill liquid of any kind onto or into the product.
To avoid damage of internal components and to prevent battery
leakage, do not place the product on a vibrating surface.
Keep this equipment away from humidity and high temperature
Do not operate the product in a location that is subject to an ambient
temperature above 35
o
C (95
o
F) or below 0
o
C (32
o
F).
Avoid using a cleaner containing alcohol or acetone to clean the
equipment.
Danger of explosion if battery is incorrectly replaced. Replace only
with the same or equivalent type recommended by the manufacturer.

EDGE‐HD4MiniPC
- 8 -
EN
Route the power cord in a way that people are unlikely to step on it. Do
not place anything on top of the power cord.
Keep any strong magnetic or electrical objects away from the
equipment.
Your device and its accessories may contain small parts. Keep them
out of the reach of small children.
REACH
Complying with the REACH (Registration, Evaluation, Authorization, and
Restriction of Chemicals) regulatory framework.
RoHS
Complying with the RoHS (Restriction of Hazardous Substances) regulatory
framework.
Lithium-Ion Battery Warning
Danger of explosion if battery is incorrectly replaced. Replace only with the
same or equivalent type recommended by the manufacturer. Dispose of
used batteries according to the manufacturer’s instructions.
CE Mark Warning
This is a Class B product, in a domestic environment, this product may
cause radio interference, in which case the user may be required to take
adequate measures.
CE marking for devices without wireless LAN/Bluetooth
The shipped version of this device complies with the requirements of the
EEC directives 2004/108/EC “Electromagnetic compatibility” and
2006/95/EC “Low voltage directive”.
R&TTE Directive 1999/5/EC as attested by conformity with the following
harmonized standard:
• Article Safety
• EN60950
• Article EMC
• EN301 489-1/-17
• Article Spectrum Usages
• EN300 328

EDGE‐HD4MiniPC
- 9 -
EN
WEEE Statement
Under the European Union (“EU”) Directive on Waste Electrical and
Electronic Equipment, Directive 2002/96/EC, effective from August 13, 2005,
states products of “electrical and electronic equipment” no longer may be
discarded as municipal waste. Please refer to your original point of purchase
for instruction on the correct procedure of discarding as municipal waste. It
is the sole responsibility/obligation of the local authorized reseller/distributor
of such covered electronic equipment to take back such products at the end
of their useful life.
For better environmental protection, waste batteries should be
collected separately for recycling or special disposal.
FCC Statement This device complies with Part 15 of the FCC Rules.
Operation is subject to the following two conditions:
(1) This device may not cause harmful interference, and
(2) This device must accept any interference received, including
interference that may cause undesired operation.
Note:
The manufacturer is not responsible for ANY interference, for example
RADIO or TV interference, caused by unauthorized modifications to this
equipment. Such modifications could void the user’s authority to operate the
equipment.

EDGE‐HD4MiniPC
- 10 -
DE
Benutzerhandbuch
EDGE-HD4 Mini PC
1. Technische Daten
Wichtige Sicherheitsinformationen
Bitte lesen Sie dieses Handbuch sorgfältig durch, bevor Sie dieses
Produkt verwenden und bewahren Sie es für zukünftige Zwecke auf.
Stellen Sie sicher, dass der Mini-PC ausgeschaltet und von der
Stromversorgung abgetrennt ist, bevor Sie ihn reinigen.
Verwenden Sie keine Flüssigreiniger oder Sprays, ein feuchtes
Tuch sollte genügen
Verbinden Sie den Stromstecker mit dem Mini PC bevor Sie das
Stromkabel mit der Steckdose verbinden.
Wenn Sie die Stromversorgung zum Gerät abtrennen müssen,
trennen Sie das Stromkabel von der Steckdose, bevor Sie den
Stromstecker vom Mini PC entfernen.
Item Description
CPU Intel Sandy Bridge 847
Chipset INTEL Panther Point (NM70)
RAM 4GB – DDR3
Storage Support 2.5'' SATA 250GB / 320GB / 500GB HDD
LAN Built-in Ethernet supporting 10/100/1000 Mbps
WIFI Built-in WIFI supporting IEEE 802.11 b/g/n
I/O
1 x VGA,1 x HDMI, 1 x RJ45, 1 x USB 3.0 Port,
3 x USB 2.0 Ports, 1 x Audio-In, 1 x Line Out
AC Power Adapter
Input: AC 100~240V, 50/60MHz
Output: DC 19V, 3.42A, 65W
Dimensions 19.3(L) X 14.8(W) X 2.2(H) cm
Weight 530g
Operating System
Pre-installed with FREE DOS;
Supports Win8 / Win7 / Vista

EDGE‐HD4MiniPC
- 11 -
DE
2. Produktübersicht
Eigenschaften
Nr. Komponente Beschreibung
1
Ein/Ausschalter und
Betriebsanzeige
Mit dem Ein/Ausschalter können Sie
den Mini PC EIN oder AUS schalten.
Die Lampe wird leuchten, wenn das
Gerät eingeschaltet ist
2
HDD Aktivitätsanzeige
Die Lampe wird leuchten, wenn die
Festplatte verwendet wird
3
VGA Anschluss Zum Anschluss eines VGA Monitors
4
HDMI Anschluss Zum Anschluss eines HDMI Monitors
5
Hintere USB 2.0 Ports Zum Anschluss von USB Geräten
6
LAN Anschluss
Zum Anschluss eines Ethernet LAN
Kabels
7
Netzeingang Zum Anschluss der Stromversorgung
8
Audio Ausgangsbuchse
Zum Anschluss von Kopfhörern oder
Lautsprechern
9
Mikrofon Eingangsbuchse
Zum Anschluss eines Mikrofons oder
anderer Audioquellen
10
Vordere USB 2.0/3.0 Ports
(Abdeckung entfernen)
Zum Anschluss von USB Geräten.

EDGE‐HD4MiniPC
- 12 -
DE
3. Mini PC Einrichtung und Anschlüsse
Anbringen des Tischständers
(1).Führen Sie die mitgelieferte
Flügelschraube durch die
Öffnung an der Unterseite
des Ständers
(2).Richten Sie den Ständer an
der Unterseite des Mini PC
aus
(3).Ziehen Sie die Schraube mit
der Hand fest
Anschluss eines VGA
Monitors
Schließen Sie den VGA Monitor
oder ein anderes Anzeigegerät
an den 15 Pin D-Sub Anschluss
an der Rückseite des Gerätes
an.
Anschluss eines HDMI
Bildschirms / Fernsehers
Schließen Sie den HDMI
Monitor oder ein anderes
Anzeigegerät an den HDMI
Anschluss an der Rückseite des
Gerätes an.
Anschluss eines DVI Monitors
(1). Schließen Sie den mit dem
Mini PC mitgelieferten HDMI
oder DVI Adapter an den
HDMI Anschluss an der
Rückseite des Gerätes an.
(2). Schließen Sie den DVI
Monitor an die DVI Buchse
des Adapters an.

EDGE‐HD4MiniPC
- 13 -
DE
Anschluss von USB Geräten
Schließen Sie USB Geräte an
die USB Ports an der Rückseite
des Gerätes und unter der
Abdeckung an der Vorderseite
des Gerätes an.
Anschluss an das Netzwerk
Schließen Sie das
Ethernetkabel von Ihrem
Netzwerk Switch / Router an
den RJ45 LAN Anschluss an der
Rückseite des Gerätes an.
Anschluss des Netzteils
Schließen Sie den Stromstecker
des mitgelieferten Netzteils an
die Strombuchse an der
Rückseite des Gerätes an
BEVOR Sie das Stromkabel mit
der Steckdose verbinden.
Anschluss von Lautsprechern
oder Kopfhörern
Schließen Sie das 3,5mm
Audiokabel an die Audio
Ausgangsbuchse an der
Rückseite des Gerätes an.
Anschluss eines Mikrofons
oder einer anderen
Audioquelle
Schließen Sie das 3,5mm
Audiokabel an die Line In
Buchse an der Rückseite des
Gerätes an.

EDGE‐HD4MiniPC
- 14 -
DE
4. Ändern der Bootlaufwerk-Priorität
(Zum Beispiel für die Installation eines anderen Betriebssystems)
Standardmäßig ist der Mini PC so eingestellt, dass er von seiner eigenen
Festplatte in DOS bootet. Um ein anderes Betriebssystem zu installieren
(zum Beispiel Linux oder Windows 7
®
), müssen Sie zunächst die
Bootlaufwerk-Priorität im BIOS ändern, um sicherzustellen, dass der Mini PC
vom USB CD-Laufwerk / HDD / USB-Stick booten wird, auf dem/der sich die
Installationsdateien des neuen Betriebssystems befinden.
(1) Schalten Sie den Computer ein und drücken Sie sofort auf <ENTF>,
um das BIOS aufzurufen.
(2) Gehen Sie zur <Boot> Seite und wählen Sie “Boot Device Priority” aus

EDGE‐HD4MiniPC
- 15 -
DE
(3) Wählen Sie als ‘1
st
Drive’ Ihr angeschlossenes USB CD/DVD/HDD
Gerät aus. Dies wird die interne HDD automatisch als 2
nd
Drive
einstellen.
(4) Gehen Sie zur <Exit> Seite und wählen Sie ‘Save Changes and Exit’.
Nach dem Neustart wird der Mini PC versuchen, von Ihrem
ausgewählten Laufwerk vor der internen HDD zu booten, um zum
Beispiel die Installation eines anderen Betriebssystems zu
ermöglichen. Für einige Microsoft
®
Betriebssysteme benötigte
Gerätetreiber können Sie auf dem USB-Stick finden, der dem Mini PC
beiliegt.

EDGE‐HD4MiniPC
- 16 -
DE
Hinweis:
Einige ältere Betriebssysteme unterstützen den AHCI Modus nicht. Falls das
Betriebssystem, das Sie versuchen zu installieren, die HDD nicht als
gültiges Ziel erkennt, gehen Sie bitte zur <Advanced> Seite im BIOS,
wählen Sie die “SATA Configuration” Seite und stellen Sie “SATA Controller
Mode” auf “SATA Mode”.
Warnungen
• Verwenden Sie dieses Produkt nicht in der Nähe von Wasser oder
einer Wärmequelle wie z.B. einer Heizung.
• Stellen Sie dieses Produkt nicht auf einen wackeligen Ständer oder
Unterlage. Wenn das Produkt fallengelassen wird, könnte es ernsthaft
beschädigt werden.
• Der Lüfter im Gehäuse wird für den Luftaustausch verwendet und
bewahrt das Gerät vor Überhitzung. Blockieren Sie keinesfalls die
Lüftungsöffnungen.
• Stecken Sie keine Gegenstände, egal welcher Art, durch die
Öffnungen des Gehäuses. Dies kann zum Berühren gefährlicher
Spannungspunkte oder zu Kurzschlüssen führen und somit ein Feuer
oder einen Stromschlag auslösen.
• Schütten Sie niemals Flüssigkeit, egal welcher Art, auf oder in das
Produkt.
• Um Schäden an den internen Bauteilen und Auslaufen der Batterie zu
vermeiden, stellen Sie das Produkt nicht auf eine vibrierende
Unterlage.
• Halten Sie dieses Gerät von Feuchtigkeit und hohen Temperaturen
fern
• Betreiben Sie dieses Gerät nicht in einer unklimatisierten Umgebung
mit einer Temperatur über 35
o
C (95
o
F) oder unter 0
o
C (32
o
F). Dies
kann zu Schäden im Gerät führen.

EDGE‐HD4MiniPC
- 17 -
DE
• Verwendung Sie einen Reiniger ohne Alkohol oder Aceton, das Gerät
zu löschen.
• Es besteht Explosionsgefahr, wenn die Batterie falsch eingelegt wird.
Nur mit Batterie desselben Typs oder mit vom Hersteller empfohlenen
Batterie-Typen ersetzen.
• Verlegen Sie das Stromkabel so, dass niemand darüber stolpern kann.
Nichts auf das Stromkabel legen.
• Gegenstände mit starken Magnetfeldern oder elektromagnetischen
Feldern vom Gerät fernhalten.
• Das Gerät und seine Zubehörteile können Kleinteile enthalten. Halten
Sie sie von kleinen Kindern fern.
REACH
Entspricht der REACH (Registration, Evaluation, Authorization, and
Restriction of Chemicals) Verordnung
RoHS
Entspricht der RoHS (Restriction of Hazardous Substances) Verordnung
Lithium-Ion Batteriewarnung
Es besteht Explosionsgefahr, wenn die Batterie falsch eingelegt wird. Nur
mit Batterien desselben Typs oder mit vom Hersteller empfohlenen Typen
ersetzen. Entsorgen Sie verbrauchte Batterien gemäß Herstelleranweisung.
CE Zeichen
Dies ist ein Produkt der Klasse B. Bei häuslichen Installationen könnte das
Produkt Störungen verursachen, was die Behebung der Störung durch eine
oder mehrere der folgenden Maßnahmen durch
den Benutzer zur Folge haben könnte.
CE Zeichen für Geräte ohne Wireless LAN/Bluetooth
Die ausgelieferte Versionen dieses Gerätes entspricht den Bestimmungen
der EU Richtlinien 2004/108/EC “Elektromagnetische Verträglichkeit” und
2006/95/EC “Niederspannungsrichtlinie”.
Die Konformität mit den folgenden harmonisierten Normen gemäß der
R&TTERichtlinie 1999/5/EG wurde bescheinigt:
• Artikel Sicherheit
• EN60950
• Artikel EMV
• EN301 489-1/-17
• Artikel Nutzung des Hochfrequenzspektrums
• EN300 328

EDGE‐HD4MiniPC
- 18 -
DE
WEEE Erklärung
Die Richtlinie der Europäischen Union (“EU”) Direktive zur Vermeidung von
Elektroschrott (Waste Electrical and Electronic Equipment), Richtlinie
2002/96/EC, die am 13. August 2005 in Kraft getreten ist, regelt, dass
“elektrische und elektronische Geräte” nicht mehr länger als Hausmüll
entsorgt werden dürfen. Bitte wenden Sie sich an die Stelle, bei der Sie das
Gerät erworben haben, um den korrekten Ablauf für die Entsorgung zu
erfahren. Es ist die alleinige Verantwortung/Pflicht des lokal autorisierten
Einzel-/Großhändlers eines solchen Gerätes, diese Produkte am Ende der
Betriebszeit zurückzunehmen.
Falls Batterien oder Akkus vom falschen Typ eingesetzt werden,
besteht Explosionsgefahr. Ersetzen Sie Batterien und Akkus nur mit
identischen oder gleichwertigen, vom Hersteller empfohlenen
Typen.

EDGE‐HD4MiniPC
- 19 -
ES
Manual del usuario
EDGE-HD4 Mini PC
1. Especificaciones del producto
Información importante para su seguridad y comodidad
Lea estas instrucciones atentamente antes de utilizar el producto y
guárdela para su consulta en el futuro.
Asegúrese de que el Mini-PC esté apagado y desconectado de la
fuente de alimentación principal antes de su limpieza
No utilice líquido ni limpiadores de aerosol, un trapo humedecido
debería ser suficiente
Inserte el conector de corriente en el Mini PC antes de enchufar el
cable de corriente en la toma de corriente AC.
Cuando necesite desconectar la alimentación del equipo,
desenchufe el cable de corriente de la toma de corriente AC antes
de quitar el conector de corriente del Mini PC.
Item Description
CPU Intel Sandy Bridge 847
Chipset INTEL Panther Point (NM70)
RAM 4GB – DDR3
Storage Support 2.5'' SATA 250GB / 320GB / 500GB HDD
LAN Built-in Ethernet supporting 10/100/1000 Mbps
WIFI Built-in WIFI supporting IEEE 802.11 b/g/n
I/O
1 x VGA,1 x HDMI, 1 x RJ45, 1 x USB 3.0 Port,
3 x USB 2.0 Ports, 1 x Audio-In, 1 x Line Out
AC Power Adapter
Input: AC 100~240V, 50/60MHz
Output: DC 19V, 3.42A, 65W
Dimensions 19.3(L) X 14.8(W) X 2.2(H) cm
Weight 530g
Operating System
Pre-installed with FREE DOS;
Supports Win8 / Win7 / Vista
La page est en cours de chargement...
La page est en cours de chargement...
La page est en cours de chargement...
La page est en cours de chargement...
La page est en cours de chargement...
La page est en cours de chargement...
La page est en cours de chargement...
La page est en cours de chargement...
La page est en cours de chargement...
La page est en cours de chargement...
La page est en cours de chargement...
La page est en cours de chargement...
La page est en cours de chargement...
La page est en cours de chargement...
La page est en cours de chargement...
La page est en cours de chargement...
La page est en cours de chargement...
La page est en cours de chargement...
La page est en cours de chargement...
La page est en cours de chargement...
La page est en cours de chargement...
La page est en cours de chargement...
La page est en cours de chargement...
La page est en cours de chargement...
La page est en cours de chargement...
La page est en cours de chargement...
La page est en cours de chargement...
La page est en cours de chargement...
La page est en cours de chargement...
La page est en cours de chargement...
La page est en cours de chargement...
La page est en cours de chargement...
La page est en cours de chargement...
La page est en cours de chargement...
La page est en cours de chargement...
-
 1
1
-
 2
2
-
 3
3
-
 4
4
-
 5
5
-
 6
6
-
 7
7
-
 8
8
-
 9
9
-
 10
10
-
 11
11
-
 12
12
-
 13
13
-
 14
14
-
 15
15
-
 16
16
-
 17
17
-
 18
18
-
 19
19
-
 20
20
-
 21
21
-
 22
22
-
 23
23
-
 24
24
-
 25
25
-
 26
26
-
 27
27
-
 28
28
-
 29
29
-
 30
30
-
 31
31
-
 32
32
-
 33
33
-
 34
34
-
 35
35
-
 36
36
-
 37
37
-
 38
38
-
 39
39
-
 40
40
-
 41
41
-
 42
42
-
 43
43
-
 44
44
-
 45
45
-
 46
46
-
 47
47
-
 48
48
-
 49
49
-
 50
50
-
 51
51
-
 52
52
-
 53
53
-
 54
54
-
 55
55


Sapphire Audio EDGE-HD4 Mini PC Manuel utilisateur
- Taper
- Manuel utilisateur
dans d''autres langues
Autres documents
-
NEC PlasmaSync® 50XR6 Manuel utilisateur
-
Datapath iolite 600 Fiche technique
-
Datapath VisionSC-HD4+ Mode d'emploi
-
Marantz Computer Monitor PD6001 Manuel utilisateur
-
Datapath iolite 12i Fiche technique
-
-
-
ASROCK Z77E-ITX Le manuel du propriétaire
-
ASROCK H67M-ITX Le manuel du propriétaire
-
MSI A78I Manuel utilisateur