Fontaine by Italia MFF-BVRK2-BN Guide d'installation
- Catégorie
- Articles sanitaires
- Taper
- Guide d'installation
Ce manuel convient également à

Cinta selladora para rosca
Ruban pour tuyau
Pipe Tape
Destornillador cruciforme
Tournevis Phillips
Phillips ScrewdriverAdjustable Wrench Groove join pliers
Clé à molette Pince multiprise
Llave ajustable Pinzas ajustables
MFF-BVRK2-CP
MFF-BVRK2-BN
MFF-BVRK2-ORB
Bellver Series
Single Handle Kitchen Faucet
with Side-Spray
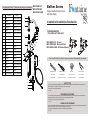
Tools You Will Need / Outils dont vous aurez besoin / Herramientas necesarias
Replacement Parts / Pièces de rechange / Repuestos
SAFETY TIPS
• If you use soldering for the installation of the faucet, the seats, cartridges and washers will have to be removed
before using flame. Otherwise, warranty will be void on those parts.
• Cover your drain to avoid losing parts.
• 0℃~55℃.
CONSIGNES DE SÉCURITÉ
• Si vous posez le robinet par brasage, il est essentiel de retirer les sièges, les cartouches et les rondelles avant
d’appliquer la flamme, faute de quoi la garantie sur ces pièces sera annulée.
• Couvrez le drain pour ne pas perdre des pièces.
• 0℃~55℃.
CONSEJOS DE SEGURIDAD
• En el caso de utilizar soldadura para instalar el grifo, remueva los asientos, cartuchos y arandelas antes de usar la
llama. De lo contrario, se anulará la garantía para esos componentes.
• Tape la boca del desagüe para prevenir la pérdida de piezas pequeñas.
• 0℃~55℃.
15
14
9
Handle
8
Screw
7
Diverter
6
Spout seat
5
4
Escutcheon
Body
13
Button
12
11
Metal washer
10
2
Cap 04805CP/BN/NB
09115CP/BN/NB
09152CP/BN/NB
08621
09160CP/BN/NB
85237CP/BN/NB
85239
85241
85612
85609
09157
51615CP/BN/NB
50803
50802
85231CP/BN/NB
33113CP/BN/NB16
5071417
5081918
Aerator assembly
3
Rubber washer
DescriptionNO.
1
Mounting nut
Cartridge
08633CP/BN/NB19
Spray assembly
Bonnet
Cap
Base plate
Shank
Spout
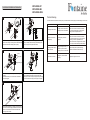
Installation/Installation/Instalación
CUSTOMER SERVICE
TOLL-FREE 1-877-482-5422
MFF-BVRK2-CP - Chrome
MFF-BVRK2-BN - Brushed Nickel
MFF-BVRK2-ORB - Oil Rubbed Bronze
6
7
1
12
13
14
15
16
17
19
18
2
3
4
5
8
9
10
11
Part No.

MFF-BVRK2-CP
MFF-BVRK2-BN
MFF-BVRK2-ORB
1
Place Escutcheon(6) on bottom of new faucet (Optional).
Position Faucet through mounting hole.Pre-drilled hole size
requirements:Faucet:Ø1-3/8”(min)~Ø1-1/2”(max)
2
Screw the mounting stud into the body(5).Secure the faucet
to sink by installing rubber washer(8),metal washer(9) and
mounting nut(10) onto it.Tighten with wrench.
3
A: Place the new spray seat through on the mounting
surface.
B:Assemble mounting nut onto shank form underside of
sink.Hand tighten,
4
For Models with a Spray Support.Place faucet in position
on the sink.Mount spray support in far right hole in sink.
Insert spray hose down through the support and up through
center hole of sink.Attach spray hose to spray hose nipple.
5
Important:After installation is completed, removed aerator
(12) and turn on water supply and allow both hot and cold
water to run for at least one minute each. While water
is running check for leaks.
Installation/Installation/Instalación
6
Ø1-3/8
"~Ø1-1/2”
MAX 1-3/8"
8
5
9
10
Spray seat
Spray
Mounting nut
If you have followed the instructions carefully and your faucet still does not work properly,take the following corrective step
Trouble-Shooting
Leakage under handle
Locking nut has come loose or
cartridge needs to be reseated
Loosen the set screw located at the base of the
handle with a hex wrench.Remove the handle
and unscrew cartridge holder by hand.Tighten
locking nut with an adjustable wrench.
Water will not shut off
completely
Cartridge may need to be
adjusted
Loosen the set screw located at the base of the
handle with a hex wrench.Remove the handle
and unscrew cartridge cover by hand. Unscrew
the locking nut with an adjustable wrench .
Remove ceramic disc cartridge Check for cracks,
and if O-ring is seated correctly.Reseat cartridge.
Leaking between spray
head and hose
Spray head may be loose, or
washer may not be seated
correctly in the hose connection
Tighten the spray head by hand until snug.
Make sure the washer is seated correctly.
Hose does not retract
Weight may not be installed
correctly
Readjust the weight on the hose.
PROBLEM CAUSE ACTION
12
-
 1
1
-
 2
2


Fontaine by Italia MFF-BVRK2-BN Guide d'installation
- Catégorie
- Articles sanitaires
- Taper
- Guide d'installation
- Ce manuel convient également à
dans d''autres langues
Documents connexes
-
Fontaine by Italia MFF-CHAC1-CP Guide d'installation
-
Fontaine by Italia MFF-BSK4-BN Guide d'installation
-
-
-
-
-
-
-
-
Fontaine by Italia MFF-VARC1-ORB Guide d'installation