Dell OptiPlex 5055 A-Series Guide de démarrage rapide
- Taper
- Guide de démarrage rapide

OptiPlex 5055
Small Form Factor
Quick Start Guide
Aan de slag
Guide de démarrage rapide
Schnellstart-Handbuch
Guida introduttiva rapida
1 Connect the keyboard and mouse
Sluit het toetsenbord en de muis aan
Connectez le clavier et la souris
Tastatur und Maus anschließen
Collegare la tastiera e il mouse
2 Connect the network cable — optional
Sluit de netwerkkabel aan (optioneel)
Branchez le câble réseau (facultatif)
Netzwerkkabel anschließen (optional)
Collegare il cavo di rete (opzionale)
3 Connect the display
Sluit het beeldscherm aan
Branchez l’écran
Bildschirm anschließen
Collegare il display
NOTE: If you ordered your computer with a discrete graphics card, connectthe display to the
discrete graphics card.
OPMERKING: Als u uw computer inclusief een aparte grafische kaart hebt gekocht, sluit u het
beeldscherm aan op de aparte grafische kaart.
REMARQUE: Si vous avez commandé votre ordinateur avec une carte graphique séparée,
branchez l’écran sur la carte graphique séparée.
ANMERKUNG: Wenn Sie den Computer mit einer separaten Grafikkarte erworben haben,
schließen Sie den Bildschirm an die separate Grafikkarte an.
NOTA: Se il computer è dotato di scheda grafica dedicata, collegare il display alla scheda grafica.
Product support and manuals
Productsupport en handleidingen
Assistance produits et manuels
Produktsupport und Handbücher
Supporto e manuali del prodotto
Dell.com/support
Dell.com/support/manuals
Dell.com/support/windows
Contact Dell
Contact opnemen met Dell | Contacter Dell
Kontaktaufnahme mit Dell | Contatta Dell
Dell.com/contactdell
Regulatory and safety
Regelgeving en veiligheid | Réglementations et sécurité
Sicherheitshinweise und Zulassungsinformationen
Normative e sicurezza
Dell.com/regulatory_compliance
Regulatory model
Beschreven model | Modèle réglementaire
Muster-Modellnummer | Modello normativo
D11S
Regulatory type
Beschreven type | Type réglementaire
Muster-Typnummer | Tipo di conformità
D11S003
Computer model
Computermodel | Modèle de l’ordinateur
Computermodell | Modello computer
OptiPlex 5055 SFF
2017-11© 2017 Dell Inc. or its subsidiaries.

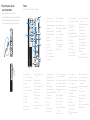
Features
Functies | Caractéristiques | Funktionen | Caratteristiche
1. Optical drive (optional)
2. USB 2.0 port with PowerShare
3. Power button and power light
4. Line-out port
5. Hard-drive activity light
6. Memory card reader (optional)
7. DisplayPorts
8. Headset port
9. Serial port
10. USB 2.0 port
11. PS/2 keyboard port
12. USB 3.1 Gen 1 ports
13. USB 2.0 ports (supports Smart
Power on)
14. Expansion card slots
15. Power connector port
16. Power supply diagnostic light
17. Cable cover lock slot
18. Release latch
19. VGA port (optional)
20. PS/2 mouse port
21. Network port
22. Kensington security cable slot
23. Padlock ring
1. Optisch station (optioneel)
2. USB 2.0 poort met PowerShare
3. Aan/uit-knop of voedingslampje
4. Lijnuitgang-poort
5. Activiteitslampje vaste schijf
6. Geheugenkaartlezer (optioneel)
7. DisplayPorts
8. Headsetpoort
9. Seriële poort
10. USB 2.0-poort
11. PS/2-toetsenbordpoort
12. USB 3.1 Gen 1-poorten
13. USB 2.0-poorten (ondersteunt
Smart Power On)
14. Uitbreidingskaartsleuven
15. Netconnectorpoort
16. Diagnostisch lampje voeding
17. Kabeldeksel voor beveiligingssleuf
18. Vergrendeling
19. VGA-poort (optioneel)
20. PS/2-muispoort
21. Netwerkaansluiting
22. Sleuf voor Kensington-
beveiligingskabel
23. Padlock-ring
1. Lecteur optique (en option)
2. Port USB2.0 avec PowerShare
3. Bouton d’alimentation et voyant
d’alimentation
4. Port de sortie de ligne
5. Voyant d’activité du disque dur
6. Lecteur de carte mémoire (en option)
7. Ports DisplayPort
8. Port casque
9. Port série
10. Port USB2.0
11. Port PS/2 pour clavier
12. Ports USB3.1 Gen1
13. Ports USB2.0 (prennent en charge la
mise sous tension intelligente)
14. Emplacements pour carte d’extension
15. Port du connecteur d’alimentation
16. Voyant de diagnostic d’alimentation
17. Emplacement du verrou du cache-
câbles
18. Loquet de dégagement
19. Port VGA (en option)
20. Port PS/2 pour souris
21. Port réseau
22. Emplacement pour câble de sécurité
Kensington
23. Anneau pour cadenas
1. Optisches Laufwerk (optional)
2. USB 2.0-Anschluss mit PowerShare
3. Betriebsschalter und
Betriebsanzeige
4. Line-Out-Anschluss
5. Festplattenaktivitätsanzeige
6. Medienkarten-Lesegerät (optional)
7. DisplayPorts
8. Headset-Anschluss
9. Serielle Schnittstelle
10. USB 2.0-Anschluss
11. PS/2-Tastaturanschluss
12. USB 3.1 Gen 1-Anschlüsse
13. USB 2.0-Anschlüsse (unterstützt
Smart Power On)
14. Erweiterungskartensteckplätze
15. Netzanschluss-Port
16. Diagnoseanzeige der
Stromversorgung
17. Sicherheitskabeleinschub
18. Entriegelungsriegel
19. VGA-Anschluss (optional)
20. PS/2-Maus-Anschluss
21. Netzwerkanschluss
22. Kensington-
Sicherheitskabeleinschub
23. Ring für das Vorhängeschloss
1. Unità ottica (opzionale)
2. porta USB 2.0 con PowerShare
3. Pulsante e indicatore di alimentazione
4. Porta con linea in uscita
5. Indicatore di attività del disco rigido
6. Lettore scheda smart (opzionale)
7. Porte DisplayPort
8. Porta per cuffia auricolare
9. Porta seriale
10. Porta USB 2.0
11. Porta per tastiera PS/2
12. Porte USB 3.1 Gen 1
13. Porte USB 2.0 (supportano Smart
Power On)
14. Slot delle schede di espansione
15. Porta connettore di alimentazione
16. Indicatore di diagnostica
dell’alimentatore
17. Slot del blocco della protezione per
icavi
18. Dispositivo di sblocco
19. Porta VGA (opzionale)
20. Porta per mouse PS/2
21. Porta di rete
22. Slot per cavo di protezione Kensington
23. Anello del lucchetto
4 Connect the power cable and
press the power button
Sluit de stroomkabel aan en druk op de aan/uit-knop
Branchez le câble d’alimentation et appuyez sur le bouton d’alimentation
Schließen Sie das Netzkabel an und drücken Sie den Betriebsschalter
Collegare il cavo di alimentazione e premere il pulsante di accensione
-
 1
1
-
 2
2


Dell OptiPlex 5055 A-Series Guide de démarrage rapide
- Taper
- Guide de démarrage rapide
dans d''autres langues
Documents connexes
-
Dell OptiPlex 5055 A-Series Guide de démarrage rapide
-
Dell OptiPlex 5055 Ryzen CPU Guide de démarrage rapide
-
-
Dell OptiPlex 7050 Guide de démarrage rapide
-
-
Dell Precision 7920 Tower Guide de démarrage rapide
-
-
Dell Precision 5820 Tower Guide de démarrage rapide
-
-
Dell Precision 7820 Tower Guide de démarrage rapide