Electrolux WOGL9060CN Manuel utilisateur
- Catégorie
- Hottes
- Taper
- Manuel utilisateur

WOGL9060CN
Cooker Hood
Dunstabzugshaube
Hotte De Cuisine
Cappa
EN
DE
FR
IT

EN USER MANUAL .....................................................................................................................3
DE GEBRAUCHSANLEITUNG
..........................................................................................
7
FR MANUEL D’UTILISATION
..........................................................................................
11
IT LIBRETTO DI USO
...................................................................................................
27

3
ENGLISH
WE’RE THINKING OF YOU
Thank you for purchasing an Electrolux appliance. You’ve chosen a product that
brings with it decades of professional experience and innovation. Ingenious and
stylish, it has been designed with you in mind. So whenever you use it, you can
be safe in the knowledge that you’ll get great results every time.
Welcome to Electrolux
ACCESSORIES AND CONSUMABLES
In the Electrolux webshop, you’ll nd everything you need to keep all your
Electrolux appliances looking spotless and working perfectly. Along with a wide
range of accessories designed and built to the high quality standards you would
expect, from specialist cookware to cutlery baskets, from bottle holders to delicate
laundry bags…
Visit the webshop at:
www.electrolux.com/shop
ENVIRONMENT CONCERNS
Recycle the materials with the symbol Put the packaging in applicable
containers to recycle it.
Help protect the environment and human health and to recycle waste of
electricaland electronic appliances. Do not dispose appliances marked with the
symbol with the household waste. Return the product to your local recycling
facility orcontact your municipal ofce.
CUSTOMER CARE AND SERVICE
We recommend the use of original spare parts.
When contacting Service, ensure that you have the following data available
The information can be found on the rating plate.
Model ___________________________
PNC ____________________________
Serial Number ____________________

4
www.electrolux.com
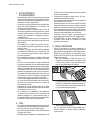
1. RECOMMENDATIONS AND
SUGGESTIONS
• The Instructions for Use apply to several ver-
sions of this appliance. Accordingly, you may
nd descriptions of individual features that do
not apply to your specic appliance.
• The manufacturer will not be held liable for any
damages resulting from incorrect or improper
installation.
• The minimum safety distance between the
cooker top and the extractor hood is 650 mm
(some models can be installed at a lower height,
please refer to the paragraphs on working
dimensions and installation).
• Check that the mains voltage corresponds to
that indicated on the rating plate xed to the
inside of the hood.
• For Class I appliances, check that the domestic
power supply guarantees adequate earthing.
• Connect the extractor to the exhaust ue
through a pipe of minimum diameter 120
mm. The route of the ue must be as short
as possible.
• Do not connect the extractor hood to exhaust
ducts carrying combustion fumes (boilers,
replaces, etc.).
• If the extractor is used in conjunction with
non-electrical appliances (e.g. gas burning
appliances), a sufcient degree of aeration
must be guaranteed in the room in order to
prevent the backow of exhaust gas. The
kitchen must have an opening communicating
directly with the open air in order to guarantee
the entry of clean air. When the cooker hood is
used in conjunction with appliances supplied
with energy other than electric, the negative
pressure in the room must not exceed 0,04
mbar to prevent fumes being drawn back into
the room by the cooker hood.
• In the event of damage to the power cable, it
must be replaced by the manufacturer or by
the technical service department, in order to
prevent any risks.
• Connect the hood to the mains through a
two-pole switch having a contact gap of at
least 3 mm.
• If the instructions for installation for the gas hob
specify a greater distance specied above, this
has to be taken into account. Regulations con-
cerning the discharge of air have to be fullled.
2. USE
• The extractor hood has been designed exclu-
sively for domestic use to eliminate kitchen
smells.
• Never use the hood for purposes other than
for which it has been designed.
• Never leave high naked ames under the hood
when it is in operation.
• Adjust the ame intensity to direct it onto the
bottom of the pan only, making sure that it does
not engulf the sides.
• Deep fat fryers must be continuously monitored
during use: overheated oil can burst into ames.
• Do not ambè under the range hood; risk of re.
• This appliance is not intended for use by
persons (including children) with reduced
physical, sensory or mental capabilities, or
lack of experience and knowledge, unless
they have been given supervision or instruction
concerning use of the appliance by a person
responsible for their safety.
• Children should be supervised to ensure that
they do not play with the appliance.
• “CAUTION: Accessible parts may become hot
when used with cooking appliances”.
3. MAINTENANCE
• Switch off or unplug the appliance from the
mains supply before carrying out any main-
tenance work.
• Clean and/or replace the Filters after the speci-
ed time period (Fire hazard).
- Activated charcoal lter W These lters are
not washable and cannot be regenerated,
and must be replaced approximately every
4 months of operation, or more frequently
with heavy usage.
W
- Grease lters Z The lters must be cleaned
every 2 months of operation, or more fre-
quently for particularly heavy usage, and
can be washed in a dishwasher.
Z
- Control lights, if present.
• Clean the hood using a damp cloth and a
neutral liquid detergent.

5
ENGLISH
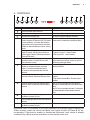
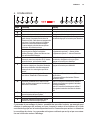
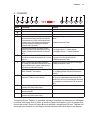
4. CONTROLS
Button Function Display
A
Turns the suction motor on and o. -
B
Decreases the working speed. The number of lighted segments decreases.
C
Increases the working speed.
The number of lighted segments increases.
D
Activates Intensive speed from any other speed,
with the exception of Delay and 24H. This speed
is set to operate for 10 minutes, after which the
system returns to the speed that was set before.
Suitable to deal with maximum levels of cooking
fumes.
The indicator I ashes and all the segments on the
Display are lit.It is disabled by pressing the Button.
Pressing and holding the button for approxi-
mately 5 seconds, with all functions turned o
(Motor+Light), Enables / Disables the Activated
Charcoal Filter alarm.
2 Flashes of symbol C – Alarm Enabled.
1 Flash of symbol C – Alarm Disabled.
E
Starts the Motor in Air Change mode, at a speed
that allows suction 10 minutes for hour, after
which the Motor will stop.
Displays 24 and the segments on the Display all
light up and then turn o one at a time in cycle.It is
disabled by pressing the Button.
F
Activates automatic switch-o with a 30’ delay.
Suitable to complete elimination of residual
odours. Can only be activated with the mo-
tor turned on at a Speed other than 24H and
Intensive.
Displays a ashing Clock symbol.It is disabled by
pressing the Button.
Press and hold the button for approximately 5
seconds to Enable / Disable the Remote control.
2 Flashes of the Horizontal Bars – Remote Control
Enabled.
1 Flash of the Horizontal Bars – Remote Control
Disabled.
G
Performs a Reset of the Filter saturation alarm
when the Button is pressed for approximately 3
seconds.
After 100 hours in operation the Drop symbol is
displayed to indicate saturation of the Metal Grease
Filters.
After 200 hours in operation the letter C is displayed
to indicate saturation of the Activated Charcoal
lters.
H
Decreases the intensity of the Lighting each time
the Button is pressed, in cycle.
I
Turns the lighting system on and o at maximum
intensity.
L
Increases the intensity of the Lighting each time
the Button is pressed, in cycle.
Keyboard Lock: it is possible to lock the keyboard, for example when cleaning the
Glass surface, when the Hood has Motor and Lights turned o.Press A for ap-
proximately 5 Seconds to enable or disable the Keyboard Lock, which is always
conrmed by a Beep and an animation on the display motor bar.

6
www.electrolux.com
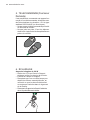
5. REMOTE CONTROL (Optional)
The appliance can be controlled using a re-
mote control powered by a 1.5 V carbon-zinc
alkaline batteries of the standard LR03-AAA
type (not included).
• Do not place the remote control near to
heat sources.
• Used batteries must be disposed of in the
proper manner.
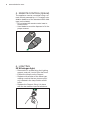
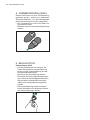
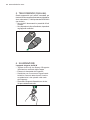
6. LIGHTING
20 W halogen light.
• Remove the 2 screws xing the Lighting
support, and pull it out of from the Hood.
• Extract the lamp from the Support.
• Replace with another of the same type,
making sure that the two pins are prop-
erly inserted in the lamp holder socket
holes.
• Replace the Support, xing it in place
with the two screws removed as above.

7
GERMAN
WIR DENKEN AN SIE
Vielen Dank, dass Sie sich für ein Electrolux Gerät entschieden haben. Sie haben
ein Produkt gewählt, hinter dem eine jahrzehntelange professionelle Erfahrung
und Innovation steht. Bei der Entwicklung dieses großartigen und eleganten
Geräts haben wir an Sie gedacht.
So haben Sie bei jedem Gebrauch die Gewissheit, dass Sie stets großartige
Ergebnisse erzielen werden.
Willkommen bei Electrolux.
ZUBEHÖR UND VERBRAUCHSMATERIALIEN
Im Electrolux Webshop nden Sie alles, was Sie für ein makelloses Aussehen
und perfektes Funktionieren Ihrer Electrolux Geräte benötigen. Wir bieten auch
ein umfangreiches Zubehörsortiment, das Ihre höchsten Qualitätsansprüche
erfüllt, vom Pro-Kochgeschirr bis zu Besteckkörben, von Flaschenhaltern bis hin
zu Wäschebeuteln für empndliche Wäsche...
Besuchen Sie den Webshop unter:
www.electrolux.com/shop
UMWELTTIPPS
Recyceln Sie Materialien mit dem Symbol . Entsorgen Sie die Verpackung in
den entsprechenden Recyclingbehältern.
Recyceln Sie zum Umwelt- und Gesundheitsschutz elektrische und elektronische
Geräte. Entsorgen Sie Geräte mit diesem Symbol nicht mit dem Hausmüll.
Bringen Sie das Gerät zu Ihrer örtlichen Sammelstelle oder wenden Sie sich an
Ihr Gemeindeamt.
KUNDENDIENST UND -BETREUUNG
Wir empfehlen die Verwendung von Originalersatzteilen.
Halten Sie folgende Angaben bereit, wenn Sie sich an den Kundendienst wenden.
Die Informationen nden Sie auf dem Typenschild.
Modell ___________________________
Produkt-Nummer PNC ______________
Seriennummer ____________________

8
www.electrolux.com
1. EMPFEHLUNGEN UND
HINWEISE
• Diese Gebrauchsanleitung gilt für mehrere Geräte-
Ausführungen. Es ist möglich, dass einzelne Aus-
stattungsmerkmale beschrieben sind, die nicht auf
Ihr Gerät zutreffen.
• Der Hersteller haftet nicht für Schäden, die auf eine
fehlerhafte und unsachgemäße Montage zurück-
zuführen sind.
• Der minimale Sicherheitsabstand zwischen Koch-
mulde und Haube muss 650 mm betragen (einige
Modelle können an einer geringeren Höhe installiert
werden, beziehen Sie sich dazu auf den Absatz
Raumbedarf und Installation).
• Prüfen, ob die Netzspannung mit dem Wert auf
dem im Haubeninneren angebrachten Schild
übereinstimmt.
• Bei Geräten der Klasse I ist sicherzustellen, dass
die elektrische Anlage des Wohnhauses über eine
vorschriftsmäßige Erdung verfügt.
• Das Anschlussrohr der Haube zur Luftaustrittsöff-
nung muss einen Durchmesser von 120 mm oder
darüber aufweisen. Der Rohrverlauf muss so kurz
wie möglich sein.
• Die Haube darf an keine Entlüftungsschächte
angeschlossen werden, in die Verbrennungsgase
(Heizkessel, Kamine usw.) geleitet werden.
• Werden im Raum außer der Dunstabzugshaube
andere, nicht elektrisch betriebene (z.B. gasbetriebe-
ne) Geräte verwendet, muss für eine ausreichende
Belüftung gesorgt werden. Sollte die Küche diesbe-
züglich nicht entsprechen, ist an einer Aussenwand
eine Öffnung anzubringen, die Frischluftzufuhr
gewährleistet. Der Gebrauch ist dann sachgemäß
und sicher, wenn der max. Unterdruck des Raums
nicht mehr als 0,04 mbar beträgt.
• Ein schadhaftes Kabel muss vom Hersteller oder vom
technischen Kundendienst ausgewechselt werden,
damit jedes Risiko vermieden wird.
• Bei Anschluss der Haube an das Stromnetz muss
ein zweipoliger Schalter mit einem Öff-nungsweg
von mindestens 3 mm zwischengeschaltet werden.
• Wenn die Anweisungen für die Installation für die
Gaskochgeräts einen größeren Abstand oben ange-
geben, muss dies berücksichtigt werden. Vorschriften
über die Entlastung der Luft müssen erfüllt sein.
2. BEDIENUNG
• Die Dunstabzugshaube ist ausschließlich zum
Einsatz im privaten Haushalt und zur Beseitigung
von Küchengerüchen vorgesehen.
• Unsachgemäßer Einsatz der Haube ist zu unter-
lassen.
• Große Flammen bei eingeschalteter Haube niemals
unbedeckt lassen.
• Die Intensivität der Flamme ist so zu regulieren, dass
sie den Topfboden nicht überragt.
• Frittiergeräte müssen während des Gebrauchs
stets beaufsichtigt werden: überhitztes Öl kann
sich entzünden.
• Keine ambierten Speisen unter der Abzugshaube
zubereiten: Brandgefahr.
• Dieses Gerät darf nicht von Personen, auch Kindern,
mit verminderten psychi-schen, sensorischen und
geistigern Fähigkeiten, oder von Personen ohne
Erfahrung und Kenntnisse benutzt werden, sofern
sie nicht von für ihre Sicherheit verantwortlichen
Personen beaufsichtigt und beim Gebrauch des
Geräts angeleitet werden.
• Kinder dürfen sich nicht unbeaufsichtigt in der Nähe
des Geräts aufhalten und auf keinen Fall mit dem
Gerät spielen.
• “ACHTUNG: Die zugänglichen Teile können sehr
heiß werden, wenn sie mit Kochgeräten eingesetzt
werden.”
3. WARTUNG
• Bevor Wartungsarbeiten durchgeführt werden, muss
die Stromzufuhr zur Haube unterbrochen werden,
indem der Stecker gezogen oder der Hauptschalter
abgeschaltet wird.
• Bei der Filterwartung müssen die vom Hersteller
empfohlenen Zeiträume zum Austauschen der Filter
genauestens eingehalten werden (Brandgefahr).
- Geruchslter W Sie können weder gewaschen
noch wiederverwendet werden und sind alle 4
Betriebsmonate bzw. bei starkem Einsatz auch
häuger auszutauschen.
W
- Fettlter Z Sie müssen nach 2-monatigem Betrieb
bzw. bei starkem Einsatz auch häuger gereinigt
werden, was im Geschirrspüler möglich ist.
Z
- Kontrolllampen der Steuerungen, wo vorhanden.
• Zur Reinigung der Haubenächen Wir empfehlen ein
feuchtes Tuch und ein mildes Flüssigreinigungsmittel.

9
GERMAN
4. BEDIENELEMENTE
Taste Funktion Display
A
Schaltet den Saugmotor ein und aus. -
B
Vermindert die Betriebsgeschwindigkeit. Die leuchtenden Segmente nehmen ab.
C
Erhöht die Betriebsgeschwindigkeit.
Die leuchtenden Segmente nehmen zu.
D
Aktiviert von jeder Geschwindigkeit aus, mit
Ausnahme von Delay und 24H, die Intensivge-
schwindigkeit, die auf 10 Minuten zeitgeregelt ist;
nach Ablauf dieser Zeit kehrt das System zu der
zuvor eingestellten Geschwindigkeit zurück. Für
die Beseitigung von sehr intensiven Kochdüns-
ten geeignet.
I blinkt und alle Segmente auf dem Display leuch-
ten.Wird durch Drücken der Taste ausgeschaltet.
Mit zirka 5 Sekunden langem Gedrückthalten
der Taste bei abgeschalteten Verbrauchern
(Motor+Licht) wird der Alarm der Aktivkohlelter
aktiviert / deaktiviert.
2 Mal Blinken des Symbols C – Alarm aktiviert.
1 Mal Blinken des Symbols C – Alarm deaktiviert.
E
Aktiviert den Motor bei Luftaustausch-Modus,
eine Geschwindigkeit, die eine Absaugleistung
von 100 m3/h für die Dauer von 10 Minuten jede
Stunde ermöglicht, nach deren Ablauf der Motor
angehalten wird.
Zeigt 24 an und alle auf dem Display angezeigten
Segmente verlöschen nacheinander.
Wird durch Drücken der Taste ausgeschaltet.
F
Aktiviert das automatische Ausschalten mit einer
Verzögerung von 30’. Vervollständigt die Besei-
tigung von Restgerüchen. Nur bei eingeschalte-
tem Motor bei anderer Geschwindigkeit als 24H
oder Intensivgeschwindigkeit aktivierbar.
Zeigt das Symbol einer blinkenden Uhr an.Wird
durch Drücken der Taste ausgeschaltet.
Mit zirka 5 Sekunden langem Gedrückthalten
der Taste wird die Fernbedienung aktiviert /
deaktiviert.
2 Mal Blinken der horizontalen Balken - Fernbedie-
nung aktiviert.
1 Mal Blinken der horizontalen Balken - Fernbedie-
nung aktiviert.
G
Führt durch ca. 3 Sekunden langes Drücken der
Taste ein Reset des Filtersättigungsalarms aus.
Nach 100 Betriebsstunden zeigt das Symbol Trop-
fen die Sättigung der Metalllter an.
Nach 200 Betriebsstunden zeigt C die Sättigung
der Aktivkohlelter an.
H
Vermindert bei jedem Drücken der Taste zyk-
lisch die Intensität der Beleuchtung.
I
Schaltet die Beleuchtungsanlage auf höchster
Intensitätsstufe ein und aus.
L
Steigert die Intensität der Beleuchtung zyklisch
mit jedem Drücken der Taste.
Steuerbefehl Tastatursperre: Die Tastatur lässt sich z.B. zur Reinigung der Glas-
scheiben sperren, wenn Motor und Beleuchtung der Haube ausgeschaltet sind.Zum
Aktivieren oder Deaktivieren der Tastatursperre die Taste A ca. 5 Sekunden lang
drücken. Der Vorgang wird immer durch einen Piepton und die Motorbalkenanzeige
auf dem Display bestätigt.

10
www.electrolux.com
5. FERNBEDIENUNG (Option)
Dieses Gerät kann mit einer Fernbedienung
gesteuert werden, welche mit alkalischen
Zink-Kohle-Batterien 1,5 V des Standardtyps
LR03-AAA versorgt wird (nicht mitgeliefert).
• Die Fernbedienung nicht in die Nähe von
Hitzequellen legen.
• Batterien müssen vorschriftsmäßig entsorgt
werden.
6. BELEUCHTUN
Halogenlampe 20 W
• Vor dem Auswechseln der Lampen, die
beiden Schrauben der Lampenhalterung
loesen und die Lampenhalterung aus der
Dunstabzugshaube ziehen.
• Die Lampe aus der Halterung nehmen.
• Die Lampe durch eine gleichwertige erset-
zen und bei der Remontage darauf achten,
daß die beiden Steckerstifte vorschrifts-
mäßig in die Lampenfassung eingeführt
werden.
• Die Lampenhalterung wieder montieren,
indem die beiden zuvor entfernten Schrau-
ben wieder angezogen werden.

11
FRENCH
NOUS PENSONS À VOUS
Merci d’avoir choisi ce produit Electrolux. Avec ce produit, vous bénéciez de
dizaines d’années d’expérience professionnelle et d’innovation. Ingénieux et
élégant, il a été conçu sur mesure pour vous.
Grâce à cet appareil, vous savez que chaque utilisation vous apportera
satisfaction.
Bienvenue chez Electrolux.
ACCESSOIRES ET CONSOMMABLES
Dans la boutique en ligne d’Electrolux, vous trouverez tout ce qu’il vous faut
pour que vos appareils Electrolux soient toujours impeccables et fonctionnent
parfaitement, sans oublier une vaste gamme d’accessoires conçus et fabriqués
selon les critères de qualité les plus élevés qui soient, des ustensiles de cuisine
spécialisés aux range-couverts, des porte-bouteilles aux sacs à linge délicats...
Visitez notre boutique en ligne
www.electrolux.com/shop
EN MATIÈRE DE PROTECTION DE L’ENVIRONNEMENT
Recyclez les matériaux portant le symbole . Déposez les emballages dans les
conteneurs prévus à cet effet.
Contribuez à la protection de l’environnement et à votre sécurité, recyclez
vos produits électriques et électroniques. Ne jetez pas les appareils portant le
symbole avec les ordures ménagères. Emmenez un tel produit dans votre
centre local de recyclage ou contactez vos services municipaux.
SERVICE APRÈS-VENTE
N’utilisez que des pièces de rechange d’origine.
Avant de contacter le service, assurez-vous de disposer des informations suivantes:
Vous trouverez ces informations sur la plaque signalétique.
Modèle __________________________
PNC ____________________________
Numéro de série ___________________

12
www.electrolux.com
1. CONSEILS
ET SUGGESTIONS
• La présente notice d’emploi vaut pour plusieurs
versions de l’appareil. Elle peut contenir des
descriptions d’accessoires ne gurant pas dans
votre appareil.
• Le fabricant décline toute responsabilité en cas
de dommage dû à une installation non correcte
ou non conforme aux règles de l’art.
• La distance minimale de sécurité entre le plan de
cuisson et la hotte doit être de 650 mm au moins.
• Vérier que la tension du secteur correspond à
la valeur qui gure sur la plaquette apposée à
l’intérieur de la hotte.
• Pour les Appareils appartenant à I
a
Ière Classe,
veiller à ce que la mise à la terre de l’installation
électrique domestique ait été effectuée confor-
mément aux normes en vigueur.
• Connecter la hotte à la sortie d’air aspiré à l’aide
d’une tuyauterie d’un diamètre égal ou supérieur
à 120 mm. Le parcours de la tuyauterie doit être
le plus court possible.
• Ne pas connecter la hotte à des conduites d’éva-
cuation de fumées issues d’une combustion tel
que (Chaudière, cheminée, etc…).
• Si vous utilisez des appareils qui ne fonctionnent
pas à l’électricité dans la pièce ou est installée la
hotte (par exemple: des appareils fonctionnant
au gaz), vous devez prévoir une aération suf-
sante du milieu. Si la cuisine en est dépourvue,
pratiquez une ouverture qui communique avec
l’extérieur pour garantir l’inltration de l’air
pur. Pour un emploi correct et sans risque, la
dépression maximum dans la pièce ne doit pas
dépasser 0,04 mbar.
• En cas d’endommagement du cordon d’alimen-
tation, faites-le remplacer par le constructeur
ou par le service après-vente, an de prévenir
tout risque.
• Brancher la hotte sur le secteur en interposant
un interrupteur bipolaire avec ouverture des
contacts d’au moins 3 mm.
• Si les instructions de montage pour la plaque
de cuisson au gaz spécient une plus grande
distance indiquée ci-dessus, cela doit être pris
en compte. Règlement concernant l’évacuation
d’air doivent être remplies.
2. UTILISATION
• La hotte a été conçue exclusivement pour l’usage
domestique, dans le but d’éliminer les odeurs
de la cuisine.
• Ne jamais utiliser abusivement la hotte.
• Ne pas laisser les ammes libres à forte intensité
quand la hotte est en service.
• Toujours régler les ammes de manière à éviter
toute sortie latérale de ces dernières par rapport
au fond des marmites.
• Contrôler les friteuses lors de l’utilisation car
l’huile surchauffée pourrait s’enammer.
• Ne pas préparer d’aliments ambés sous la hotte
de cuisine : risque d’incendie.
• Cet appareil ne doit pas être utilisé par des
personnes (y compris les enfants) ayant des
capacités psychiques, sensorielles ou mentales
réduites, ni par des personnes n’ayant pas l’expé-
rience et la connaissance de ce type d’appareils,
à moins d’être sous le contrôle et la formation
de personnes responsables de leur sécurité.
• Les enfants doivent être surveillés pour s’assurer
qu’ils ne jouent pas avec l’appareil.
• “ATTENTION : Les parties accessibles peuvent
devenir très chaudes si utilisées avec des appa-
reils de cuisson.”
3. ENTRETIEN
• Avant de procéder à toute opération d’entretien,
débrancher la hotte en retirant la che ou en
actionnant l’interrupteur général.
• Effectuer un entretien scrupuleux et en temps
dû des Filtres, à la cadence conseillée (Risque
d’incendie).
- Filtre anti-odeur W Il ne sont pas lavables ni
régénérables, il faut les remplacer au moins
tous les 4 mois d’emploi ou plus fréquemment
en cas d’emploi particulièrement intense.
W
- Filtres anti-graisse Z Lavables au lave-vais-
selle, ils doivent être lavés environ tous les 2
mois d’emploi ou plus fréquemment en cas
d’emploi particulièrement intense.
Z
- Voyants commandes si présents.
• Pour le nettoyage des surfaces de la hotte,
il suft d’utiliser un chiffon humide et détersif
liquide neutre.

13
FRENCH
4. COMMANDES
Taste Funktion Display
A
Branche / Débranche le moteur d’aspiration. -
B
Réduit la vitesse d’exercice. Les segments allumés diminuent.
C
Augmente la vitesse d’exercice.
Les segments allumés augmentent.
D
Active la vitesse Intensive à partir de n’importe
quelle vitesse, à l’exception des fonctions de
Retard et de 24H. Cette vitesse est programmée
pour durer 10 minutes, après quoi le système
retourne à la vitesse précédemment réglée.
Fonction indiquée pour faire face aux pointes
d’émission de fumées de cuisson.
Le I clignote et les segments sur l’achage sont
tous allumés.Appuyer sur la touche pour désactiver.
Garder la touche appuyée pendant 5 secondes,
lorsque toutes les charges sont éteintes
(Moteur+Éclairage), l’alarme des ltres au char-
bon actif s’Active/se Désactive.
2 clignotements symbole C – Alarme Activée.
1 clignotement symbole C – Alarme Désactivée.
E
Active le moteur en mode Rechange Air, une
vitesse qui permet une aspiration de 10 minutes
toutes les heures ; puis le moteur s’arrête.
Ache 24 et les segments sur l’achage, d’abord
tous allumés, s’éteignent un à un, par cycles.
Appuyer sur la touche pour désactiver.
F
Active l’extinction automatique avec un retard de
30 minutes. Indiqué pour compléter l’élimination
des odeurs résiduelles. Activable seulement à
moteur allumé à un autre régime que 24H et
Intensif.
Ache le symbole d’une Horloge clignotante.
Appuyer sur la touche pour désactiver.
Garder la touche appuyée pendant 5 secondes
pour Activer / Désactiver la Télécommande.
2 Clignotements Barres Horizontales Télécom-
mande Active.
1 Clignotement Barres Horizontales Télécom-
mande Non Active.
G
Eectue la Réinitialisation de l’alarme de satu-
ration des ltres en appuyant sur la touche pen-
dant environ 3 secondes.
Après 100 heures de fonctionnement, ache le
symbole de la Goutte pour signaler la saturation
des ltres métalliques.
Après 200 heures de fonctionnement, ache C
pour signaler la saturation des ltres au charbon
actif.
H
Réduit l’intensité de l’éclairage à chaque pres-
sion sur la touche de façon cyclique.
I
Allume et éteint l’éclairage à l’intensité maximale.
L
Augmente l’intensité de l’éclairage à chaque
pression sur la touche de façon cyclique.
Commande de verrouillage du clavier : possibilité de verrouiller le clavier, par exemple pour
eectuer le nettoyage des surfaces en verre, lorsque le moteur et les lumières de la hotte
sont éteints.Appuyer sur la touche A pendant environ 5 secondes pour activer ou désactiver
le verrouillage du clavier : la commande est toujours conrmée par un bip et par une anima-
tion sur la barre du moteur d’achage.

14
www.electrolux.com
5.
TELECOMMANDE (Fournie sur
Demande)
Il est possible de commander cet appareil au
moyen d’une télécommande, alimentée avec
des piles alcalines zinc-charbon 1,5 V du type
standard LR03-AAA25 (ne fournis pas).
• Ne pas ranger la télécommande à proximité
de sources de chaleur.
• Ne pas jeter les piles; il faut les déposer
dans les ré-cipients de récolte spécialement
prévus à cet effet.
6. ÉCLAIRAGE
Ampoule halogène de 20 W
• Retirer les 2 Vis qui xent le Support
éclairage et ôter ce dernier de la Hotte.
• Extraire la Lampe du Support.
• Remplacer par une nouvelle lampe pos-
sédant les mêmes caractéristiques, en
veillant à ce que les deux ches soient
correctement insérées dans le logement
de la Douille.
• Remonter le Support en le xant à l’aide des
deux Vis précédemment retirées.

15
ITALIAN
PENSATI PER VOI
Grazie per aver acquistato un’apparecchiatura Electrolux. Avete scelto un
prodotto che ha alle spalle decenni di esperienza professionale e innovazione.
Ingegnoso ed elegante, è stato progettato pensando a voi.
Quindi, in qualsiasi momento desiderate utilizzarlo, potete esser certi di ottenere
sempre i migliori risultati.
Benvenuti in Electrolux.
ACCESSORI E CONSUMABILI
All’interno del webshop Electrolux troverete tutto ciò che vi serve per fare in
modo che le vostre apparecchiature Electrolux siano sempre perfettamente pulite
e funzionanti. Non mancano inoltre una vasta gamma di accessori studiati e
realizzati conformemente ai più elevati standard qualitativi: pentole, scolaposate,
portabottiglie, sacchi biancheria delicati...
Visitate il webshop all’indirizzo:
www.electrolux.com/shop
CONSIDERAZIONI AMBIENTALI
Riciclare i materiali con il simbolo . Buttare l’imballaggio negli appositi
contenitori per il riciclaggio.
Aiutare a proteggere l’ambiente e la salute umana e a riciclare riuti derivanti da
apparecchiature elettriche ed elettroniche. Non smaltire le apparecchiature che
riportano il simbolo insieme ai normali riuti domestici. Portare il prodotto al
punto di riciclaggio più vicino o contattare il comune di residenza.
ASSISTENZA
Consigliamo sempre l’impiego di ricambi originali.
Prima di contattare il centro di assistenza, assicurarsi di avere a portata di mano i
seguenti dati.
Le informazioni sono riportate sulla targhetta.
Modello __________________________
PNC ____________________________
Numero di serie ___________________

www.electrolux.com
1. AVVERTENZE E
SUGGERIMENTI
• Questo libretto di istruzioni per l’uso è previsto per
più versioni dell’ apparecchio. É possibile che siano
descritti singoli particolari della dotazione, che non
riguardano il Vostro apparecchio.
• Il produttore declina qualsiasi responsabilità per
danni dovuti ad installazione non corretta o non
conforme alle regole dell’arte.
• La distanza minima di sicurezza tra il Piano di
cottura e la Cappa deve essere di 650 mm, (alcuni
modelli possono essere installati ad un’altezza
inferiore, fare riferimento ai paragra ingombro
e installazione).
• Vericare che la tensione di rete corrisponda a
quella riportata nella targhetta posta all’interno
della Cappa.
• Per Apparecchi in Classe I
a
accertarsi che l’im-
pianto elettrico domestico garantisca un corretto
scarico a terra.
• Collegare la Cappa all’uscita dell’aria aspirata
con tubazione di diametro pari o superiore a 120
mm. Il percorso della tubazione deve essere il
più breve possibile.
• Non collegare la Cappa a condotti di scarico dei
fumi prodotti da combustione (caldaie, caminetti,
ecc.).
• Nel caso in cui nella stanza vengano utilizzati sia
la Cappa che apparec-chi non azionati da energia
elettrica (ad esempio apparecchi utilizzatori di gas),
si deve provvedere ad una aerazione sufciente
dell’ambiente. Se la cucina ne fosse sprovvista,
praticare un’apertura che comunichi con l’esterno,
per garantire il richiamo d’aria pulita. Un uso proprio
e senza rischi si ottiene quando la depressione
massima del locale non supera i 0,04 mBar.
• In caso di danneggiamento del cavo alimentazio-
ne, esso deve essere sostituito dal costruttore o
dal servi-zio di assistenza tecnica, in modo da
prevenire ogni rischio.
• Collegare la Cappa all’Alimentazione di Rete
interponendo un Interruttore bipolare con apertura
dei contatti di almeno 3 mm.
• Se le istruzioni di installazione del dispositivo
di cottura a gas indicano che è necessaria una
distanza maggiore di quella indicato sopra, è
necessario tenerne conto. Bisogna rispettare tutte
le normative relative allo scarico dell’aria.
2. USO
• La Cappa è stata progettata esclusivamente per
uso domestico, per ab-battere gli odori della cucina.
• Non fare mai uso improprio della Cappa.
• Non lasciare amme libere a forte intensità sotto
la Cappa in funzione.
• Regolare sempre le amme in modo da evitare una
evidente fuoriuscita laterale delle stesse rispetto
al fondo delle pentole.
• Controllare le friggitrici durante l’uso: l’olio surri-
scaldato potrebbe inammarsi.
• Non preparare alimenti ambè sotto la cappa da
cucina; pericolo d’incendio.
• Questo apparecchio non deve essere utilizzato
da persone (bambini inclusi) con ridotte capacità
psichiche, sensoriali o mentali, oppure da persone
senza esperienza e conoscenza, a meno che non
siano controllati o istruiti all’uso dell’apparecchio da
persone responsabili della loro sicurezza.
• I bambini devono essere supervisionati per
assicurarsi che non giochino con l’apparecchio.
• “ATTENZIONE: Le parti accessibili possono
diventare molto calde se utilizzate con degli
apparecchi di cottura.”
3. MANUTENZIONE
• Prima di procedere a qualsiasi operazione di
manutenzione, disinserire la Cappa togliendo la
spina elettrica o spegnendo l’interruttore generale.
• Effettuare una scrupolosa e tempestiva manu-
tenzione dei Filtri secondo gli intervalli consigliati
(Rischio di incendio).
- W Il Filtro antiodore al Carbone attivo non è
lavabile e non è rigenerabile, va sostituito ogni
4 mesi circa di utilizzo o più frequentemente,
per un uso particolarmente intenso.
W
- Filtri antigrasso Z Sono lavabili anche in lava-
stoviglie, e necessitano di essere lavati ogni 2
mesi circa di utilizzo o più frequentemente, per
un uso particolarmente intenso.
Z
- Spie comandi ove presenti.
• Per la pulizia delle superci della Cappa è suf-
ciente utilizzare un panno umido e detersivo
liquido neutro.

17
ITALIAN
4. COMANDI
Tasto Funzione Display
A
Accende / Spegne il motore di aspirazione. -
B
Decrementa la velocità di esercizio. Diminuiscono i segmenti accesi.
C
Incrementa la velocità di esercizio.
Aumentano i segmenti accesi.
D
Attiva la velocità Intensiva da qualsiasi velocità
ad eccezione del Delay e del 24H, tale velocità
è temporizzata a 10 minuti, al termine del tempo
il sistema ritorna alla velocità precedentemente
impostata. Adatta a fronteggiare le massime
emissioni di fumi di cottura.
Lampeggia I e i segmenti sul Display sono tutti
accesi.
Si disattiva premendo il Tasto.
Tenendo il tasto premuto per circa 5 secondi,
quando tutti i carichi sono spenti (Motore+Luce),
si Attiva / Disattiva l’allarme dei Filtri al Carbone
attivo.
2 Lampeggi simbolo C – Allarme Attivato.
1 Lampeggio simbolo C – Allarme Disattivato.
E
Attiva il motore alla modalità Ricambio Aria, una
velocità che consente un’aspirazione di 10 minuti
ogni ora.
Visualizza 24 e i segmenti sul Display da tutti accesi
si spengono uno alla volta ciclicamente.
Si disattiva premendo il Tasto.
F
Attiva lo spegnimento automatico ritardato di
30’. Adatto per completare l’eliminazione di odori
residui. Attivabile solo a motore acceso ad una
Velocità diversa da 24H e Intensiva.
Visualizza il simbolo di un Orologio che lampeggia.
Si disattiva premendo il Tasto.
Tenendo il tasto premuto per circa 5 secondi si
Attiva / Disattiva il Telecomando.
2 Lampeggio Barre Orizzontali Telecomando At-
tivo.1 Lampeggio Barre Orizzontali Telecomando
Disattivo.
G
Eettua il Reset dell’allarme saturazione Filtri
premendo il Tasto per circa 3 Secondi.
Dopo 100 ore di Funzionamento Visualizza il sim-
bolo Goccia per segnalare la saturazione dei Filtri
Metallici.Dopo 200 ore di Funzionamento Visualizza
C per segnalare la saturazione dei Filtri al Carbone
Attivo.
H
Decrementa l’intensità di Illuminazione ad ogni
pressione del Tasto in modo ciclico.
I
Accende e spegne l’impianto di illuminazione alla
massima intensità.
L
Incrementa l’intensità di Illuminazione ad ogni
pressione del Tasto in modo ciclico.
Comando Blocco Tastiera: è possibile bloccare la tastiera, ad esempio per eettuare
la pulizia della super-cie in Vetro, quando la Cappa ha il Motore e le Luci spente.Pre-
mendo per circa 5 Secondi il tasto A si può abilitare o disabilitare il Blocco Tastiera che
è sempre con-fermato con un Beep e un’animazione sulla barra motore del display.

18
www.electrolux.com
5. TELECOMANDO (
Opzionale)
Questo apparecchio può essere comandato per
mezzo di un telecomando, alimentato con pile alcaline
zinco-carbone da 1,5 V del tipo standard LR03-AAA
(non incluse).
• Non riporre il telecomando in prossimità di fonti
di calore.
• Non disperdere le pile nell’ambiente, depositarle
negli appositi contenitori.
6. ILLUMINAZIONE
Lampade alogene da 20 W
• Togliere le due viti che ssano il Supporto
illuminazione e slarlo dalla Cappa
• Estrarre la Lampada dal Supporto.
• Sostituirla con una nuova di uguali carat-
teristiche, facendo attenzione di inserire
correttamente i due spinotti nella sede
del Supporto.
• Rimontare il Supporto ssandola con le due
Viti pre-cedentemente tolte.


www.electrolux.com/shop
991.0360.687_01 - 150107
-
 1
1
-
 2
2
-
 3
3
-
 4
4
-
 5
5
-
 6
6
-
 7
7
-
 8
8
-
 9
9
-
 10
10
-
 11
11
-
 12
12
-
 13
13
-
 14
14
-
 15
15
-
 16
16
-
 17
17
-
 18
18
-
 19
19
-
 20
20


Electrolux WOGL9060CN Manuel utilisateur
- Catégorie
- Hottes
- Taper
- Manuel utilisateur
dans d''autres langues
- italiano: Electrolux WOGL9060CN Manuale utente
- English: Electrolux WOGL9060CN User manual
- Deutsch: Electrolux WOGL9060CN Benutzerhandbuch
Documents connexes
-
Electrolux EFC9360X Manuel utilisateur
-
Electrolux IHPL1240WE Manuel utilisateur
-
Electrolux DBGL5430CN Manuel utilisateur
-
-
Electrolux IHGL9030CN Manuel utilisateur
-
-
-