Olympia PS 55 CC Le manuel du propriétaire
- Catégorie
- Destructeurs de papier
- Taper
- Le manuel du propriétaire

D Automatischer Aktenvernichter
G Automatic Shredder
F Destructeur automatique de documents
I Distruggidocumenti automatico
n Automatische papiervernietiger
E Destructora automática de documentos
P Destruidor automático de documentos
C Automatický skartovač
PS 55 CC

2
Inhalt
Verpackungsinhalt � � � � � � � � � � � � � � � � � � � �4
Zu Ihrer Sicherheit � � � � � � � � � � � � � � � � � � � �4
Übersicht � � � � � � � � � � � � � � � � � � � � � � � � � � �5
Bestimmungsgemäße Verwendung� � � � � � �6
Bevor Sie loslegen� � � � � � � � � � � � � � � � � � � �6
Aktenvernichter sicher aufstellen� � � � � � � � �6
Aktenvernichter bedienen � � � � � � � � � � � � � �7
Wenn etwas nicht funktioniert � � � � � � � � � � �7
Entsorgung � � � � � � � � � � � � � � � � � � � � � � � � �9
Technische Daten � � � � � � � � � � � � � � � � � � � �9
Konformitätserklärung � � � � � � � � � � � � � � � � �9
Garantie � � � � � � � � � � � � � � � � � � � � � � � � � � � �9
Contents
Package Contents � � � � � � � � � � � � � � � � � � �10
For Your Safety � � � � � � � � � � � � � � � � � � � � �10
General View � � � � � � � � � � � � � � � � � � � � � � �11
Intended Use � � � � � � � � � � � � � � � � � � � � � � �12
Before You Start � � � � � � � � � � � � � � � � � � � �12
Positioning the Shredder Safely � � � � � � � �12
Operating the Shredder � � � � � � � � � � � � � � �13
If Something Does Not Work � � � � � � � � � � �13
Disposal � � � � � � � � � � � � � � � � � � � � � � � � � � �15
Technical Data � � � � � � � � � � � � � � � � � � � � � �15
Declaration of Conformity � � � � � � � � � � � � �15
Guarantee � � � � � � � � � � � � � � � � � � � � � � � � �15
Contenu
Contenu du coffret � � � � � � � � � � � � � � � � � � �16
Pour votre sécurité � � � � � � � � � � � � � � � � � �16
Tableau � � � � � � � � � � � � � � � � � � � � � � � � � � �17
Utilisation conforme à l'usage prévu � � � � �18
Avant de commencer � � � � � � � � � � � � � � � � �18
Poser le destructeur de documents
de sorte qu'il soit stable � � � � � � � � � � � � � � �18
Comment utiliser le destructeur de
documents � � � � � � � � � � � � � � � � � � � � � � � � �19
En cas de panne
� � � � � � � � � � � � � � � � � � � �19
Élimination � � � � � � � � � � � � � � � � � � � � � � � � �21
Caractéristiques techniques � � � � � � � � � � �21
Déclaration de conformité � � � � � � � � � � � � �21
Garantie � � � � � � � � � � � � � � � � � � � � � � � � � � �21
Sommario
Contenuto della confezione � � � � � � � � � � � �22
Note importanti sulla sicurezza � � � � � � � � �22
Panoramica � � � � � � � � � � � � � � � � � � � � � � � �23
Impiego conforme agli usi previsti � � � � � � �24
Prima della messa in funzione� � � � � � � � � �24
Posizionamento sicuro del
distruggidocumenti � � � � � � � � � � � � � � � � � �24
Esercizio del distruggidocumenti � � � � � � � �25
Malfunzionamenti � � � � � � � � � � � � � � � � � � �25
Smaltimento� � � � � � � � � � � � � � � � � � � � � � � �27
Dati tecnici � � � � � � � � � � � � � � � � � � � � � � � � �27
Dichiarazione di conformità � � � � � � � � � � � �27
Garanzia � � � � � � � � � � � � � � � � � � � � � � � � � �27

3
Inhoud
Inhoud van de verpakking � � � � � � � � � � � � �28
Voor uw eigen veiligheid � � � � � � � � � � � � � �28
Overzicht � � � � � � � � � � � � � � � � � � � � � � � � � �29
Beoogd gebruik � � � � � � � � � � � � � � � � � � � � �30
Voordat u begint � � � � � � � � � � � � � � � � � � � �30
Papiervernietiger veilig neerzetten � � � � � �30
Papiervernietiger bedienen � � � � � � � � � � � �31
Als er iets niet werkt � � � � � � � � � � � � � � � � �31
Gescheiden inzameling � � � � � � � � � � � � � � �33
Technische gegevens � � � � � � � � � � � � � � � �33
Verklaring van overeenstemming � � � � � � �33
Garantie � � � � � � � � � � � � � � � � � � � � � � � � � � �33
Contenido
Contenido del embalaje � � � � � � � � � � � � � � �34
Para su seguridad � � � � � � � � � � � � � � � � � � �34
Vista general � � � � � � � � � � � � � � � � � � � � � � �35
Uso previsto� � � � � � � � � � � � � � � � � � � � � � � �36
Antes de empezar � � � � � � � � � � � � � � � � � � �36
Emplazar la destructora de
documentos en un lugar seguro � � � � � � � �36
Manejo de la destructora de documentos �37
Si hay algo que no funciona � � � � � � � � � � �37
Eliminación � � � � � � � � � � � � � � � � � � � � � � � �39
Datos técnicos � � � � � � � � � � � � � � � � � � � � � �39
Declaración de conformidad � � � � � � � � � � �39
Garantía� � � � � � � � � � � � � � � � � � � � � � � � � � �39
Indice
Conteúdo da embalagem � � � � � � � � � � � � �40
Para a sua segurança � � � � � � � � � � � � � � � �40
Vista geral � � � � � � � � � � � � � � � � � � � � � � � � �41
Utilização conforme a nalidade � � � � � � � �42
Antes de começar � � � � � � � � � � � � � � � � � � �42
Posicionar de forma segura o destruidor
de documentos � � � � � � � � � � � � � � � � � � � � �42
Operar o destruidor de documentos � � � � �43
Caso algo não funcione � � � � � � � � � � � � � � �43
Eliminação � � � � � � � � � � � � � � � � � � � � � � � � �45
Dados técnicos � � � � � � � � � � � � � � � � � � � � �45
Declaração de conformidade�
� � � � � � � � � �45
Garantia � � � � � � � � � � � � � � � � � � � � � � � � � � �45
Obsah
Obsah balení � � � � � � � � � � � � � � � � � � � � � � �46
Pro vaši bezpečnost � � � � � � � � � � � � � � � � �46
Přehled � � � � � � � � � � � � � � � � � � � � � � � � � � �47
Používání v souladu s určením � � � � � � � � �48
Než se pustíte do práce� � � � � � � � � � � � � � �48
Bezpečné umístění skartovače � � � � � � � � �48
Obsluha skartovače � � � � � � � � � � � � � � � � � �49
Pokud něco nefunguje � � � � � � � � � � � � � � � �49
Likvidace � � � � � � � � � � � � � � � � � � � � � � � � � �51
Technické údaje � � � � � � � � � � � � � � � � � � � � �51
Prohlášení o shodě � � � � � � � � � � � � � � � � � �51
Záruka � � � � � � � � � � � � � � � � � � � � � � � � � � � �51

4
Verpackungsinhalt
Prüfen Sie den Verpackungsinhalt Ihres Aktenvernichters, bevor Sie Ihren Aktenvernichter in
Betrieb nehmen� Sollte etwas fehlen oder beschädigt sein, nehmen Sie das Gerät keinesfalls in
Betrieb� Wenden Sie sich an unseren Service�
Automatischer Aktenvernichter PS 55 CC mit Auffangbehälter
Bedienungsanleitung
Zu Ihrer Sicherheit
Lesen und beachten Sie die Sicherheitshinweise, um sich und die Umwelt zu schützen�
Warnung! Verletzungsgefahr durch Stromschlag� Fehlerhafter Umgang mit dem
Aktenvernichter kann zu Stromschlag führen� Eigenmächtige Veränderungen oder
Umbauten am Aktenvernichter sind nicht zulässig� Lassen Sie Reparaturen nur von
qualiziertem Fachpersonal durchführen. Darauf achten, dass der Aktenvernichter in
der Nähe einer leicht zugänglichen Steckdose aufgestellt wird, damit der Aktenvernich-
ter im Notfall schnell vom Stromnetz getrennt werden kann� Den Aktenvernichter
niemals mit nassen Händen anfassen� Jeden Kontakt mit Wasser vermeiden� Den
Aktenvernichter ausschließlich in trockenen Innenräumen verwenden�
Warnung! Erstickungsgefahr durch Kleinteile, Verpackungsmaterialien oder
Schutzfolien� Kinder können Kleinteile, Verpackungsmaterialien oder Schutz-
folien verschlucken� Kinder vom Gerät und dessen Verpackung fernhalten�
Warnung! Dieses Gerät kann von Kindern ab einem Alter von acht Jahren und von
Personen mit eingeschränkten physischen, sensorischen oder geistigen Fähigkeiten
oder einem Mangel an Erfahrung und/oder Wissen verwendet werden, wenn sie
beaufsichtigt werden oder bezüglich des sicheren Gebrauchs des Geräts unterwiesen
wurden und die daraus resultierenden Gefahren verstanden haben� Kinder dürfen nicht
mit dem Gerät spielen� Reinigung und Benutzerwartung dürfen nicht durch Kinder ohne
Beaufsichtigung durchgeführt werden�
Warnung! Verletzungsgefahr durch Einzugsmechanismus� Lose Gegenstände können
sich im Einzug verfangen und Verletzungen hervorrufen� Halten Sie Finger, Haare,
Schals, Krawatten, Schmuck etc� vom Einzug fern�
Vorsicht! Stolpergefahr durch unsachgemäß verlegte Kabel� Verlegen Sie Kabel so,
dass niemand darüber stolpern kann� Achten Sie darauf, dass keine Schäden am
Stecker und am Netzkabel auftreten können�
achtung! Sachschaden möglich. Umwelteinüsse wie z. B. Rauch, Staub, Erschütte-
rungen, Chemikalien, Feuchtigkeit, Hitze oder direkte Sonneneinstrahlung vermeiden�
Verwenden Sie den Aktenvernichter nur in geschlossenen Räumen und innerhalb der in
den Technischen Daten angegebenen zulässigen Umgebungsbedingungen�

5
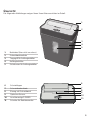
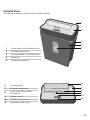
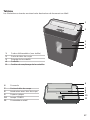
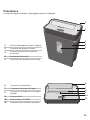
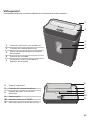
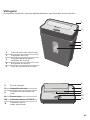
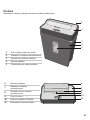
Übersicht
Die folgenden Abbildungen zeigen Ihnen Ihren Aktenvernichter im Detail�
7
6
8
10
9
11
6 Schutzklappe
7 Schneidwerkaufsatz
8 Einzug mit Schneidwerk
9 Optischer Sensor
10 Leuchtanzeige POWER
11 Schalter für Betriebsmodus
1
2
3
4
5
1 Netzkabel (hier nicht zu sehen)
2 Schneidwerkaufsatz
3 Tragegriff für Auffangbehälter
4 Auffangbehälter
5 Sichtfenster für Auffangbehälter

6
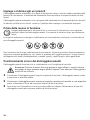
Bestimmungsgemäße Verwendung
Der automatische Aktenvernichter kann Papier und Kreditkarten durch einen automatischen
Einzug zerkleinern� Das zu zerkleinernde Material muss den in den Technischen Daten angege-
benen Anforderungen entsprechen�
Der automatische Aktenvernichter dient nicht zur Zerkleinerung von Material, das nicht den in
den Technischen Daten angegebenen Anforderungen entspricht (z� B� Pappe)� Jede andere
Verwendung gilt als nicht bestimmungsgemäß�
Bevor Sie loslegen
Lesen Sie die Bedienungsanleitung aufmerksam durch und beachten Sie die Hinweise
bei der Handhabung Ihres Aktenvernichters� Bewahren Sie die Bedienungsanleitung für
eine spätere Verwendung auf�
Die folgenden Hinweise helfen dabei, dass Ihr Aktenvernichter stets so funktioniert, wie Sie es
erwarten�
Greifen Sie niemals direkt in den Einzug� Entfernen Sie vor dem Zerkleinern des Materials even-
tuell vorhandene Heft- und/oder Büroklammern, Gummibänder und andere Fremdkörper� Halten
Sie lose Teile von Bekleidung, Krawatten, Schmuck, langes Haar oder andere lose Gegenstände
vom Gerät fern�
Aktenvernichter sicher aufstellen
Ihr Aktenvernichter funktioniert nur mit dem Auffangbehälter�
Vorsicht! Verletzungsgefahr durch scharfkantiges Schneidwerk� Die Unterseite des
Schneidwerks enthält scharfkantige Ecken� Fassen Sie Ihren Aktenvernichter nicht
an der Unterseite an�
1 Setzen Sie den Aktenvernichter auf den Auffangbehälter� Der Aktenvernichter rastet hörbar
ein�
2 Stellen Sie den Aktenvernichter mit Auffangbehälter standsicher auf einer ebenen, waage-
rechten Oberäche und in der Nähe einer leicht zugänglichen Steckdose auf.
3 Achten Sie darauf, dass der Schalter auf der Position off steht und schließen Sie das Netz-
teil des Aktenvernichters an eine leicht zugängliche Steckdose an�

7
Aktenvernichter bedienen
Ihr Aktenvernichter arbeitet mit einer automatischen Zerkleinerung� Der Einzug ist zu Ihrem
Schutz mit einer aufschwenkbaren Schutzklappe versehen� Der optische Sensor für den auto-
matischen Einzug von Material ist mittig platziert�
Vorsicht! Verletzungsgefahr durch scharfkantiges Schneidwerk� Fassen Sie den
Aktenvernichter NIEMALS an der Unterseite an, während Ihr Aktenvernichter in Be-
trieb ist�
1 Stellen Sie den Schalter auf die Position auto� Der Aktenvernichter ist betriebsbereit� Die
blaue Leuchtanzeige POWER leuchtet�
2 Klappen Sie die Schutzklappe nach oben�
Warnung! Verletzungsgefahr durch automatischen Einzug� Der Einzug startet
automatisch, sobald Material zugeführt wird� Halten Sie langes Haar, Krawatten,
Schmuck, lose Teile von Bekleidung und andere lose Gegenstände vom Einzug
Ihres Aktenvernichters fern�
achtung! Sachschaden durch Materialstau möglich! Beachten Sie die
maximale Schnittleistung des Einzugs�
3 Führen Sie zu zerkleinerndes Material mittig in den Einzug� Der Einzug zieht das Material
ein und stoppt etwa 2 - 4 Sekunden, nachdem die Zerkleinerung abgeschlossen ist und kein
weiteres Material zugeführt wird�
4 Wenn Sie eine Kreditkarte vernichten möchten, führen Sie die Kreditkarte mittig und mit der
kurzen Kante voran in den Einzug ein�
Aktenvernichter ausschalten
Schalten Sie den Aktenvernichter aus, wenn Sie den Aktenvernichter nicht mehr benötigen� So
sparen Sie Strom und verhindern, dass ein Dritter sich versehentlich am Aktenvernichter verlet-
zen kann�
1 Stellen Sie den Schalter auf die Position off�
2 Klappen Sie die Schutzklappe nach unten�
3 Ziehen Sie den Netzstecker aus der Steckdose�
Wenn etwas nicht funktioniert
Die folgenden Hinweise helfen Ihnen, wenn etwas nicht so funktioniert, wie Sie es erwarten�
Überhitzungsschutz
Der Motor schaltet bei Überhitzung bzw� Überlastung automatisch ab�
Die Leuchtanzeige POWER leuchtet weiterhin blau� Nach der Abkühlphase ist der Aktenvernich-
ter wieder betriebsbereit� Beachten Sie den zulässigen Betriebszyklus�

8
Schneidwerk ölen
Wenn Sie die Lebensdauer des Aktenvernichters verlängern möchten, ölen Sie das Schneidwerk
des Aktenvernichters in regelmäßigen Abständen� Olympia Business Systems Vertriebs GmbH
führt spezielles Öl für Aktenvernichter� Wenden Sie sich dafür an unsere Service-Hotline�
achtung! Sachschaden durch die Verwendung falscher Öle möglich!
Keine Sprühöle verwenden� Ausschließlich Spezialöl für Aktenvernichter
verwenden�
1 Tragen Sie Spezialöl für Aktenvernichter in mehreren Querlinien auf ein Blatt Papier auf�
2 Stellen Sie den Schalter auf die Position auto�
3 Führen Sie das geölte Blatt Papier dem Papiereinzug zu� Das mit Öl benetzte Papier wird
eingezogen und ölt das Schneidwerk�
Auffangbehälter leeren
Leeren Sie den Auffangbehälter regelmäßig� So verhindern Sie, dass sich zerkleinertes Material
stauen und damit zu Fehlfunktionen führen kann�
1 Stellen Sie den Schalter auf die Position off�
2 Ziehen Sie den Netzstecker aus der Steckdose�
3 Nehmen Sie den Aktenvernichter vom Auffangbehälter herunter�
4 Leeren Sie den Auffangbehälter�
5 Setzen Sie den Aktenvernichter wieder auf den Auffangbehälter auf� Der Aktenvernichter
rastet hörbar ein�
Materialreste entfernen
Wenn Ihr Aktenvernichter das Material nicht mehr so zerkleinert, wie Sie es erwarten, entfernen
Sie eventuell verbliebene Materialreste aus dem Schneidwerk�
1 Stellen Sie den Schalter auf die Position reV� Das Schneidwerk läuft rückwärts und gibt
eventuell im Schneidwerk verbliebenes Material frei�
2 Stellen Sie den Schalter auf die Position off�
3 Ziehen Sie den Netzstecker aus der Steckdose�
4 Entfernen Sie eventuell verbliebene Materialreste mit einem geeigneten spitzen Gegenstand
vorsichtig aus dem Schneidwerk�
Regelmäßig reinigen
Reinigen Sie den Aktenvernichter in regelmäßigen Abständen�
1 Ziehen Sie den Netzstecker aus der Steckdose�
2 Verwenden Sie ein leicht feuchtes, fusselfreies Tuch, um die Gehäuseoberäche des Akten-
vernichters zu reinigen� Verwenden Sie keine Reinigungs- oder Lösungsmittel�

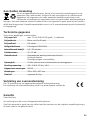
9
Entsorgung
Wollen Sie Ihr Gerät entsorgen, bringen Sie es zur Sammelstelle Ihres kommu-
nalen Entsorgungsträgers (z� B� Wertstoffhof)� Nach dem Elektro- und Elektronik-
gerätegesetz sind Besitzer von Altgeräten gesetzlich verpichtet, alte Elektro-
und Elektronikgeräte einer getrennten Abfallerfassung zuzuführen� Das Symbol
bedeutet, dass Sie das Gerät auf keinen Fall in den Hausmüll werfen dürfen! Verpackungsmate-
rialien entsorgen Sie entsprechend den lokalen Vorschriften�
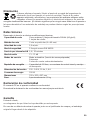
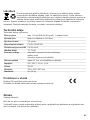
Technische Daten
Technische Änderungen bleiben vorbehalten�
Schnittleistung max� 10 Blätter DIN A4 (80 g/m2), 1 Kreditkarte
Schnittmethode Partikelschnitt (4 x 40 mm)
Schnittgeschwindigkeit 2,0 m/min�
Sicherheitsstufe P4 nach DIN 66399
Aussetzbetrieb AB 2,0 / 30 Minuten
Geräuschpegel 73 - 75 dB
Betriebsmodi Automatik-Betrieb (Start-Stopp-Funktion)
Rückwärtslauf
Überhitzungsschutz
Auffangbehälter 21 Liter Volumen, mit Sichtfenster und Tragegriffen
Spannungsversorgung 220 - 240 V, 50 Hz, 1,6 A
Leistungsaufnahme 350 W
Abmessungen 320 x 203 x 507 mm
Gewicht etwa 4,9 kg
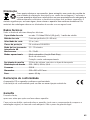
Konformitätserklärung
Das CE-Kennzeichen auf dem Gerät bestätigt die Konformität�
Die Konformitätserklärung nden Sie unter www.olympia-vertrieb.de
Garantie
Die Garantiezeit beträgt 24 Monate�
Die Garantiezeit beginnt ab Kaufdatum� Bitte bewahren Sie den Kaufbeleg und die Original-
verpackung auf� Sollte ein Problem auftreten, besuchen Sie unser Retouren-Portal (RMA) im
Bereich Support auf unserer Internetseite www.olympia-vertrieb.de
Bei weiteren Fragen steht Ihnen unsere Hotline unter der Nummer 0180 5 007514 (Kosten aus
dem dt� Festnetz bei Drucklegung: 14 ct/Min�, mobil maximal 42 ct/Min�) zur Verfügung�

10
Package Contents
Check the package contents of your shredder before putting the shredder into operation� If
anything is missing or shows signs of damage, do not put the device into operation� Contact our
Service department�
PS 55 CC automatic shredder with waste bin
Operating Manual
For Your Safety
Read and observe all the safety information to protect yourself and the environment
from any harm�
Warning! Risk of injury through electric shock! Handling the shredder improperly could
lead to an electric shock�
Unauthorised modications or reconstructions to the shredder are not permitted.
Repairs may only be carried out by properly trained specialists�Pay attention that the
shredder is set-up in the vicinity of an easily accessible power socket so that the
shredder can be disconnected from the power supply in an emergency� Never take hold
of the shredder if your hands are wet� Avoid any contact with water� Only use the
shredder in dry rooms indoors�
Warning! Risk of suffocation through small parts, packaging materials or
protective foils� Children can swallow small parts, packaging materials and
protective foils� Keep children away from the device and its packaging�
Warning! This device can be used by children from the age of eight and persons with
restricted physical, sensory or mental capabilities or a lack of experience and/or
knowledge when they are supervised or have been instructed with regard to safe use of
the device and the risks involved with its use� Never allow children to play with the
device� Cleaning and user servicing must not be carried out by children without
supervision�
Warning! Risk of injury through the insertion mechanism� Loose objects could be
caught in the insertion slot and cause injuries. Keep ngers, hair, scarves, ties, jewel-
lery etc� away from the insertion slot�
caution! Risk of tripping through improperly laid cable� Lay cables so that they do not
represent a risk of tripping� Ensure that no damage can occur to the power socket and
cable�
attention! Risk of property damage� Prevent exposing the device to environmental
inuences such as smoke, dust, vibration, chemicals, moisture, heat or direct sunlight.
Only use the shredder in rooms indoors and within the permissible ambient conditions
stipulated in the Technical Data�

11
General View
The following diagrams illustrate the shredder in detail�
7
6
8
10
9
11
6 Pivoting guard
7 Shredder attachment
8
Paper infeed with cutting
mechanism
9 Optical sensor
10 POWER control lamp
11 Operating mode switch
1
2
3
4
5
1 Power cable (not illustrated here)
2 Shredder attachment
3 Carrying handle for the waste bin
4 Waste bin
5 Window to waste bin

12
Intended Use
The automatic shredder can be used to shred paper and credit cards by inserting them in the
insertion slot� The material to be shred must comply with the requirements stipulated in Technical
Data�
The automatic shredder is not intended for shredding material which does not comply with the
requirements stipulated in the Technical Data (e�g� cardboard)� Any other use is considered
unintended use�
Before You Start
Read this operating manual through carefully, observing all the information contained
regarding handling and using the shredder� Keep the operating manual in a safe place
for future reference�
The following information should help to ensure that the shredder always functions as you expect
it to�
Never reach into the insertion slot� Before starting to shred material, remove any staples, paper
clips, rubber bands or other foreign bodies from the material concerned�
Keep all loose pieces of clothing, jewellery, long hair or other loose items away from the device�
Positioning the Shredder Safely
The shredder only operates when t on the waste bin.
caution! Risk of injury through sharp edges on the cutting mechanism� The
underside of the cutting mechanism has sharp edges and corners� Do not take hold
of the shredder from the underside�
1 Mount the shredder on the waste bin� The shredder latches audibly in place�
2 Set the shredder down on a stable, level, horizontal surface and in the vicinity of an easily
accessible power socket�
3 Pay attention that the switch is set to its off position and then connect the power adapter
plug to an easily accessible power socket�

13
Operating the Shredder
The shredder works using an automatic shredding mechanism� The insertion slot is provided
with a pivoting guard for your safety� The optical sensor for the material in the automatic insertion
is positioned in the centre of the slot�
caution! Risk of injury through sharp edges on the cutting mechanism� NEVER
take hold of the shredder by the underside when the shredder is in operation�
1 Set the switch to its auto position� The shredder is now ready to operate� The blue POWER
control lamp lights up�
2 Pivot the guard upwards�
Warning! Risk of injury through automatic insertion� The infeed starts automatically
when material is inserted� Keep all loose pieces of clothing, jewellery, long hair or
other loose items away from the shredder's insertion slot�
attention! Risk of property damage through material jam! Observe the
maximum cutting output of the insertion slot�
3 Feed the material to be shred in the centre of the insertion slot� The insertion slot draws
the material in and stops 2 - 4 seconds after shredding has been completed and no further
material is fed in�
4 If you want to shred a credit card, insert the credit card in the centre of the slot with a short
edge to the front�
Switching the Shredder Off
Switch the shredder off when you no longer need to use it� This saves electricity and prevents
third parties inadvertently injuring themselves with the shredder�
1 Set the switch to its off position�
2 Pivot the guard downwards�
3 Disconnect the power plug from the power socket�
If Something Does Not Work
The following information should help if something does not work as you expect it to�
Overheating Protection
The motor switches off automatically in the event of overheating and overloading�
The POWER control lamp continues to light up blue� When the cool down phase has elapsed,
the shredder is ready to operate again� Pay attention to the intermittent operation value�

14
Lubricating the Cutting Mechanism
If you want to increase the working life of the shredder, you should oil the shredder's cutting
mechanism at regular intervals� Olympia Business Systems Vertriebs GmbH offers a special oil
for shredders� For more information, please contact our hotline�
attention! Risk of property damage through using the wrong oil! Do not use
spray oils� Only use a special oil intended for shredders�
1 Apply the special oil for shredders in several lines square to the sheet of paper�
2 Set the switch to its auto position�
3 Insert the oiled sheet of paper in the paper infeed� The paper with oil applied is inserted and
oils the cutting mechanism�
Emptying the Waste Bin
Empty the waste bin regularly� This prevents shred material jamming and causing malfunctions
as a result�
1 Set the switch to its off position�
2 Disconnect the power plug from the power socket�
3 Remove the shredder from the waste bin�
4 Empty the waste bin�
5 Mount the shredder on the waste bin again� The shredder latches audibly in place�
Clearing Residual Material
If the shredder no longer shreds material as you expect, remove any residual material from the
cutting mechanism�
1 Set the switch to its reV position� The cutting mechanism runs in reverse and releases any
material remaining in the cutting mechanism�
2 Set the switch to its off position�
3 Disconnect the power plug from the power socket�
4 Remove any residual material carefully from the cutting mechanism using an appropriate
pointed object�
Regular Cleaning
Clean the shredder at regular intervals�
1 Disconnect the power plug from the power socket�
2 Use a slightly damp, lint-free cloth to clean the surface of the shredder housing� Do not use
any solvents or cleaning agents�

15
Disposal
In order to dispose of your device, take it to a collection point provided by your
local public waste authorities (e�g� recycling centre)� According to laws on the
disposal of electronic and electrical devices, owners are obliged to dispose of old
electronic and electrical devices in a separate waste container� The symbol
indicates that the device must not be disposed of in normal domestic waste!
Packaging materials must be disposed of according to local regulations�
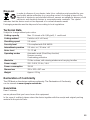
Technical Data
Subject to change without prior notice�
Cutting capacity Max� 10 sheets of A4 (80 g/m2), 1 credit card
Cutting method Particle-cut (4 x 40 mm)
Shredding speed 2�0 m/min�
Security level P4 compliant with DIN 66399
Intermittent operation 2�0 mins� on / 30 mins� off
Noise level 73 - 75 dB
Operating modes Automatic mode (Start-Stop function)
Reverse running
Overheating protection
Waste bin 21-litre volume, with viewing window and carrying handles
Power supply 220 - 240 V, 50 Hz, 1�6 A
Power consumption 350 W
Dimensions 320 x 203 x 507 mm
Weight Approx� 4�9 kg
Declaration of Conformity
The CE Mark on the device conrms conformity. The Declaration of Conformity
can be viewed at www.olympia-vertrieb.de
Guarantee
Dear Customer,
we are pleased that you have chosen this equipment�
In the case of a defect, please return the device together with the receipt and original packing
material to the point-of-sale�

16
Contenu du coffret
Contrôlez le contenu de l'emballage de votre destructeur de documents avant de faire fonction-
ner celui-ci� Si un élément manque ou a été endommagé, NE PAS mettre en marche l'appareil !
Adressez-vous à notre service de réparation�
Destructeur automatique de documents PS 55 CC avec corbeille
Mode d'emploi
Pour votre sécurité
Veuillez lire le mode d'emploi et en tenir compte pour vous protéger ainsi que respecter l'envi-
ronnement�
aVertissement ! Risque de blessures par électrocution ! Une manipulation incorrecte du
destructeur de documents peut entraîner une électrocution� Il est interdit d'apporter de
son propre gré des modications et des transformations de l'appareil. Faites effectuer
les réparations uniquement par du personnel spécialisé et qualié. Prenez soin de
placer le destructeur de documents à proximité d'une prise de courant facile d'accès
pour pouvoir le débrancher facilement du secteur en cas d'urgence� Ne touchez jamais
l'appareil avec des mains humides� Évitez tout contact avec de l'eau� Utiliser le
destructeur de documents uniquement à l'intérieur dans un endroit sec�
aVertissement ! Risque d'étouffement lié à des petits objets, des lms d'embal-
lage ou de protection ! Les enfants peuvent avaler des petits objets, des lms
d'emballage ou de protection� Tenir l'appareil et son emballage hors de portée
des enfants�
aVertissement ! Cet appareil peut être utilisé par des enfants dès l'âge de huit ans et
des personnes avec des capacités physiques, sensorielles ou mentales réduites ou un
manque d'expérience et / ou de connaissances si elles sont supervisées ou ont reçu
des instructions concernant l'utilisation de l'appareil en toute sécurité et ont compris les
risques qui en résultent� Ne pas laisser les enfants jouer avec l'appareil� Le nettoyage
et l'entretien ne doivent pas être effectués par des enfants sans surveillance�
aVertissement ! Risque de blessures lié au mécanisme d'introduction� Des objets en
vrac pourraient se coincer dans l'introducteur et provoquer des blessures� Tenez doigts,
cheveux, écharpes, cravates, bijoux, etc� éloignés de l'introducteur�
Prudence! Risque de trébucher en raison de câbles posés de manière non profession-
nelle ! Poser les câbles de sorte que personne ne puisse trébucher� Assurez-vous de
protéger la che et le cordon d'alimentation de tout dommage.
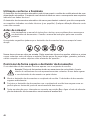
attention! Risques de dommage matériel ! Éviter les impacts environnementaux tels
que fumée, poussière, vibrations, produits chimiques, humidité, grande chaleur ou
ensoleillement direct� Utilisez le broyeur uniquement à l'intérieur et dans les conditions
requises spéciées dans les données techniques.

17
Tableau
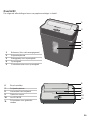
Les illustrations suivantes montrent votre destructeur de document en détail�
7
6
8
10
9
11
6 Couvercle
7 Cache du bloc de coupe
8 Introducteur avec bloc de coupe
9 Capteur optique
10 Lampe POWER
11 Commutateur rotatif
1
2
3
4
5
1 Cordon d'alimentation (non visible)
2 Cache du bloc de coupe
3 Poignée de la corbeille
4 Corbeille
5 Fenêtre de remplissage de la corbeille

18
Utilisation conforme à l'usage prévu
Le destructeur de documents automatique - appelé par la suite appareil - peut détruire du papier
et des cartes de crédit qui sont introduits dans une fente d'insertion à mécanisme automatique�
Le document à détruire doit répondre aux exigences mentionnées au point „Données tech-
niques“ !
Le destructeur de documents automatique ne sert pas à détruire des documents ne répondant
pas aux exigences indiquées dans les „Données techniques“ tels que du carton� Toute autre
forme d'utilisation n'est pas conforme à l'usage prévu�
Avant de commencer
Lisez attentivement le mode d'emploi et observer les consignes pour l'utilisation de
votre destructeur de documents� Conservez le mode d'emploi pour les utilisations
ultérieures�
Les consignes suivantes vous aideront à garantir que votre destructeur de documents fonctionne
toujours comme prévu�
Ne touchez jamais directement l'introducteur� Retirez d'éventuels agrafes et/ou trombones, élas-
tiques et autres corps étrangers du document avant de détruire celui-ci� Éloignez de l'appareil
des parties de vêtement volantes, cravates, bijoux, cheveux longs ou autres objets non xés.
Poser le destructeur de documents de sorte qu'il soit stable
Votre destructeur de documents fonctionne uniquement avec la corbeille�
Prudence! Risque de blessures par le bloc de coupe très coupant� La face infé-
rieure du bloc de coupe comporte des angles vifs� Ne saisissez pas le destructeur
de documents par la face inférieure�
1 Placez le destructeur de documents sur la corbeille� L'appareil s'enclenche de façon audible�
2 Placez le destructeur de documents muni de la corbeille en position stable sur une surface
plane, horizontale et à proximité d'une prise de courant facile d'accès�
3 Vériez que l'interrupteur est en position arrêt (off) et branchez la che d'alimentation de
l'appareil sur une prise facile d'accès�

19
Comment utiliser le destructeur de documents
Votre destructeur de papier est équipé d'une destruction automatique� Pour votre sécurité l'intro-
ducteur est muni d'un couvercle articulé� Le capteur optique pour l'alimentation automatique des
documents est situé au centré�
Prudence! Risque de blessures par le bloc de coupe très coupant� Ne touchez
JAMAIS à la face inférieure du destructeur de documents quand l'appareil est en
marche�
1 Mettez le commutateur rotatif en position auto� Le destructeur de documents est prêt à
l'emploi� La lampe bleue POWER est allumée�
2 Ouvrez le couvercle�
aVertissement ! Risque de blessures avec l'introducteur automatique� L'introducteur
démarre automatiquement dès que vous insérez un document� Éloignez de
l'appareil les cheveux longs, les cravates, bijoux, parties de vêtement volantes, et
autres objets non xés.
attention! Dommage matériel éventuel en cas de bourrage du support !
Veuillez respecter la capacité de coupe maximum de l'introducteur�
3 Introduisez les documents à détruire au centre de l'introducteur� L'introducteur happe le
document et s'arrête automatiquement 2 à 4 secondes après la n de la destruction si aucun
autre document n'est introduit�
4 Si vous voulez détruire une carte de crédit, introduisez la carte de crédit au centre de l'intro-
ducteur par le petit côté�
Mise hors tension du destructeur de documents
Mettez le destructeur de documents hors tension quand vous n'en avez plus besoin� Vous éco-
nomisez de l'énergie et vous évitez qu'une personne se blesse accidentellement avec l'appareil�
1 Positionnez le commutateur rotatif en position d'arrêt off�
2 Fermez le couvercle�
3 Retirez la che de secteur de la prise de courant.
En cas de panne
Les consignes suivantes vous aideront quand votre destructeur de documents ne fonctionne
toujours comme prévu�
Protection thermique
Le moteur se débranche automatiquement en cas de surchauffe ou de surcharge�
La lampe bleue POWER reste allumée� Le destructeur de documents est prêt à l'emploi après
une période de refroidissement� Respectez le cycle de fonctionnement autorisé�

20
Huilage du bloc de coupe
Pour prolonger la durée de vie du destructeur de documents, huilez le bloc de coupe à inter-
valles réguliers� Olympia Business Systems Vertriebs GmbH fournit une huile spéciale pour
destructeur de documents� Adressez-vous à notre ligne d'assistance directe�
attention! Risque de dommage matériel an cas d'utilisation d'une huile
non adaptée ! N'utilisez pas d'huiles de pulvérisation� Utilisez exclusive-
ment une huile spéciale pour destructeurs de documents�
1 Enduisez une feuille de papier de cette huile sous forme de lignes transversales�
2 Mettez le commutateur rotatif en position auto�
3 Insérez la feuille huilée dans la fente. Le papier imbibé d'huile est introduit et il lubrie le bloc
de coupe�
Vidage de la corbeille
Videz la corbeille régulièrement� Vous évitez ainsi l'accumulation de matériaux détruits qui peut
entraîner un mauvais fonctionnement�
1 Positionnez le commutateur rotatif en position d'arrêt off�
2 Retirez la che de secteur de la prise de courant.
3 Séparez le destructeur de documents de la corbeille par en-dessous�
4 Videz régulièrement la corbeille�
5 Replacez le destructeur de documents sur la corbeille� L'appareil s'enclenche de façon
audible�
Extraction des restes de documents
Si votre appareil ne détruit plus les documents aussi bien que prévu retirez les restes éventuels
pris dans le bloc de coupe�
1 Positionnez le commutateur rotatif sur reV� Le bloc de coupe tourne en sens inverse et
libère les éventuels restes de matériaux�
2 Positionnez le commutateur rotatif en position d'arrêt off�
3 Retirez la che de secteur de la prise de courant.
4 Retirez les éventuels restants de document pris dans le bloc de coupe avec précaution à
l'aide d'un objet pointu�
Nettoyage régulier
Nettoyez le destructeur de documents à intervalles réguliers�
1 Retirez la che de secteur de la prise de courant.
2 Utilisez un chiffon légèrement humide et non pelucheux pour nettoyer la surface du boîtier
du destructeur de document� N'utilisez pas de produits d'entretien ni de solvants�
La page charge ...
La page charge ...
La page charge ...
La page charge ...
La page charge ...
La page charge ...
La page charge ...
La page charge ...
La page charge ...
La page charge ...
La page charge ...
La page charge ...
La page charge ...
La page charge ...
La page charge ...
La page charge ...
La page charge ...
La page charge ...
La page charge ...
La page charge ...
La page charge ...
La page charge ...
La page charge ...
La page charge ...
La page charge ...
La page charge ...
La page charge ...
La page charge ...
La page charge ...
La page charge ...
La page charge ...
La page charge ...
-
 1
1
-
 2
2
-
 3
3
-
 4
4
-
 5
5
-
 6
6
-
 7
7
-
 8
8
-
 9
9
-
 10
10
-
 11
11
-
 12
12
-
 13
13
-
 14
14
-
 15
15
-
 16
16
-
 17
17
-
 18
18
-
 19
19
-
 20
20
-
 21
21
-
 22
22
-
 23
23
-
 24
24
-
 25
25
-
 26
26
-
 27
27
-
 28
28
-
 29
29
-
 30
30
-
 31
31
-
 32
32
-
 33
33
-
 34
34
-
 35
35
-
 36
36
-
 37
37
-
 38
38
-
 39
39
-
 40
40
-
 41
41
-
 42
42
-
 43
43
-
 44
44
-
 45
45
-
 46
46
-
 47
47
-
 48
48
-
 49
49
-
 50
50
-
 51
51
-
 52
52


Olympia PS 55 CC Le manuel du propriétaire
- Catégorie
- Destructeurs de papier
- Taper
- Le manuel du propriétaire
dans d''autres langues
- italiano: Olympia PS 55 CC Manuale del proprietario
- español: Olympia PS 55 CC El manual del propietario
- Deutsch: Olympia PS 55 CC Bedienungsanleitung
- Nederlands: Olympia PS 55 CC de handleiding
- português: Olympia PS 55 CC Manual do proprietário
- slovenčina: Olympia PS 55 CC Návod na obsluhu
Documents connexes
-
Olympia PS 57 CC Le manuel du propriétaire
-
-
Olympia PS 38 CD Le manuel du propriétaire
-
Olympia PS 57 CC plus Le manuel du propriétaire
-
Olympia PS 58 CC Plus Le manuel du propriétaire
-
Olympia MC 306.2 Le manuel du propriétaire
-
Olympia CC 518.4 Le manuel du propriétaire
-
Olympia PS-25CC Le manuel du propriétaire
-