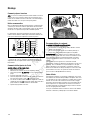
Murray 7800889 Manuel utilisateur
- Catégorie
- Tondeuses à gazon
- Taper
- Manuel utilisateur
Ce manuel convient également à

Operator's Manual
7105382
Rev. A
22” WALK BEHIND
MOWER
Model No.Description
7800889 MD22550FC
7800890 M22550FC
!
en fr
Not for
Reproduction

Thank You for purchasing this quality-built Murray product. We’re pleased that you placed your confidence in the Murray
brand. When operated and maintained according to the instructions in this manual, your Murray product will provide many
years of dependable service.
This manual contains safety information to make you aware of the hazards and risks associated with the machine and how to
avoid them. This machine is designed and intended only for finish cutting of established lawns and is not intended for any
other purpose. It is important that you read and understand these instructions thoroughly before attempting to start or operate
this equipment. Save these original instructions for future reference.
Complete the following information on your Murray purchase.
Date of Purchase_______________________________________________________________________________________
Retailer______________________________________________________________________________________________
Retailer's Phone Number________________________________________________________________________________
Equipment
Model Number_________________________________________________________________________________
Serial Number ______________________________________________________________________________
Engine
Model___________________________Type___________________________Code__________________________
Copyright © 2012, Briggs & Stratton Corporation
Milwaukee, WI, USA. All Rights Reserved.
Not for
Reproduction

3
Table of Contents
Operator Safety . . . . . . . . . . . . . . . . . . . . . . . . . . . . . . . . . . . . . . . . . . . . . . . .4
Assembly . . . . . . . . . . . . . . . . . . . . . . . . . . . . . . . . . . . . . . . . . . . . . . . . . . . .8
Unpacking . . . . . . . . . . . . . . . . . . . . . . . . . . . . . . . . . . . . . . . . . . . . . . . . . . . . . . . . .8
Handle . . . . . . . . . . . . . . . . . . . . . . . . . . . . . . . . . . . . . . . . . . . . . . . . . . . . . . . . . . . .8
Handle Height . . . . . . . . . . . . . . . . . . . . . . . . . . . . . . . . . . . . . . . . . . . . . . . . . . . . . .9
Grass Bag . . . . . . . . . . . . . . . . . . . . . . . . . . . . . . . . . . . . . . . . . . . . . . . . . . . . . . . .10
Mulching Plate . . . . . . . . . . . . . . . . . . . . . . . . . . . . . . . . . . . . . . . . . . . . . . . . . . . .11
Mulching Tips . . . . . . . . . . . . . . . . . . . . . . . . . . . . . . . . . . . . . . . . . . . . . . . . . . . . .11
Side Discharge . . . . . . . . . . . . . . . . . . . . . . . . . . . . . . . . . . . . . . . . . . . . . . . . . . . .11
How to Prepare the Engine . . . . . . . . . . . . . . . . . . . . . . . . . . . . . . . . . . . . . . . . . . .12
Final Preparation . . . . . . . . . . . . . . . . . . . . . . . . . . . . . . . . . . . . . . . . . . . . . . . . . . .13
Operation . . . . . . . . . . . . . . . . . . . . . . . . . . . . . . . . . . . . . . . . . . . . . . . . . . .14
Engine Stop Lever . . . . . . . . . . . . . . . . . . . . . . . . . . . . . . . . . . . . . . . . . . . . . . . . . .14
How to Stop the Engine . . . . . . . . . . . . . . . . . . . . . . . . . . . . . . . . . . . . . . . . . . . . .14
How to Start the Engine . . . . . . . . . . . . . . . . . . . . . . . . . . . . . . . . . . . . . . . . . . . . .14
Rules for Safe and Effective Operation . . . . . . . . . . . . . . . . . . . . . . . . . . . . . . . . . .15
Adjusting the Height of Cut . . . . . . . . . . . . . . . . . . . . . . . . . . . . . . . . . . . . . . . . . . .15
Maintenance . . . . . . . . . . . . . . . . . . . . . . . . . . . . . . . . . . . . . . . . . . . . . . . . .16
Maintenance Chart . . . . . . . . . . . . . . . . . . . . . . . . . . . . . . . . . . . . . . . . . . . . . . . . .16
Mower Maintenance . . . . . . . . . . . . . . . . . . . . . . . . . . . . . . . . . . . . . . . . . . . . . . . .17
Engine Maintenance . . . . . . . . . . . . . . . . . . . . . . . . . . . . . . . . . . . . . . . . . . . . . . . .19
Storage . . . . . . . . . . . . . . . . . . . . . . . . . . . . . . . . . . . . . . . . . . . . . . . . . . . . . . . . . .20
Troubleshooting . . . . . . . . . . . . . . . . . . . . . . . . . . . . . . . . . . . . . . . . . . . . . . .21
Warranties . . . . . . . . . . . . . . . . . . . . . . . . . . . . . . . . . . . . . . . . . . . . . . . . . .22
Slope Guide . . . . . . . . . . . . . . . . . . . . . . . . . . . . . . . . . . . . . . . . . . . . . . . . .25
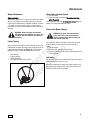
WARNING
Battery posts, terminals and related accessories contain
lead and lead compounds, chemicals known to the State of
California to cause cancer and birth defects or other
reproductive harm. Wash hands after handling.
!
!
WARNING
Engine exhaust, some of its constituents, and certain
vehicle components contain or emit chemicals known to
the State of California to cause cancer or other reproductive
harm.
!
!
en
Not for
Reproduction

www.murray.com4
Operator Safety
Operating Safety
Power equipment is only as safe as the operator. If it is misused, or
not properly maintained, it can be dangerous! Remember, you are
responsible for your safety and that of those around you.
Use common sense, and think through what you are doing. If you are
not sure that the task you are about to perform can be safely done
with the equipment you have chosen, ask a professional: contact your
local authorized dealer.
Read the Manual
The operator’s manual contains important safety information you need to
be aware of BEFORE you operate your unit as well as DURING operation.
Safe operating techniques, an explanation of the product’s features and
controls, and maintenance information is included to help you get the
most out of your equipment investment.
Be sure to completely read the Safety Rules and Information found on the
following pages. Also completely read the Operation section.
Children
Tragic accidents can occur with children. Do not allow them any-
where near the area of operation. Children are often attracted to the
unit and mowing activity. Never assume that children will remain
where you last saw them. If there is a risk that children may enter
the area where you are mowing, have another responsible adult
watch them.
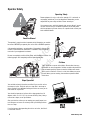
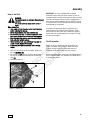
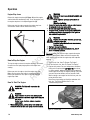
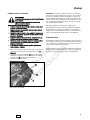
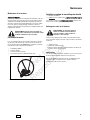
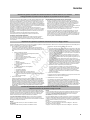
Slope Operation
You could be seriously injured or even killed if you use this unit on
too steep an incline. Using the unit on a slope that is too steep or
where you don’t have adequate footing or traction can cause you to
lose control or slip and fall.
You should not operate on inclines with a slope greater than 10
degrees, which is a 3.5 ft (1,5 m) rise over 20.0 ft (6,0 m). Always
mow across slopes, never up and down.
Also note that the surface you are mowing can greatly impact con-
trol. Wet grass or leaves can seriously affect your footing and trac-
tion on a slope.
If you feel unsure about operating the unit on an incline, don’t do it.
It’s not worth the risk.
20.0 ft
(6,0 m)
3.5 ft
(1,5 m)
Not for
Reproduction

5
Operator Safety
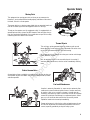
Moving Parts
This equipment has moving parts that can injure you or someone else.
However, if you stand behind the handle properly and follow all the rules in
this book, the unit is safe to operate.
The mower deck has a spinning mower blade that can amputate hands and
feet. Do not allow anyone near the equipment while it is running!
To help you, the operator, use this equipment safely, it is equipped with an
operator present safety system. Do NOT attempt to alter or bypass the sys-
tem. See your dealer immediately if the system does not pass all the safety
interlock system tests found in this manual.
Thrown Objects
This unit has a spinning mower blade. This blade can pick up and
throw debris that could seriously injure a bystander. Be sure to clean
up the area to be mowed BEFORE you start mowing.
Do not operate this unit without the entire grass catcher or discharge
guard (deflector) in place.
Also, do not allow anyone in the area while the unit is running! If
someone does enter the area, shut the unit off immediately until they
leave.
Debris Accumulation
Accumulation of grass and debris can result in a fire. Be sure to clean any
accumulation of grass and debris with a brush or compressed air, before
and after operation.
Fuel and Maintenance
Gasoline is extremely flammable. Its vapors are also extremely flam-
mable and can travel to distant ignition sources. Gasoline must only
be used as a fuel, not as a solvent or cleaner. It should never be
stored any place where its vapors can build up or travel to an ignition
source like a pilot light. Fuel belongs in an approved, plastic, sealed
gas can, or in the tractor fuel tank with the cap securely closed.
Spilled fuel needs to be cleaned up immediately.
Proper maintenance is critical to the safety and performance of your
unit. Be sure to perform the maintenance procedures listed in this
manual, especially periodically testing the safety system.
Not for
Reproduction

www.murray.com6
!
WARNING: This powerful cutting machine is capable of amputating hands and feet and can throw objects that
can cause injury and damage! Failure to comply with the following SAFETY instructions could result in serious
injury or death to the operator or other persons. The owner of the machine must understand these instructions
and must allow only persons who understand these instructions to operate machine. Each person operating
the machine must be of sound mind and body and must not be under the influence of any substance, which
might impair vision, dexterity or judgment. If you have any questions pertaining to your machine which your
dealer cannot answer to your satisfaction, contact the Customer Service Department (1-800-661-6662 or
www.murray.com).
Protection for Children
Tragic accidents can occur if the operator is not alert to the
presence of children. Children are often attracted to the
machine and the mowing activity. Never assume that
children will remain where you last saw them.
1. KEEP children out of the mowing area and under the
watchful care of a responsible adult other than the operator.
2. DO NOT allow children in yard when machine is operated
and turn machine OFF if anyone enters the area.
3. DO NOT allow pre-teenage children to operate machine.
4. ALLOW only responsible adults & teenagers with mature
judgment under close adult supervision to operate machine.
5. DO NOT pull mower backwards unless absolutely
necessary. LOOK and SEE behind and down for children,
pets and hazards before and while backing.
6. USE EXTRA CARE when approaching blind corners,
shrubs, trees, or other objects that may obscure vision.
Slope Operation
1. Slopes are a major factor related to slip and fall acci-
dents, which can result in severe injury. All slopes require
extra caution. If you feel uneasy on a slope, DO NOT mow
it.
2. Mow across slopes, never up-and-down. Exercise
extreme CAUTION when changing directions on slopes. DO
NOT mow steep slopes or other areas where stability or
traction is in doubt. Refer to the Slope Guide at the end of
this manual.
3. Use extra care with grass catchers or other attachments;
these affect the handling and the stability of the machine.
Preparation
1. Read, understand, and follow instructions and warnings
in this manual and on the mower, engine and attachments.
Know the controls and the proper use of the mower before
starting.
2. Only mature, responsible persons shall operate the
machine and only after proper instruction.
3. Data indicates that operators age 60 and above, are
involved in a large percentage of mower-related injuries.
These operators should evaluate their ability to operate the
mower safely enough to protect themselves and others
from serious injury.
Preparation
(Continued From Previous Column)
4. Handle fuel with extra care. Fuels are flammable and
vapors are explosive. Use only an approved fuel container.
DO NOT remove fuel cap or add fuel with engine running.
Add fuel outdoors only with engine stopped and cool. Clean
spilled fuel and oil from machine. DO NOT smoke.
5. Check the area to be mowed and remove all objects such
as toys, wire, rocks, limbs and other objects that could
cause injury if thrown by blade or interfere with mowing.
Also note the location of holes, stumps, and other possible
hazards.
6. Keep people and pets out of the mowing area.
Immediately, STOP Blade, Stop engine and Stop mower if
anyone enters the area.
7. Check shields, deflectors, switches, blade controls and
other safety devices frequently for proper operation and
location.
8. Make sure all safety decals are clearly legible. Replace if
damaged.
9. Protect yourself when mowing and wear safety glasses, a
dust mask, long pants, and substantial footwear. DO NOT
mow barefooted or with sandals.
10. Know how to STOP blade and engine quickly in
preparation for emergencies.
11. Use extra care when loading or unloading the machine
into a trailer or truck.
12. Check grass catcher components frequently for signs of
wear or deterioration and replace as needed to prevent
injury from thrown objects going through weak or torn
spots.
Safe Handling of Gasoline
To avoid personal injury or property damage, use extreme
care in handling gasoline. Gasoline is extremely flammable
and the vapors are explosive.
1. Extinguish all cigarettes, cigars, pipes and other sources
of ignition.
2. Use only an approved fuel container.
3. DO NOT remove fuel cap or add fuel with the engine
running. Allow the engine to cool before refueling.
4. DO NOT refuel the machine indoors.
5. DO NOT store the machine or fuel container inside where
there is an open flame, spark or pilot light such as on a
water heater or other appliances.
Operator Safety
Not for
Reproduction

7
Operator Safety
Safe Handling of Gasoline
(Continued From Previous Page)
6. DO NOT fill fuel containers inside a vehicle or on a truck
or trailer bed with a plastic liner. Always place the contain-
ers on the ground away from the vehicle before filling.
7. Remove gas-powered equipment from the vehicle or
trailer and refuel it on the ground. If this is not possible,
then refuel equipment using a portable container, rather
than a gasoline dispenser nozzle.
8. DO NOT start gas powered equipment in enclosed vehi-
cles or trailers.
9. Keep the nozzle in contact with the rim of the fuel tank or
container opening at all times until fueling is complete. DO
NOT use a nozzle lock-open device
10. If fuel is spilled on clothing, change clothing
immediately.
11. DO NOT overfill a fuel tank. Replace fuel cap and tight-
en securely.
Operation
1. DO NOT put hands or feet near or under rotating parts.
Keep clear of discharge area while engine is running.
2. STOP engine when crossing gravel drives, walks, or
roads, and under any conditions where thrown objects
might be a hazard.
3. Mow only in daylight or good artificial light.
4. DO NOT operate mower while under the influence of
alcohol or drugs.
5. After striking a foreign object or if mower vibrates
abnormally, STOP the engine, disconnect and secure spark
plug wire. Inspect the mower for any damage and repair
the damage before starting.
6. DO NOT mow near drop offs, ditches or embankments.
Operator could lose footing or balance.
7. STAY ALERT for holes and other hidden hazards. Tall
grass can hide obstacles. Keep away from ditches,
washouts, culverts, fences and protruding objects.
8. DO NOT mow on wet grass. Always be sure of your
footing. Keep a firm hold on the handle and walk, never
run. Slipping could cause injury.
9. ALWAYS stay behind handle when engine (motor) is
running.
10. DO NOT leave the machine with the engine running.
STOP BLADE and STOP ENGINE before leaving the opera-
tors position for any reason.
11. Before cleaning, repairing or inspecting make certain
engine, blade and all moving parts have STOPPED.
Disconnect and secure spark plug wire away from plug to
prevent accidental starting.
12. STOP engine and wait until the blade comes to com-
plete STOP before removing grass bag and/or clearing
grass.
Operation
(Continued From Previous Column)
13. DO NOT operate mower without the entire grass catch-
er, or guards in place discharge guard, rear guard or other
safety devices in place and working. DO NOT point dis-
charge at people, passing cars, windows or doors.
14. DO NOT discharge material against a wall or obstruc-
tion. Material may ricochet back towards the operator.
15. Slow down before turning.
16. Watch out for traffic when near or crossing roadways.
17. DO NOT operate engine in enclosed areas. Engine
exhaust gases contain carbon monoxide, a deadly poison.
18. Only use accessories approved by the manufacturer.
See manufacturer’s instructions for proper operation and
installation of accessories.
Maintenance and Storage
1. DO NOT store mower or fuel container inside where
fumes may reach an open flame, spark or pilot light such as
in a water heater, furnace, clothes dryer or other gas appli-
ance. Allow engine to cool before storing machine in an
enclosure. Store fuel container out of reach of children in a
well ventilated, unoccupied building.
2. Keep mower and engine free of grass, leaves or excess
grease to reduce fire hazard and engine overheating.
3. When draining fuel tank, drain fuel into an approved
container outdoors and away from open flame.
4. Keep all bolts, especially blade bolts, nuts and screws
properly tight. Check that all cotter pins are in proper
position.
5. Always provide adequate ventilation when running
engine. Engine exhaust gases contain carbon monoxide, a
deadly poison.
6. Service engine and make adjustments only when engine
is stopped. Removed spark plug wire from spark plug and
secure wire away from spark plug to prevent accidental
starting.
7. DO NOT change engine governor speed settings or
overspeed engine.
8. Check grass bag assembly frequently for wear or
deterioration to avoid thrown objects and exposure to
moving parts. Replace with new bag if loose seams or tears
are evident. Replace slider or bag adapter if broken or
cracked.
9. Mower blades are sharp and can cut. Wrap the blades or
wear heavy leather gloves and use CAUTION when handling
them.
10. DO NOT test for spark by grounding spark plug next to
spark plug hole; spark plug could ignite gas exiting engine.
11. Have machine serviced by an authorized dealer at least
once a year and have the dealer install any new safety
devices.
12. Use only factory authorized replacement parts or like
parts when making repairs.
en
Not for
Reproduction

www.murray.com8
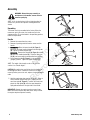
WARNING: Before doing any assembly or
maintenance to the mower, remove the wire
from the spark plug.
NOTE: In this instruction book, left and right describe the
location of a part with the operator standing behind the
handle.
Unpacking
The mower was fully assembled at the factory. When the
mower was put in the carton, the handle was put in the
storage position. To put the handle in the operating position,
follow the steps below.
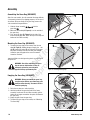
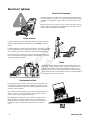
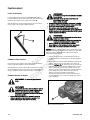
Handle
1. Remove the mower from the carton.
2. Remove all packing material from the mower and the
handle.
3. MD22550FC - Raise the lower handle (A, Figure 1).
Make sure the lower handle is between the locking tabs
(B). Tighten the lower wingnuts (C).
M22550FC - Remove the wingnut (A, Figure 2) and bolt
(B) from each handle bracket (C). Raise the lower han-
dle (D), and secure with the removed bolt and wingnut.
4. Put the upper handle (D, Figure 1) in the operating
(upright) position. Tighten the upper wingnuts (E).
NOTE: The height of the handle can be set for operator
comfort. See “Handle Height”.
CAUTION: Be careful when you fold or raise the handle. Do
not damage the cables. A cable that is bent will not work
correctly. Before you use the unit, replace a bent or damaged
cable.
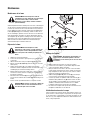
5. Hold the engine stop lever against the handle. (Refer to
section entitled ‘Engine Stop Lever’.) Slowly pull the
recoil-start grip (A, Figure 2). To attach the recoil-start
grip to the rope guide (B), twist the rope through the
rope guide mounted on the right side of the handle.
IMPORTANT: Operate the engine stop lever several times.
Make sure that the engine stop cable moves freely and that
the engine stop lever operates correctly.
A
Figure 1: Unfolding the handle (MD22550FC)
C
B
D
E
Figure 3: Attaching the recoil-start grip
A
B
A
Figure 2: Unfolding the handle (M22550FC)
B
Assembly
D
C
Not for
Reproduction

9
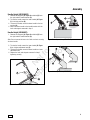
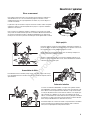
Handle Height (MD22550FC)
1. Remove the wingnuts (A, Figure 4) and bolts (B) from
the right and left handle brackets (C).
2. To raise the handle, mount the lower handle (A, Figure
5) in the high position (B).
3. To lower the handle, mount the lower handle in the low
position (C).
4. Attach the lower handle to the handle brackets with the
bolts and wingnuts removed in Step 1.
Handle Height (M22550FC)
1. Remove the wingnuts (A, Figure 6) and bolts (B) from
the right and left handle brackets (C).
Note: Do not remove the lower set of bolts and nuts securing
the lower handle.
2. To raise the handle, mount the lower handle (D, Figure
6) to a higher adjustment hole (E).
3. To lower the handle, mount the lower handle to a lower
adjustment hole.
4. Replace the bolts and wingnuts removed in Step 1,
tightening securely.
B
Figure 4: Removing the handle adjustment hardware
C
A
Figure 6: Handle positions (M22550FC)
A
Assembly
B
C
D
E
B
Figure 5: Handle positions (MD22550FC)
A
C
en
Not for
Reproduction

www.murray.com10
Assembling the Grass Bag (M22550FC)
Note: On some models, the side mounted discharge deflector
is temporarily attached (for shipping purposes) to the rear of
the mower. Before assembly of the grass bag, remove the
side mounted discharge deflector.
1. Slide the frame assembly (A, Figure 7) into the
grass bag (B).
2. Make sure the handle (A, Figure 8) is on the outside of
the grass bag.
3. First, attach the clips (B, Figure 8) to the side of the
frame assembly (C). Next, attach the clips to the top and
bottom of the frame assembly.
Mounting the Grass Bag (M22550FC)
1. To mount the grass bag on the mower, raise the rear
door (A, Figure 9). Holding the grass bag by the han-
dle (B), mount the hooks (C) on either end of the grass
bag frame assembly onto the rear door pivot rod (D).
Lower the grass bag against the rear of the mower.
Lower the rear door.
Important: Make sure both grass bag hooks are mounted on
the pivot rod.
WARNING: Check the condition of the grass
bag for wear or deterioration. If worn or
damaged, replace the parts only with
approved factory replacement parts.
Emptying the Grass Bag (M22550FC)
WARNING: Before you remove the grass bag,
stop the engine. Before you remove any grass
from the mower housing, disconnect the wire
from the spark plug.
1. Raise the rear door to a vertical position.
2. Hold the handle of the grass bag and lift the frame
assembly. Continue to lift the frame assembly until the
hooks are no longer mounted on the pivot rod. Remove
the grass bag.
3. Empty the grass from the grass bag.
4. To mount the grass bag on the mower, see “Mounting
The Grass Bag”.
B
Figure 7: Installing the frame assembly
A
B
Figure 8: Installing the bag clips
A
C
Figure 9: Mounting the grass bag
C
D
A
B
Assembly
Not for
Reproduction

11
Attaching the Mulching Plate
(MD22550FC)
WARNING: To prevent the engine from
starting, disconnect the wire from the
spark plug.
1. Raise the chute deflector (A, Figure 10).
2. Align the mulcher plate (B) with the side discharge
opening. Make sure that the two alignment bumps (C)
are inside the opening.
3. Mount the tab (D) on the top of the mulcher plate to the
inside of the mower housing.
4. Mount the tab (E) on the bottom of the mulcher plate to
the inside of the mower housing.
5. Lower the chute deflector.
6. Attach the wire to the spark plug.
Note: On some models, the mulcher kit is installed at the
factory. To convert from a mulcher to a side discharge,
simply remove the mulching plate.
Mulching Tips
Mulching finely cuts the grass so that the grass can be easily
recycled. Because the nutrients are returned to the soil, the
lawn will need less fertilizer. To correctly mulch the lawn,
follow the tips below.
• The grass must be dry. If the grass is wet, it will be
difficult to cut and cause heavy clumps of grass.
• The grass must not be too tall. The maximum height to
effectively cut is 4 1/2 inches. Set the height adjusters
so that only the top third of the grass is cut.
• If the grass is more than 4 1/2 inches high, two
mowings will be necessary. For the first mowing, set the
height adjusters in the highest position. Then, lower the
height adjusters for the second mowing.
• Keep a sharp edge on the blade. A blade that is not
sharp will cause the ends of the grass to become brown.
• Clean the underside of the mower housing. Grass and
other debris can keep the mower from working
correctly.
If the quality of cut is marginal, try the following:
• Set the height adjusters at a higher cutting height.
• Cut the grass more frequently.
• Operate the mower at a slower ground speed.
• Overlap the cutting swaths instead of cutting a full
swath with each pass.
• Mow across the marginal areas a second time.
Convert to Side Discharge
(M22550FC)
WARNING: To prevent the engine from
starting, disconnect the wire from the
spark plug.
1. Ensure the grass bag is removed.
2. Lift the mulching cover.
3. Slide the two tabs (A, Figure 11) on the side deflector
under the pivot pin.
4. Lower the side deflector. Make sure the locking tabs (B)
go through the slots in the side deflector.
5. Release the mulching cover (it will lay on top of the side
discharge deflector).
Assembly
en
Figure 10: Installing the mulcher plate
(MD22550FC)
D
A
C
E
B
Figure 11: Side deflector (M22550FC)
A
B
Not for
Reproduction

www.murray.com12
Assembly
How To Prepare The Engine
NOTICE: The engine does not contain oil. Before you start
the engine, make sure you add oil according to the instruc-
tions in this manual. If you start the engine without oil, it will
be damaged beyond repair and will not be covered under
warranty.
Oil Recommendations
We recommend the use of Briggs & Stratton Warranty
Certified oils for best performance. Other high-quality deter-
gent oils are acceptable if classified for service SF, SG, SH,
SJ or higher. Do not use special additives.
Outdoor temperatures determine the proper oil viscosity for
the engine. Use the chart to select the best viscosity for the
outdoor temperature range expected.
* Below 40°F (4°C) the use of SAE 30 will result in hard
starting.
** Above 80°F (27°C) the use of 10W-30 may cause
increased oil consumption. Check oil level more frequently.
How To Check/Add Oil
Before adding or checking the oil
• Place engine level.
• Clean the oil fill area of any debris.
1. Remove the dipstick (A, Figure 12) and wipe with a
clean cloth.
2. Insert and tighten the dipstick.
3. Remove the dipstick and check the oil level. It should be
at the top of the full indicator (B) on the dipstick.
4. If low, add oil slowly into the engine oil fill (C). Do not
overfill. After adding oil, wait one minute and then
recheck the oil level.
5. Replace and tighten the dipstick.
Fuel Recommendations
Fuel must meet these requirements:
• Clean, fresh, unleaded gasoline.
• A minimum of 87 octane/87 AKI (91 RON). High altitude
use, see below.
• Gasoline with up to 10% ethanol (gasohol) or up to
15% MTBE (methyl tertiary butyl ether) is acceptable.
CAUTION: Do not use unapproved gasolines, such as E85.
Do not mix oil in gasoline or modify the engine to run on
alternate fuels. This will damage the engine components and
void the engine warranty.
To protect the fuel system from gum formation, mix a fuel
stabilizer into the fuel. See Storage. All fuel is not the same.
If starting or performance problems occur, change fuel
providers or change brands. This engine is certified to oper-
ate on gasoline. The emissions control system for this
engine is EM (Engine Modifications).
High Altitude
At altitudes over 5,000 feet (1524 meters), a minimum 85
octane/85 AKI (89 RON) gasoline is acceptable. To remain
emissions compliant, high altitude adjustment is required.
Operation without this adjustment will cause decreased per-
formance, increased fuel consumption, and increased emis-
sions. See a Briggs & Stratton Authorized Dealer for high
altitude adjustment information.
Operation of the engine at altitudes below 2,500 feet (762
meters) with the high altitude kit is not recommended.
Figure 12: Engine oil
B
A
C
Not for
Reproduction

13
Assembly
How To Add Fuel
WARNING
Fuel and its vapors are extremely flammable and
explosive.
Fire or explosion can cause severe burns or
death.
When Adding Fuel:
• Turn engine off and let engine cool at least 2 minutes
before removing the fuel cap.
• Fill fuel tank outdoors or in well-ventilated area.
• Do not overfill fuel tank. To allow for expansion of the
fuel, do not fill above the bottom of the fuel tank neck.
• Keep fuel away from sparks, open flames, pilot lights,
heat, and other ignition sources.
• Check fuel lines, tank, cap, and fittings frequently for
cracks or leaks. Replace if necessary.
• If fuel spills, wait until it evaporates before starting
engine.
1. Clean the fuel cap area of dirt and debris. Remove the
fuel cap (A, Figure 13).
2. Fill the fuel tank (B) with fuel. To allow for expansion of
the fuel, do not fill above the bottom of the fuel tank
neck (C).
3. Reinstall the fuel cap.
IMPORTANT: This unit is equipped with an internal
combustion engine and must not be used on or near any
unimproved forest-covered, brush-covered or grass-covered
and unless the engine’s exhaust system is equipped with a
spark arrester meeting applicable local or state laws (if any).
If a spark arrester is used, it must be maintained in effective
working order by the operator.
In the State of California the above is required by law
(Section 4442 of the California Public Resources Code).
Other states may have similar laws. Federal laws apply on
federal lands. See an Authorized Service Center for a spark
arrester for the muffler.
Final Preparation
Before you use the mower, check the assembly of the
wheels, the handle, and the controls. Make sure all the
fasteners are tight. Make sure the throttle control (if
equipped) and the engine stop lever work correctly.
Before starting the engine, make sure each height adjuster is
set at the desired height. See “Adjusting The Height Of Cut”
in the Operation section.
en
Figure 13: Adding fuel
B
A
C
Not for
Reproduction

www.murray.com14
Engine Stop Lever
Release the engine stop lever (A, Figure 14) and the engine
and the blade will automatically stop. To run the engine, hold
the engine stop lever in the Operating position (B).
Before you start the engine, operate the engine stop lever
several times. Make sure the cable moves easily.
How to Stop the Engine
To stop the engine, release the engine stop lever. Disconnect
the wire from the spark plug to prevent the engine from
starting.
Before you start the engine, check the engine stop cable.
Make sure the engine stop cable is assembled correctly.
Before you operate the unit, replace a bent or damaged
engine stop cable.
How To Start The Engine
WARNING: The blade will rotate when the
engine runs.
WARNING
Rapid retraction of starter cord (kickback) will
pull hand and arm toward engine faster than you
can let go.
Broken bones, fractures, bruises or sprains
could result.
• When starting engine, pull the starter cord slowly until
resistance is felt and then pull rapidly to avoid kickback.
WARNING
Fuel and its vapors are extremely flammable and
explosive.
Fire or explosion can cause severe burns or
death.
When Starting Engine
• Ensure that spark plug, muffler, fuel cap and air cleaner
(if equipped) are in place and secured.
• Do not crank engine with spark plug removed.
• If engine floods, set choke (if equipped) to OPEN/RUN
position, move throttle (if equipped) to FAST position
and crank until engine starts.
WARNING
Engines give off carbon monoxide, an odorless,
colorless, poison gas.
Breathing carbon monoxide can cause nausea,
fainting or death.
• Start and run engine outdoors.
• Do not start or run engine in enclosed area, even if
doors or windows are open.
Important: Before you start the engine, operate the engine
stop lever several times. Make sure that the engine stop
cable moves freely and that the engine stop lever operates
correctly.
1. Check the oil. See “How To Prepare The Engine”.
2. Fill the fuel tank. See “How To Prepare The Engine”.
3. Engines with primer: For most temperature conditions,
firmly push the primer bulb (A, Figure 15) three times.
In cooler weather, additional priming may be needed. A
warm engine will usually not require priming. Every time
you push the primer button, wait two seconds. Note:
When starting a new engine for the first time, push the
primer bulb five times.
Note: Excessive priming can flood the carburetor with
fuel. See “The Engine Will Not Start” in the
Troubleshooting section.
Figure 14: Operating the engine stop lever
A
B
Figure 15: Primer bulb
A
Operation
Not for
Reproduction

15
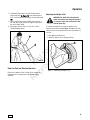
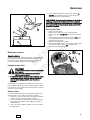
4. Stand behind the mower. Use one hand to hold the
engine stop lever (A, Figure 16) in the operating posi-
tion. Use the other hand to hold the recoil starter handle
(B).
5. Slowly pull the recoil starter handle until resistance is
felt, then pull quickly to start the engine. Slowly return
the recoil starter handle.
6. If the engine does not start in 5 or 6 tries, see the
Troubleshooting section.
Rules for Safe and Effective Operation
Refer to the ‘Operator Safety’ section of this manual for
important rules concerning safe and effective mower
operation.
Adjusting the Height of Cut
WARNING: The blade will rotate when the
engine runs. Before you change the height of
cut, stop the engine and disconnect the wire
from the spark plug.
To change the height of cut, move the position of the
adjuster arm at each wheel (A, Figure 17). Make sure each
adjuster arm is in the same position so that the mower will
cut level.
1. Disengage the adjuster arm.
2. Move the adjuster arm to another position.
Figure 16: Starting the engine
A
B
Operation
en
Figure 17: Adjusting the height of cut
A
Not for
Reproduction

www.murray.com16
Maintenance
Maintenance Chart
WARNING: Before you make an inspection,
adjustment (except carburetor), or repair, stop
the engine and disconnect the wire from the
spark plug.
MOWER
Every 8 Hours or Daily
Check safety interlock system
Clean debris off mower
Every 25 Hours or Annually *
Check mower for loose hardware
See Dealer Annually to
Lubricate mower
Check mower blade **
Check mower blade stopping time
ENGINE
First 5 Hours
Change engine oil
Every 8 Hours or Daily
Check engine oil level
Every 25 Hours or Annually *
Clean engine air filter and pre-cleaner (if equipped) **
Every 50 Hours or Annually *
Change engine oil
Replace oil filter (if equipped)
Annually
Replace air filter
Replace pre-cleaner (if equipped)
See Dealer Annually to
Inspect muffler and spark arrester (if equipped)
Replace spark plug
Replace fuel filter (if equipped)
Clean engine air cooling system
* Whichever comes first
**Check blades more often in regions with sandy soils or
high dust conditions.
* Whichever comes first
**Clean more often in dusty conditions or when airborne
debris is present.
Not for
Reproduction

17
Mower Maintenance
Emissions Control
Maintenance, replacement, or repair of the emissions control
devices and systems may be performed by any non-road
engine repair establishment or individual. However, to obtain
“no charge” emissions control service, the work must be
performed by a factory authorized dealer. See the Emissions
Warranty.
WARNING: Before you make an inspection,
adjustment (except carburetor), or repair, stop
the engine and disconnect the wire from the
spark plug.
Engine Tipping
When you service the engine, inspect the blade, or clean the
underside of the mower housing; make sure to always tip the
engine with the spark plug up (Figure 18). Transporting or
tipping the engine with the spark plug down will cause:
• Hard starting.
• Engine smoking.
• Spark plug fouling.
• Oil or gas saturation of the air filter.
Check Safety Interlock System
1. Start the mower.
2. Release the engine stop lever. The engine must stop
within 3 seconds.
If the engine does not stop, do not use the mower. Bring the
mower to an authorized dealer for service.
Cleaning the Mower Housing
WARNING: The blade will rotate when the
engine runs. Before you clean the mower
housing, stop the engine and disconnect the
wire from the spark plug.
Grass and other debris can keep the mower from working
correctly. After you mow, clean the mower housing as
follows.
1. Stop the engine.
2. Disconnect the wire from the spark plug.
3. Clean dirt and debris from the top and the bottom of the
mower housing.
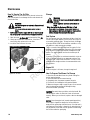
Lubrication
For maximum performance, lubricate the wheels and all pivot
points with engine oil every 25 hours.
Note: Do not lubricate the engine stop cable. Lubricants will
damage the cable and prevent the cable from moving freely.
Replace the cable if bent or damaged.
Figure 18: No forward engine tipping
Maintenance
en
Not for
Reproduction

www.murray.com18
Blade Service
WARNING: Before you inspect the blade or the
blade adapter, disconnect the wire to the
spark plug. If the blade hits an object, stop the
engine. Disconnect the wire to the spark plug.
Check the unit for damage.
Frequently check the blade for wear or damage such as
cracks. Frequently check the bolt that holds the blade. Keep
the bolt tight. If the blade hits an object, stop the engine.
Disconnect the wire to the spark plug. Check the blade
adapter (A, Figure 19) for damage. Check for a bent or
damaged blade, a badly worn blade, or other damage. Before
you operate the unit, damaged parts must be replaced with
factory replacement parts. For safety, replace the blade every
two years. Keep a sharp edge on the blade. A blade that is
not sharp will cause the ends of the grass to become brown.
Remove the blade as follows.
Removing the Blade
WARNING: Before you remove the blade,
disconnect the wire to the spark plug. The
blade has sharp edges. When you hold the
blade, use gloves or cloth material to protect
your hands.
1. Drain the fuel tank.
2. Lift the side of the mower that has the muffler or spark
plug.
3. Use a piece of wood to keep the blade from rotating.
4. Remove the bolt (B, Figure 19) that holds the blade
with a 9/16” (14mm) wrench.
5. Check the blade (C) according to the “Blade Service”
instructions. Replace a badly worn or damaged blade
with a factory replacement blade.
6. Mount the blade with the curved edges toward the
housing. If the blade is upside down, the blade will not
cut correctly and can cause an accident.
7. Fasten the blade with the original washer (D) and bolt.
Make sure the outside rim of the Belleville washer is
toward the blade.
8. Tighten the bolt that holds the blade to a torque of 30
foot pounds.
WARNING: Always keep the bolt that holds the
blade tight. A loose bolt or blade can cause an
accident.
Sharpening the Blade
WARNING: Vibration is the result if the blade
is not correctly balanced. A blade that is
damaged with cracks can break and cause
an accident.
1. Sharpen the blade two times a year or every 25 hours.
2. If the blade is on the unit, do not sharpen. Remove the
blade according to the instructions in “Removing The
Blade”.
3. Clean the blade with a brush, soap, and water. Check the
blade. Look for cracks, nicks, or other damage. Replace
a blade that is badly worn, bent, or damaged with a
factory replacement blade.
4. Sharpen the blade (A, Figure 20) with a file (B). Make
sure you keep the original beveled cutting edge.
5. Make sure the blade is balanced. Use a screwdriver (C)
and hold the blade parallel to the ground (D) as shown.
A blade that is balanced will stay parallel to the ground.
If the blade is not balanced, the heavy end will rotate
toward the ground. Sharpen the heavy end until the
blade is balanced.
6. A new blade will cut better than a badly worn blade.
Every two years replace the old blad6.
Checking the Level of Cut
Test the unit in a small area. If the height of cut is not level
or if the cut grass is not discharged, the cause can be: (1)
the blade is bent or damaged, (2) the blade is not sharp, (3)
a worn blade, (4) or a broken blade adapter. Before you use
the unit, correct the problem.
Figure 19: Removing the blade
D
B
D
C
B
C
A
A
Maintenance
Not for
Reproduction

19
Maintenance
en
Engine Maintenance
Carburetor Adjustment
Never make adjustments to the carburetor. The carburetor
was set at the factory to operate efficiently under most con-
ditions. However, if adjustments are required, see any Briggs
& Stratton Authorized Dealer for service.
How To Change The Oil
WARNING
Fuel and its vapors are extremely flammable and
explosive.
Fire or explosion can cause severe burns or
death.
• If you drain the oil from the top oil fill tube, the fuel tank
must be empty or fuel can leak out and result in a fire or
explosion.
Used oil is a hazardous waste product and must be disposed
of properly. Do not discard with household waste. Check
with your local authorities, service center, or dealer for safe
disposal/recycling facilities.
Remove Oil
You can drain the oil from the bottom drain hole, the side
drain hole, or from the top oil fill tube.
1. With engine off but still warm, disconnect the spark plug
wire and keep it away from the spark plug.
2. The engine is equipped with a bottom drain and/or a
side drain. Remove the oil drain plug. Drain the oil into
an approved container.
3. After the oil has drained, install and tighten the oil drain
plug.
4. If you drain the oil from the top oil fill tube (C, Figure
21), keep the spark plug end of the engine up. Drain the
oil into an approved container.
WARNING: If you drain the oil from the top oil
fill tube, the fuel tank must be empty or fuel can
leak out and result in a fire or explosion. To
empty the fuel tank, run the engine until it stops
from lack of fuel.
Add Oil
• Place engine level.
• Clean the oil fill area of any debris.
1. Remove the dipstick (A, Figure 21) and wipe with a
clean cloth.
2. Pour the oil slowly into the engine oil fill (C). Do not
overfill. After adding oil, wait one minute and then check
the oil level.
3. Install and tighten the dipstick.
4. Remove the dipstick and check the oil level. It should be
at the top of the full indicator (B) on the dipstick.
5. Install and tighten the dipstick.
Figure 20: Sharpening the blade
D
C
B
A
Figure 21: Engine oil
B
A
C
Not for
Reproduction

www.murray.com20
Maintenance
How To Service The Air Filter
NOTICE: Do not use pressurized air or solvents to clean the
filter. Pressurized air can damage the filter and solvents will
dissolve the filter.
WARNING
Fuel and its vapors are extremely flammable and
explosive.
Fire or explosion can cause severe burns or
death.
• Never start or run the engine with the air cleaner assem-
bly (if equipped) or the air filter (if equipped) removed.
1. Open the cover (A, Figure 22) and remove the filter (B).
2. Gently tap the filter on a hard surface. If the filter is
excessively dirty, replace with a new filter.
3. Install the filter and close the cover.
Storage
WARNING
Fuel and its vapors are extremely flammable and
explosive.
Fire or explosion can cause severe burns or
death.
When Storing Fuel Or Equipment With Fuel In Tank
• Store away from furnaces, stoves, water heaters or
other appliances that have pilot lights or other ignition
sources because they can ignite fuel vapors.
Fuel System
Fuel can become stale when stored over 30 days. Stale fuel
causes acid and gum deposits to form in the fuel system or
on essential carburetor parts. To keep fuel fresh, use Briggs
& Stratton FRESH START® fuel stabilizer, available as a liq-
uid additive or a drip concentrate cartridge.
There is no need to drain gasoline from the engine if a fuel
stabilizer is added according to instructions. Run the engine
for 2 minutes to circulate the stabilizer throughout the fuel
system. The engine and fuel can then be stored up to 24
months.
If gasoline in the engine has not been treated with a fuel sta-
bilizer, it must be drained into an approved container. Run
the engine until it stops from lack of fuel. The use of a fuel
stabilizer in the storage container is recommended to main-
tain freshness.
Engine Oil
While the engine is still warm, change the engine oil.
How To Prepare The Mower For Storage
1. Clean the dirt and debris from the cylinder cooling fins
and the engine housing.
2. Clean the bottom of the mower housing.
3. Completely clean the mower to protect the paint.
4. Put the unit in a building that has good ventilation.
5. Make sure the grass bag is empty of grass. Grass remain-
ing in the bag during storage will damage the bag.
6. Fold the handles (if desired).
CAUTION: Be careful when you fold or raise the handle. Do
not damage the cables. A cable that is bent will not work
correctly. Before you use the unit, replace a bent or damaged
cable.
NOTICE: Store the engine level (normal operating position).
If the engine is tipped for storage, the fuel tank must be
empty and the spark plug side must be up. If the fuel tank is
not empty and if the engine is tipped in any other direction, it
may be difficult to start due to oil or gasoline contaminating
the air filter and/or the spark plug.
Figure 22: Air filter
B
A
Not for
Reproduction
La page est en cours de chargement...
La page est en cours de chargement...
La page est en cours de chargement...
La page est en cours de chargement...
La page est en cours de chargement...
La page est en cours de chargement...
La page est en cours de chargement...
La page est en cours de chargement...
La page est en cours de chargement...
La page est en cours de chargement...
La page est en cours de chargement...
La page est en cours de chargement...
La page est en cours de chargement...
La page est en cours de chargement...
La page est en cours de chargement...
La page est en cours de chargement...
La page est en cours de chargement...
La page est en cours de chargement...
La page est en cours de chargement...
La page est en cours de chargement...
La page est en cours de chargement...
La page est en cours de chargement...
La page est en cours de chargement...
La page est en cours de chargement...
La page est en cours de chargement...
La page est en cours de chargement...
La page est en cours de chargement...
La page est en cours de chargement...
La page est en cours de chargement...
La page est en cours de chargement...
La page est en cours de chargement...
La page est en cours de chargement...
-
 1
1
-
 2
2
-
 3
3
-
 4
4
-
 5
5
-
 6
6
-
 7
7
-
 8
8
-
 9
9
-
 10
10
-
 11
11
-
 12
12
-
 13
13
-
 14
14
-
 15
15
-
 16
16
-
 17
17
-
 18
18
-
 19
19
-
 20
20
-
 21
21
-
 22
22
-
 23
23
-
 24
24
-
 25
25
-
 26
26
-
 27
27
-
 28
28
-
 29
29
-
 30
30
-
 31
31
-
 32
32
-
 33
33
-
 34
34
-
 35
35
-
 36
36
-
 37
37
-
 38
38
-
 39
39
-
 40
40
-
 41
41
-
 42
42
-
 43
43
-
 44
44
-
 45
45
-
 46
46
-
 47
47
-
 48
48
-
 49
49
-
 50
50
-
 51
51
-
 52
52


Murray 7800889 Manuel utilisateur
- Catégorie
- Tondeuses à gazon
- Taper
- Manuel utilisateur
- Ce manuel convient également à
dans d''autres langues
- English: Murray 7800889 User manual
Documents connexes
Autres documents
-
Simplicity MANUAL, OPS, MP22675FC Manuel utilisateur
-
Simplicity 7800465 Manuel utilisateur
-
-
-
-
-
-
-
 Yard Pro 96148001900 Le manuel du propriétaire
-
Husqvarna 96145000700 Le manuel du propriétaire
