

INSTRUCTIONS AND ADVICE FOR INSTALLING,
USING AND SERVICING OF COOKERS
ENGLISH Instructions for use Page 3-31
FRANÇAIS Mode d’emploi Page 32-61
INSTRUCTIONS D’INSTALLATION, D’UTILISATION,
ET D’ENTRETIEN DE LA CUISINIÈRE

3
CONTENTS
IMPORTANT SAFETY INSTRUCTIONS 4
IMPORTANT INSTRUCTIONS 10
DESCRIPTION OF THE APPLIANCE 11
USER’S INSTRUCTIONS 15
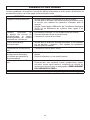
TROUBLESHOOTING 24
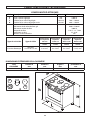
TECHNICAL FEATURES 25
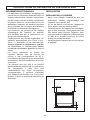
INSTRUCTIONS FOR THE INSTALLER 26
AFTER-SALES SERVICE 31

4
YOUR SAFETY AND THE SAFETY OF OTHERS ARE VERY IMPORTANT
This manual and the appliance itself provide important safety messages, to be read and observed
at all times.
This is the safety alert symbol, pertaining to safety, which alerts users to potential hazards
to themselves and others.
All safety messages will follow the safety alert symbol and either the terms:
DANGER
Indicates a hazardous situation which, if not avoided, will cause
serious injury.
WARNING
Indicates a hazardous situation which, if not avoided, could cause
serious injury.
This manual and the appliance itself provide
important safety advices, to be read and observed
at all times.
All safety Warnings give specic details of the
potential risk present and indicate how to reduce
risk of injury, damage and electric shock resulting
from improper use of the appliance. Carefully
observe the following instructions:
• Failure to follow these instructions may involve
risks.
• The manufacturer declines any liability for failure
to follow this guide.
• Keep these instructions for future reference.
• Use protective gloves to perform all unpacking
and installation operations.
• The appliance must be disconnected from the
power supply before carrying out any installation
work.
• Installation and maintenance must be carried
out by a qualied technician, in compliance with
the manufacturer’s instructions and local safety
IMPORTANT SAFETY INSTRUCTIONS

5
regulations. Do not repair or replace any part of
the appliance unless specically stated in the user
manual.
• The power cable must be long enough for
connecting the appliance, once tted in its
housing, to the power supply.
• Power cable replacement must be carried out
by a qualied Technician. Contact an authorized
service centre.
• Regulations require that the appliance is earthed.
• For installation to comply with current safety
regulations, an omnipolar switch with minimum
contact gap of 3 mm must be utilized.
• Do not use multiple plug adapters or extension
leads.
• Do not pull the power supply cable in order to
unplug the appliance.
• The electrical components must not be accessible
to the user after installation.
• During and after use, do not touch the heating
elements or interior surfaces of the appliance - risk
of burns. Do not allow the appliance to come into
contact with cloths or other ammable materials
until all the components have cooled suciently.
• At the end of cooking, exercise caution when
opening the appliance door, letting the hot air or
steam exit gradually before accessing the oven.
When the appliance door is shut, hot air is vented
from the aperture above the control panel. Do not
obstruct the vent apertures.
• Use oven gloves to remove pans and accessories,
IMPORTANT SAFETY INSTRUCTIONS

6
taking care not to touch the heating elements.
• Do not place ammable materials in or near the
appliance: a re may break out if the appliance is
inadvertently switched on.
• Do not heat or cook sealed jars or containers in the
appliance. The pressure that builds up inside might
cause the jar to explode, damaging the appliance.
• Do not use containers made of synthetic materials.
• Overheated oils and fats catch re easily. Always
remain vigilant when cooking foods rich in fat and
oil.
• Never leave the appliance unattended during food
drying.
• If alcoholic beverages are used when cooking
foods (e.g. rum, cognac, wine), remember that
alcohol evaporates at high temperatures. As a
result, there is a risk that vapours released by the
alcohol may catch re upon coming into contact
with the electrical heating element.
• The installation, and maintenance operations listed
in section «INSTRUCTIONS FOR THE INSTALLER»
must only be carried out by qualied personnel.
• This appliance is designed solely for use as a
domestic appliance for cooking food. No other
type of use is permitted (e.g. heating rooms).
The manufacturer declines all responsability
for inappropiate use or incorrect setting of the
controls.
• Once the packaging has been removed from
the outer surfaces and the various inner parts,
thoroughly check that the appliance is in perfect
IMPORTANT SAFETY INSTRUCTIONS

7
condition. If you have any doubts do not use the
appliance and call in a qualied person.
• The packaging materials used (cardboard, plastic
bags, polystyrene foam, nails, etc.) must not be
left with in easy reach of children because they are
a potential hazard source. All packaging materials
used are environmentally-friendly and recyclable.
• Before connecting the appliance ensure that the
rating plate data corresponds to that of the gas
and electricity supply (see section «TECHNICAL
FEATURES»).
• If the surface of the glass hob is cracked, do not
use it and switch o the appliance to avoid the
possibility of electric shock.
• Do not touch the appliance with any wet part of
the body and do not operate in when barefoot.
• Do not use the appliance when barefoot.
• Do not leave the appliance exposed to the
atmosphere (rain, sun, etc.).
The appliance and its accessible parts become hot
during use. Care should be taken to avoid touching
heating element. Very young (0-3 years) and young
chidren (3-8 years) shall be kept away unless
continuously supervised.
Keep children away from the product during the
cooking cycle.
Children from 8 years and above and persons with
reduced physical, sensory or mental capabilities or
lack of experience and knowledge if they have been
given supervision or instruction concerning use
IMPORTANT SAFETY INSTRUCTIONS

8
of the appliance in a safe way and understand the
hazards involved.
Children shall not play with the appliance. Cleaning
and user maintenance shall not be made by children
without supervision.
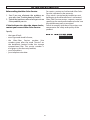
ln order to prevent accidental tipping of the
appliance, for example by a child climbing over the
open oven door, or too high weights are leant on
the open oven door, two chains must be screwed
on the back on the cooker and xed to the wall with
hooks. Ensure the chains are taut. Please refer to
instructions for installation.
Unattended cooking on a hob with fat or oil can be
dangerous and may result in re.
• Never try to extinguish a re with water, but switch
of the appliance and then cover ame e.g. with a
lid or a re blanket.
• Do not store items on the cooking surfaces.
• Do not use harsh abrasive cleaners or sharp
metal scrapers to clean the oven glass door since
they can scratch the surface, which may result
in shattering of the glass. Never use sponges or
abrasive products, and solvents to remove stains
or adhesives on the painted or stainless steel
surfaces.
• The appliance is not intended to be operated by
means of an external timer or separate remote-
control system.
• Ensure that the appliance is switched o before
replacing the lamp to avoid the possibility of
electric shock.
IMPORTANT SAFETY INSTRUCTIONS

9
• Do not use a steam cleaner.
• The appliance is to be placed directly on the oor
and shall not be mounted on a base.
• Keep the appliance clean. Food residues can be a
re hazard.
• If an electrical socket near the appliance is used,
ensure that the cables of any other electrical
appliances do not come into contact with the oven
and are at a sucient distance from the hot parts
of the oven.
• After using the appliance ensure that all the
controls are in the o or closed position, and check
that the “0” on the knob corresponds with the
symbol “•“ printed on the front panel.
• Before carrying out any kind of cleaning, or
maintenance operation, disconnect the appliance
from the electricity supplies.
• Using the glass scraper, clean from the cooking
zone, any pieces of tin foil or plastic objects that
could have melted or stuck; likewise sugar or
sugary food spilled over during cooking.
• After the hour or so has elapsed leave the oven to
cool down and then clean its interior with hot water
and a mild detergent. Also wash the accessories
(shelves, trays, drip pan, spit..) prior to use.
IMPORTANT SAFETY INSTRUCTIONS

10
• For this reason, we recommend that you
to contact your nearest Service Centre
specifying the model of your appliance and
the type of problem.
The appliance was designed and made in
accordance with the European standards listed
below:
=> EN 60 335-1 and EN 60 335-2-6 (electrical)
plus relative amendments.
The appliance complies with the prescriptions of
the European Directives as below:
=> 2006/95/EC concerning electrical safety
(BT).
=> 2004/108/EC concerning electromagnetic
compatibility (EMC).
Oven that could come into contact with
foodstus are made with materials that comply
with the provisions of the 1935/2004 EC
directive.
SAFEGUARDING THE ENVIRONMENT
Disposal of packing material
The packing material is 100% recyclable and
is marked with the recycle symbol ( ). The
various parts of the packing must therefore be
disposed of responsibly and in full compliance
with local authority regulations governing
waste disposal.
Scrapping the product
- This appliance is marked in compliance
with European Directive 2002/96/EC, Waste
Electrical and Electronic Equipment (WEEE).
- By ensuring this product is disposed of
correctly, you will help prevent potential
negative consequences for the environment
and human health, which could otherwise
be caused by inappropriate waste handling
of this product.
- The symbol on the product or on the
accompanying documentation indicates
that it should not be treated as domestic
waste but must be taken to an appropriate
collection centre for the recycling of
electrical and electronic equipment.
IMPORTANT INSTRUCTIONS

11
1
2
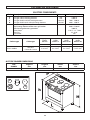
DESCRIPTION OF THE APPLIANCE
PRESENTATION
The cookers are tted with a hob to vitroceramic,
and a electric oven;. the latter can be either
conventional or forced type (with fan).
Each knob on the front panel has a diagram
printed above it showing to which plate it
refers. The combination of the dierent sized
plates oers the possibility of various types of
cooking.
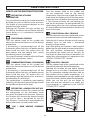
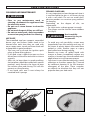
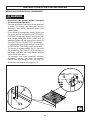
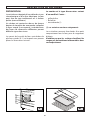
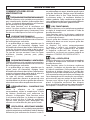
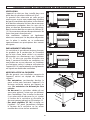
The oven walls are tted with various runners
(g. 1) on which the following accessories can
be placed.
Supply and quantities vary from model to
model:
• oven shelf
• drip tray or drip pan
• set spit (*)
(*) Only certain versions.
The cookers can be fitted with a small
compartment under the oven that can be used
for storing things.
Remember that the surfaces become hot, do
not to place inammable materials inside.

12
DESCRIPTION OF THE APPLIANCE
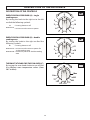
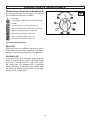
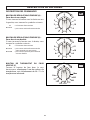
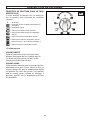
DESCRIPTION OF THE CONTROLS
ENERGY REGULATOR KNOB (A) - single
cooking zone
By turning the knob to the right or to the left
we nd the following symbols:
0 = heating elements o
from 1 to 12
= minimum and maximum power
ENERGY REGULATOR KNOB (B) - double
cooking zone
By turning the knob to the right we nd the
following symbols:
0
= heating elements o
from 1 to 12
= minimum and maximum power for
single cooking zone
from 12 to 0
= maximum power for double cooking
zone
THERMOSTAT KNOB FOR THE FAN OVEN (C)
By turning the oven knob clockwise we will nd
the dierent oven temperature values (from
50°C to Maxi).
A
B
C

13
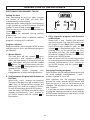
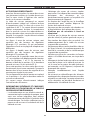
FAN OVEN FUNCTION SELECTOR KNOB (8) (D)
By turning the knob to the right or to the left
we will nd the following symbols:
0
= Oven o
= Oven light on, which stays on for all functions
= Fan on
= Top and bottom heating elements on
= Top and bottom heating elements and fan on
= Bottom heating element and fan on
= Rear heating element and fan on
= Grill + spit heating element on (*)
= Grill heating element and fan on
(*) only certain versions
RED LIGHT
If present, when lit it indicates that one or more
of the hob electric plates is working, if the hob is
mixed, or one of the oven electric components.
YELLOW LIGHT
If present, when lit it indicates that either the
electric oven or electric grill is working. While
the oven is being used the light will switch
o when the set temperature is reached.
During baking it is normal for the yellow light
to switch on and o several times as the oven
temperature is controlled.
DESCRIPTION OF THE APPLIANCE
D

14
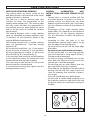
ELECTRONIC PROGRAMMER “TOUCH”
Setting the time.
After connecting to mains or after a power
cut, symbol “A” and “0,00” will both ash
simultaneously on the display.
Keep pressed for some seconds simultaneously
+ and - buttons or just MODE button, till when
symbol “A” turn o and symbol turn on.
Time can be set just when the dot beneath the
symbol ashes.
Time cannot be adjusted during cooking
program run.
If time is selected while a automatic cooking
program is running, this is deleted.
Program selection
Keep pressed for some seconds MODE button
and pressing it in turns, the following programs
are selected:
1. Minute Minder
The time turns o, the symbol turns
on and with + and - buttons is possible to
select the time alarm. At the end of the set
time, the buzzer will start and the symbol
ashes. To turn o the buzzer and turn
o the symbol keep pressed for some
seconds MODE button.
The minute minder program runs
independently of other cooking programs.
2. Semiautomatic Program with Duration or
End Time
Select with + and - buttons the duration.
The time of the day turns o, symbol “A” and
“dur” ash. At the end of the set time, the
buzzer will start and the symbol “A” ashes.
To turn o the buzzer press MODE button.
Now the oven is o. Keep pressed for some
seconds simultaneously + and - buttons or
just MODE button and the symbol is
illuminated.
3. Fully automatic program with Duration
and End time
Select with + and - buttons the duration
and the end time. The time of the day turns
o, symbol “A” and “End” ash. Symbol
turns o and the symbol “A” turns on. The
symbol is illuminated again when the
cooking starts. At the end of the set time,
the buzzer will start, the symbol turns
o and the symbol “A” ashes. To turn o the
buzzer press MODE button.
Now the oven is o. To set the programmer
on manual operation keep pressed for some
seconds simultaneously + and - buttons or
just MODE button and the symbol is
illuminated.
Changing/Clearing programs
Each program can be cleared keeping pressed
for some seconds simultaneously + and -
buttons. Symbol “A” turns o.
Each program can be changed keeping
pressed for some seconds MODE button and
then pressing it in turns to the function to be
changed. The adjustment can be done with +
and - buttons.
Is it possible to check whenever the progress
of program keeping pressed for some seconds
MODE button and then pressing in turns to the
function to be checked.
DESCRIPTION OF THE APPLIANCE

15
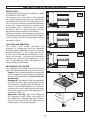
SWITCHING THE HEATING ELEMENTS
The cooking zones are clearly visible on the
hob, being circular. Only the inside of the circles
traced on the glass is heated.
The hob has a built-in warning light that
switches on when the temperature in the
cooking zone exceeds 60°C. This warning light
will only switch o when the temperature in
the cooking zone has gone below this value
and it is for this reason it is called the “residual
heat warning”.
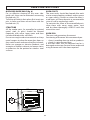
The heating elements with a single cooking
zone, are controlled by energy regulators with
12 positions (A) that permit to obtain a big
range of dierent temperatures.
The heating element with a double cooking
zone, are controlled by 12-position energy
regulators (B).
By turning the knob from 1 to 12, the powers
of the rst zone of cooking “1” are regulated.
By turning besides the number 12, the second
zone of cooking “2” is activated (g. 3).
In this position, both work the zone of cooking
to the maximum power. By turning the knob
counterclockwise to regulate its power.
Only returning on the position “0” the second
zone of cooking is disconnected.
A red coloured warning light signals that the
heating elements are on.
USER’S INSTRUCTIONS
GENERAL INFORMATION AND
INSTRUCTIONS FOR USING CERAMIC GLASS
HOBS
• Ceramic glass is a natural product and, like
any other material in ceramic, can have an
uneven surface. You might even see some
bubbles inside the ceramic glass itself: these
will not inuence cooking or the lifetime of
the hob.
• Illumination of the single cooking zones
might dier. This depends on the technical
characteristics of the heating elements.
This has absolutely no eect on quality or
operation.
• According to how you look at it, the
incandescent heating might appear to go
over the edge of the cooking zone.
• Do not put very hot pans on the outer edge
of the hob.
• Do not use pans with aluminum bottom.
• Do not use the hob as a work top and take
care not to let hard or sharp objects fall on it.
The top could be damaged.
• Do not put empty enamelled pans on the
heat. Both the bottom of the pan and the
ceramic glass could be damaged.
• Do not drag pans or other objects over the
glass top which could get scratched.
• Clean and dry the bottom of the pan before
putting it on the hob. Salt, sugar or grains of
sand, for example, that could be in greens,
can scratch.
• Clean o immediately any spilled liquid.
• Do not cook or reheat food wrapped in tin
foil or plastic containers. Both the tin foil and
the plastic containers would melt, sticking to
the hob.
3

16
USER’S INSTRUCTIONS
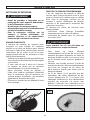
HOW TO SAVE ELECTRICITY
To get the maximum yield with the minimum consumption of electricity it is recommended to
keep the following points in mind:
• Switch the hob heating element on only after you have put the pan on the cooking zone or plate
• Thoroughly dry the bottom of the pan before putting it on the cooking zone or plate.
• Do not use pans with a diameter that is less than that of the cooking zone or plate (g. 4). When
you are buying saucepans keep in mind that the manufacturer usually gives the largest diameter
of the pan which is normally bigger than the base diameter.
• Use pans with at, thick bottoms (see g. 4). Bottoms that are not at will make cooking times
longer.
• Always put a lid on the pan (g. 4).
• If cooking time is longer than 40 minutes you can switch the plate o 5 to 10 minutes before the
end of cooking time and make use of the residual heat.
• For your information only, the table gives hints on how to use the cooking zones and plates.
Position of
knobs
Heat
intensity
Possible cooking processes
0 O
1-2 Low To melt butter, chocolate, etc. To heat small amounts of liquid.
3-4 Moderate To heat greater quantities of liquid.
5-6 Slow Thawing frozen food and preparing stews, boiling or simmering.
7-8 Medium Bringing foods to boiling point. For delicate roasts and sh.
9-10 Strong For roasts, chops and steaks. For large amounts of boiled meat.
11-12 Hot Bringing large amounts of water to the boil. Frying.
4

17
USER’S INSTRUCTIONS
OVEN: GENERAL INSTRUCTIONS
• Always keep the appliance lid open when using
the oven, in order to prevent overheating.
• Always grip the centre of the oven door when
opening. Do not practice excessive pressures
on the door when it is open.
• Do not worry if condensation forms on the
door and on the internal walls of the oven
during cooking. This does not compromise
its eciency.
• The appliance becomes very hot during use.
Do not touch the heating elements inside
the oven. Wear oven gloves when placing or
removing pans from the oven.
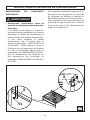
• When removing the tray from the oven,
always use the grill pan handle (fig. 3) (if
provided). Hook the handle to the edge of
the tray and pull it out, slightly lifting it as you
do so.
• When inserting or removing food from
the oven, check that excess juices do not
overow onto the oven base (oils and fats are
highly inammable when overheated).
• For good results during cooking, we strongly
recommend not to cover the base of the
oven or the grill with aluminium foil or other
materials.
• When grilling always put a little water in the
grill pan. The water prevents the grease from
burning and from giving o bad smells and
smoke. Add more water during grilling to
compensate for evaporation.
• After using the appliance ensure that all the
controls are in the o position.
• During and after use, the oven door glass and
the accessible parts can be very hot, therefore
keep children away from the appliance.
• Always keep oven door closed during baking
or grilling.
WHAT TO DO THE FIRST TIME YOU USE THE
OVEN
If the appliance has a programming
accessory, place it on the manual position,
and, before cooking for the rst time, ensure
the oven is empty and its door closed, heat the
oven at maximum temperature for 2 hours. This
will allow the protective coating on the interior
of the oven to be burnt o and dissipate the
associated smells. During this time do not stay
in the same room and keep it aerated.
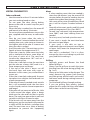
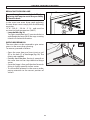
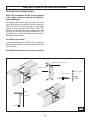
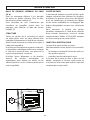
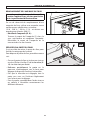
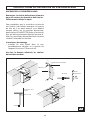
HOW TO USE THE SPIT (g. 5)
• Place the chicken or piece of meat to roast
rmly between the two forks on the spit and
make sure it is evenly balanced to prevent
straining the motor.
• Rest the spit on the support introducing the
end in the seat and unscrew and remove the
hand grip from the spit.
• Fit support into the corresponding runner,
and insert its end into the relative motor
coupling.
• Close the oven door, turn the oven knob on
the symbol .
• When the grill turns on, the spit turn too.
• Always use the drip pan to catch the gravy,
as indicated in the paragraph “USEFUL
COOKING TIPS”.

18
USER’S INSTRUCTIONS
HOW TO USE THE MULTIFUNCTION OVEN
DEFROSTING AT ROOM
TEMPERATURE
Turn the selector knob to the symbol and place
the food you want to defrost inside the oven.
The length of time required depends on the
quantity and type of food.
Selecting this function will only activate the
fan. Mild air circulation around frozen food will
slowly defrost it. It is particularly suitable for
fruit and cakes.
TRADITIONAL COOKING
Turn the selector knob to the symbol and
adjust the thermostat knob to suit the desired
temperature.
If pre-heating is recommended wait till the
thermostat yellow led turns o before placing
foods inside the oven. This option turns on
both bottom and top heating units, evenly
distributing heat on your foods.
This type of cooking is ideal for all kind of foods
(meats, sh, bread, pizzas, cakes..).
COMBINED TRADITIONAL + FAN COOKING
Turn the selector knob to the symbol and
adjust the thermostat knob to suit the desired
temperature.
If pre-heating is recommended wait till the
thermostat yellow led turns o before placing
foods inside the oven. This option turns on
both bottom and top heating units, and heat is
distributed by fan ventilation.
This combination is suitable for rapid cooking
and allows for the use of more plates positioned
on the dierent levels of the oven.
DEFROSTING + WARM UP BY HOT AIR
Turn the selector knob to the symbol and set
the temperature on the thermostat knob,
now place the food inside the oven. Selecting
this function will activate the bottom heating
unit and its heat is distributed by the fan.
This function is particularly recommended to
defrost and warm up ready-made meals.
FAN + REAR HEATING COMBINED
COOKING
Turn the selector knob to the symbol and
set the thermostat knob to the desired
temperature, then place your food the oven. If
oven needs pre-heating wait till the thermostat
yellow led turns o before placing foods inside
it. This function activates the rear heating unit
and the fan distributes the heat produced. This
combination allows for a fast and even cooking
of several dierent foods placed on the diverse
levels of the oven.
CONVETIONAL GRILL COOKING
Turn the selector knob to the symbol and set the
thermostat knob to the desired temperature.
Selecting this function the top central heating
element turns on and heat is distributed
directly on food surface.
Apart from grilling, this function is ideal to add a
golden roast to your recipes or to toast bread slices.
The grill function automatically activates
the eventual spit. When you use the grill, do
not forget to place the drip pan beneath it to
collect any sauce dripping, as suggested in the
“USEFUL COOKING TIPS “ section.
FAN GRILL COOKING
Turn the selector knob to the symbol and set the
thermostat knob to the desired temperature.
Selecting this function the top central heating
element turns on and heat is distributed by the
fan. This procedure mitigates the direct heat on
food surface and uses milder temperatures. It is
therefore recommended for an even golden and
crispy nish touch, ideal for whole sh and poultry.
When you use the grill, do not forget to
place the drip pan beneath it to collect any
sauce dripping, as suggested in the “USEFUL
COOKING TIPS “ section.
5

19
USEFUL COOKING TIPS
Cakes and bread:
• Heat the oven for at least 15 minutes before
you start cooking bread or cakes.
• Do not open the door during baking
because the cold air would stop the yeast
from rising.
• When the cake is cooked turn the oven o
and leave it in for about 10 minutes.
• Do not use the enamelled oven tray or drip
pan, supplied with the oven, to cook cakes
in.
• How do you know when the cake is
cooked? About 5 minutes before the end of
cooking time, put a cake tester or skewer in
the highest part of the cake. If it comes out
clean the cake is cooked.
• And if the cake sinks? The next time use less
liquids or lower the temperature 10°C.
• If the cake is too dry: Make some tiny holes
with a toothpick and pour some drops of
fruit juice or spirits on it. The next time,
increase the temperature 10°C and set a
shorter cooking time.
• If the cake is too dark on top: the next time
put the cake on a lower shelf, cook it at a
lower temperature and longer.
• If the top of the cake is burnt: cut o
the burnt layer and cover with sugar or
decorate it with cream, jam, confectioner’s
cream, etc..
• If the cake is too dark underneath: the next
time place it on a higher shelf and cook it at
a lower temperature.
• If the cake or bread is cooked nicely outside
but is still uncooked inside: the next time
use less liquids, cook at a lower temperature
and longer.
• If the cake will not come out of the tin: slide
a knife around the edges, place a damp
cloth over the cake and turn the tin upside
down. The next time grease the tin well and
sprinkle it with our or bread crumbs.
• If the biscuits will not come away from the
baking tray: put the tray back in the oven for
a while and lift the biscuits up before they
cool. The next time use a sheet of baking
parchment to prevent this happening
again.
Meat:
• If, when cooking meat, the time needed is
more than 40 minutes, turn the oven o 10
minutes before the end of cooking time to
exploit the residual heat (energy saving).
• Your roast will be juicier if cooked in a closed
pan; it will be crispier if cooked without a
lid.
• Normally white meat, poultry and sh need
medium temperatures (less than 200°C).
• To cook “rare” red meats, high temperatures
(over 200°C) and short cooking times are
needed.
• For a tasty roast, lard and spice the meat.
• If your roast is tough: the next time leave
the meat to ripen longer.
• If your roast is too dark on top or
underneath: the next time put it on a higher
or lower shelf, lower the temperature and
cook longer.
• Your roast is underdone? Cut it in slices,
arrange the slices on a baking tray with the
gravy and nish cooking it.
Grilling:
• Sparingly grease and avour the food
before grilling it.
• Always use the grill pan to catch the juices
that drip from the meat during grilling (see
g. 1 or 2).
• Always put a little water in the drip pan. The
water prevents the grease from burning
and from giving o bad smells and smoke.
Add more water during cooking because it
evaporates.
• Turn the food half way through cooking.
• If you are grilling fatty poultry (goose)
pierce the skin under the wings after about
half an hour so the fat can drip away.
USER’S INSTRUCTIONS

20
USER’S INSTRUCTIONS
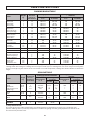
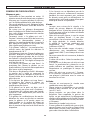
COOKING/BAKING TABLE
Foods
Weight
kg
Position of
the oven
shelf from
the bottom
Cooking by natural convenction Cooking by forced convenction
(with fan)
Temperatures
in °C
Cooking time
in minutes
Temperatures
in °C
Cooking time
in minutes
MEAT
Roast veal
Roast beef
Roast pork
Roast lamb
1
1
1
1
1-2
1-2
1-2
1-2
200-225
200-225
200-225
200-225
100-120
40-50
100-120
100-120
190
190
190
190
100-120
40-50
100-120
100-120
GAME
Roast hare
Roast pheasant
Roast partridge
1
1
1
1-2
1-2
1-2
200-Max
200-Max
200-Max
50-60
60-70
50-60
200-Max
200-Max
200-Max
50
60
50
POULTRY
Roast chicken
Roast turkey
Roast duck
1
1
1
1-2
1-2
1-2
200-225
200-225
200-225
80-90
100-120
90-110
190
190
190
70-80
90-110
80-100
FISH
Roast sh
Casseroled sh
1
1
2-3
2-3
200
175
30-35
20-25
170-190
160-170
25-30
15-20
BAKED PASTA
Lasagne
Cannelloni
2.5
2.5
3
3
210-225
210-225
60-75
60-75
225-Max
225-Max
30-40
30-40
PIZZA 1
3
225-Max 25-30 225-Max 20-25
BREAD
1
3
225-Max 20-25 220 20
PASTRIES
Biscuits in general
Shortcrust pastry
Victoria sponge 0.8
2
2
2
190
200
200
15
20
40-45
170-190
190-200
190-200
15
20
40-45
CAKES
Angel cake
Fruit cake
Chocolate cake
0.8
0.8
0.8
2
2
2
190
200
200
52
65
45
170-190
190-200
190-200
45
65
45
The values given in the tables (temperatures and cooking times) are approximate and may vary according to each person’s
cooking habits. This table gives cooking times on only one shelf. If you are cooking with a fan oven and you are using more
than one shelf (placing the shelves on the 1st and 3rd or 2rd and 4rd position) cooking time will be about 5 to 10 minutes
longer.
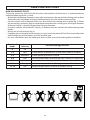
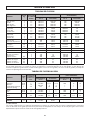
GRILLING TABLE
Foods
Weight
kg
Position of
the oven
shelf from
the bottom
Cooking by natural convenction
Cooking by forced convenction
(with fan)
Temperatures
in °C
Cooking time
in minutes
Temperatures
in °C
Cooking time
in minutes
1st side
2nd
side
1st side
2nd
side
MEAT
Chop
Beefsteaks
Half chicken (each
half 0.5 kg)
0.50
0.15
1
3
3-4
3-4
225-Max
200-225
225
12-15
5
20
12-15
5
20
200
=
=
15
=
=
10
=
=
FISH
Trout
Sole
0.42
0.20
4
4
225-Max
225-Max
=
=
=
=
200
200
10
7
10
7
BREAD
Toast
4-5
225-Max 2-3 2-3 200 2-3 2-3
SPIT (*)
CHICKEN 1.3 3 225-Max 60-80 =
(*) only certain versions
The values given in the tables (temperatures and cooking times) are approximate and may vary according to each
person’s cooking habits. In particular, temperatures and times for grilling meat will greatly depend on the thickness of
the meat and on personal tastes.
La page est en cours de chargement...
La page est en cours de chargement...
La page est en cours de chargement...
La page est en cours de chargement...
La page est en cours de chargement...
La page est en cours de chargement...
La page est en cours de chargement...
La page est en cours de chargement...
La page est en cours de chargement...
La page est en cours de chargement...
La page est en cours de chargement...
La page est en cours de chargement...
La page est en cours de chargement...
La page est en cours de chargement...
La page est en cours de chargement...
La page est en cours de chargement...
La page est en cours de chargement...
La page est en cours de chargement...
La page est en cours de chargement...
La page est en cours de chargement...
La page est en cours de chargement...
La page est en cours de chargement...
La page est en cours de chargement...
La page est en cours de chargement...
La page est en cours de chargement...
La page est en cours de chargement...
La page est en cours de chargement...
La page est en cours de chargement...
La page est en cours de chargement...
La page est en cours de chargement...
La page est en cours de chargement...
La page est en cours de chargement...
La page est en cours de chargement...
La page est en cours de chargement...
La page est en cours de chargement...
La page est en cours de chargement...
La page est en cours de chargement...
La page est en cours de chargement...
La page est en cours de chargement...
La page est en cours de chargement...
La page est en cours de chargement...
La page est en cours de chargement...
La page est en cours de chargement...
-
 1
1
-
 2
2
-
 3
3
-
 4
4
-
 5
5
-
 6
6
-
 7
7
-
 8
8
-
 9
9
-
 10
10
-
 11
11
-
 12
12
-
 13
13
-
 14
14
-
 15
15
-
 16
16
-
 17
17
-
 18
18
-
 19
19
-
 20
20
-
 21
21
-
 22
22
-
 23
23
-
 24
24
-
 25
25
-
 26
26
-
 27
27
-
 28
28
-
 29
29
-
 30
30
-
 31
31
-
 32
32
-
 33
33
-
 34
34
-
 35
35
-
 36
36
-
 37
37
-
 38
38
-
 39
39
-
 40
40
-
 41
41
-
 42
42
-
 43
43
-
 44
44
-
 45
45
-
 46
46
-
 47
47
-
 48
48
-
 49
49
-
 50
50
-
 51
51
-
 52
52
-
 53
53
-
 54
54
-
 55
55
-
 56
56
-
 57
57
-
 58
58
-
 59
59
-
 60
60
-
 61
61
-
 62
62
-
 63
63


dans d''autres langues
- English: Maytag ACM 406 User guide
Documents connexes
Autres documents
-
Whirlpool ACM 244/BL Mode d'emploi
-
Amana ACM 9413/1 G/IX Mode d'emploi
-
-
-
-
-
-
Bauknecht ACK 9401 IN Mode d'emploi
-
-