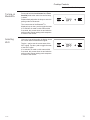
GE ZGU30RSLSS Manuel utilisateur
- Catégorie
- Cuisinières
- Taper
- Manuel utilisateur

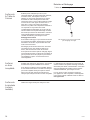
OWNER’S
MANUAL
30" and 36"
Stainless Steel Gas Cooktops
ENGLISH/FRANÇAIS/ESPAÑOL
Monogram.com

2 49-80818
Contents
Stainless Steel Gas Cooktops
Contents
Consumer Information ................3
Safety Information ....................5
Features of Your Cooktop .............8
Cooktop Controls
Electronic Ignition & Automatic Reignition . .9
To Light a Surface Burner ...............9
Dual-flame Stacked Burners .............9
Multi-Ring Burner .....................9
Timer ..............................10
Gas Lockout Feature ..................10
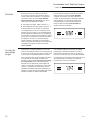
Turning on Bluetooth
®
.................11
Selecting Wi-Fi ......................11
Surface Cooking
How to Select Flame Size ..............12
Stove Top Grills ......................12
Griddle Accessory ....................13
Care and Cleaning
Cooktop Surface .....................14
Stainless Steel Surfaces ...............14
Timer Surface .......................14
Dual-flame Stacked Burners
and Multi-Ring Burner ...............15
Spark Igniter and Electrodes ............15
Burner Grates .......................16
Grate Support Bumpers ...............16
Griddles ............................16
Troubleshooting Tips ................17
Warranty ...........................19
Consumer Support ..................20

49-80818 3
WARNING
If the information in this manual is not followed exactly, a fire or
explosion may result, causing property damage, personal injury or death.
- Do not store or use gasoline or other flammable vapors and liquids in the vicinity of this
or any other appliance.
- WHAT TO DO IF YOU SMELL GAS
Ŷ 'RQRWWU\WROLJKWDQ\DSSOLDQFH
Ŷ 'RQRWWRXFKDQ\HOHFWULFDOVZLWFKGRQRWXVHDQ\SKRQHLQ\RXUEXLOGLQJ
Ŷ,PPHGLDWHO\FDOO\RXUJDVVXSSOLHUIURPDQHLJKERU¶VSKRQH)ROORZWKHJDVVXSSOLHU¶V
instructions.
Ŷ ,I\RXFDQQRWUHDFK\RXUJDVVXSSOLHUFDOOWKHILUHGHSDUWPHQW
- Installation and service must be performed by a qualified installer, service agency or the
gas supplier.
Consumer Information
Stainless Steel Gas Cooktops

4 49-80818
If you
Received a
Damaged
Cooktop
Immediately contact the dealer (or builder) that
sold you the cooktop
Trouble-
Shooting Tips
Before you request service, check the
Problem Solver in the back of this manual.
It lists causes of minor operating problems that
you can correct yourself.
If you
Need
Service
To obtain service, see the Consumer
Services page in the back of this manual.
We’re proud of our service and want you to be
pleased. If for some reason you are not happy
with the service you receive, here are steps to
follow for further help.
FIRST, contact the people who serviced your
appliance. Explain why you are not pleased.
In most cases, this will solve the problem.
NEXT, if you are still not pleased, write all the
details—including your phone number—to:
Manager, Customer Relations
Monogram
Appliance Park
Louisville, KY 40225
Remove
Packaging
Tape
Carefully grasp a corner of the protective
shipping film with your fingers and slowly peel
it from the appliance surface. Do not use any
sharp items to remove the film. Remove all
of the film before using the appliance for the
first time.
To assure no damage is done to the finish
of the product, the safest way to remove
the adhesive from packaging tape on new
appliances is an application of a household
liquid dishwashing detergent. Apply with a soft
cloth and allow to soak.
NOTE: The adhesive must be removed from
all parts. It cannot be removed if it is baked on.
Write
Down the
Model
& Serial
Numbers
You’ll find them on a label located on the bottom
of the cooktop.
Before sending in the registration card,
please write these numbers here:
Model Number
Serial Number
Use these numbers in any correspondence or
service calls concerning your cooktop.
Consumer Information
Stainless Steel Gas Cooktops

49-80818 5
IMPORTANT SAFETY INFORMATION
READ ALL INSTRUCTIONS BEFORE USING THE APPLIANCE
READ AND SAVE THESE INSTRUCTIONS
WARNING
Read all safety instructions before using the product. Failure to follow these instructions may result
in fire, electrical shock, serious injury or death.
WARNING
GENERAL SAFETY INSTRUCTIONS
WARNING
NEVER use this appliance as a
space heater to heat or warm the room. Doing
so may result in carbon monoxide poisoning.
Ŷ 8VHWKLVDSSOLDQFHIRULWVLQWHQGHGSXUSRVHDV
described in this owner’s manual.
Ŷ +DYH\RXUFRRNWRSLQVWDOOHGDQGSURSHUO\JURXQGHGE\
a qualified installer in accordance with the provided
installation instructions.
Ŷ $Q\DGMXVWPHQWDQGVHUYLFHVKRXOGEHSHUIRUPHG
only by a qualified gas cooktop installer or service
technician. Do not attempt to repair or replace
any part of your cooktop unless it is specifically
recommended in this manual.
Ŷ <RXUFRRNWRSLVVKLSSHGIURPWKHIDFWRU\VHWIRUXVH
with natural gas but can be converted to propane (LP)
gas. If required, these adjustments must be made by a
qualified technician in accordance with the installation
instructions and local codes. The agency performing
this work assumes responsibility for the conversion.
Ŷ +DYHWKHLQVWDOOHUVKRZ\RXWKHORFDWLRQRIWKH
cooktop gas shut-off valve and how to turn it off if
necessary.
Ŷ 3OXJ\RXUFRRNWRSLQWRDYROWJURXQGHGRXWOHW
only. Do not remove the round grounding prong
from the plug. If in doubt about the grounding of the
home electrical system, it is your responsibility and
obligation to have an ungrounded outlet replaced with
a properly grounded, three prong outlet in accordance
with the National Electrical Code. Do not use an
extension cord with this appliance.
Ŷ %HIRUHSHUIRUPLQJDQ\VHUYLFHXQSOXJWKHFRRNWRS
or disconnect the power supply at the household
distribution panel by removing the fuse or switching
off the circuit breaker.
Ŷ %HVXUHDOOSDFNLQJPDWHULDOVDUHUHPRYHGIURPWKH
cooktop before operating to prevent ignition of these
materials.
Ŷ $YRLGVFUDWFKLQJRULPSDFWLQJJODVVGLVSOD\V'RLQJVR
may lead to glass breakage. Do not cook on a product
with broken glass. Shock, fire, or cuts may occur.
Ŷ 'RQRWOHDYHFKLOGUHQDORQHRUXQDWWHQGHGLQDQDUHD
where an appliance is in use. They should never
be allowed to climb, sit or stand on any part of the
appliance.
Ŷ 1HYHUEORFNWKHYHQWVDLURSHQLQJVRIWKHFRRNWRS
They provide the air inlets and outlets that are
necessary for the cooktop to operate properly with
correct combustion. Air openings are located around
the cooktop knobs.
Ŷ 8VHRQO\GU\SRWKROGHUV²PRLVWRUGDPSSRWKROGHUV
on hot surfaces may result in burns from steam. Do
not let pot holders touch surface burners and burner
grates. Do not use a towel or other bulky cloth in
place of pot holders.
Ŷ 6XUIDFHVRIWKHDSSOLDQFHPD\EHFRPHKRWHQRXJK
to cause burns. Potentially hot surfaces include the
burners, grates, any backguard, or high shelf surface.
Ŷ 'RQRWKHDWXQRSHQHGIRRGFRQWDLQHUV3UHVVXUH
could build up and the container could burst, causing
an injury.
Ŷ &RRNIRRGWKRURXJKO\WRKHOSSURWHFWDJDLQVW
foodborne illness. Minimum safe food temperature
recommendations can be found at
www.IsItDoneYet.gov and www.fsis.usda.gov. Use
a food thermometer to take food temperatures and
check several locations.
Ŷ 'RQRWDOORZDQ\RQHWRFOLPEVWDQGRUKDQJRQWKH
cooktop. They could damage the cooktop causing
severe injury or death.
Ŷ .HHSWKHYHQWLODWRUKRRGDQGJUHDVHILOWHUVFOHDQWR
maintain good venting and to avoid grease fires. Turn
the ventilator OFF in case of a fire or when intentionally
"flaming" liquor or other spirits on the cooktop. The
blower if in operation, could spread the flames.

6 49-80818
IMPORTANT SAFETY INFORMATION
READ ALL INSTRUCTIONS BEFORE USING THE APPLIANCE
READ AND SAVE THESE INSTRUCTIONS
WARNING
KEEP FLAMMABLE MATERIALS AWAY FROM THE COOKTOP
Failure to do so may result in fire or personal injury.
Ŷ 'RQRWVWRUHRUXVHIODPPDEOHPDWHULDOVQHDUWKH
cooktop, including paper, plastic, pot holders, linens,
wall coverings, curtains, drapes and gasoline or other
flammable vapors and liquids.
Ŷ 1HYHUZHDUORRVHILWWLQJRUKDQJLQJJDUPHQWVZKLOH
using the appliance. These garments may ignite if
they contact hot surfaces causing severe burns.
Ŷ 'RQRWOHWFRRNLQJJUHDVHRURWKHUIODPPDEOH
materials accumulate in or near the cooktop. Grease
on the cooktop may ignite.
WARNING
IN THE EVENT OF A FIRE, TAKE THE FOLLOWING
STEPS TO PREVENT INJURY AND FIRE SPREADING
Ŷ 'RQRWXVHZDWHURQJUHDVHILUHV1HYHUSLFNXSDIODPLQJSDQ7XUQWKHFRQWUROVRII6PRWKHUDIODPLQJSDQRQD
surface unit by covering the pan completely with a well-fitting lid, cookie sheet or flat tray. Use a multi-purpose dry
chemical or foam-type fire extinguisher.
WARNING
COOKTOP SAFETY INSTRUCTIONS
Ŷ 1HYHUOHDYHWKHVXUIDFHEXUQHUVXQDWWHQGHGDW
medium or high heat settings. Foods, especially oily
foods, may ignite resulting in fire that could spread to
surrounding cabinets.
Ŷ 1HYHUOHDYHRLOXQDWWHQGHGZKLOHIU\LQJ,IDOORZHGWR
heat beyond its smoking point, oil may ignite resulting
in fire that may spread to surrounding cabinets. Use
a deep fat thermometer whenever possible to monitor
oil temperature.
Ŷ 7RDYRLGRLOVSLOORYHUDQGILUHXVHWKHPLQLPXPDPRXQW
of oil when using a shallow pan-frying and avoid
cooking frozen foods with excessive amounts of ice.
Ŷ 8VHSURSHUSDQVL]HDQGDYRLGSDQVWKDWDUHXQVWDEOH
or easily tipped. Select cookware that is matched
to the size of the burner. Burner flames should be
adjusted so that they do not extend beyond the bottom
of the pan. Excessive flame may be hazardous.
Ŷ $OZD\VXVHWKH/,7(SRVLWLRQZKHQLJQLWLQJWKHWRS
burners and make sure the burners have ignited.
Ŷ :KHQXVLQJJODVVFHUDPLFFRRNZDUHPDNHVXUHLW
is suitable for cooktop service; others may break
because of sudden change in temperature.
Ŷ 7RPLQLPL]HWKHSRVVLELOLW\RIEXUQVLJQLWLRQRI
flammable materials and spillage, the handle of a
container should be turned toward the center of the
cooktop without extending over nearby burners.
Ŷ 'RQRWXVHDZRNZLWKDURXQGPHWDOVXSSRUWULQJ
The ring may trap heat and block air to the burner
resulting in a carbon monoxide hazard.
Ŷ 'RQRWDWWHPSWWROLIWWKHFRRNWRS'RLQJVRPD\
damage the gas tubing to the surface burners
resulting in a gas leak and risk of fire.
Ŷ :KHQGLVDEOLQJ/RFN&RQWURORQVRPHPRGHOV
make sure the surface controls are set to the OFF
position. This will prevent unintended gas flow from
the burners.
Ŷ 'RQRWXVHDOXPLQXPIRLOWRFRYHUWKHJUDWHVRU
line any part of the cooktop. Doing so may result
in carbon monoxide poisoning, overheating of the
cooktop surfaces, or a potential fire hazard.
STATE OF CALIFORNIA PROPOSITION 65 WARNINGS
WARNING
This product contains one or more chemicals known to the State of California to cause cancer, and
birth defects or other reproductive harm.

49-80818 7
IMPORTANT SAFETY INFORMATION
READ ALL INSTRUCTIONS BEFORE USING THE APPLIANCE
READ AND SAVE THESE INSTRUCTIONS
Radio Frequency Interference
This unit has been tested and found to comply with the
limits for a class B digital device, pursuant to Part 18
of the FCC rules. These limits are designed to provide
reasonable protection against harmful interference in
a residential installation. This unit generates, uses and
can radiate radio frequency energy and, if not installed
and used in accordance with the instructions, may cause
harmful interference to radio communications. However,
there is no guarantee that interference will not occur in
a particular installation. If this unit does cause harmful
interference to radio or television reception, which can
be determined by turning the unit off and on, the user is
encouraged to try to correct the interference by one or
more of the following measures:
Ŷ 5HRULHQWRUUHORFDWHWKHUHFHLYLQJDQWHQQDH
Ŷ ,QFUHDVHWKHGLVWDQFHEHWZHHQWKHXQLWDQGUHFHLYHU
Ŷ &RQQHFWWKHXQLWLQWRDQRXWOHWRUDFLUFXLWGLIIHUHQWIURP
that to which the receiver is connected.
CAUTION
Persons with a pacemaker or similar
medical device should exercise caution when using or
standing near an induction unit while it is in operation.
The electromagnetic field may affect the working of the
pacemaker or similar medical device. It is advisable
to consult your doctor or the pacemaker manufacturer
about your particular situation.
Ŷ8VHWKLVDSSOLDQFHRQO\IRULWVLQWHQGHGSXUSRVHDV
described in this Owner’s Manual.
Ŷ%HVXUH\RXUDSSOLDQFHLVSURSHUO\LQVWDOOHGDQG
grounded by a qualified installer in accordance with the
provided installation instructions.
Ŷ'RQRWDWWHPSWWRUHSDLURUUHSODFHDQ\SDUWRI\RXU
range unless it is specifically recommended in this
manual. All other servicing should be transferred to a
qualified technician.
Remote Enable Equipment
This device complies with part 15 of the FCC Rules.
Operation is subject to the following two conditions: (1) This
device may not cause harmful interference, and (2) this
device must accept any interference received, including
interference that may cause undesired operation.
The wireless communication equipment installed on this
range has been tested and found to comply with the limits
for a Class B digital device, pursuant to part 15 of the FCC
Rules. These limits are designed to:
(a) provide reasonable protection against harmful
interference in a residential installation. This equipment
generates, uses, and can radiate radio frequency energy
and, if not installed and used in accordance with the
instructions, may cause harmful interference to radio
communications. However, there is no guarantee that
interference will not occur in a particular installation. If
this equipment does cause harmful interference to radio
or television reception, which can be determined by
turning the equipment off and on, the user is encouraged
to try to correct the interference by one or more of the
following measures:
Ŷ5HRULHQWRUUHORFDWHWKHUHFHLYLQJDQWHQQD
Ŷ,QFUHDVHWKHVHSDUDWLRQEHWZHHQWKHHTXLSPHQWDQG
receiver.
Ŷ&RQQHFWWKHHTXLSPHQWLQWRDQRXWOHWRQDFLUFXLW
different from that to which the receiver is connected.
Ŷ&RQVXOWWKHGHDOHURUDQH[SHULHQFHGUDGLR79WHFKQLFLDQ
for help.
(b) accept any interference received, including interference
that may cause undesired operation of the device.
Note that any changes or modifications to the wireless
communication device installed on this oven that are not
expressly approved by the manufacturer could void the
user’s authority to operate the equipment.

8 49-80818
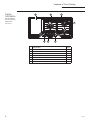
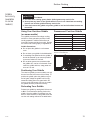
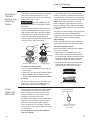
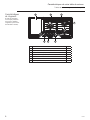
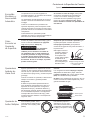
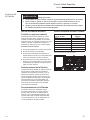
Design
Information
(Not all features
are on all models.
Appearance
may vary.)
Feature Index Page
1 Dual-Flame Spill-proof Burners-High Output 8
2 Multi-Ring Burners 8
3 Control Knobs (One For Each Surface Burner) 11
4 Burner "ON" Indicator Lights (One on each Control knob) —
5 Burner Grates 13
6 Griddle 10
7 Timer (on some models) 10
Features of Your Cooktop
Stainless Steel Gas Cooktops
2
374
65
1

49-80818 9
Cooktop Controls
Stainless Steel Gas Cooktops
Electronic
Ignition &
Automatic
Reignition
To Light
a Surface
Burner
Dual-flame
Stacked
Burners
Multi-Ring
Burner
The cooktop is equipped with electronic
ignition which eliminates the need for a
standing pilot light.
The burners on this cooktop will automatically
relight if the flame goes out.
All surface burner igniters will spark and make
clicking sounds when any burner is turned on.
Do not touch any of the burners when igniters
are clicking.
Occasionally the burners may spark if excess
wind or a draft blows the flame away from the
burner’s flame sensor.
In case of a power outage, you can light the
surface burners on your cooktop with a match.
Hold a lighted match to the burner, then turn
the knob to the LITE position. Use extreme
caution when lighting burners this way.
Push the control knob down and turn it
counterclockwise to the LITE position.
WARNING
Burners should be
operated only when covered by cookware.
Burner flames not covered by cookware
present a risk of fire or clothing ignition.
Never let flames extend beyond the sides
of the cookware. Failure to comply may
result in serious injury.
After the burner ignites, turn the knob to
adjust the flame size.
To turn a burner off, turn the knob clockwise,
as far as it will go, to the OFF position.
Ŷ Do not operate a burner
for an extended period
of time without cookware
on the grate. The finish
on the grate may chip
without cookware to
absorb the heat.
Some surface burners on your cooktop have
two sets of flames stacked one on top of the
other; the dual-flame burners have a lower
(simmer) flame and a upper (main) flame.
When a burner is turned on, the lower flame
will always light and stay on.
Simmering:
The stacked burner design provides a wide
cooktop of heat settings with which to simmer.
Depending on the type and quantity of food,
and pan size, the flame can be adjusted to suit
your specific need. The lowest setting uses
only the lower flame and can maintain delicate
foods at a safe 140°F.
Cooking:
Settings from LO to HI will use both upper and
lower flames. Use LO to HI for all purpose
cooking. Use HI with larger diameter cookware.
HI is a very high heat setting and is intended
to sear foods quickly and boil large quantities
of water.
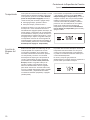
For large cookware, activate
all rings by setting the burner
between Hi and Med.
For small cookware or low
heating applications, only
activate the inner rings by
setting the burner between
Lo and Sim.
Lower
Flame
Upper Flame
Lower Flame
Push the control knob
in and turn it to the
LITE position.

10 49-80818
Timer
Gas Lockout
Feature
As a part of the power up sequence, the control
lights up all the display elements. To start the
timer, tap the Timer Start/Off pad once which
prompts the use to start adding time.
Ŷ 7RDGGWLPHWDSWKH+ pad.
Ŷ 7RUHPRYHWLPHWDSWKH– pad.
A single tap on the +- pads results in a 1
minute change in time. Pressing and holding
the +-SDGVZLOODXWRPDWLFDOO\DGGUHPRYH
more time. Time can be added or removed
from a running timer as long as the control
is not locked by tapping the +- pads. After
adding time, wait for 3 sec until the timer starts
count down automatically or to start the timer
immediately, tap the Timer Start/Off pad once.
To cancel a running timer and turn it off, tap the
Timer Start/Off pad once at any time. Once
the timer finishes count down, it expires. It then
starts flashing the display and starts producing
a notification tone of five beeps until the user
either adds more time to the timer or taps the
Timer Start/Off pad to cancel it and turn it off.
This feature can only be used after all the
knobs on the cooktop have been turned off.
If a knob is on, attempting to activate this
feature produces a chime and this feature is
not activated.
To lockout the flow of gas to the cooktop
and to lock the control, press and hold the
Lock Control pad for 3 seconds until a beep
is heard. After the beep the pad must be
released within 5 sec to activated this feature.
Upon activation of this feature, the “LOCKED”
icon on the display will start blinking and
depending on the state will stay lit (locked) or
turn off (unlocked).
It is possible to use the lockout feature while
the timer is running. Once the control is
locked, the timer can’t be turned on again until
the control is unlocked.
The control and the flow of gas can be
unlocked at any time by repeating the
procedure used to lock.
Cooktop Controls
Stainless Steel Gas Cooktops

49-80818 11
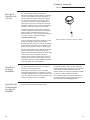
Turning on
Bluetooth
®
Selecting
Wi-Fi
Press and hold the Lock Control and Timer
Start/Off pads at the same time until a beep
is heard.
Release both pads after the beep to enter the
pairing mode for Bluetooth
®
.
The current state of the Bluetooth
®
is
displayed, tap on the + pad to toggle the state.
If no selection is made on this screen within
5 seconds, this screen times out and exits the
pairing mode. Repeat pairing mode sequence
to return to this screen.
Upon entry into pairing mode, the display shows
the current state of the Bluetooth
®
signal.
Tap the – pad to see the current state of the
Wi-Fi signal. Tap the + pad to toggle the state
of the Wi-Fi signal.
If no selection is made on this screen within
5 seconds, this screen times out and exits the
pairing mode. Repeat pairing mode sequence
to return to this screen.
Cooktop Controls
Stainless Steel Gas Cooktops

12 49-80818
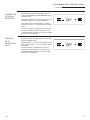
Surface Cooking
Stainless Steel Gas Cooktops
How to
Select
Flame Size
Stove Top
Grills
Watch the flame, not the knob, as you
increase or reduce heat.
The flame size on a gas burner should match
the cookware you are using.
FOR SAFE HANDLING OF COOKWARE,
NEVER LET THE FLAME EXTEND UP THE
SIDES OF THE COOKWARE. Any flame
larger than the bottom of the cookware will
not result in faster heating and could be
hazardous.
For surface stability, 6” minimum diameter
cookware is recommended. Use larger
diameter cookware for heat setting.
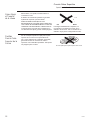
Do not use an after-market stove top grill on
your gas surface burners. A stove top grill will
cause incomplete combustion resulting in carbon
monoxide levels above allowable standards. This
could be hazardous to your health.
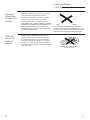
Do not use stove top grills

49-80818 13
Surface Cooking
Stainless Steel Gas Cooktops
Griddle
Accessory
(available
on some
models)
Using Your Cast-Iron Griddle
(on some models)
Your griddle provides an extra-large cooking
surface for meats, pancakes and other foods
usually prepared in a skillet. Before first use,
rinse with hot water and dry thoroughly. Prepare
the surface with cooking spray or vegetable oil.
Griddle Precautions:
Ŷ 'RQRWSODFHWKHJULGGOHLQDPLFURZDYH
oven.
Ŷ 'RQRWFOHDQ\RXUJULGGOHLQWKHGLVKZDVKHU
Ŷ ,IVRPHWKLQJKDVVSLOOHGXQGHUWKHJULGGOHLW
should be cleaned up as soon as possible
to prevent “baked on” food soil.
Ŷ 'RQRWDOORZJUHDVHWRDFFXPXODWHXQGHU
the griddle as it can be a fire hazard. Clean
under the griddle with hot, soapy water as
soon as it is cool.
Positioning Your Griddle
The cast-iron griddle (on some models) can only
be used over the left burners of the cooktop. To
position the griddle, place the griddle on top of
the left grate. Adjust the griddle until it is fully
seated and sitting flat on the grate below. Do
not turn on the left burners until you are certain
the griddle has been positioned correctly.
Preheating Your Griddle
Preheat your griddle by setting both left burners
to Hi for 5 minutes before placing food on the
griddle. Once the griddle is preheated, turn the
knob on each left burner to the griddle zone and
use the cook setting outlined in the table below.
CAUTION
Fire Hazard
Ŷ 8VHFDUHZKHQFRRNLQJJUHDV\IRRGV6SLOOHGJUHDVHPD\UHVXOWLQILUH
Ŷ 1HYHUSODFHDQ\LWHPVRQWKHJULGGOHZKHQLWLVQRWLQXVH+HDWIURPVXUURXQGLQJ
burners can heat the griddle and may result in fire.
Ŷ 3ODFHDQGUHPRYHWKHJULGGOHRQO\ZKHQJULGGOHLVFRRODQGDOOVXUIDFHEXUQHUVDUH
turned Off.
Type of Food Cook Setting
Bacon Med
Breakfast Sausage Links Med
Eggs Lo
Grilled Cheese Med-Lo
Hamburgers Med-Lo
Pancakes Med-Lo
Warming Tortillas Lo
Cook settings may need to be reduced if the griddle is
used for an extended time.
Preseasoned Cast-Iron Griddle

14 49-80818
Cooktop
Surface
Do not use oven cleaners, abrasive cleansers,
strong liquid cleansers, steel wool, plastic
scouring pads, or cleaning powders on the
cooktop surface. Clean with a mild soap and
ZDWHURUDVROXWLRQRIYLQHJDUDQGZDWHU
Rinse with clean water and dry with a soft
cloth. When cleaning surfaces, make sure that
they are at room temperature and not in direct
sunlight.
Spillage of marinades, fruit juices, tomato
sauces and basting liquids containing acids
may cause discoloration and should be wiped
up as soon as hot surfaces cool, then clean
and rinse.
Cleaning Knobs
For easier cleaning, the control knobs may be
removed by pulling them directly upwards once
the knobs are in the OFF position. The knobs
can be washed by hand with soap and water.
Do not submerge the knobs under water. If
water collects under the glass from underneath
the knob, it will drain out within 24 hours.
To replace knobs after cleaning, align the hole
on the knob backside with the gas valve shaft
and push downward until the knob is securely
fastened. All knobs are interchangeable.
Care and Cleaning
Stainless Steel Gas Cooktops
Stainless
Steel
Surfaces
Timer
Surface
(on some
models)
Do not use a steel-wool pad; it will
permanently scratch the surface.
To clean the stainless steel surface, use
warm sudsy water or a stainless steel cleaner.
Always wipe the surface in the direction of
the grain. Follow the cleaner instructions for
cleaning the stainless steel surface.
Spillage of marinades, fruit juices, tomato
sauces and basting liquids containing acids may
cause discoloration and should be wiped up as
soon as hot surfaces cool, then clean and rinse.
To inquire about purchasing stainless steel
appliance cleaner, please call our toll-free
number, 800.626.2002 or visit monogram.com.
Use a damp cloth to clean the glass.

49-80818 15
Care and Cleaning
Stainless Steel Gas Cooktops
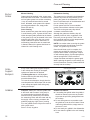
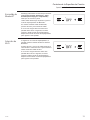
Burner cap not properly seated
Burner cap properly seated
The burner consists of three parts: the burner
base, burner head, and burner cap. The
burner head and burner cap can be lifted off,
making them easy to clean.
CAUTION
DO NOT OPERATE THE
BURNER WITHOUT ALL BURNER PARTS
IN PLACE.
Surface burners should be cleaned routinely,
especially after bad spillovers, which could
clog the slots and holes in the burner heads.
The electrode is located at the rear of each
burner. Do not attempt to disassemble or
clean around any burner while another burner
is on. An electric shock may result.
To remove the burner parts:
1. Turn all controls OFF before removing any
burner parts.
2. When cool, you may lift off the burner grates,
burner caps and burner heads for easier
cleaning. Do not remove the burner bases.
Cleaning
Lift off burner parts only when cool. Wash in hot,
soapy water. You may use a plastic scouring
pad to remove burned-on food particles.
To remove burned-on food, soak the burner
heads in a solution of mild liquid detergent and
hot water for 20–30 minutes. For more stubborn
stains, use a plastic scouring pad or toothbrush.
NOTE: Do not use steel wool or scouring
pads to clean the burner parts as these may
clog the openings. Never wash burner heads
in your dishwasher. Doing so may cause them
to discolor.
The ports in the burner heads must be kept clean
at all times for an even, unhampered flame.
Clogged or dirty burner ports or electrodes will
not allow the burner to operate properly.
After Cleaning
Before replacing the burner parts, shake out
excess water and then dry them thoroughly.
To replace the burner parts:
Make sure that the burner parts are replaced
in the correct location.
1. Replace the burner head on top of the
burner base, making sure that the hole in
the burner head is properly aligned with the
electrode in the burner base. A small gap
between the base and head is normal.
2. Place the burner cap on top of the burner
head. Make sure that the burner cap is
properly seated on the burner head.
Dual-flame
Stacked
Burners and
Multi-Ring
Burner
The electrode of the electronic ignition system
is positioned at the rear of the burner base.
When cleaning the cooktop, be careful not
to snag the igniter with your cleaning cloth.
Damage to the igniter could occur.
Be careful not to push in a control knob while
cleaning. It could cause the igniter to spark.
Make sure that the white ceramic igniters
on the cooktop are dry and clean. Clean the
metal portion of the electrode with a soft cloth
or emery board.
Do not attempt to remove the electrode
from the cooktop.
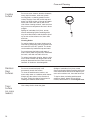
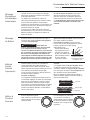
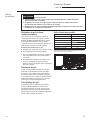
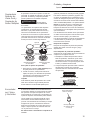
Spark
Igniter and
Electrodes
Clean this metal part
with an emery board.
Do not clean this white
ceramic part with an
emery board.
Multi-Ring BurnerDual-flame Stacked Burner
Cap
Cap
Electrode
Burner
Burner
Head
Burner
Base
Electrode
Burner
Cap

16 49-80818
Care and Cleaning
Stainless Steel Gas Cooktops
Burner
Grates
Manual Cleaning
Grates should be washed in hot, soapy water
and rinsed with clean water. To soften burned-
on food, place grates in a solution containing
¼-cup of household ammonia for several
hours. Afterward, scrub grates with a plastic
scouring pad soaked in hot, soapy water.
Rinse well and dry.
Oven Cleaning
Some models have grates that can be cleaned
in a self-cleaning oven. If grates do NOT have
rubber bumpers (pads) attached to the bottom
of the grates, they may be cleaned in the oven
using the self-clean cycle. See your oven's
Owner's Manual for specific instructions. If
self-cleaning instructions are not mentioned
in Owner's Manual, the grates should not be
cleaned in a self-cleaning oven.
Dishwasher Cleaning
The grates may be cleaned in the dishwasher.
Remove any burnt-on food particles prior to
placing the grates in the dishwasher. Place
them on the lowest rack of the dishwasher and
run on a "heavy duty" cycle.
Do not operate a burner for an extended
period of time without cookware on the grate.
The finish on the grate may chip without
cookware to absorb the heat.
Although the grates are durable, they will
gradually lose their shine, regardless of the
best care you can give them. This is due to
their continual exposure to high temperatures
and abrasion by the cookware.
NOTE: Use caution when removing the grates
from the oven after the self-clean cycle has
ended. The grates may still be hot.
Once the self-clean cycle is complete, the
grates may carefully be removed. You may
notice a white residue on the grates. Wipe it
off with a damp sponge. If white spots persist,
ZHWWKHVSRQJHZLWKDVROXWLRQRI
vinegar and water and wipe the grates again.
When replacing the grates on the cooktop, be
sure to locate them correctly. Grates should fit
securely into the cooktop.
If any of the rubber grate support bumpers
in the cooktop are missing or damaged,
replacement parts can be obtained.
Visit Monogram.com or call Monogram
Preferred Service (800.444.1845) during
normal business hours.
To insert the new bumpers, simply place the
cone-shaped end of the bumper into the hole
in the cooktop and push down while gently
twisting the bumper.
Grate
Support
Bumpers
Griddles
Cast-Iron: Clean your cast-iron griddle with
a stiff brush and hot water. Using soap is
not recommended, and harsh detergents
should never be used as they will remove
the seasoning. Rinse with hot water and dry
thoroughly. After a rinsing, preseason the
griddle by applying a light coat of cooking
oil to the griddle surface. Wipe off excess oil
with a paper towel.
Store in a cool, dry place.
Griddle Precautions:
Ŷ If something has spilled under the griddle, it
should be cleaned up as soon as possible
to prevent the spill from getting baked onto
the cooktop.
Ŷ Do not allow grease to accumulate under
the griddle as it can be a fire hazard. Clean
under the griddle with hot, soapy water as
soon as it is cool.
Ŷ Do not wash your griddle in the dishwasher.
Ŷ 'RQRWFOHDQWKHJULGGOHLQWKHVHOIFOHDQLQJ
oven.
2
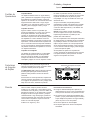
Grate Support Bumpers

49-80818 17
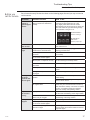
Before you
call for service
Save time and money! Review the charts on the following pages first and you may not need to
call for service.
Troubleshooting Tips
Stainless Steel Gas Cooktops
Problem Possible Causes What To Do
Burners have
yellow or
yellow-tipped
flames
The combustion quality of burner
flames needs to be determined
visually.
Determine the quality of flames visually. Normal
burner flames should look like (A) or (B).
Long, bright yellow flames are not normal.
Normal flames may show signs of an orange tint
when well heated or signs of flickering orange
due to particles in the gas or air.
Control knobs
will not turn
Knob isn’t pushed down. To turn from the OFF position, push the knob
down and then turn.
Burners do not
light
Plug on cooktop is not completely
inserted in the electrical outlet.
Make sure electrical plug is plugged into a live,
properly grounded outlet.
Gas supply not connected or
turned on.
See the Installation Instructions that came with
your cooktop.
A fuse in your home may be blown
or the circuit breaker tripped.
Replace the fuse or reset the circuit breaker.
Burner parts not replaced correctly. See the Cleaning the Cooktop section.
The electrodes under the burners
are soiled.
See the Cleaning the Cooktop section.
Cooktop is locked. Unlock the cooktop. See the Using the Cooktop
section.
The igniter hole (on some models)
is plugged.
See the Cleaning the Cooktop section.
Ticking sound
of igniter
persists after
burner lights
Control knob is still in the LITE
position.
Turn the knob out of the LITE position to the
desired setting.
Turn the burner off and relight. If ticking is still
present, call for service.
Auto-reignition feature is attempting
to re-ignite flame.
While in its lowest setting, the flame can be
shifted away from the burner's flame sensor by
drafts around the cooktop. Turn down or redirect
any fans or ventilation equipment operating
around the cooktop until sparking ceases.
Top burners
do not burn
evenly
Improper burner assembly. Make sure the burner caps are seated correctly.
See the Care and Cleaning of the range section.
Burner slots on the side of the
burner may be clogged.
Remove the burners for cleaning. See the Care
and Cleaning of the range section.
Unresponsive
keypad
Keypad is dirty Clean the keypad.
A fuse in your home may be blown
or the circuit breaker tripped.
Replace the fuse or reset the circuit breaker.
Timer control panel glass is wet
around its edges.
Dry the edges as best as possible and wait
several minutes for the timer buttons to become
responsive again.
(A) Soft blue flames—
Normal for natural gas
(B) Yellow tips on
outer cones—
Normal for propane gas

18 49-80818
Notes
Stainless Steel Gas Cooktops
Notes

49-80818 19
Warranty
Stainless Steel Gas Cooktops
EXCLUSION OF IMPLIED WARRANTIES
Your sole and exclusive remedy is product repair as provided in this Limited Warranty. Any implied
warranties, including the implied warranties of merchantability or fitness for a particular purpose, are
limited to one year or the shortest period allowed by law.
WHAT IS
COVERED
From the Date
of the Original
Purchase
LIMITED TWO-YEAR WARRANTY
For two years from date of original purchase, we will provide, free of charge, parts and service labor in your
home to repair or replace any part of the cooktop that fails because of a manufacturing defect.
This warranty is extended to the original purchaser and any succeeding owner for products purchased for
ordinary home use in the 48 mainland states, Hawaii and Washington, D.C. In Alaska the warranty is the
same except that it is LIMITED because you must pay to ship the product to the service shop or for the
service technician’s travel costs to your home.
All warranty service will be provided by our Factory Service Centers or by our authorized Customer Care
®
servicers during normal working hours.
Should your appliance need service, during warranty period or beyond, in the U.S.A. call 800.444.1845.
In Canada: 888.880.3030
Some states do not allow the exclusion or limitation of incidental or consequential damages, so the above
limitation or exclusion may not apply to you. This warranty gives you specific legal rights, and you may also
have other rights which vary from state to state.
To know what your legal rights are in your state, consult your local or state consumer affairs office or your
state’s Attorney General.
Warrantor: GE Appliances, a Haier company
Warrantor in Canada: MC Commercial, Burlington, ON, L7R 5B6
WHAT IS NOT
COVERED
Ŷ Service trips to your home to teach you how to
use the product.
Ŷ Discoloration of the griddle plate or oven racks.
Ŷ Chipping of porcelain enamel grates or oven
racks.
Ŷ Replacement of house fuses or resetting of
circuit breakers.
Ŷ Incidental or consequential damage caused by
possible defects with this appliance.
Ŷ Damage after delivery.
Ŷ Damage to the product caused by accident,
fire, floods or acts of God.
Ŷ Product damage or failure of the product if it
is abused, misused, used for other than the
intended purpose, or used commercially.
Ŷ Improper installation, delivery or maintenance.
If you have an installation problem, contact
your dealer or installer. You are responsible
for providing adequate electrical, gas,
exhausting and other connecting facilities
as described in the Installation Instructions
provided with the product.
Ŷ Product not accessible to provide required
service.
YOUR MONOGRAM COOKTOP WARRANTY
Staple your receipt here. Proof of the original purchase date is needed to
obtain service under the warranty.

20 49-80818
With the purchase of your new Monogram appliance, receive the
assurance that if you ever need information or assistance from
Monogram, we will be there. All you have to do is call!
Register Your
Appliance
Register your new appliance on-line at your convenience! Timely product registration will allow for
enhanced communication and prompt service under the terms of your warranty, should the need
arise. You may also mail in the pre-printed registration card included in the packing material.
In the US: Monogram.com
In Canada: Prodsupport.mabe.ca/crm/Products/ProductRegistration.aspx
Schedule Service
Expert Monogram repair service is only one step away from your door. Get on-line and schedule
your service at your convenience any day of the year.
In the US: Monogram.com
or call 800.444.1845 during normal business hours.
In Canada: GEAppliances.ca/en/support/service-request or call 888.880.3030
Extended
Warranties
Remote
Connectivity
Parts and
Accessories
Purchase a Monogram extended warranty and learn about special discounts that are available while
your warranty is still in effect.
In the US: Monogram.com
or call 800.444.1845 during normal business hours.
In Canada: GEAppliances.ca/en/support/purchase-extended-warranty or call 888.880.3030
For assistance with wireless network connectivity (for models with remote enable),
visit our website at
Monogram.com
or call
800.444.1845
in the US only.
Individuals qualified to service their own appliances can have parts or accessories sent directly to
their homes (VISA, MasterCard and Discover cards are accepted). Order on-line today 24 hours
every day.
In the US: Monogram.com or by phone at 800.444.1845 during normal business hours.
Instructions contained in this manual cover procedures to be performed by any user. Other
servicing generally should be referred to qualified service personnel. Caution must be
exercised, since improper servicing may cause unsafe operation.
Customers in Canada should consult the yellow pages for the nearest MC Commercial service center,
visit our website at GEAppliances.ca/en/products/parts-filters-accessories or call 888.880.3030.
Consumer Support
Stainless Steel Gas Cooktops
49-80818
12-17 GEA
Printed in the United States
La page est en cours de chargement...
La page est en cours de chargement...
La page est en cours de chargement...
La page est en cours de chargement...
La page est en cours de chargement...
La page est en cours de chargement...
La page est en cours de chargement...
La page est en cours de chargement...
La page est en cours de chargement...
La page est en cours de chargement...
La page est en cours de chargement...
La page est en cours de chargement...
La page est en cours de chargement...
La page est en cours de chargement...
La page est en cours de chargement...
La page est en cours de chargement...
La page est en cours de chargement...
La page est en cours de chargement...
La page est en cours de chargement...
La page est en cours de chargement...
La page est en cours de chargement...
La page est en cours de chargement...
La page est en cours de chargement...
La page est en cours de chargement...
La page est en cours de chargement...
La page est en cours de chargement...
La page est en cours de chargement...
La page est en cours de chargement...
La page est en cours de chargement...
La page est en cours de chargement...
La page est en cours de chargement...
La page est en cours de chargement...
La page est en cours de chargement...
La page est en cours de chargement...
La page est en cours de chargement...
La page est en cours de chargement...
La page est en cours de chargement...
La page est en cours de chargement...
La page est en cours de chargement...
La page est en cours de chargement...
-
 1
1
-
 2
2
-
 3
3
-
 4
4
-
 5
5
-
 6
6
-
 7
7
-
 8
8
-
 9
9
-
 10
10
-
 11
11
-
 12
12
-
 13
13
-
 14
14
-
 15
15
-
 16
16
-
 17
17
-
 18
18
-
 19
19
-
 20
20
-
 21
21
-
 22
22
-
 23
23
-
 24
24
-
 25
25
-
 26
26
-
 27
27
-
 28
28
-
 29
29
-
 30
30
-
 31
31
-
 32
32
-
 33
33
-
 34
34
-
 35
35
-
 36
36
-
 37
37
-
 38
38
-
 39
39
-
 40
40
-
 41
41
-
 42
42
-
 43
43
-
 44
44
-
 45
45
-
 46
46
-
 47
47
-
 48
48
-
 49
49
-
 50
50
-
 51
51
-
 52
52
-
 53
53
-
 54
54
-
 55
55
-
 56
56
-
 57
57
-
 58
58
-
 59
59
-
 60
60


GE ZGU30RSLSS Manuel utilisateur
- Catégorie
- Cuisinières
- Taper
- Manuel utilisateur
dans d''autres langues
- English: GE ZGU30RSLSS User manual
- español: GE ZGU30RSLSS Manual de usuario
