Brizo 6716814-BN Maintenance And Installation Manual
- Catégorie
- Articles sanitaires
- Taper
- Maintenance And Installation Manual
Ce manuel convient également à

12486.00 05.05
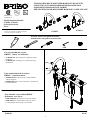
1
Models/Modelos/Modèles
6716815, 6716814
Series/Series/Seria
Trevit
Writepurchasedmodelnumberhere.
Escriba aquíelnúmero del modelocomprado.
Inscrivez lenuméro demodèleici.
Youmay need/Usted puedenecesitar/
Articlesdontvouspouvez avoirbesoin:
For easyinstallationofyour
BRIZOtfaucetyouwill need:
*ToREAD ALL theinstructionscompletely before
beginning.
*ToREAD ALL warnings,care,and maintenance
information.
Parainstalaciónfácil desullave
BRIZOtusted necesitará:
*LEERTODASlasinstruccionescompletamente
antesde empezar.
*LEERTODOSlosavisos,cuidados,einformación
demantenimiento.
Pourinstaller votre robinetBRIZOt
facilement, vousdevez :
*LIRE TOUTESlesinstructionsavantdedébuter.
*LIRE TOUSlesavertissementsainsiquetoutes
lesinstructionsdenettoyage etd’entretien.
TWO HANDLE DECK--MOUNTED ROMAN TUBFAUCETS
LLAVESDEAGUA PARA BAÑERASROMANASDEDOS
MANIJASINSTALADASENEL BORDE
MÉLANGEURSPOUR BAIGNOIREROMAINE-- POSESPLAGE
3mm
6716815 6716814
S
IL
IC
O
N
E
t
r
CSAB125
ASMEA112.18.1
ICC/ANSIA117.1
r

2
12
12486.00
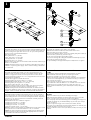
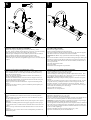
PREPARINGINSTALLATION
Determinewhichmodelyou want toinstall,with orwithouthandheldshowerand
whethertheshoweristo bepositionedtotherightorleftofthefaucet.Drill 3 or4
holesaccording tothis.Space hole centers4.5”to 10” apart,withequaldistance
betweencentersasrecommendedinstallation.
Holesize’sintub rim:
Hotregulation unit: 1¼”(32 mm)
Spout/outletunit: 1 1/8”(28,5mm)
Coldregulation unit: 1¼”(32 mm)
Hand showernest: 1 3/8”(35 mm)
Note:Toensureproper fit,do notoversize theseholes.If desired,all holesmay be
drilledat1 3/8”diameter.
Option:If mounting surface isuneven,usesiliconesealantunder faucetunits,in
addition to/ in place ofgaskets.Apply/removesealantaccording tomanufactur-
er’sinstructions.
INSTALLATIONOFHOT&COLD VALVEASSEMBLY
Disassemblethemanifold(5)piece fromavalve assembly.
Note:Blueinsert indicatescoldwater,redinsert indicateshotwater.
MakesureO--Ring (1)isin place as shown.
Insertvalveintomounting surface,securevalve assemblywith plasticwasher (2)
and metalwasher (3)and nut(4),as showninfig.2.
Lineup valvebody and tightenthenut(Hex.30 mm).
Take carenot to damagetheO--Rings.Reassemblethemanifold piece (5)with
brass washer (6)and securewith nut(7).
Lineup manifold piece and tightenthenut(Hex.24 mm).Do notovertighten.
1
3
5
2
4
6
7
PREPARANDOLAINSTALACIÓN
Determinequemodelo desea instalar,conosinlaregaderademanoosi la
regadera esparasercolocadaaladerechaoalaizquierdadelallavede agua.
Taladre3ó4agujerosde acuerdo con esto.Espacioentreloscentrosdelos
agujerosdemontajeseparadosde4.5“a10”,con igualdistancia entreloscentros
eslainstalación recomendada.
Tamañosdelosagujerosenlaorilladelabañera:
Unidadreguladorapara elagua caliente:1¼”(32 mm)
Unidad del tubo desalidade agua/caño:1 1/8”(28,5mm)
Unidadreguladorapara elaguafría:1¼”(32 mm)
Baseparalaregaderademano:1 3/8”(35 mm)
Nota:Para asegurarun ajuste correcto,no taladre estosagujerosmásgrandes.
Puedeoptarentaladrartodoslosagujerosaun diámetro de1 3/8”.
Opción:Si lasuperficiedeinstalación estádesnivelada,useselladordesilicón
debajo delasunidadesdelallavede agua,ademásde/enlugardelosempaques.
Aplique/remueva elselladorde acuerdo con lasinstruccionesdelfabricante.
PRÉPARATIFS
Déterminez lequeldesmodèlesvous souhaitez poser,avec ou sansladouche à
mainetdequelcôtévousvoulez poserladoucheàmain,àladroiteou àlagau-
chedu mélangeur.Percez 3ou4trous selon la configuration choisie.Espacez les
axesde4.5”à10”,selon vospréférences.L’installation conseillée prévoit une
distance égale entre chacun.
Dimensionsdestrous surlerebord delabaignoire:
assemblaged’eauchaude:1¼”(32 mm)
assemblagebec/sortie:1 1/8”(28,5mm)
assemblaged’eaufroide:1¼”(32 mm)
supportdeladoucheàmain:1 3/8”(35 mm)
N.B.:Pourassurerun bon ajustement,nesurdimensionnez paslestrous.Lestrous
percéspeuvent tousavoirun mêmediamètrede1 3/8”,sion ledésire.
Option:Si lasurface demontage est inégale,appliquez unepâtebouche--fentes
silicone appropriée en plusou aulieu desjoints.Appliquez/enlevez lasilicone
conformémentaux instructionsdu fabricant.
INSTALACIÓN DEL ENSAMBLE DE LA VÁLVULA CALIENTE
YFRÍA
Desensamblelaválvuladedistribución (59 delensambledelaválvula.
Nota:El indicadorazulesdelaguafríayelrojo delagua caliente.
Asegúreseque elAnillo--O(1)esté ensitiocomosemuestra.
Introduzca laválvula enagujerosdelasuperficiedemontaje,fije elensamblede
laválvula con la arandelaplástica (2)yla arandelademetal(3)ylatuerca (4),
comosemuestra enlafigura2.
Alínie elcuerpo delaválvulayaprietelatuerca (Hex.30 mm).
Tenga cuidado deno dañarlosAnillos--O.Re-- ensambleotravez laválvulade
distribución (5)con la arandeladebronce (6)yfijela con latuerca (7).
Alínielaválvuladedistribuciónyaprietelatuerca (Hex.24 mm).Noapriete
demasiado.
INSTALLATION DES SOUPAPESD’EAU CHAUDEETD’EAU
FROIDE
Démontez le collecteur (5)del’un desassemblagesdesoupape.
N.B.:L’indicateurbleuidentifiel’eaufroide,l’indicateur rougel’eauchaude.
Assurez--vousquelejoint torique(1)estposédelafaçon illustrée.
Placez lasoupapesurlasurface demontage,fixez l’assemblagedesoupape avec
larondelle en plastique(2),larondellemétallique(3)et l’écrou (4),delafaçon
illustréeàlafigure2.
Alignez le corpsdelasoupape etserrez l’écrou (cléàmolette,30 mm).
Ayez soin denepasendommagerlesjointstoriques.Replacez le collecteur (5)et
larondelledelaiton (6)etfixez--lesavec l’écrou (7).
Alignez le collecteuretserrez l’écrou (cléàmolette,24 mm).Neserrez pasexces-
sivement.

3
34
12486.00
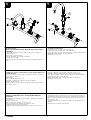
INSTALLATIONOFDIVERTERBODY (forspout)
On diverterbody assembly,roughlyadjustnut(8)torim thickness and
disassembletop piece (9) frombody (10).
Insertdiverterbody intomounting surface,fromunderneath,assemble
with gasket(11)and top piece (9),tightenthetop piece (size:1 1/2”,38
mm).Do notovertighten.
Securethebody withwasher (12)and nut(8).
Forleakagetest,assemble cap(13)totop piece,and secureit withsetscrew
(14).Allen key,3mm.
INSTALLATIONOFHAND HELDSHOWER
Remove connection piece (1) fromshowernest(2),disassemblenut(3)and
washer (4).
InsertShowernest intomounting surface,assemble and securewithwasher
(4)and nut(3).
Assembleshowerhead,elbow(8)and connecting piece (1)makesurethe
gaskets(5)isin place.
Attachtheshowerhose(6),gasket(7),toconnecting piece (1)and insert
theshowerassemblyintotheshowernest(2).
Connect theshowerhose(6),gasket(7),to 23”hose(8).
8
2
12
10
14
13
11
9
6
7
1
5
4
3
8
7
INSTALACIÓN DE LAPIEZAINVERSORA (paraelcaño)
Enelensambledel inversor,ajuste aproximadamentelatuerca (8)algrosor
delbordey desensamblelapieza de arriba(9)delcuerpo (10).
Introduzca el inversorenlasuperficiedemontaje,desde el interior,ensamble
elempaque(11)ylapieza de arriba(9)aprietelapieza de arriba(tamaño:1
1/2”,38 mm).Noaprietedemasiado.
Fije elcuerpo con la arandela(12)ylatuerca (8).
Paraprobarsihayfugasofiltración,ensamblelatapa(13)enlapieza de
arriba,yfíjela con el tornillo depresión (14).LlaveAllen,3mm.
INSTALLATION DE L’INVERSEUR (pourlebec)
Surl’assemblagedu corpsdel’inverseur,placez l’écrou (8)approximative-
mentàl’épaisseurdu rebordetdémontez lapièce supérieure(9)du corps
(10).
Introduisez le corpsdel’inverseurdansletrou demontagepar--dessous,
assemblez avec lejoint(11)et lapièce supérieure(9)etserrez lapièce supé-
rieure(1½”,38 mm).Neserrez pasexcessivement.
Fixez le corpsavec larondelle(12)et l’écrou (8).
Pourvérifierl’étanchéité,posez lebouchon (13)surlapièce supérieure et
serrez lavisd’arrêt(14).(Cléhexagonalede3mm).
INSTALACIÓN DE LA REGADERA DEMANO
Quitelapieza de conexión (1)delabasedelaregaderademano (2),
desensamblelatuerca (3)yla arandela(4).
Introduzca labasedelaregadera enlasuperficiedeinstalación,ensambley
fije con la arandela(4)ylatuerca (3).
Ensamblela cabeza delaregaderaylapieza de conexión (1)asegureque
elempaque(5)esté ensitio.
Conectelamangueradelaregadera(6),elempaque(7),alapieza de
conexión (1)eintroduzca elensambledelaregadera enlabasede ésta(2).
Conectelamangueradelaregadera(6),elempaque(7),alamanguerade
23”(8).
INSTALLATION DE LA DOUCHEÀMAIN
Enlevez labague(1)du supportdeladouche(2),puisdémontez l’écrou
(3)et larondelle(4).
Introduisez lesupportdeladouchedansletrou demontage etfixez--le
en place avec larondelle(4)et l’écrou (3).
Assemblez lapommededouche et labague(1)en veillantàcequele
jointétanche(5)soit bienen place.
Attachez leflexibled’arrosage(6)et lejointétanche(7)àlabague(1)
puisintroduisez l’assemblagededouchedanslesupportdeladouche
(2).
Raccordez leflexibled’arrosage(6)et lejointétanche(7)auflexiblede
23”(8).
8
5

4
5
12486.00
MAKECONNECTIONSTOWATERLINES
Thehoses supplied have½”--14 female connectionsthatcan beusedtoconnect
directlytothewatersupplies.
Option:Anadaptorkit hasbeenincludedwithadaptorsand nutsforball nose
type connectionsand ½”I.P.S.faucetconnections.See instructionsincludedwith
thekit.
Connecthosesaccording tofig.5.Makesurethewatersuppliesare connected
tothemaininletsideofthevalves.(Markedwitharrowsat themanifold piece.)
Tightenthehoses(1),butdo notovertighten.Attachcap(2)toshoweroutletat
thediverterbody,tightencap.
Turnonthewatersuppliestothevalvebody.Open hotand cold valves.
Carefullyinspectall connectionsforleakage,withthewaterpressureon.Re--
tightenifnecessary,butdo notovertighten.Repairasneeded.
Turn off watersuppliesand valves.
Firmlysecure all unitsafteryou haveverifiedthat installation iscorrect.
Position abucketundertheshoweroutlet,and depressurize thesystem,by re-
moving the cap(2).
Attachshowerhosetotheshoweroutletat thediverterbody,instead ofthe cap.
1
2
1
1
1
HAGALASCONEXIONESDE LASTUBERÍASDEAGUA
Lasmanguerasproporcionadastienenconexioneshembrasde½”--14 que
puedenserutilizadaspara conectardirectamentealos suministrosde agua.
Opción:Herramientasde adaptación hansido incluidascon losadaptadores
ytuercasparalasconexionesdelastuberíasdelasllavesde agua con
válvulasdebolaedeI.P.S.de½”.Vea lasinstruccionesincluidascon el
juego depiezas.
Conectelasmanguerasde acuerdo con lailustración 5.Asegúresequelos
suministrosde agua estánconectadosdel lado delatuberíaprincipaldelas
válvulas.(Indicada con lasflechasenlapieza
dedistribución)
Aprietelasmangueras(1),pero no demasiado.Conectelatapa(2)alasalida
delaregadera enlapieza inversora,aprietelatapa.
Abralos suministrosde aguaalaválvula.Abralasválvulascalientesylas
frías.
Conectelamangueradelaregadera al tubo desalidade agua enlapieza del
desviador,en vez delatapa.
Con la acción delapresión delagua,cuidadosamenteinspeccionetodaslas
conexionesparaversihayfugasofiltraciones.Siesnecesarioaprietede
nuevo,peronoaprietedemasiado.Repare cuando sea necesario.
Cierre elsuministro de aguaylasválvulas.
Firmementefijetodaslasunidadesdespuésdehaberse asegurado quela
instalación está correcta.
Coloqueun cubo debajo delatuberíadesalidade aguadelaregadera,y
alivielapresión delsistemaquitando latapa(2).
Conectelamangueradelaregadera al tubo desalidade agua enlapieza del
inversor,en vez delatapa.
RACCORDEZ LESCONDUITESD’EAU FROIDEETD’EAU
CHAUDE
Lesflexiblesfournis sontdotésderaccordsfemellesde1/2”--14 quipeuvent
seraccorderdirectementaux conduitesd’arrivée.
Option:Onajointun nécessaired’adaptation comprenantdesadapteurset
desécrousdestinésàrecevoirdesraccordsàboutsphériqueou desraccords
derobinet½”IPS.Lisez lesinstructionscomprisesdanslenécessaire.
Raccordez lesflexiblesdelafaçon illustréeàlafigure5.Assurez--vousque
lesconduitesd’arrivée sontraccordéesdu côtédel’entrée principaledes
soupapes(identifiéescommetellesparuneflèchesurle collecteur).
Serrez lesflexibles(1),sans serrerexcessivement.Posez lebouchon (2)sur
lasortiededouchedu corpsdel’inverseuretserrez.
Rétablissez l’arrivée d’eauaux soupapesetouvrez les soupapesd’eauchau-
de etd’eaufroide.
Inspectez soigneusement touslesraccordspourbien vérifierleurétan-
chéitésouslapression del’eau.Resserrez au besoinsanstoutefoistrop
serrer.Réparez s’il yalieu.
Coupez l’arrivée etfermez les soupapes.
Aprèsavoirvérifiéquel’installation estbienfaite,serrez solidement tous
leséléments.
Placez un seausouslasortiededouche etdépressurisez lesystème en
enlevant lebouchon (2).
Attachez leflexibled’arrosageàlasortiededouchesurle corpsdel’in-
verseurd’où vousavez ôtélebouchon.

5
67
12486.00
FLUSHYOUR SYSTEM
Turnonwatersupplies,ifclosed.
Removestreamstraightener from the end ofspout.
Turnfaucethandlestothefull on position.Turn on hotand coldwatersupplies
and flushwaterlinesforoneminute.Turn off faucethandles.
Important: Thisflushesawayany debristhatcouldcausedamagetointernal
parts.
Turnonfaucethandlesalittle,thewaterwill flowthrough thespout.Pickupthe
hand shower,and operatethediverter.Thefaucet isnowinshowermode,and
waterwill beflowing fromshowerhead.Closethehandles,and thediverter re-
turnstospout mode.
Checkall connectionsforleaks.
Repairasneeded.
Reassemblestreamstraightenertospoutoutlet.
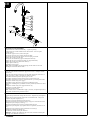
INSTALLATIONOFSPOUTASSEMBLY
Removethe cap(3)by loosening thesetscrew(4).Allen key,3mm.
Onspout/diverterassembly,loosenthelowersetscrew(5)at thediverterbody.
ApplyalittlesiliconegreasetotheO--Ringsand spoutnest(6).
Insert thespoutassemblyintothenest.Pushthespoutontothenestuntil it is
snug,with diverterknob locatedat theback ofthediverterbody.
Makesurethediverteroperatesfreely.Tightenthelowersetscrew(5).
Position thespout tothefront,and tightentheuppersetscrewtosecurethespout
in place.
4
3
5
6
INSTALACIÓN DEL ENSAMBLE DEL CAÑO
Quitelatapa(3)aflojando el tornillo depresión (4).LlaveAllen de3mm.
Enelensambledelcaño / inversor,afloje el tornillo depresión inferior (5)
colocado enelcuerpo inversor.
Apliqueunapequeña cantidad deselladordesilicón enlosanillos--Oyla
basedelaregaderademano (6).
Introduzca elensambledelcaño enlabase convexa.Empuje elcaño enla
basehastaquequede ajustado,con elpomo del inversorubicado enlaparte
posteriordel inversoro pieza inversora.
Asegureque el inversor funcionelibremente.Apriete el tornillo depresión
inferior.
Coloque elcaño hacia elfrente,yapriete el tornillo depresión superiorpara
fijarelcaño ensusitio.
INSTALLATIONDUBEC
Enlevez lebouchon (3)en desserrant lavisd’arrêt(4).Cléhexagonalede
3mm.
Surl’assemblagebec--inverseur,desserrez lavisd’arrêt inférieure(5)située
prèsdu corpsdel’inverseur.
Appliquez un peu delubrifiantsiliconesurlesjointstoriquesetsurlesupport
du bec (6).
Introduisez l’assemblagedu bec danslesupport.Appuyez surlebec jusqu’à
ce qu’il soit biencalé,en veillantàorienterlebouton situésurl’inverseurvers
l’arrière.
Assurez--vousquel’inverseur fonctionnelibrement.Serrez lavisd’arrêt infé-
rieure(5).
Orientez lebec versl’avantetserrez lavisd’arrêtsupérieurepour fixerlebec
solidementen place.
DEJEELAGUA CORRERPOREL SISTEMA
Abralos suministrosde agua,si lostiene cerrados.
Quite elrompechorrosde aguadelpico delcaño.
Girelasmanijaspara abrirelaguaalaposición completamente abierta.Abra
los suministrosde agua calienteyfríay dejeque elagua corraporlastuberías
porun minuto.Girelasmanijaspara cerrarelagua.
Importante:Estolimpia cualquier residuo quepueda causardaño alaspartes
internas.
Gireun pocolasmanijaspara abrirelagua,elaguasaldráporelcaño.Levante
laregaderademano,ymanipule el inversor.Lallavede agua está ahora en
función deregadera,yelaguasaldráporla cabeza delaregadera.Girelas
manijaspara cerrarelagua,yel inversorvolveráasufunción dellavede agua.
Revisetodaslasconexionesporsiexistenfugas.
Repare cuando sea necesario.
Ensambleotravez elrompechorros.
RINCEZ LE MÉLANGEUR
Rétablissez l’alimentation eneau,s’il yalieu.
Enlevez le canalisateurdejetsdu boutdu bec.
Ouvrez lesmanettesàfond.Ouvrez lesrobinetsd’arrivée d’eauchaude etd’eau
froide etrincez lesconduitespendantuneminute.Fermez lesmanettes.
Important:Lefait delaissercoulerl’eau permetd’évacuerlescorpsétrangers
quipourraientabîmerlescomposantsinternesdu mélangeur.
Ouvrez légèrement lesmanettespour faire coulerun peu d’eau du bec.Saisissez
ladoucheàmainetactionnez l’inverseur.Lemélangeurestalorsenmodedou-
che et l’eaucouledelapommededouche.Fermez lesmanetteset l’inverseurse
replace enmoderemplissage.
Vérifiez l’étanchéitédetouslesraccordsetréparez s’il yalieu.
Reposez le canalisateurdejets surl’extrémitédu bec.

6
89
12486.00
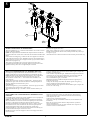
MAINTENANCESPOUT
If spout leaksatbaseofoutlet-- replace O--ring.(1).
If spout leaksatbaseofspoutbody -- replace O--ring.(2).
Unscrewtheupper/ lowersetscrewatspoutbase,by using a3mm Allen key.
Pull off spout/base,and replace O--ring on shank.
Assembleinreverseorder.
MAINTENANCE
SHUTOFF WATERSUPPLIESBEFORESERVICINGVALVE
ASSEMBLY
If faucet leaksoutofspoutorunderhandle-- replace valve cartridge.(1).
Pull off handle(2).
Removeblue/red plasticinsert(3).
Unscrewand replace valve cartridge,19 mm Hex.
Assembleinreverseorder.
Lineup handles,with valvesinclosed position,beforepushing handlesinto
place.
2
1
2
3
1
MANTENIMIENTO
CIERRE LASVÁLVULASDE ENTRADA ANTESDEPROCEDER CON
LA REPARACIÒN.
Sielaguase estáfiltrando porelcaño o pordebajo delamanija-- reemplace
elcartucho delaválvula.(1).
Halelamanija.
Quite el indicadorplásticoazul/rojo
Destornilleyreemplace elcartucho delaválvula,19 mm Hex.
Ensamble en ordeninverso.
Alínielasmanijas,con lasválvulasenlaposición cerrada,antesdepresionar
lasmanijasensusitio.
ENTRETIEN
FERMEZ L’ARRIVÉE D’EAU AVANTDERÉPARERLES
SOUPAPES
Si lemélangeur fuit parlebec ou souslamanette–remplacez la cartouchede
lasoupape.(1)
Tirez surlamanette.(2)
Retirez l’indicateurdeplastiquebleuourouge.(3)
Dévissez etremplacez la cartouche.Cléàmolette,19 mm.
Procédez dansl’ordreinversepour remonter.
Alignez lesmanettes surles soupapesferméesavantdelescaleren place.
MANTENIMIENTODEL CAÑO
Sielaguasefiltrapordebajo delcaño– reemplace elanillo--O.(2).
Sielaguasefiltraporelcuerpo delcaño– reemplace elanillo--O.(3).
Destornillelostornillosdepresión superioreseinferioresenlabasedel tubo
desalida,usando unallaveAllen de3mm.
Hale el tubo desalida/base,yreemplace elanillo--Oenla espiga.
Ensamble en ordeninverso.
ENTRETIEN-- BEC
Si lemélangeur fuit àlabasedel’inverseur -- remplacez lejoint torique.(1).
Si lemélangeur fuit entrelebec et l’inverseur -- remplacez lejoint torique(2).
Dévissez lavisd’arrêt(inférieureou supérieure)du becàl’aided’une clé
hexagonalede3mm.
Tirez pourdégagerlebec ou l’inverseuretremplacez lejoint toriquesurle
manchon.
Procédez dansl’ordreinversepour remonter.

7
10
12486.00
MAINTENANCEDIVERTER
If spout leaksoutofdiverterholein body -- replace top seal(3).
If spout leaksoutofoutletwith diverterinshowermode-- clean or replace
O--rings(4&5).
Unscrewtheuppersetscrew,removethespout.
Unscrewthelowersetscrew,removethediverterbody
Unscrewthediverterknob,thediverterstemand spring isreleased.
Replace theO--ring (5)on thestem,
Unscrewthedivertershank (6) (span:20 mm) from thebody.
Replace thetop seal(3)noting itsposition.(U--shapedownwards)
Replace theO--ring (4)on thedivertershank (6)
Replace plasticwasher (7).
Assembleinreverseorder.
Note:Whenreassembling thestemand spring,theflatsurface on thestem
should point towardsthediverterknob.
7
5
3
4
6
4
MANTENIMIENTODEL DESVIADOR
Sielcaño tieneunafiltración desde elagujero del inversor–reemplace elsello
superior (3).
Sielcaño tieneunafiltración desde el tubo desalida cuando tiene el inversoren
modo deregadera–limpieoreemplace losanillos--O(5&4).
Destornille el tornillo depresión superior,quite elcaño.
Destornille el tornillo depresión inferior,quite elcuerpo del inversor
Destornille elpomo del inversor.La espigadel inversoryelresortequedasuelto.
Reemplace elanillo--O(5)dela espiga,
Destornillela espigadel inversor (6) (alcance:20 mm)delcuerpo.
Reemplace elsellosuperior (3)tomando notadelaposición (LaformadeUhacia
abajo)
Reemplace elanillo--O(4)enla espigadel inversor (6)
Reemplace la arandelaplástica (7).
Ensamble en ordeninverso.
Nota:Cuando estére--ensamblando la espigayelresorte,lasuperficieplanadela
espigadebeseñalarhacia elpomo del inversor.
ENTRETIEN-- INVERSEUR
Si lebec fuit parletrou dansle corpsdel’inverseur–remplacez lejointsupérieur
(3).
Si lebec fuit parlasortielorsquel’inverseurestenmodedouche– nettoyez ou
remplacez lesjointstoriques(4et5)
Dévissez lavisd’arrêtsupérieure etenlevez lebec.
Dévissez lebouton del’inverseurpourdégagerlatige et leressortdel’inverseur.
Remplacez lejoint torique(5)surlatige.
Dévissez lemanchon del’inverseur (6) (cléde20 mm)du corps.
Remplacez lejointsupérieur (3)en prenantnotedesaposition.(Utournéversle
bas)
Remplacez lejoint torique(4)surlemanchon del’inverseur (6).
Remplacez larondelle en plastique(7).
Procédez dansl’ordreinversepour remonter.
Remarque:Lorsquevousremontez latige et leressort,orientez lasurface plate
delatigeverslebouton del’inverseur.

8
6716815
sPlease specifyfinishwhen ordering thisreplacementpart.
sSedeberá especificarelacabado cuando pida estapiezaderepuesto.
sVeuillezspécifierlefiniàlapassation de commandede ces pièces détachées.
BN =BrillianceRBrushedNickel
Nosuffixisrequiredforchrome.
Para cromonoes necesariounsufijo.
Aucun suffixe n’estexigépourchrome
12486.00
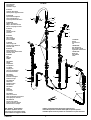
1.RP40101s
Flowstraightener
Rompechorros
Canalisateurdejets
2.RP40102
O--Ring forSpoutshank
Anillo--Oparala espigadelsurtidor
3.RP40103s
Spoutwithflowstraightener
Caño con Rompechorros
Joint toriquedu manchon du bec
5.RP40104
Setscrew
Tornillo depresión
Visd’arrêt
4.RP36269s
Handle+colourmarks
Manija+marcaciónes de color
Manette+marquagede couleur
14.RP40107
O--Ring
Juntatórica
Joint torique
16.RP40109s
Diverterknob,complete
Pomo parainversor,completo
Bouton d’inverseurcomplet
13.RP40106s
Hand shower
Regaderademano
Doucheàmain
15.RP40108
Gasketset fordiverter
Juego de empaques para el inversor
Jeu dejointspourl’inverseur
12.RP40105
Hose assembly
Ensambledemanguera
Flexibled’arrosage
6.RP36276
Nut&washer
Tuerca y arandela
Écrou etrondelle
7.RP40128
Valve cartridge,cold
Cartucho parala válvulafría
Cartouche,froid
8.RP40129
Valve cartridge,hot
Cartucho parala válvula caliente
Cartouche,chaud
9.RP28827
Hose
Manguera
Flexible
10.RP36278
Adapter
Acoplamiento
Accouplement
11.RP5861
Coupling nuts
Tuercas de acoplamiento
Ecrousdebranchement
17.RP36255
Wrench
Llave detuerca
Clé
18.RP42301s
Nest,hand shower
Base,regaderamanual
Logementdedoucheàmain
19.RP41951s
Elbowpiece
Tubo acodado
Coude
17
x2
4
5
1
15
16
6
10
11 x2
9
9
5
12
13
99
3
14
x2
7
8
2
18
19

9
sPlease specifyfinishwhen ordering thisreplacementpart.
sSedeberá especificarelacabado cuando pida estapiezaderepuesto.
sVeuillezspécifierlefiniàlapassation de commandede ces pièces détachées.
BN =BrillianceRBrushedNickel
Nosuffixisrequiredforchrome.
Para cromonoes necesariounsufijo.
Aucun suffixe n’estexigépourchrome
12486.00
1.RP40101s
Flowstraightener
Rompechorros
Canalisateurdejets
2.RP40102
O--Ring forSpoutshank
Anillo--Oparala espigadelsurtidor
3.RP40103s
Spoutwithflowstraightener
Caño con Rompechorros
Joint toriquedu manchon du bec
5.RP40104
Setscrew
Tornillo depresión
Visd’arrêt
4.RP36269s
Handle+colourmarks
Manija+marcaciónes de color
Manette+marquagede couleur
14.RP40107
O--Ring
Juntatórica
Joint torique
6.RP36276
Nut&washer
Tuerca y arandela
Écrou etrondelle
7.RP40128
Valve cartridge,cold
Cartucho parala válvulafría
Cartouche,froid
8.RP40129
Valve cartridge,hot
Cartucho parala válvula caliente
Cartouche,chaud
9.RP28827
Hose
Manguera
Flexible
10.RP36278
Adapter
Acoplamiento
Accouplement
11.RP5861
Coupling nuts
Tuercas de acoplamiento
Ecrousdebranchement
17.RP36255
Wrench
Llave detuerca
Clé
17
x2
4
5
1
6
10
11 x2
9
9
5
99
3
14
x2
7
8
2
6716814

10
Toutesles pièceset lesfinis du robinetBRIZOtsontprotégéscontreles défectuosités dematé-
riauet les vices defabrication parunegarantiequiestconsentie au premieracheteuretquide-
meurevalidetantque celui--cidemeurepropriétairedesamaison.Deltarecommandedefaire
appelàun plombiercompétentpourl’installation et laréparation du robinet.
Pendant lapériodedegarantie,DeltaremplaceraGRATUITEMENTtoutepièce ou toutfini,
présentantunedéfectuositédematériau ou un vice defabrication pourautantquel’appareil ait été
installé,utilisé etentretenu correctement.Pourobtenirdes piéces derechange,veuillez communi-
querpartéléphone au numéro 1--877--345--BRIZO(2749) (aux États--Unis ou auCanada)etpar
écrit àl’unedesadresses suivantes:
AuxÉtats--Unis
DeltaFaucetCompany
ProductService
55 E.111thStreet
Indianapolis,IN46280
AuCanada
DeltaFaucetCanada
Centredeservicestechniques
420 Burbrook Place
London,OntarioN6A4L6
PLACEMENTD’UN ÉLÉMENTAINSIQUE LES PERTESOU DOMMAGESDE TOUTE AUTRE
NATURENESONTPASCOUVERTS PARLA GARANTIE.Touteréclamation en vertu delaprésen-
tegarantiedoit être adresséeàDelta,accompagnée delapreuved’achat(originaldelafacture)du
premieracheteur.CETTE GARANTIE EST LASEULE OFFERTE PARDELTAFAUCET COMPANY
OUTDELTAFAUCET CANADA.SELON LE CAS.ELLE EXCLUT TOUTE AUTREGARANTIE,Y
COMPRISLA GARANTIEIMPLICITE DEQUALITÉ MARCHANDE.
Cettegarantie exclut toutusageindustrielou commercialou dans les places d’affaires,dont les
acheteurs sontcouverts parunegarantielimitée de cinq ans quiprend effetà compterdeladate
d’achat.Touteslesautresconditions delagarantiede cinq ans sont identiquesà celles delaprésente
garantieàl’exception deladurée de celle--ci.Laprésentegaranties’appliqueàtous lesrobinets
BRIZOtfabriquésaprèsle1erjanvier1995.
Dans les États ou les provinces òu il est interdit d’exclureou delimiterlesresponsabilitésàl’égard
des dommagesindirects ou fortuits,lesexclusions et leslimites susmentionnées nes’appliquentpas.
Les dommagesrésultantd’unemauvaiseutilisation,d’uneutilisation abusivedelanégligence ou de
l’utilisation depiècesautres quedes pièces d’origineDeltarRENDENT LA GARANTIENULLE ET
SANSEFFET.
Laprésentegarantievous donnedes droits précis quipeuventvarierselon votrelieu derésidence.
Ellenes’appliquequ’aux robinetsBRIZOtinstallésaux États--Unis,auCanada etau Mexique.
All partsand finishes oftheBRIZOtfaucetarewarrantedtotheoriginalconsumerpurchaserto
befree fromdefectsinmaterialand workmanshipforaslong astheoriginalconsumerpurchaser
owns theirhome.DeltaFaucetCompany recommends using aprofessionalplumber forall in-
stallation and repair.
Deltawill replace,FREE OFCHARGE,during thewarranty period,any partor finish thatproves
defectiveinmaterialand/orworkmanship undernormal installation,use and service.Replacement
partsmay beobtainedbycalling 1--877--345--BRIZO(2749) (intheU.S.and Canada)orby
writing to:
Todaslas piezas y acabados delallaveBRIZOtetán garantizados alconsumidorcomprador
original,de estarlibres dedefectos dematerialyfabricación,porel tiempo que elconsumidor
compradorsea dueño desu casa.DeltaFaucetCompany recomiendaqueuseun plomero
profesionalparatodaslasinstalaciones y reparaciones.
Deltareemplazará,LIBREDECARGO,durante elperíodo degarantía,cualquierpieza oacabado
quepruebetenerdefectos dematerialy/ofabricación bajoinstalación normal,uso y servicio.
Piezas derepuesto pueden serobtenidasllamando al1--877--345--BRIZO(2749) (enlos Estados
Unidos y Canada)oescribiendo a:
IntheUnited States:
DeltaFaucetCompany
ProductService
55 East111thStreet
Indianapolis,IN46280.
InCanada:
DeltaFaucetCanada
TechnicalService Centre
420 Burbrook Place
London ON N6A4L6
Enlos Estados Unidos:
DeltaFaucetCompany
ProductService
55 East111thStreet
Indianapolis,IN46280
EnCanada:
DeltaFaucetCanada
TechnicalService Centre
420 Burbrook Place
London ON N6A4L6
COMOTAMBIÉNCUALQUIEROTROTIPO DEPÉRDIDA O DAÑOSESTÁN EXCLUIDOS.
Pruebade compra(recibo originaldeventa)delcompradorconsumidororiginaldebedeser
disponibleaDeltaparatodos los reclamos.ESTAESLA GARANTÍAEXCLUSIVA DEDELTA
FAUCET COMPANY,QUENO HACECUALQUIEROTRA GARANTÍA DECUALQUIERTIPO,
INCLUYENDO LA GARANTÍAIMPLÍCITA DECOMERCIALIZACIÓN.
Estagarantía excluyetodo uso industrial,comercialy denegocio,cuyos compradores seles da
unagarantíalimitada extendidade cincoaños desdelafechade compra,con todos los otros
términos de estagarantía aplicados,exeptoeldeduración de ésta.Estagarantía esaplicablealas
llaves deBRIZOtfabricadas después deEnero 1,1995.
Algunos estados/provincias no permitenla exclusiónolimitación dedaños incidentales o
consecuentes,demaneraquelalimitaciónoexclusión arriba escritapuedeno aplicarleausted.
Cualquierdaño a estallave,resultado demaluso,abuso,o descuido,ocualquierotro uso de
piezas derepuesto queno sean genuinas deDeltarANULARÁN LA GARANTÍA.
Estagarantíaledaderechos legalesespecíficos,y usted puedetambiéntenerotros derechos que
varian de estado/provinciaaestado/provincia.Es aplicablesóloalasllavesBRIZOtinstaladasen
los Estados Unidos deAmerica,Canaday Mexico.
CLEANINGAND CARE
Careshould begiventothe cleaning ofthis product.Although itsfinish isextremely durable,it
can bedamaged by harsh abrasives orpolish.To clean,simplywipegentlywithadampclothand
blotdrywithasoft towel.
LIFETIMEFAUCET AND FINISHLIMITEDWARRANTY
WELL ASANY OTHERKIND OFLOSS ORDAMAGESARE EXCLUDED.Proofofpurchase
(originalsalesreceipt) from theoriginalconsumerpurchasermustbemade availabletoDeltafor
all warrantyclaims.THISISTHE EXCLUSIVEWARRANTYBY DELTAFAUCET COMPANY,
WHICH DOESNOT MAKEANY OTHERWARRANTY OFANY KIND,INCLUDING THE
IMPLIEDWARRANTY ORMERCHANTABILITY.
Thiswarrantyexcludesall industrial,commercialand business usage,whosepurchasersare
hereby extendedafiveyearlimitedwarrantyfrom thedateofpurchase,withall otherterms of
thiswarrantyapplying except theduration ofthewarranty.Thiswarrantyisapplicableto
BrizotfaucetsmanufacturedafterJanuary 1,1995.
Somestates/provinces do notallowthe exclusion orlimitation ofincidentalorconsequential
damages,so the abovelimitation orexclusion may notapplyto you.Any damagetothisfaucet
asaresult ofmisuse,abuse,orneglect,orany useofotherthan genuineDeltarreplacement
partsWILL VOIDTHEWARRANTY.
Thiswarranty gives you specificlegalrights,and you mayalso haveother rightswhich vary
fromstate/province to state/province.Itapplies onlyforBrizotfaucetsinstalledinthe
UnitedStates ofAmerica,Canada,and Mexico.
Thiswarrantyisextensiveinthatitcoversreplacementofall defectivepartsand evenfinish,but
these aretheonlytwothings thatare covered.LABOR CHARGESAND/ORDAMAGEIN-
CURREDININSTALLATION,REPAIR,OR REPLACEMENTAS
ã2004,MascoCorporation of Indiana
LIMPIEZA Y CUIDADODESULLAVE
Debedetenercuidado enlalimpieza de esteproducto.Aunquesu acabado esextremadamente
durable,puedeserdañado porabrasivos o pulimentos ásperos.Paralimpiarsimplementefrote
suavemente con un paño húmedo,y séquelocon un paño suave.
GARANTÍALIMITADA DEPOR VIDA DE LALLAVEYSU ACABADO
Estagarantía esextensiva enlo que cubre elreemplazamiento detodaslas piezas defectuosas y
hasta elacabado,peroéstas son las únicas dos cosas que estáncubiertas.CARGOSDE LABOR
Y/O DAÑOSINCURRIDOSENLAINSTALACIÓN,REPARACIÓN,OREEMPLAZAMIENTO
INSTRUCTIONSDENETTOYAGE
Ilfaut lenettoyeravec soin.Mêmesison finiestextrèmementdurable,il peutêtre abîmépardes
produitsfortementabrasifs ou des produits depolissage.Ilfautsimplement lefrotterdoucement
avec un chiffon humide et lesécheràl’aided’un chiffon doux.
GARANTIEÀ VIE LIMITÉE DESROBINETSET DE LEURSFINIS
Laprésentegaranties’applique auremplacementdetoutesles pièces défectueuses,ycomprisle
fini,etellene couvreque ceséléments.LES FRAISDE MAIN D’OEUVREET(OU)LESDOM-
MAGES PROVOQUÉSAU COURSDE L’INSTALLATION,DE LARÉPARATION OU DU REM--
ã2004,Division deMascoIndiana
ã2004,MascoCorporatión deIndiana
12486.00
-
 1
1
-
 2
2
-
 3
3
-
 4
4
-
 5
5
-
 6
6
-
 7
7
-
 8
8
-
 9
9
-
 10
10


Brizo 6716814-BN Maintenance And Installation Manual
- Catégorie
- Articles sanitaires
- Taper
- Maintenance And Installation Manual
- Ce manuel convient également à
dans d''autres langues
- English: Brizo 6716814-BN
- español: Brizo 6716814-BN


