Muskoka MHC35BL Guide d'installation
- Catégorie
- Cheminées
- Taper
- Guide d'installation

Español p. 26
Français p. 14
MHC35BL
2015-06-23
Important:
Retain for future reference:
Read carefully
Important :
Conserver pour référence
ultérieure : lire attentivement
Importante:
Conserve para referencias futuras:
Lea cuidadosamente antes de usar
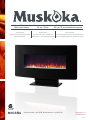
89 cm / 35 in curved
Wall mount heater
Foyer mural courbé de
89 cm / 35 po
Calefactor de pantalla curva de
89 cm / 35 po montable en la pared
Model/Modèle : MHC35BL Brand/Marque : MUSKOKA
®
218326

2
Table of Contents ...................................2
Safety Information ..................................2
Warranty ..........................................3
Pre-Installation .....................................4
Installation - Wall-Mount .............................7
Installation - Table Top ...............................9
Operation. . . . . . . . . . . . . . . . . . . . . . . . . . . . . . . . . . . . . . . . . 11
Care and Cleaning .................................13
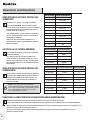
1. Read all instructions before using this fireplace.
2. Always unplug this appliance when not in use.
3. Children should be advised not to play with this fireplace.
4. Do not operate any heater with a damaged cord or plug or after
the heater malfunctions, has been dropped or damaged
in any manner. Return heater to authorized service facility for
examination, electrical or mechanical adjustment, or repair.
5. Any repairs to this appliance should be carried out by
qualified/authorized service personnel only.
6. Under no circumstances should this appliance be modified.
Parts having to be removed for servicing must be replaced
with original “OEM” (original equipment manufacturers) parts
only.
7. Do not use outdoors.
8. This appliance is not intended for use in bathrooms, laundry
areas, and similar indoor locations. Never locate this appliance
where it may fall into a bathtub or other water container.
9. Do not run the cord under carpeting. Do not cover the cord with
throw rugs, runners, or the like. Arrange the cord away from
traffic areas and where it will not be tripped over.
10. To disconnect heater, turn controls to off, then remove plug
from outlet.
11. Connect to properly grounded outlets only.
12. This appliance, when installed, must be electrically grounded
in accordance with local codes, with the current CSA C22.1
Canadian Electric codes, or for USA installations, follow local
codes and the National Electrical Code, ANSI/NFPA No. 70.
13. There is a thermostat limiter inside the fireplace. When the
inner temperature over heats or abnormal heating occurs, the
thermostat protective device will cut off power supply to avoid
damage to the fireplace or risk of fire.
14. This appliance has hot and arching or sparking parts inside.
Do not use it in areas where gasoline, paint, or flammable
liquids are used or stored. This appliance should not be used
as a drying rack for clothing, nor should Christmas stockings
or decorations be hung on or near it.
15. Use this appliance only as described in this manual. Any other
use not recommended by the manufacturer may cause fire,
electric shock, or injury to persons.
Table of Contents
Safety Information
WARNING: This heater is hot when in use. To avoid burns,
do not let bare skin touch hot surfaces. If provided, use
handles when moving this appliance. Keep combustible
materials, such as furniture, pillows, bedding, papers,
clothes, and curtains at least 0.9 m / 3 feet from front, sides
and rear of the heater.
CAUTION: Extreme caution is necessary when any heater
is used by or near children or invalids, and whenever the
heater is left operating and unattended.
CAUTION: Do not insert or allow foreign objects to enter
any ventilation or exhaust openings, as this may cause an
electric shock or fire, or damage to the heater.
CAUTION: To prevent a possible fire, do not block heater
air intakes or the exhaust in any manner. Do not operate
the heater on soft surfaces, like a bed, where openings may
become blocked.
CAUTION: When using electrical appliances, basic
precautions should always be followed to reduce the risk of
fire, electrical shock, and injury to persons.
CAUTION: Operate only on supplied stand or mounted to
wall.
16. Always plug heaters directly into a wall outlet/ receptacle. Never-
use with an extension cord or relocatable power tap (outlet/power
strip).
17. Do not use this appliance with a programmable timer or any other
device that switches the appliance on and off automatically. In
order to avoid a hazard due to inadvertent resetting of the thermal
cut out, this appliance must not be supplied through an external
switching device, such as a timer, or connected to a circuit that is
regularly switched on and off by an utility.
18. This product contains a button battery. If swallowed, it could
cause severe injury or death in just 2 hours. Seek medical
attention immediately.
IMPORTANT:
SAVE THESE INSTRUCTIONS.
Retain for future reference: Read carefully

3
WHAT IS COVERED
The manufacturer warrants that your new electric fireplace is free from manufacturing and material defects for a period of one year from
date of purchase, subject to the following conditions and limitations.
This electric fireplace must be installed and operated at all times in accordance with the instructions furnished with the product. Any
alteration, willful abuse, accident, or misuse of the product shall nullify this warranty. This warranty is non-transferrable, and is made to
the original owner, provided that the purchase was made through an authorized supplier of the manufacturer.This warranty is limited to the
repair or replacement of part(s) found to be defective in material or workmanship, provided that such part(s) have been subjected to normal
conditions of use and service, after said defect is confirmed by the manufacturer’s inspection. The manufacturer may, at its discretion, fully
discharge all obligations with respect to this warranty by refunding the wholesale price of the defective part(s).
WHAT IS NOT COVERED
Any installation, labor, construction, transportation, or other related costs/expenses arising from defective part(s), repair, replacement,
or otherwise of same, will not be covered by this warranty, nor shall the manufacturer assume responsibility for same. Further, the
manufacturer will not be responsible for any incidental, indirect, or consequential damages, except as provided by law.
All other warranties - expressed or implied - with respect to the product, its components and accessories, or any obligations/liabilities on
the part of the manufacturer are hereby expressly excluded. The manufacturer neither assumes, nor authorizes any third party to assume,
on its behalf, any other liabilities with respect to the sale of this product. The warranties as outlined within this document do not apply to
nonmanufacturer accessories used in conjunction with the installation of this product.
This warranty does not cover the light bulb(s) included with the fireplace.
This warranty is void if: the fireplace has been operated in atmospheres contaminated by chlorine, fluorine, or other damaging chemicals;
the fireplace is subjected to prolonged periods of dampness or condensation; the fireplace is altered, willfully abused, damaged by accident,
or misused in any way.
Make sure you have your warranty, your sales receipt, and the model/serial number of your product.
DO NOT ATTEMPT TO DO ANY SERVICE WORK YOURSELF. Please contact Customer Service at:
1 Year Warranty
1-866-253-0447 Monday to Thursday from 8:30AM to 5:00PM (EST),
Friday from 8:30AM to 4:00PM (EST)
Web: www.greenwayhp.com
Email: support@greenwayhp.com
Canada: 400 Southgate Dr., Guelph, Ontario, Canada, N1G 4P5
USA: 6440 W. Howard Street, Niles, Illinois U.S.A. 60714

4
PLANNING INSTALLATION
Before you begin assembly, locate the instructions and hardware. Compare all parts with the Hardware Included and Package Contents lists.
Be sure you have all the parts and can identify them. A helping hand is always good. Assemble your fireplace with an adult assistant if
possible. Some pieces are heavy and will need to be held by a helper. Assembly time will take approximately 5-20 minutes.
Before assembly, use scissors to unwrap the parts from the packaging. Do not use a knife, as you may cut into the heater pieces inside the
box and damage the finish. Check for the red hardware bag located inside the packaging, taped to the top of the box. Do not discard any
pieces. Use an appropriate screwdriver to insert and tighten all screws.
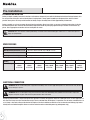
Pre-Installation
SPECIFICATIONS
Model No.
MHC35BL
Wall Mounted Dimensions W x D x H
91.5 cm / 36 in x 12.8 cm / 5 in x 44 cm / 17.3 in
Stand Mounted Dimensions W x D x H
91.5 cm / 36 in x 22.2 cm / 8.7 in x 54.1 cm / 21.3 in
Net Weight • Gross Weight
14.4 kg / 31.8 lb • 17.9 kg / 39.5 lb
Country
USA Canada Mexico UK Spain Australia Taiwan
Heater Rating
120V, 60Hz,
1400 W,
4777 BTUs
120V, 60Hz,
1400 W,
4777 BTUs
120V, 60Hz,
1400 W,
4777 BTUs
220-240V,
50Hz, 1400 W,
4777 BTUs
220-240V,
50Hz, 1400 W,
4777 BTUs
220-240V,
50Hz, 1400 W,
4777 BTUs
110V, 60Hz,
1200 W,
4094 BTUs
CAUTION: This carton includes a GLASS panel! Always use extreme caution when handling glass. Failure to do so could result in personal
injury or property damage.
ELECTRICAL CONNECTION
WARNING: Electrical outlet wiring must comply with local building codes and other applicable regulations to reduce the risk of fire, electrical
shock, and injury to persons.
WARNING: Do not use this fireplace if any part of it has been under water. Immediately call a qualified service technician to inspect the
fireplace and replace any part of the electrical system which has been under water.
A properly grounded outlet is required to operate this appliance. Preferably, the appliance will be on a dedicated circuit, as other appliances on
the same circuit may cause the circuit breaker to trip or the fuse to blow when the fireplace is in operation. The unit comes standard with a 1.8
m / 6 ft long 3-wire cord, exiting out the back of the fireplace. Plan the installation to avoid the use of an extension cord. Always plug heaters
directly into a wall outlet/receptacle. Never use with an extension cord or relocatable power tap (outlet/power strip).

5
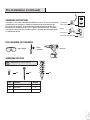
TOOLS REQUIRED (NOT INCLUDED)
Safety goggles
Phillips
screwdriver
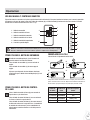
HARDWARE INCLUDED
NOTE: Hardware shown to actual size.
Part Description Quantity
AA Small Screw 12
BB Large Screw 4
CC Wall Anchor 4
AA
Pre-Installation (continued)
GROUNDING INSTRUCTIONS
This fireplace is for use with 110V/120V/220-240V power sources. The cord has a three-blade,
grounding-type plug. An adapter is available for connecting three-blade grounding-type
plugs to two-slot receptacles. The green grounding lug extending from the adapter must
be connected to a permanent ground, such as a properly grounded outlet box. The adapter
should not be used if a three-slot grounded receptacle is available. (Note: Grounding adapter
use prohibited in Canada)
Adapter
Grounding Lug
Cover of Grounded Outlet Box
Grounding Pin
Cover of Grounded Outlet Box
Metal
Screw
Power drill
BB CC

6
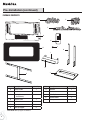
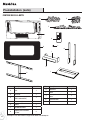
Part Description Quantity
A Electric Firebox 1
B Glass Front 1
C Mounting Bracket (attached
to the Firebox A)
1
D Acrylic Crystals 1
E Pebbles 1
F Log Set 1
G Table Top Support 2
PACKAGE CONTENTS
Pre-Installation (continued)
A
B
E
D
F
K
C
L
Part Description Quantity
H Deflector 1
I Front 1
J Table Top Base 1
K Remote Control 1
L Battery 1
G
H
I
J
Note: Both table top supports are identical.

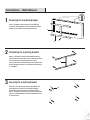
7
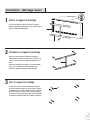
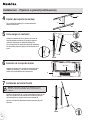
1
Removing the mounting bracket
□ Using a screwdriver, loosen the two screws (AA) that
secure the mounting bracket (C) to the top of the electric
firebox (A), and remove the mounting bracket (C).
Installation - Wall-Mount
2
Positioning the mounting bracket
□ Choose a solid wall. Position the mounting bracket (C)
where the electric firebox (A) is to be installed on the wall,
and ensure that the mounting bracket (C) is level.
□ Use a pen to mark the 4 mounting holes on the wall at the
desired mounting location, using the mounting bracket (C)
as a template.
3
Securing the mounting bracket
□ Insert the 4 self-drilling wall anchors (CC) into the wall
where previously marked. If installing the mounting
bracket (C) to a wall stud, there is no need to drill the
holes in the wood and no need for the plastic wall anchors
(CC). It is recommended to install the mounting bracket to
at least one stud.
CC
C
A
C
AA

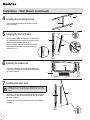
8
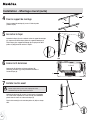
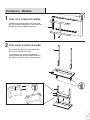
NOTE: This glass front is heavy. It is recommended that you use two
people at this stage to prevent damage to the glass front or the electric
firebox.
Installation - Wall-Mount (continued)
4
Securing the mounting bracket
□ Secure the mounting bracket (C) to the wall using four
large screws (BB).
5
Hanging the electric firebox
□ Hang the electric firebox (A) on the hooks at the bottom of
the mounting bracket (C), and push the top of the electric
firebox (A) into the mounting bracket (C).
□ Secure the electric firebox (A) to the mounting bracket
(C) by refitting the two small screws (AA) which were
removed in step 1.
6
Inserting the ember bed
□ Arrange the ember beds (acrylic crystals [D], pebbles [E]
or log set [F] ) along the inset window ledge at the front of
the electric firebox (A).
7
Installing the glass front
□ Lift the glass front (B) into place, making sure the 2 tabs on the top
back of the glass front (B) fit securely into the holes on the top of
the electric firebox (A).
□ Secure the glass front (B) by fastening two small screws (AA) on
both sides.
BB
C
A
B
WALL
A
D, E, or F
WALL
C
A
AA
AA

9
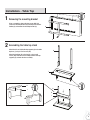
Installation - Table Top
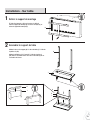
1
Removing the mounting bracket
□ Using a screwdriver, loosen the two screws (AA) that
secure the mounting bracket (C) to the top of the electric
firebox (A), and remove the mounting bracket (C).
2
Assembling the table top stand
□ Attach the left and right table top supports (G) to the table
top base (J) using 4 small screws (AA).
□ Attach the deflector (H) to the front (I) using 2 small
screws (AA). Slide the front assembly onto the table top
supports (G), and onto the base assembly.
J
G
H
H
I
I
G
A
C
AA
AA
AA

10
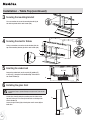
3
Securing the mounting bracket
□ Use a screwdriver to secure the mounting bracket (C) to
the table top stand with 4 small screws (AA).
Installation - Table Top (continued)
4
Securing the electric firebox
□ Using a screwdriver, secure the electric firebox (A) to the
top of the mounting bracket (C) with 2 small screws (AA).
NOTE: This glass front is heavy. It is recommended that you use two
people at this stage to prevent damage to the glass front or the electric
firebox.
6
Installing the glass front
□ Lift the glass front (B) into place, making sure the 2 tabs on the
top back of the glass fit securely into the holes on the top of the
electric firebox (A).
□ Secure the glass front (B) by fastening two small screws (AA) on
both sides.
5
Inserting the ember bed
□ Arrange the ember beds (acrylic crystals [D], pebbles [E]
or log set [F] ) along the inset window ledge at the front of
the electric firebox (A).
C
A
D, E, or F
AA
AA
A
C
A
B
STAND
AA

11
Operation
USING THE POWER BUTTON
□ The main power button (1) is located on the control panel
on the side of the electric fireplace.
□ Pressing the power button (1) once turns the power on.
□ Pressing the power button (1) again will turn the power
off.
□ If you find that none of the other buttons appear to work,
check to make sure that the main power (1) is turned on.
USING THE FLAME CONTROL BUTTON
□ Press the flame control button (2) to turn on the ember
bed and flame effect.
□ Pressing the flame control button (2) once turns flames on
and lights the ember bed.
□ Pressing the flame control button (2) again will cycle
through different colors of the ember bed. The color
rotation mode will cycle through the 3 different color
settings continuously. Reference the table for more
detailed information.
USING THE MANUAL AND REMOTE CONTROLS
On the top-right side plate of the electric fireplace (A) is the control panel. This panel contains the buttons to properly operate the electric
fireplace. The buttons on the control panel on the side of the electric fireplace (A) and the remote control (K) function in the same way. The
remote control has an effective range of up to 3.9 m / 13 ft.
K
3
4
5
2
1
Button Press Flame State Ember Bed Color
1st Press ON Amber
2nd Press ON Blue
3rd Press ON Amber and Blue
4th Press ON Color Rotation
1. Power Button
2. Flame Control Button
3. Thermostat Control Button
4. Side Light Control Button
5. Timer Control Button
6. Digital Display Panel
BATTERY REPLACEMENT
3 Volt lithium coin cell type 2032
1.
3.
2.
4.
1
2
3
4
5
6
This product contains a button battery. If swallowed, it could cause severe injury
or death in just 2 hours. Seek medical attention immediately. Please dispose of
the used battery per municipal or provincial/state law.
NOTE: The remote control is intended only for the functional operation product,
it cannot lock/unlock the heating function or adjust the temperature setting.

12
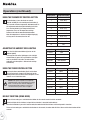
USING THE THERMOSTAT CONTROL BUTTON
□ The heat button (3) turns the heater on and off.
□ With the unit ON, press the control panel heat button (3)
for 5 seconds and enter temperature adjustment mode. In
the adjustment mode, the digital indicator (6) will flash.
□ Press the heat button (3) to change to the desired
temperature. There are 10 temperature settings.
Reference the table for more detailed information.
□ After the temperature is selected, the digital display (6)
will stay on for 10 seconds, then turn off.
ADJUSTING THE AMBIENT SIDE LIGHTING
□ Press the side light control button (4) to turn on the
ambient lighting.
□ To change the color of the lighting press the side light
control button (4) again. You can control the side lights
color as described in the table. The color rotation
mode will cycle through the 3 different color settings
continuously.
USING THE TIMER CONTROL BUTTON
□ Pressing the timer control button (5) will set the timer.
This interval period is shown in the display (6) on the
control panel on the side of the electric fireplace. The set
intervals are as listed in the table.
Operation (continued)
NOTE: If this product experiences exceptionally
high temperature, it may automatically stop heating.
If this occurs the product should be unplugged or
isolated from the main supply for a period of 30
seconds before the power is then re-supplied.
Button Press Side Light Color
1st Press Blue
2nd Press Amber
3rd Press Amber and Blue
4th Press Color Rotation
5th Press Off
Button Press Timer Interval Display Value
1st Press 1 Hour 1
2nd Press 2 Hour 2
3rd Press 3 Hour 3
4th Press 4 Hour 4
5th Press 5 Hour 5
6th Press 6 Hour 6
7th Press 7 Hour 7
8th Press 8 Hour 8
9th Press OFF NONE
Display Value Temperature Setting
0 18°C / 64°F
1 19°C / 66°F
2 20°C / 68°F
3 21°C / 70°F
4 22°C / 72°F
5 23°C / 74°F
6 24°C / 76°F
7 25°C / 78°F
8 26°C / 80°F
9 27°C / 82°F
N ON
NO HEAT FUNCTION (DEMO MODE)
□ To turn off heat mode, press and hold the heat button for 10 seconds to enter heat lock out mode.
□ Ember bed lights will flash 6 times to signal the heat function is turned off and locked out.
□ When the heat button is pressed in lock out mode, the ember bed will flash 6 times until heating mode is turned on
□ To turn on heat mode, press and hold the heat button for 10 seconds, the ember bed will flash 6 times and the heat function will be
restored.
10 SEC

13
□ Wipe the exterior surface of the electric firebox occasionally with a soft, damp cloth (not dripping wet), and dry the exterior surface
before operating.
□ Do not immerse the electric fireplace in water.
□ Do not use any cleaning chemicals such as detergents and abrasives.
□ Do not allow the interior to get wet, as this could create a hazard.
□ Light accumulated dust may be removed from the electric fireplace with a soft, dry cloth.
□ To store the electric fireplace, put it back into its original packaging and store in a clean, dry place.
□ The blower and flame motor are pre-lubricated for a durable using time and need no further lubrication or maintenance. Dust
particles will accumulate on/in the electric fireplace, so periodic cleaning/vacuuming of the electric fireplace is recommended.
IMPORTANT: Always unplug the power cord before cleaning the unit. Allow the unit to cool before cleaning it.
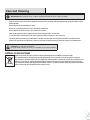
Care and Cleaning
CAUTION: Do not mix old and new batteries.
Do not mix alkaline, standard (carbon-zinc), or rechargeable (ni-cad, ni-mh, etc) batteries.
DISPOSAL OF USED BATTERIES
Battery may contain hazardous substances which could endanger the environment and human health.
This symbol marked on the battery and/ or packaging indicates that used battery shall not be treated as municipal
waste. Batteries should be disposed of at an appropriate collection point for recycling. By ensuring the used batteries are
disposed of correctly, you will help preventing potential negative consequences for the environment and human health.
The recycling of materials will help to conserve natural resources. For more information about recycling of used batteries,
please contact your local municipality waste disposal service.

14
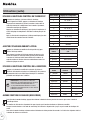
Table des matières .................................14
Renseignements de sécurité .........................14
GARANTIE ........................................15
Préinstallation .....................................16
Installation - Montage mural .........................19
Installation - Sur table ..............................21
Instructions de fonctionnement .......................23
Instructions d’entretien .............................25
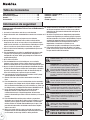
1. Lire toutes les instructions avant d’utiliser cet appareil de
chauffage.
2. Débrancher toujours l’appareil lorsqu’il n’est pas utilisé.
3. Les enfants devraient être avisés de ne pas jouer avec ce foyer.
4. Ne pas utiliser un appareil de chauffage pourvu d’un cordon
d’alimentation ou d’une fiche endommagés, ni après une défaillance
de l’appareil, ni si l’appareil est tombé au sol ou s’il a été endommagé
de quelque façon. Retourner l’appareil de chauffage à un atelier de
service autorisé pour faire effectuer une vérification, un ajustement des
systèmes électriques et mécaniques ou pour toute réparation.
5. Toute réparation de cet appareil doit être effectuée par un personnel
d’entretien qualifié et autorisé seulement.
6. La modification de cet appareil est absolument interdite. Les pièces qui
doivent être déposées pour un service d’entretien
doivent être remplacées des pièces d’origine seulement.
7. Ne pas utiliser à l’extérieur.
8. Cet appareil de chauffage n’a pas été conçu pour être utilisé dans une
salle de bain, une salle de lavage ni pour tout autre endroit similaire à
l’intérieur. Ne jamais placer cet appareil où il pourrai tomber dans la
baignoire ou un contenant rempli d’eau.
9. Ne pas acheminer le cordon sous un tapis. Ne pas couvrir le cordon
d’une moquette ou d’un tapis, ou de tout autre matériau similaire.
Disposer le cordon à bonne distance des zones de passage, à un endroit
où il ne risque pas d’être un obstacle.
10. Pour débrancher l’appareil, tourner la commande en position
d’arrêt (OFF), puis débrancher la fiche de la prise murale.
11. Branchez dans des prises correctement mises à la terre
seulement.
12. Lors de l’installation, veillez à ce que le foyer soit mis à la terre
conformément aux codes locaux, à la plus récente version du
Code canadien de l’électricité, CSA C22.1 ou, dans le cas des
installations aux É.-U., aux codes locaux et au code national de
l’électricité, ANSI/NFPA Nº 70.
13. Il y a un thermostat à l’intérieur du foyer. Quand la température interne
est trop élevée ou qu’un chauffage anormal se produit, le dispositif
protecteur à thermostat coupera l’alimentation pour éviter des
dommages au foyer ou un risque d’incendie.
14. Ce foyer renferme des pièces chaudes et qui produisent des arcs
électriques ou des étincelles. N’utilisez pas le foyer là où de l’essence,
de la peinture ou des liquides inflammables sont utilisés ou entreposés.
Cefoyer et ses environs ne doivent pas servir de support de séchage
pour les vêtements ni à accrocher des bas de Noël ou des décorations.
15. Utilisez cet appareil comme décrit dans ce manuel seulement. Toute
autre utilisation non recommandée par le fabricant pourrait causer un
incendie, une décharge électrique ou une blessure.
Table des matières :
Renseignements de sécurité
AVERTISSEMENT: Ce poêle est chaud lorsqu’il est utilisé.
Afin d’éviter les brûlures, ne touchez pas aux surfaces chaudes.
Si le poêle est muni de poignées, servez-vous des poignées pour
le déplacer. Assurez-vous que les matières combustibles, telles
que les meubles, les oreillers, la literie, le papier, les vêtements et
les rideaux, se trouvent au moins à 0,9m / 3 pi du devant, côtés
et arrière du radiateur.
MISE EN GARDE: Assurez une surveillance étroite quand
le foyer est utilisé par ou près des enfants ou des personnes
invalides et lorsque vous le laissez en marche sans surveillance.
MISE EN GARDE: N’insérez jamais un objet, quel qu’il soit,
dans les ouvertures de ventilation ou de sortie d’air du foyer
afin de prévenir les dommages ainsi que les risques de choc
électrique et d’incendie.
MISE EN GARDE: Afin de prévenir les risques d’incendie, ne
bloquez jamais les prises d’entrée ou de sortie d’air de quelque
façon que ce soit. Ne placez pas l’appareil sur une surface molle
comme un lit, car les ouvertures pourraient se bloquer.
MISE EN GARDE: Lors de l’utilisation d’appareils électriques,
des précautions fondamentales doivent toujours être observées
pour réduire le risque d’incendie, de choc électrique et de
blessure aux personnes, y compris qui suivent :
16. Toujours chauffe brancher directement dans une prise de
courant / de la prise murale. Ne jamais utiliser avec une
rallonge ou du robinet d’alimentation relocatable (bande de
sortie / puissance).
17. N’utilisez pas cet appareil avec une minuterie programmable
ou tout autre appareil qui allume ou éteint l’appareil
automatiquement. Afin d’éviter un risque causé par la
réinitialisation accidentelle de l’interrupteur thermique, cet
appareil ne doit pas être alimenté par l’entremise d’un appareil
interrupteur externe, comme une minuterie, ou être branché sur
un circuit étant régulièrement allumé et éteint par un appareil.
18. Cet article contient une pile bouton. De graves blessures
ou la mort pourraient suivre dans les deux heures suivant
l’ingestion. Demander l’aide de professionnels de la santé
sur-le-champ.
IMPORTANT:
CONSERVER CES INSTRUCTIONS.
Conserver pour référence ultérieure : lire attentivement
MISE EN GARDE: Utiliser seulement sur le support fourni ou
monté au mur.

15
CE QUI EST COUVERT
Le fabricant garantit que votre nouveau foyer électrique est exempt de défauts de matériau et de fabrication pour une période d’un an à compter de la date
d’achat, sous réserve des conditions et limitations suivantes.
Ce foyer électrique doit être installé et fonctionner en tout temps conformément aux instructions fournies avec le produit. Toute altération, abus volontaire,
accident ou mauvais usage du produit annulera cette garantie. Cette garantie n’est pas transférable et est faite au propriétaire d’origine, à condition que
l’achat a été effectué par l’intermédiaire d’un fournisseur agréé du fabricant.Cette garantie est limitée à la réparation ou au remplacement de la pièce qui
comporte un défaut de matériel ou de fabrication, à condition que cette pièce ait été soumise à des conditions normales d’utilisation et de service, après
que ledit défaut soit confirmé par l’inspection du fabricant. Le fabricant peut, à sa discrétion, assumer pleinement toutes ses obligations à l’égard de cette
garantie en remboursant le prix de gros de la pièce défectueuse.
QU’EST-CE QUI N’EST PAS COUVERT
Toute installation, travail, construction, transport ou autres frais connexes/dépenses découlant de pièce(s) défectueuse(s), réparation, remplacement, ou
sinon de même, ne sont pas couverts par cette garantie, ni que le fabricant assume la responsabilité de même. En outre, le fabricant ne pourra être tenu
pour responsable de tout dommage indirect, ou dommages indirects, sauf dans les cas prévus par la loi.
Toutes les autres garanties - expresses ou implicites - en ce qui a trait au produit, ses composants et accessoires, ou toutes les obligations ou
responsabilités de la part du fabricant sont expressément exclues. Le fabricant n’assume, ni n’autorise aucun tiers à assumer en son nom toute autre passif
à l’égard de la vente de ce produit. Les garanties décrites dans le présent document ne s’appliquent pas aux accessoires, autres que ceux du fabricant,
utilisés en conjonction avec l’installation de ce produit.
Cette garantie ne couvre pas les ampoules incluses avec le foyer.
Cette garantie est nulle si : le foyer a été utilisé dans une atmosphère contaminée par du chlore, du fluor, ou autres produits chimiques nuisibles; le foyer est
soumis à des périodes prolongées d’humidité ou de condensation; le foyer est modifié, sciemment abusé, endommagé par accident, utilisation abusive de
quelque façon.
Assurez-vous d’avoir votre garantie, votre reçu de vente et le modèle/numéro de série de votre produit.
NE PAS TENTER DE FAIRE TOUT TRAVAIL D’ENTRETIEN VOUS-MÊME. COMMUNIQUEZ AVEC LE SERVICE À LA CLIENTÈLE AU NUMÉRO SANS FRAIS SUIVANT :
Garantie Limitée D’un An
1-866-253-0447 Du lundi au jeudi, de 8:30 à 5:00 h (HNE),
le vendredi, de 8:30 à 4:00 h (HNE)
Site web : www.greenwayhp.com
Courriel : support@greenwayhp.com
Au Canada : 400 Southgate Dr., Guelph, Ontario, Canada, N1G 4P5
Aux États-Unis : 6440 W. Howard Street, Niles, Illinois U.S.A. 60714

16
PLANIFIER L’INSTALLATION
Avant de commencer, ayez sous la main les directives d’installation et les articles de quincaillerie. Sortez toutes les pièces et comparez-les par
rapport aux schémas ci-dessous. Assurez vous d’avoir toutes les pièces et de pouvoir les identifier. L’Assemblage de ce produit nécessite deux
personnes. Il vous faudra environ 5-20 minutes pour faire l’assemblage.
Avant de commencer l’assemblage, utilisez des ciseaux pour déballer les pièces de leur emballage. N’UTILISEZ PAS un couteau pour ne pas
couper le manteau à l’intérieur de la boîte et pour ne pas endommager la finition. Vérifiez le sac rouge contenant les articles de quincaillerie; ce
sac se trouve à l’intérieur de l’emballage; le sac est fixé à l’aide de ruban adhésif sur la boîte supérieure. Assurez-vous que vous ne jetez aucune
pièce.
Préinstallation
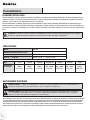
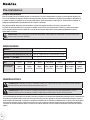
SPÉCIFICATIONS
ATTENTION : Cette boîte contient un panneau de VERRE! Soyez toujours extrêmement prudent quand vous manipulez
du verre. Un manque de prudence pourrait causer une blessure ou des dommages à la propriété.
Modèle
MHC35BL
Dimensions de xation murale L x P x H
91.5 cm / 36 po x 12.8 cm / 5 po x 44 cm / 17.3 po
Dimensions de support L x P x H
91.5 cm / 36 po x 22.2 cm / 8.7 po x 54.1 cm / 21.3 po
Poids net • Poids brut
14.4 kg / 31.8 lb • 17.9 kg / 39.5 lb
Pays
É.-U.A. Canada Mexique Royaume-Uni Espagne Australie Taiwan
Spécications
de chauffage
120V, 60Hz,
1400 W,
4777 BTUs
120V, 60Hz,
1400 W,
4777 BTUs
120V, 60Hz,
1400 W,
4777 BTUs
220-240V,
50Hz, 1400 W,
4777 BTUs
220-240V,
50Hz, 1400 W,
4777 BTUs
220-240V,
50Hz, 1400 W,
4777 BTUs
110V, 60Hz,
1200 W,
4094 BTUs
RACCORDEMENT ÉLECTRIQUE
MISE EN GARDE: Le câblage électrique doit être conforme aux codes du bâtiment locaux et à la réglementation en
vigueur afin de prévenir les risques d’incendie, les chocs électriques et les blessures.
MISE EN GARDE: Ne pas utiliser le manteau de foyer si une partie de l’appareil a été immergée dans l’eau. Dans ce
cas, communiquer immédiatement avec un technicien qualifié pour faire vérifier le manteau de foyer et pour faire
remplacer les pièces du système électrique qui ont été immergées.
Un circuit pourvu d’une fiche mise à la terre est nécessaire pour le fonctionnement de cet appareil. De préférence, le manteau de foyer doit être
un circuit indépendant et dédié, car les autres appareils sur un même circuit risqueraient de déclencher le disjoncteur lors du fonctionnement
de l’appareil de chauffage. L’unité propose de série un cordon d’alimentation de 1,8 m / 6 pi raccordé derrière le manteau de foyer. Planifier
une installation qui ne nécessite pas l’utilisation d’une rallonge. Toujours chauffe brancher directement dans une prise de courant / de la prise
murale. Ne jamais utiliser avec une rallonge ou du robinet d’alimentation relocatable (bande de sortie / puissance).

17
OUTILS NÉCESSAIRES (NON INCLUS)
Lunettes de
sécurité
Tournevis
cruciforme
MATÉRIEL INCLUS
REMARQUE: Les outils sont montrés dans leur
taille réelle.
Pièce Description Quantité
AA Petite vis 12
BB Grande vis 4
CC Ancre 4
Préinstallation (suite)
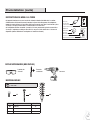
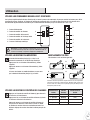
INSTRUCTIONS DE MISE À LA TERRE
Cet appareil fonctionne sous une tension de 110volts/120volts/220-240 volts. Le cordon
d’alimentation a été branché comme le montre la figure 1A du diagramme. Un adaptateur,
comme le montre la figure 1C, peut être utilisé pour raccorder une fiche à trois broches (mise
à la terre) à une prise à deux fentes. La fiche de mise à la terre verte
de l’adaptateur doit être raccordée à une mise à la terre permanente (prise de courant mise
à la terre). L’adaptateur ne doit pas être utilisé si une prise à trois fentes mise à la terre est
disponible. (Notez: Utilisation d’un adapteur est interdit au Canada).
Perceuse
Broche de
mise à la terre
Couvercle d'une boîte
de prises mises à la terre
Adaptateur
Éléments de mise
à la terre
Vis à métal
Couvercle d'une boîte
de prises mises à la terre
AA BB CC

18
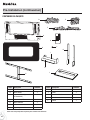
Pièce Description Quantité
A Foyer 1
B Vitre avant 1
C
Support de montage (fixé à la
boîte à combustion A)
1
D Cristaux acryliques 1
E Cailloux 1
F Ensemble de bûches 1
G
Supports pour installation
sur table
2
CONTENU DE DE LA BOÎTE
Préinstallation (suite)
Pièce Description Quantité
H Déflecteur 1
I Avant 1
J
Base pour installation sur
table
1
K Télécommande 1
L Pile 1
A
B
E
D
F
K
C
L
G
H
I
J
Remarque : Les deux meilleurs supports de table sont identiques.

19
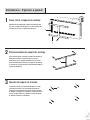
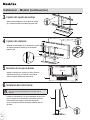
1
Retirer le support de montage
□ À l’aide d’un tournevis, dévissez les deux vis (AA) qui
fixent le support de montage (C) au dessus du foyer (A), et
retirez le support de montage (C).
Installation - Montage mural
2
Positionner le support de montage
□ Choisissez un mur solide. Positionnez le support de
montage (C) à l’endroit où le foyer (A) sera installé sur le
mur, et assurez-vous que le support de montage (C) est
droit.
□ Utilisez un crayon pour marquer les 4 trous de montage
sur le mur à l’emplacement de montage désiré, en
utilisant le support de montage (C) comme guide.
3
Fixer le support de montage
□ Insérez les 4 ancrages muraux autoperceurs (CC) dans
le mur aux endroits marqués. Si vous installez le support
de montage (C) sur un mur à montants, vous n’avez pas à
percer les trous dans le bois et vous n’avez pas à utiliser
les ancrages muraux de plastique (CC). Il est recommandé
d’installer le support de montage à au moins un montant.
CC
C
A
C
AA

20
REMARQUE : Cette vitre est lourde. Il est recommandé
d’avoir 2 personnes pour cette étape pour éviter
d’endommager la vitre avant ou le foyer.
Installation - Montage mural (suite)
4
Fixer le support de montage
□ Fixez le support de montage (C) au mur à l’aide de quatre
grandes vis (BB).
5
Accrocher le foyer
□ Accrochez le foyer (A) sur les crochets au bas du support de montage
(C), et poussez le haut du foyer (A) dans le support de montage (C).
□ Fixez le foyer (A) au support de montage (C) en replaçant les deux
petites vis (AA) qui ont été retirées à l’étape 1.
6
Insérer le lit de braises
□ Arrangez les lits de braises (cristaux acryliques [D],
cailloux [E] ou bûches [F]) le long du bord de la fenêtre à
l’avant du foyer (A).
7
Installer la vitre avant
□ Soulevez la vitre avant (B), en vous assurant que les 2 languettes
sur le côté arrière supérieur de la vitre avant (B) sont solidement
placées dans les trous sur le dessus du foyer (A).
□ Fixez la vitre avant (B) en vissant deux petites vis (AA) sur chaque
côté.
BB
C
A
B
MUR
A
D, E, ou F
MUR
C
A
AA
AA
La page charge ...
La page charge ...
La page charge ...
La page charge ...
La page charge ...
La page charge ...
La page charge ...
La page charge ...
La page charge ...
La page charge ...
La page charge ...
La page charge ...
La page charge ...
La page charge ...
La page charge ...
La page charge ...
La page charge ...
-
 1
1
-
 2
2
-
 3
3
-
 4
4
-
 5
5
-
 6
6
-
 7
7
-
 8
8
-
 9
9
-
 10
10
-
 11
11
-
 12
12
-
 13
13
-
 14
14
-
 15
15
-
 16
16
-
 17
17
-
 18
18
-
 19
19
-
 20
20
-
 21
21
-
 22
22
-
 23
23
-
 24
24
-
 25
25
-
 26
26
-
 27
27
-
 28
28
-
 29
29
-
 30
30
-
 31
31
-
 32
32
-
 33
33
-
 34
34
-
 35
35
-
 36
36
-
 37
37


Muskoka MHC35BL Guide d'installation
- Catégorie
- Cheminées
- Taper
- Guide d'installation
dans d''autres langues
- English: Muskoka MHC35BL Installation guide
- español: Muskoka MHC35BL Guía de instalación
Documents connexes
-
Muskoka MHC42BL Manuel utilisateur
-
-
-
-
-
-
-
-
-