
24" E Series Oven
Use and Care Guide
CLEANING, MAINTENANCE,
AND MORE

2 | Wolf Customer Care 800.222.7820
Contents
3 24" E Series Oven
4 Safety Precautions
6 24" E Series Oven Features
7 Oven Operation
15 Care Recommendations
17 Troubleshooting
19 Wolf Warranty
24" E Series Oven

wolfappliance.com | 3
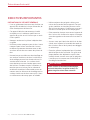
Customer Care
The model and serial number are printed on the enclosed
product registration card. Both numbers are also listed
on the product rating plate. Refer to page 6 for rating
plate location. For warranty purposes, you will also need
the date of installation and name of your authorized Wolf
dealer. Record this information below for future reference.
SERVICE INFORMATION
Model Number
Serial Number
Date of Installation
Certified Service Name
Certified Service Number
Authorized Dealer
Dealer Number
If your product ever needs attention, be sure to use a
Wolf Factory Certified Service provider recommended
by our Customer Care Center, or select one from our list
of providers available at wolfappliance.com/locator. All
Factory Certified Service providers are carefully selected
and thoroughly trained by us.
Important Note
To ensure this product is installed and operated as safely
and eciently as possible, take note of the following types
of highlighted information throughout this guide:
IMPORTANT NOTE highlights information that is especially
important.
CAUTION indicates a situation where minor injury or prod-
uct damage may occur if instructions are not followed.
WARNING states a hazard that may cause serious injury or
death if precautions are not followed.
IMPORTANT NOTE: Throughout this guide, dimensions in
parentheses are millimeters unless otherwise specified.
24" E Series Oven

4 | Wolf Customer Care 800.222.7820
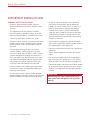
Safety Precautions
• Always use dry pot holders when removing
pans from this appliance. Wet or damp pot
holders can cause steam burns. Do not use a
towel or bulky cloth in place of pot holders.
• Position oven racks in the desired locations
when the oven is cool. If a rack must be repo-
sitioned after the oven is already hot, be sure
the pot holder does not contact a hot heating
element in the oven.
• Do not repair or replace any part of this appli-
ance unless specifically recommended in litera-
ture accompanying this appliance.
• Do not use aluminum foil to line any part of this
appliance.
• Never use this appliance to warm or heat the
room.
• Do not leave children alone or unattended in
the area where this appliance is in use. Never
allow children to sit or stand on the appliance.
• Do not store items of interest to children above
or at the back of this appliance, as they could
climb on the appliance to reach items and be
injured.
CAUTION
Before using self-clean, remove broiler pan,
oven racks, oven rack guides, and any other
utensils.
IMPORTANT INSTRUCTIONS
GENERAL SAFETY PRECAUTIONS
• Read this guide carefully before using this
appliance to reduce risk of fire, electric shock,
or injury.
• This appliance must be properly installed
and serviced by a qualified installer or service
agency and grounded by a qualified technician.
• Clean only those parts listed in this guide.
• Do not use oven cleaners. No commercial oven
cleaner or oven liner protective coating of any
kind should be used in or around any part of
the oven.
• Do not touch heating elements or interior
surfaces of oven. Heating elements may be
hot even though they are dark in color. Interior
surfaces become hot enough to cause burns.
During and after use, do not touch or let cloth-
ing or other flammable materials contact heat-
ing elements or interior surfaces of the oven
until they have had sucient time to cool.
• Exercise caution when opening the oven door.
Let hot air or steam escape before looking or
reaching into the oven.
• Be sure that the oven cool air intake (located
below the door) and oven exhaust vent (located
above the door) are unobstructed at all times.

wolfappliance.com | 5
Safety Precautions
IMPORTANT INSTRUCTIONS
GENERAL SAFETY PRECAUTIONS
• Do not use water on grease fires. Smother
the flame or use a dry chemical or foam-type
extinguisher.
• Do not heat unopened food containers, such as
baby food jars and cans. Pressure build-up may
cause the container to burst and cause injury.
• Do not store or use gasoline or other flam-
mable vapors and liquids in the vicinity of this or
any other appliance.
• Do not clean the oven gasket; rubbing or
moving the gasket may compromise the door
seal.
• Wear proper apparel. Loose-fitting or hanging
garments should never be worn while using this
appliance.
• During use the appliance becomes hot. Care
should be taken to avoid touching heating
elements inside the oven.
• Do not use harsh abrasive cleaners or sharp
metal scrapers to clean the oven door glass
since they can scratch the surface, which may
result in shattering of the glass.
• Before starting the self-cleaning cycle, excess
spillage must be removed from the oven cavity.
• Only use the temperature probe recommended
for this oven.
• Do not use a steam cleaner to clean the appli-
ance.
WARNING
Accessible parts may become hot during use.
Young children should be kept away.
WARNING
Ensure that the appliance is switched o
or unplugged before replacing the lamp to
avoid the possibility of electric shock.
WARNING
PROPOSITION 65 FOR CALIFORNIA RESIDENTS
Cancer and Reproductive Harm—
www.P65Warnings.ca.gov

6 | Wolf Customer Care 800.222.7820
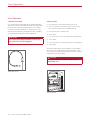
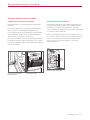
24" E Series Oven Features
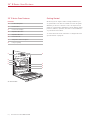
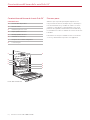
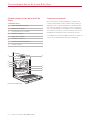
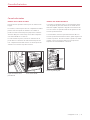
24" E Series Oven Features
FEATURES
1Product Rating Plate
2Control Panel
3Control Panel Display
4Adjustable Oven Rack
5Adjustable Oven Pan
6Convection Fan
7Temperature Probe Receptacle
8Halogen Lighting
24" E Series Oven
2
6
3
1
4
7
8
5
Getting Started
We know you are eager to start cooking, but before you
do, please take some time to read this use and care guide.
Whether you are an occasional cook or an expert chef, it
will be to your benefit to familiarize yourself with the safety
practices, features, operation, and care recommendations
of your Wolf E Series Oven.
To ensure the best results, review the cooking modes and
special features on page 12.

wolfappliance.com | 7
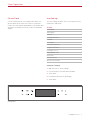
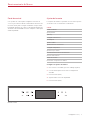
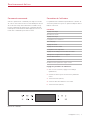
Control Panel
Use the control panel to set cooking modes and access
all the features of the 24" E series oven for exceptional
results. The control panel display will become inactive after
15 minutes of inactivity. Touch any control to activate the
display.
User Settings
The User Settings allow the user to select preferences as
listed in the chart below.
SETTING
Set Language
Adjust Display
Set Clock
Configure Notifications
Self-Clean
Set Loudness
Set Assistance Functions
Configure Temperature
Set Childproof Lock
Display Appliance Info
Demo Mode
Check Connection
Restore Factory Settings
Setting User Settings:
1 With the oven on, touch Settings.
2 Use the arrows to select the desired setting.
3 Touch Enter.
4 Follow the instructions on the display.
5 Touch Enter.
Oven Operation
Control panel

8 | Wolf Customer Care 800.222.7820
PRIOR TO USE
Follow the steps below to ensure all residual oil from the
manufacturing process has been removed.
1 Clean the oven thoroughly with hot water and a mild
detergent.
2 Rinse and dry with a soft cloth.
3 Turn on ventilation. Some smoke and odor is normal.
4 Select Bake mode and adjust the temperature to 570°F
(300°C). Heat the oven (empty) for 60 minutes.
TIME
It is very important the correct time is set if a timed cook
feature is used. The time must be reset after a power
outage.
Setting the Time:
1 With the oven on, touch Settings.
2 Use the arrows to select Set Clock and touch Enter.
3 Use the arrows to set the correct time, then touch
Enter.
TIMER
The timer can be set for a maximum of 9 hours and 59
minutes. Once the timer is set, the countdown appears
on the display. The timer is independent from the oven.
Setting the timer does not aect the operating time or
switch-o time.
Setting the Timer:
1 Touch Timer.
2 Use the arrows to set the desired duration.
3 Touch Enter.
To adjust the timer, touch Timer and use the arrows to
adjust the duration. To cancel the timer, use the left arrow
to decrease the duration to 0, then touch Enter.
Oven Operation
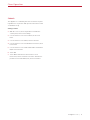
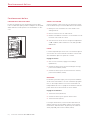
OVEN RACK POSITION
The oven rack and oven pan can be placed in any of the
four positions labeled on the right front face of the oven.
Refer to the illustration below.
Rack position
Oven Operation

wolfappliance.com | 9
Oven Operation
COOKING MODES
Selecting a Cooking Mode:
1 Touch Quick Start.
2 Use the arrows to select the desired cooking mode.
3 Touch Enter.
4 Review the information on the display.
5 Touch Enter.
The unit will start 20 seconds after the last key touch. To
start the mode immediately, use the arrows to select Start
Operation, then touch Enter.
OPTIONS
Setting the Temperature:
1 Use the arrows to select the desired temperature.
2 Touch Enter.
Setting the Duration:
The oven heats immediately and turns o after the speci-
fied duration. The oven light illuminates three minutes prior
to the end time.
If the temperature probe is used, the probe overrides the
switch-o time and turns the oven o when the set tem-
perature is reached.
1 Use the arrows to select the desired cooking duration.
2 Touch Enter.
Setting Set End:
The Set End feature automatically turns the oven on and
o at specified times. The oven remains idle until the
desired start time and turns o at the desired switch-o
time. The clock must be set to the correct time for delayed
start to function properly.
If the temperature probe is used, the probe overrides
the switch-o time and turns the oven o when the set
temperature is reached. If the probe temperature is not
reached before the switch-o time, it will not extend the
operating time.
1 Use the arrows to select the desired end time.
2 Touch Enter.
Setting the Food Probe Temperature:
1 Use the arrows to select the desired probe temperature.
2 Touch Enter.
Oven Operation

10 | Wolf Customer Care 800.222.7820
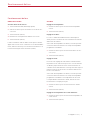
Oven Operation
TEMPERATURE PROBE
Use only the black temperature probe shipped with this
appliance. Refer to the illustration below. The temperature
probe measures the internal temperature of food while
cooking. It can be used with all cooking modes except
More Gourmet. When the temperature probe is installed,
the actual probe temperature will be displayed.
CAUTION
Use only the probe shipped with this oven. Do not
use a probe from any other appliance.
Temperature probe
Setting controls:
1 Place the probe in the thickest part of the food.
2 Place food in the oven and insert the connector into
the receptacle. Refer to the illustration below.
3 Select the desired cooking mode.
4 Touch Enter.
5 Use the arrows to select Set Food Probe Temperature.
6 Touch Enter.
7 Use the arrows to select the desired probe temperature.
8 Touch Enter.
The probe temperature set point appears on the display
above the icon. To adjust the probe temperature, select
Set Food Probe Temp, use the arrows to select the desired
temperature, then touch Enter.
CAUTION
The probe and probe receptacle will be very hot.
Handle with care.
Probe receptacle
Oven Operation

wolfappliance.com | 11
Sabbath
This appliance is certified by Star-K to meet strict religious
regulations in conjunction with specific instructions found
on www.star-k.org.
Setting controls:
1 With the oven o, touch any button to activate the
control panel, then touch Settings.
2 Use the arrows to select Set Loudness, then touch
Enter.
3 Use the arrows to select Mute, then touch Enter.
4 Use the arrows to select Set Assistance Functions, then
touch Enter.
5 Use the arrows to select Switch Automatic Illumination
O, then touch Enter.
6 Touch O.
7 Touch Quick Start and use the arrows to select
Convection, then touch Enter. Select the desired tem-
perature at or below 210°F (99°C), then touch Enter.
Oven Operation

12 | Wolf Customer Care 800.222.7820
Cooking Modes
MODE INDICATOR RANGE PROBE USES
Bake 90–570°F
(30–300°C)
•Cooking space is heated by top and bottom elements. Standard operat-
ing mode for cooking and baking on a single rack.
Convection 90–530°F
(30–275°C)
•Cooking space is heated by an element in the back wall and circulated
throughout the cavity with the convection fan. Use for cooking and
baking items on multiple racks.
Convection Bake 90–480°F
(30–250°C)
•Cooking space is heated by the bottom element and circulated through-
out the cavity with the convection fan.
Broil 1–5 Cooking space is heated by the broil element.
Convection Broil 90–480°F
(30–250°C)
Cooking space is heated by the broil element and circulated throughout
the cavity with the convection fan.
Bake Humid 90–480°F
(30–250°C)
•Cooking space is heated by top and bottom elements. Moisture pro-
duced during cooking is retained in the cavity.
Convection Humid 90–480°F
(30–250°C)
•Cooking space is heated by an element in the back wall and circulated
throughout the cavity with the convection fan. Moisture produced
during cooking is retained in the cavity.
Slow Cook 1–6 •Cooking space is heated by the bottom element only.
Oven Operation

wolfappliance.com | 13
Cooking Modes
GOURMET
Use Gourmet to prepare any of the foods listed below,
fresh or refrigerated. Select the food and desired doneness,
and the sensor adjusts the time, temperature, and humidity
so no baking instructions are required.
FOOD
Meat
Poultry
Potatoes
Fresh Pizza
One Dish Meals
Baked Goods
Setting Gourmet:
1 Touch Gourmet.
2 Use the arrows to select the desired food.
3 Touch Enter.
4 Follow instructions on the display.
5 Touch Enter.
The unit starts 20 seconds after the last key touch. To
start the mode immediately, use the arrows to select Start
Operation, then touch Enter.
MORE
Touch More to access additional Gourmet items and cook-
ing modes. Use the arrows to choose the option you want
and touch Enter.
MODE USES
Recipes Allows the user to store individual cooking
modes and temperatures or cooking sequences
used to prepare custom foods. Up to 24 dierent
user recipes can stored in the system for easy
access.
More Gourmet Use to prepare specified foods; fresh, refriger-
ated, or frozen. Select the food and desired
doneness and the sensor adjusts time, tem-
perature, and humidity so no instructions are
required. The preset temperature and range are
dependent on the food and desired doneness.
Slow Roast Use to keep meats tender by slow roasting. Insert
the temperature probe into the prepared meat,
select a Slow Roast setting and completion time.
Keep Warm Keep Warm uses convection heat to keep foods
warm.
Oven Operation

14 | Wolf Customer Care 800.222.7820
Self-Clean
During Self-Clean, the oven is heated to an extremely high
temperature to burn o food soil. Remove the oven rack,
oven pan and rack guides. They will discolor if left in during
Self-Clean.
The duration of the Self-Clean cycle can be adjusted for
the level of cooking residue. For light soil, the duration of
the cleaning cycle is 1.5 hours and 2 hours for heavy soil.
The complete cycle can take up to 5 hours including cool
down.
Setting Self-Clean:
1 Touch Settings.
2 Select Self-Clean and touch Enter.
3 Use the arrows to select the desired level of cleaning,
then touch Enter. The door locks automatically once
the cycle begins.
The unit starts 20 seconds after the last key touch. To
start the mode immediately, use the arrows to select Start
Operation, then touch Enter.
Setting Delayed Start Self-Clean:
1 Touch Settings.
2 Select Self-Clean and touch Enter.
3 Use the arrows to select the desired level of cleaning,
then touch Enter.
4 Select Set End and touch Enter.
5 Use the arrows to select desired switch-o time, then
touch Enter.
To cancel Self-Clean mode at any time, touch O. The
oven door locks and remains locked until the Self-Clean
cycle is complete and the oven temperature has cooled
below 570°F (300°C).
Cooking Modes
FAVORITES
Commonly used cooking modes or foods can be saved in
the system for easy access through the Favorites function.
Up to 24 favorites can be stored at a time.
Creating a Favorite:
1 Select the desired food and doneness or cooking mode
and temperature.
2 Before the cooking mode starts, touch Favorites.
3 Select an open file.
4 Touch Enter.
5 Using the arrows, enter a name for the file.
6 Touch Enter.
Selecting a Favorite:
1 With the oven on, touch Favorites.
2 Use the arrows to select the file to be used.
3 Touch Enter.
Oven Operation

wolfappliance.com | 15
RACK GUIDE REMOVAL
To remove the rack guides, push the top of the rack guide
towards the rear of the oven cavity. Tip the top of the
guide in towards the center of the oven and lift the bottom
posts of the guide out of the positioning holes.
To reinstall, insert the bottom posts into the positioning
holes and tip the rack guide up into position. Gently pull
the guide forward until it engages the top holes. Refer to
the illustration below.
RACK
GUIDE
Rack guide removal
Care Recommendations
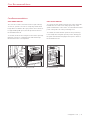
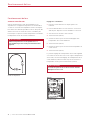
OVEN DOOR REMOVAL
The oven door can be removed for a thorough cleaning.
To remove, open the oven door completely. Rotate both
hinge latches forward to the open position. Close the door
to approximately 30° open, then lift up and out. Refer to
the illustrations below.
To reinstall, insert the door hinges into the frame openings.
Open the oven door completely and rotate both hinge
latches back to the closed position.
Care Recommendations
OPEN
POSITION
CLOSED
POSITION
Oven door hinge latch
Door open 30°

16 | Wolf Customer Care 800.222.7820
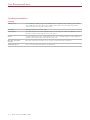
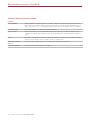
Care Recommendations
CLEANING
Stainless steel Use a nonabrasive stainless steel cleaner and apply with a soft lint-free cloth. To bring out the natural
luster, lightly wipe the surface with a water-dampened microfiber cloth followed by a dry polishing
chamois. Always follow the grain of stainless steel.
Door front Spray glass cleaner on a cloth to clean.
Control panel Use a spray degreaser to remove fingerprints and food soil. Spray on a cloth before wiping the control
panel. Do not spray cleaners directly on the control panel.
Interior For light cleaning, remove any cooking debris while the oven is still warm using a soft cloth dampened
with water and a mild detergent. Wipe dry with a soft cloth.
Oven rack, rack guides,
oven pan
Oven rack, rack guides, and stainless steel oven pan can be cleaned in the dishwasher.
Temperature probe Do not clean the temperature probe in the dishwasher.
Care Recommendations

wolfappliance.com | 17
Troubleshooting
OPERATION
Oven does not operate.
• Verify power is on.
• Verify electrical power to the oven and home circuit
breaker is on.
Oven temperature issue.
• Contact Wolf Customer Care at 800-222-7820 for
recommendations.
Illumination is not working.
• Light bulb is defective, call Wolf Factory Certified
Service.
Oven makes sounds during operation.
• The oven may emit switching sounds during operation.
Such sounds are normal.
Oven pans are dicult to remove.
• Some combinations of heat, moisture, and food place-
ment may cause oven pans to warp, but will return to
their original shape when cool.
Troubleshooting

18 | Wolf Customer Care 800.222.7820
Troubleshooting
Sub-Zero, Sub-Zero & Design, Sub-Zero & Snowflake Design, Dual Refrigeration, The Living Kitchen, Great American Kitchens The Fine Art of Kitchen Design, Wolf, Wolf &
Design, Wolf Gourmet, W & Design, red colored knobs, Cove, and Cove & Design are registered trademarks and service marks of Sub-Zero Group, Inc. and its subsidiaries.
All other trademarks are property of their respective owners in the United States and other countries.
Troubleshooting
SERVICE
• Maintain the quality built into your product by contact-
ing Wolf Factory Certified Service. For the name of the
nearest Wolf Factory Certified Service, check the Product
Support section of our website, wolfappliance.com,
or call Wolf Customer Care at 800-222-7820.
• When contacting service, you will need the model and
serial number of your product. Both numbers are listed
on the product rating plate. Refer to page 6 for rating
plate location.
• For warranty purposes, you will also need the date of
installation and name of your authorized Wolf dealer.
This information should be recorded on page 3 of this
guide.

wolfappliance.com | 19
Wolf Appliance Residential Limited Warranty
FOR RESIDENTIAL USE
FULL TWO YEAR WARRANTY*
For two years from the date of original installation, this Wolf Appliance product warranty covers all parts and labor to repair or
replace, under normal residential use, any part of the product that proves to be defective in materials or workmanship. All service
provided by Wolf Appliance under the above warranty must be performed by Wolf Factory Certified Service, unless otherwise speci-
fied by Wolf Appliance, Inc. Service will be provided during normal business hours.
LIMITED FIVE YEAR WARRANTY
For five years from the date of original installation, Wolf Appliance will repair or replace the following parts that prove to be defec-
tive in materials or workmanship: gas burners (excludes appearance), electric heating elements, blower motors (ventilation hoods),
electronic control boards, magnetron tubes and induction generators. If the owner uses Wolf Factory Certified Service, the service
provider will repair or replace these parts with the owner paying for all other costs, including labor. If the owner uses non-certified
service, the owner must contact Wolf Appliance, Inc. (using the information below) to receive repaired or replacement parts. Wolf
Appliance will not reimburse the owner for parts purchased from non-certified service or other sources.
TERMS APPLICABLE TO EACH WARRANTY
The warranty applies only to products installed for normal residential use. The warranty applies only to products installed in any one
of the fifty states of the United States, the District of Columbia or the ten provinces of Canada. This warranty does not cover any
parts or labor to correct any defect caused by negligence, accident or improper use, maintenance, installation, service or repair.
THE REMEDIES DESCRIBED ABOVE FOR EACH WARRANTY ARE THE ONLY ONES THAT WOLF APPLIANCE, INC. WILL PROVIDE,
EITHER UNDER THIS WARRANTY OR UNDER ANY WARRANTY ARISING BY OPERATION OF LAW. WOLF APPLIANCE, INC. WILL
NOT BE RESPONSIBLE FOR ANY CONSEQUENTIAL OR INCIDENTAL DAMAGES ARISING FROM THE BREACH OF THIS WARRANTY
OR ANY OTHER WARRANTY, WHETHER EXPRESS, IMPLIED OR STATUTORY.
Some states do not allow the exclusion or limitation of incidental or consequential damages, so the above limitation or exclusion may
not apply to you. This warranty gives you specific legal rights and you may also have other legal rights that vary from state to state.
To receive parts and/or service and the name of Wolf Factory Certified Service nearest you, contact Wolf Appliance, Inc., P.O. Box
44848, Madison, WI 53744; check the Product Support section of our website, wolfappliance.com, email us at customerservice@
subzero.com or call 800-222-7820.
*Stainless steel (doors, panels, handles, product frames and interior surfaces) are covered by a limited 60-day parts and labor warranty
for cosmetic defects.
*Replacement filters for ventilation hood recirculating kits are not covered by the product warranty.
Warranty

2 | Atención al cliente de Wolf 800.222.7820
Horno de la serie E de 24"
Contenido
3 Horno de la serie E de 24"
4 Precauciones de seguridad
6 Características de los hornos de la serie E de 24"
7 Funcionamiento del horno
15 Recomendaciones para el cuidado
17 Resolución de problemas
19 Garantía de Wolf
La page est en cours de chargement...
La page est en cours de chargement...
La page est en cours de chargement...
La page est en cours de chargement...
La page est en cours de chargement...
La page est en cours de chargement...
La page est en cours de chargement...
La page est en cours de chargement...
La page est en cours de chargement...
La page est en cours de chargement...
La page est en cours de chargement...
La page est en cours de chargement...
La page est en cours de chargement...
La page est en cours de chargement...
La page est en cours de chargement...
La page est en cours de chargement...
La page est en cours de chargement...
La page est en cours de chargement...
La page est en cours de chargement...
La page est en cours de chargement...
La page est en cours de chargement...
La page est en cours de chargement...
La page est en cours de chargement...
La page est en cours de chargement...
La page est en cours de chargement...
La page est en cours de chargement...
La page est en cours de chargement...
La page est en cours de chargement...
La page est en cours de chargement...
La page est en cours de chargement...
La page est en cours de chargement...
La page est en cours de chargement...
La page est en cours de chargement...
La page est en cours de chargement...
La page est en cours de chargement...
La page est en cours de chargement...
-
 1
1
-
 2
2
-
 3
3
-
 4
4
-
 5
5
-
 6
6
-
 7
7
-
 8
8
-
 9
9
-
 10
10
-
 11
11
-
 12
12
-
 13
13
-
 14
14
-
 15
15
-
 16
16
-
 17
17
-
 18
18
-
 19
19
-
 20
20
-
 21
21
-
 22
22
-
 23
23
-
 24
24
-
 25
25
-
 26
26
-
 27
27
-
 28
28
-
 29
29
-
 30
30
-
 31
31
-
 32
32
-
 33
33
-
 34
34
-
 35
35
-
 36
36
-
 37
37
-
 38
38
-
 39
39
-
 40
40
-
 41
41
-
 42
42
-
 43
43
-
 44
44
-
 45
45
-
 46
46
-
 47
47
-
 48
48
-
 49
49
-
 50
50
-
 51
51
-
 52
52
-
 53
53
-
 54
54
-
 55
55
-
 56
56


dans d''autres langues
- English: Wolf SO24TESTH User guide
- español: Wolf SO24TESTH Guía del usuario