GE Profile PHP7030 Le manuel du propriétaire
- Taper
- Le manuel du propriétaire

Write the model and serial
numbers here:
Model # _________________
Serial # _________________
You can find them on a label
under the cooktop.
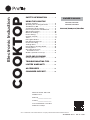
OWNER’S MANUAL
COOKTOP
Electronic Induction
49-2001135 Rev. 1 09-22 GEA
PHP7030, PHP7036
PHP9030, PHP9036
GE is a trademark of the General Electric Company. Manufactured under trademark license.
ENGLISH/FRANÇAIS/ESPAÑOL
SAFETY INFORMATION .......... 3
USING THE COOKTOP
Cooktop Features ....................... 6
Operating The Cooking Elements ......... 8
Turn Burner(s) Off ...................... 8
Selecting Cooktop Settings .............. 9
How To Synchronize Left Elements ....... 9
WiFi Commissioning ....................10
Bluetooth® Pairing ......................10
Power Sharing ..........................11
Cooktop Lockout .......................11
Timer .................................11
Hot Light Indicator ......................12
Pan Detection Removal ..................12
Precision Cooking ......................12
Settings Menu ..........................13
How Induction Cooking Works ...........14
Cooking Noise .........................14
Choosing The Correct
Cookware To Use .....................15
Griddle (optional accessory) .............17
CARE AND CLEANING
Cleaning the Glass Cooktop ..............18
TROUBLESHOOTING TIPS .......20
LIMITED WARRANTY ............ 22
ACCESSORIES .................... 23
CONSUMER SUPPORT ...........24

249-2001135 Rev. 0
THANK YOU FOR MAKING GE APPLIANCES A PART OF YOUR HOME.
Whether you grew up with GE Appliances, or this is your first, we’re happy to have you in the family.
We take pride in the craftsmanship, innovation and design that goes into every GE Appliances
product, and we think you will too. Among other things, registration of your appliance ensures that we
can deliver important product information and warranty details when you need them.
Register your GE appliance now online. Helpful websites and phone numbers are available in the
Consumer Support section of this Owner’s Manual. You may also mail in the pre-printed registration
card included in the packing material.

49-2001135 Rev. 0 3
READ AND SAVE THESE INSTRUCTIONS
IMPORTANT SAFETY INFORMATION
READ ALL INSTRUCTIONS BEFORE USING THE APPLIANCE
SAFETY INFORMATION
WARNING Read all safety instructions before using the product. Failure to follow these instructions may result
in fire, electrical shock, serious injury or death.
WARNING GENERAL SAFETY INSTRUCTIONS
Ŷ 8VHWKLVFRRNWRSRQO\IRULWVLQWHQGHGSXUSRVHDV
described in this Owner’s Manual.
Ŷ %HVXUH\RXUFRRNWRSLVSURSHUO\LQVWDOOHGDQG
grounded by a qualified installer in accordance with
the provided installation instructions.
Ŷ 'RQRWDWWHPSWWRUHSDLURUUHSODFHDQ\SDUWRI\RXU
cooktop unless it is specifically recommended in this
manual. All other servicing should be performed by
a qualified technician.
Ŷ %HIRUHSHUIRUPLQJDQ\VHUYLFHXQSOXJWKHFRRNWRS
or disconnect the power supply at the household
distribution panel by removing the fuse or switching
off the circuit breaker.
Ŷ 'RQRWOHDYHFKLOGUHQDORQH²FKLOGUHQVKRXOGQRW
be left alone or unattended in an area where the
cooktop is in use. They should never be allowed to
climb, sit or stand on any part of the cooktop.
Ŷ
CAUTION
'RQRWVWRUHLWHPVRILQWHUHVWWR
FKLOGUHQDERYHWKHFRRNWRS²FKLOGUHQFOLPELQJRQWKH
cooktop to reach items could be seriously injured.
Ŷ 8VHRQO\GU\SRWKROGHUV²PRLVWRUGDPSSRW
holders on hot surfaces may result in burns from
VWHDP'RQRWOHWSRWKROGHUVWRXFKKRWVXUIDFH
XQLWVRUKHDWLQJHOHPHQWV'RQRWXVHDWRZHORU
other bulky cloth in place of pot holders.
Ŷ 1HYHUXVH\RXUFRRNWRSIRUZDUPLQJRUKHDWLQJWKH
room.
Ŷ 'RQRWWRXFKVXUIDFHHOHPHQWV7KHVHVXUIDFHV
may be hot enough to burn even though they are
GDUNLQFRORU'XULQJDQGDIWHUXVHGRQRWWRXFK
or let clothing or other flammable materials contact
the surface elements or areas nearby the surface
elements; allow sufficient time for cooling first.
Ŷ 3RWHQWLDOO\KRWVXUIDFHVLQFOXGHWKHFRRNWRSDQG
areas facing the cooktop.
Ŷ 'RQRWKHDWXQRSHQHGIRRGFRQWDLQHUV3UHVVXUH
could build up and the container could burst,
causing an injury.
Ŷ &RRNPHDWDQGSRXOWU\WKRURXJKO\²PHDWWRDWOHDVW
an internal temperature of 160°F and poultry to at
least an internal temperature of 180°F. Cooking
to these temperatures usually protects against
foodborne illness.
WARNING KEEP FLAMMABLE MATERIALS AWAY FROM THE COOKTOP
Failure to do so may result in fire or personal injury.
Ŷ 'RQRWVWRUHRUXVHIODPPDEOHPDWHULDOVQHDU
the cooktop, including paper, plastic, pot holders,
linens, wall coverings, curtains, drapes and gasoline
or other flammable vapors and liquids.
Ŷ 1HYHUZHDUORRVHILWWLQJRUKDQJLQJJDUPHQWVZKLOH
using the cooktop. These garments may ignite if
they contact hot surfaces causing severe burns.
Ŷ 'RQRWOHWFRRNLQJJUHDVHRURWKHUIODPPDEOH
materials accumulate in or near the cooktop.
Grease on the cooktop may ignite.

449-2001135 Rev. 0
SAFETY INFORMATION
READ AND SAVE THESE INSTRUCTIONS
IMPORTANT SAFETY INFORMATION
READ ALL INSTRUCTIONS BEFORE USING THE APPLIANCE
WARNING COOKTOP SAFETY INSTRUCTIONS
Ŷ ,QWKHHYHQWRIDILUHGRQRWXVHZDWHURUJUHDVHRQ
ILUHV1HYHUSLFNXSDIODPLQJSDQ7XUQWKHFRQWUROV
off. Smother a flaming pan on a surface unit by
covering the pan completely with a well-fitted lid,
FRRNLHVKHHWRUIODWWUD\8VHDPXOWLSXUSRVHGU\
chemical or a foam-type fire extinguisher.
Ŷ 1HYHUOHDYHWKHVXUIDFHXQLWVXQDWWHQGHGDWPHGLXP
RUKLJKKHDWVHWWLQJV%RLORYHUVFDXVHVPRNLQJDQG
greasy spillovers that may catch on fire.
Ŷ 1HYHUOHDYHRLOXQDWWHQGHGZKLOHIU\LQJ,IDOORZHG
to heat beyond its smoking point, oil may ignite
resulting in fire that may spread to surrounding
FDELQHWV8VHDGHHSIDWWKHUPRPHWHUZKHQHYHU
possible to monitor oil temperature.
Ŷ 7RDYRLGVSLOORYHUDQGILUHXVHDPLQLPXPDPRXQW
of oil when shallow pan-frying and avoid cooking
frozen foods with excessive amounts of ice.
Ŷ 8VHWKHSURSHUSDQVL]HVHOHFWFRRNZDUHKDYLQJ
flat bottoms large enough to cover the surface
heating element. The use of undersized cookware
will expose a portion of the surface unit to direct
FRQWDFWDQGPD\UHVXOWLQLJQLWLRQRIFORWKLQJ3URSHU
relationship of cookware to surface unit will also
improve efficiency.
Ŷ 7RPLQLPL]HWKHSRVVLELOLW\RIEXUQVLJQLWLRQRI
flammable materials and spillage, the handle of a
container should be turned toward the center of the
range without extending over nearby surface units.
WARNING INDUCTION COOKTOP SAFETY INSTRUCTIONS
Ŷ 8VHFDUHZKHQWRXFKLQJWKHFRRNWRS7KHJODVV
surface of the cooktop will retain heat after the
controls have been turned off.
Ŷ 'RQRWFRRNRQDEURNHQFRRNWRS,IWKHJODVV
cooktop should break, cleaning solutions and
spillovers may penetrate the broken cooktop and
create a risk of electric shock. Contact a qualified
technician immediately.
Ŷ $YRLGVFUDWFKLQJWKHJODVVFRRNWRS7KHFRRNWRS
can be scratched with items such as knives, sharp
instruments, rings or other jewelry, and rivets on
clothing.
Ŷ 'RQRWSODFHRUVWRUHLWHPVWKDWFDQPHOWRUFDWFK
fire on the glass cooktop, even when it is not being
XVHG,IWKHFRRNWRSLVLQDGYHUWHQWO\WXUQHGRQWKH\
may ignite. Heat from the cooktop or oven vent after
it is turned off may cause them to ignite also.
Ŷ 'RQRWSODFHPHWDOOLFREMHFWVVXFKDVNQLYHVIRUNV
spoons, and lids on the cooktop surface since they
can get hot.
Ŷ 8VHDFHUDPLFFRRNWRSFOHDQHUDQGQRQVFUDWFK
cleaning pad to clean the cooktop. Wait until the
cooktop cools and the indicator light goes out
before cleaning. A wet sponge or cloth on a hot
surface can cause steam burns. Some cleaners can
produce noxious fumes if applied to a hot surface.
Read and follow all instructions and warnings on the
cleaning cream label. NOTE: Sugary spills are an
exception. They should be scraped off while still hot
using an oven mitt and a scraper. See the Cleaning
the glass cooktop section for detailed instructions.
Ŷ
CAUTION
3HUVRQVZLWKDSDFHPDNHURU
similar medical device should exercise caution when
using or standing near an induction cooktop while it
is in operation. The electromagnetic field may affect
the working of the pacemaker or similar medical
GHYLFH,WLVDGYLVDEOHWRFRQVXOW\RXUGRFWRURU
the pacemaker manufacturer about your particular
situation.

49-2001135 Rev. 0 5
READ AND SAVE THESE INSTRUCTIONS
IMPORTANT SAFETY INFORMATION
READ ALL INSTRUCTIONS BEFORE USING THE APPLIANCE
WARNING RADIO FREQUENCY INTERFERENCE
This unit has been tested and found to comply with the
OLPLWVIRUDFODVV%GLJLWDOGHYLFHSXUVXDQWWR3DUW
of the FCC rules. These limits are designed to provide
reasonable protection against harmful interference in
a residential installation. This unit generates, uses and
can radiate radio frequency energy and, if not installed
and used in accordance with the instructions, may
cause harmful interference to radio communications.
However, there is no guarantee that interference
ZLOOQRWRFFXULQDSDUWLFXODULQVWDOODWLRQ,IWKLVXQLW
does cause harmful interference to radio or television
reception, which can be determined by turning the unit
off and on, the user is encouraged to try to correct the
interference by one or more of the following measures:
Ŷ 5HRULHQWRUUHORFDWHWKHUHFHLYLQJDQWHQQDH
Ŷ ,QFUHDVHWKHGLVWDQFHEHWZHHQWKHXQLWDQG
receiver.
Ŷ &RQQHFWWKHXQLWLQWRDQRXWOHWRUDFLUFXLWGLIIHUHQW
from that to which the receiver is connected.
SAFETY INFORMATION
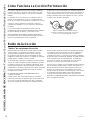
How to Remove Protective Shipping Film and Packaging Tape
Carefully grasp a corner of the protective shipping film
with your fingers and slowly peel it from the appliance
VXUIDFH'RQRWXVHDQ\VKDUSLWHPVWRUHPRYHWKHILOP
Remove all of the film before using the appliance for the
first time.
To assure no damage is done to the finish of the
product, the safest way to remove the adhesive from
packaging tape on new appliances is an application of
a household liquid dishwashing detergent. Apply with a
soft cloth and allow to soak.
NOTE: 7KHDGKHVLYHPXVWEHUHPRYHGIURPDOOSDUWV,W
cannot be removed if it is baked on.
Consider recycling options for your appliance packaging
material.
PROPER DISPOSAL OF YOUR APPLIANCE
'LVSRVHRIRUUHF\FOH\RXUDSSOLDQFHLQDFFRUGDQFHZLWK)HGHUDODQG/RFDO5HJXODWLRQV&RQWDFW\RXUORFDO
authorities for the environmentally safe disposal or recycling of your appliance.

649-2001135 Rev. 0
Throughout this manual, features and appearance may vary from your model.
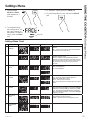
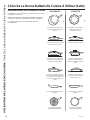
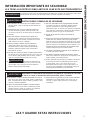
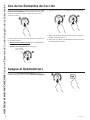
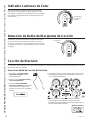
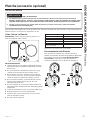
Cooktop Features
USING THE COOKTOP: Cooktop Features
8VHU,QWHUIDFH&RQWUROV
8VHU,QWHUIDFH&RQWUROV
3+3FRRNWRS
3+3FRRNWRS
4758369
2
2
69 35847
1
1
1. Cooking Element(s): See page 8.
2. Power Level Arc: See page 8.
3. All Off: See page 9.
4. Lock: See page 11.
5. Timer: See page 11.
6. Display: See page 10.
7. WiFi Connect: See page 10.
8. Bluetooth Connect: See page 10.
9. Precision Cooking: See page 12.

49-2001135 Rev. 0
Throughout this manual, features and appearance may vary from your model.
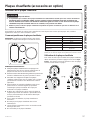
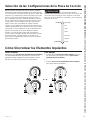
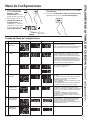
Cooktop Features
8VHU,QWHUIDFH&RQWUROV
8VHU,QWHUIDFH&RQWUROV
3+3FRRNWRS
3+3FRRNWRS
4
7583
66
2
10
10 2
66 35847
1
1
1. Cooking Element(s): See page 8.
2. Power Level Arc: See page 8.
3. All Off: See page 9.
4. Lock: See page 11.
5. Timer: See page 11.
6. Display: See page 10.
7. WiFi Connect: See page 10.
8. Bluetooth Connect: See page 10.
9. Precision Cooking: See page 12.
10. Sync Burners: See page 9.
USING THE COOKTOP: Cooktop Features

849-2001135 Rev. 0
Operating The Cooking Elements
USING THE COOKTOP: 2SHUDWLQJ 7KH &RRNLQJ (OHPHQWV 7XUQ %XUQHUV 2II
7XUQ %XUQHUV 2Q 7RXFK DQG KROG On/Off pad about
half a second. A chime can be heard with each touch to
any pad.
3RZHU OHYHO FDQ EH VHOHFWHG LQ DQ\ RI WKH IROORZLQJ ZD\V
1. Swipe the gray arc to the desired power level.
2. Touch Anywhere along the gray arc, or;
3. Touch + or - pads to adjust power level, or;
6KRUWFXW WR +L ,PPHGLDWHO\ DIWHU WXUQLQJ XQLW RQ WRXFK
the + pad, or;
6KRUWFXW WR /RZ ,PPHGLDWHO\ DIWHU WXUQLQJ XQLW RQ
touch the - pad.
Gray Arc
Swipe Area
Turn Burner(s) Off
Touch On/Off pad for an individual burner or touch the
All Off pad.

49-2001135 Rev. 0 9
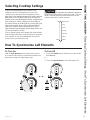
USING THE COOKTOP: 6HOHFWLQJ &RRNWRS 6HWWLQJV +RZ 7R 6\QFKURQL]H /HIW (OHPHQWV
Selecting Cooktop Settings
How To Synchronize Left Elements
Choose the element/burner that is best fit to the
cookware size. Each element/burner on your new
cooktop has its own power levels ranging from low to
KLJK 3RZHU OHYHO VHWWLQJV QHFHVVDU\ IRU FRRNLQJ ZLOO YDU\
depending on the cookware being used, the type and
TXDQWLW\ RI IRRG DQG WKH GHVLUHG RXWFRPH ,Q JHQHUDO XVH
lower settings for melting, holding and simmering and
use higher settings for heating quickly, searing and frying.
When keeping foods warm confirm selected setting is
sufficient to maintain food temperature above 140°F.
/DUJHU HOHPHQWV DQG HOHPHQWV PDUNHG ³.HHS :DUP´ DUH
not recommended for melting.
Hi is the highest power level, designed for large quantity
rapid cooking and boiling. Hi will operate for a maximum
of 10 minutes. Hi may be repeated after the initial 10
minute cycle by pressing the + pad.
CAUTION 'R QRW SODFH DQ\ FRRNZDUH XWHQVLOV RU
leave excess water spills on control key pads. This may
result in unresponsive touch pads and turning off the
cooktop if present for several seconds.
Hi boiling quickly
frying
searing
reducing
simmering
holding
melting
Low
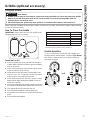
To Turn On
Hold the Sync Burners pad for about half a second
to connect the two burners. Operate either element as
described on page 8 to adjust power level.
To Turn Off
1. Touch the On/Off pad on either burner to turn off the
6\QF %XUQHUV
or
2. Touch the Sync Burners to turn both burners off.

10 49-2001135 Rev. 0
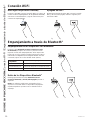
USING THE COOKTOP: :L)L &RPPLVVLRQLQJ %OXHWRRWK®3DLULQJ
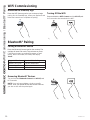
WiFi Commissioning
Bluetooth® Pairing
Download the SmartHQ App
3UHVV WKH :L)L &RQQHFW SDG RQ \RXU FRRNWRS WR EHJLQ
pairing. On the SmartHQ App, select your appliance and
follow the instructions to complete the pairing.
Turning Off the WiFi
3UHVV DQG KROG WKH WiFi Connect and the All Off pads
for 3 seconds to de-commission the WiFi.
Pairing a Bluetooth® Device
3UHVV WKH %OXHWRRWK &RQQHFW SDG RQ WKH FRRNWRS 7KH
FRRNWRS ZLOO HQWHU 3DLU PRGH 7DS FRRNZDUH RU SUHVV
ChefConnect button on enabled microwave or hood
device. When connected, the cooktop will display
"donE".
Removing Bluetooth® Devices
Tap and hold the Bluetooth Connect and All Off pads
for 3 seconds.
NOTE: Your unit cannot delete a single or specific
GHYLFH $OO RI \RXU SDLUHG GHYLFHV DUH FOHDUHG 'HYLFHV
you wish to use must be paired again.
Supported Devices How to Initiate Pairing
Hestan Cue fry pan Tap pan handle twice
Hestan Cue pot Tap pot handle twice
3UHFLVLRQ 3UREH 3UHVV VLGH EXWWRQ RQFH

49-2001135 Rev. 0 11
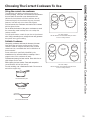
USING THE COOKTOP: 3RZHU 6KDULQJ &RRNWRS /RFNRXW .LWFKHQ 7LPHU
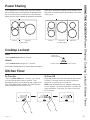
Power Sharing
$ ´ FRRNWRS KDV FRRNLQJ ]RQHV DQG D ´ FRRNWRS
KDV FRRNLQJ ]RQHV ,I WZR HOHPHQWV LQ WKH VDPH ]RQH
are in use and at least one element is at the maximum
SRZHU OHYHO +L WKH +L VHWWLQJ ZLOO RSHUDWH DW D UHGXFHG
SRZHU OHYHO 1RWH WKDW WKH GLVSOD\ ZLOO QRW FKDQJH 7KLV LV
how power is shared between two elements in the same
cooking zone.
´ :LGH FRRNWRS ´ :LGH FRRNWRS
/HIW =RQH 5LJKW =RQH&HQWHU =RQH/HIW =RQH 5LJKW =RQH
Cooktop Lockout
Kitchen Timer
Lock
Touch Control Lock pad for 3 seconds.
Unlock
Touch Control Lock pad again for 3 seconds.
6HH &XVWRP 6HWWLQJV VHFWLRQ WR DFWLYDWH $XWR /RFN IHDWXUH
To Turn On
Touch the Timer Select pad. Touch the + or - arrows
to choose the desired number of minutes. Timer
automatically starts 10 seconds after pad is touched, or
LI WKH 7LPHU 6HOHFW SDG LW WRXFKHG 7KH ³21´ /(' ZLOO
appear automatically when timer is set.
To Turn Off
3UHVV DQG UHOHDVH WKH 7LPHU 6HOHFW SDG WR FDQFHO WLPHU
or hold for 3 seconds. Alarm will sound continuously
when time is up until user turns timer off.
NOTE: 8VH WKH NLWFKHQ WLPHU WR PHDVXUH FRRNLQJ WLPH
or as a reminder. The kitchen timer does not control the
cooking elements. Timer turns off if there is no activity
for 30 seconds.
&RRNWRS /RFNRXW ORFNV RSHUDWLRQ RI WKH FRQWUROV
&RQWURO /RFN
,QGLFDWRU6\PERO

12 49-2001135 Rev. 0
USING THE COOKTOP: +RW /LJKW ,QGLFDWRU 3DQ 'HWHFWLRQ 5HPRYDO 3UHFLVLRQ &RRNLQJ
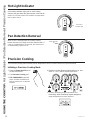
Hot Light Indicator
Pan Detection Removal
When a pan is removed from the cooktop surface,
EXUQHU OHYHO WXUQV RII 3RZHU /HYHO $UF VWDUWV WR EOLQN ,I
a pan is not detected for 25 seconds, the control turns
off automatically, lights turn off.
$ KRW VXUIDFH LQGLFDWRU OLJKW RQH IRU HDFK FRRNLQJ
HOHPHQW ZLOO JORZ ZKHQ WKH JODVV VXUIDFH LV KRW DQG ZLOO
remain on until the surface has cooled to a temperature
that is safe to touch.
Hot Surface
,QGLFDWRU /LJKW
3RZHU /HYHO $UF
Precision Cooking
7KH 3UHFLVLRQ &RRNLQJ IHDWXUH DOORZV SUHFLVH WHPSHUDWXUH FRQWURO RI FHUWDLQ GHYLFHV IRU LPSURYHG UHVXOWV
Initiating a Precision Cooking Mode
3UHVV WKH Power On/Off pad on
the desired element.
2. Tap Precision Cooking pad.
3. TAP COOKWARE legend will
pulse. Activate cookware and
ensure cookware is on desired
element.
3UHFLVLRQ &RRNLQJ 'HJUHHV OHJHQG ZLOO WXUQ RQ 8VH
slider or + and - pads to adjust temperature.
5. Cooktop will display target temperature and
3UHKHDWLQJ :KHQ 3UHKHDWLQJ OHJHQG GLVDSSHDUV
target temperature has been reached.

49-2001135 Rev. 0 13
Settings Menu
3UHVVDQGKROG
All Off and Timer
pads together for 3
seconds.
2. To navigate through
the Settings Menu, use
the + and - buttons on
WKH'LVSOD\7RVHOHFWD
menu, press the Timer
pad.
3. To activate a Setting, press the Timer pad.
4. To exit Settings Menu, press and hold the All Off
pad.
Settings Menu Chart
USING THE COOKTOP: Settings Menu
7LPHU3DG
Feature Menu 'HIDXOW Options Requirements
1Factory
Settings • "YES" : Clears customized settings and restores
defaults
1RH[LWVRXWRIWKH)DFWRU\UHVHWPHQXDQGWDNHV
the user back to the main menu.
2&RQWURO/RFN 86(U&RQWUROORFNVKDOOKDYHDDVGHILQHGLQ
&RRNWRS&RQWURO/RFNRXW
$XWR,QDGGLWLRQWRWKHVWDQGDUGORFNEHKDYLRU
&RRNWRS&RQWURO/RFNRXWWKHFRQWUROVKDOODOVRORFN
if no burner or timer has been active for 600 seconds
as well as there has been no key press for 600
seconds.
3/('/LJKW
/HYHO • Hi = 100% brightness
• rEG = 80% brightness
/R EULJKWQHVV
4%XWWRQ
Volume • "Hi" : All touch key sounds activated at 100%
/R7RXFKNH\VRXQGOHYHOVDVGHILQHGLQ
SDUDPHWULFLGHDOO\RIKLJK
• "OFF" : All touch key sounds off.
• The sound settings shall not affect alarm tone output
levels.
5Timer Alarm
Volume +L7KH'$&OHYHOVKDOOEHGHILQHGLQSDUDPHWULF
7KHSURGXFWOHYHOH[SHFWDWLRQLVWRDFKLHYHG%#
PHWHUVIURPFRRNWRSG%#PHWHUIURPFRRNWRS
/R7KH'$&OHYHOVKDOOEHGHILQHGLQSDUDPHWULF
7KHSURGXFWOHYHOH[SHFWDWLRQLVWRDFKLHYHG%#
meter from cooktop.
6Timer End
Tone • "Cont" " Timer tone plays continuously until the user
acknowledges the timer and tone.
E((37KHWLPHUHQGWRQHLVSOD\HGRQO\RQFH
Temperature
8QLWV

14 49-2001135 Rev. 0
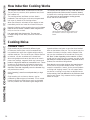
How Induction Cooking Works
Cooking Noise
The magnetic fields induce a small current in the pan.
The pan acts as a resistor, which produces heat, much
like a radiant coil.
The cooking surface itself does not heat. Heat is
produced in the cooking pan, and cannot be generated
until a pan is placed on the cooking surface.
When the element is activated, the pan begins to heat
immediately and in turn heats the contents of the pan.
Magnetic induction cooking requires the use of cookware
PDGHRIIHUURXVPHWDOV²PHWDOVWRZKLFKPDJQHWVZLOO
stick, such as iron or steel.
8VHSDQVWKDWILWWKHHOHPHQWVL]H7KHSDQPXVW
be large enough for the safety sensor to activate an
element.
The cooktop will not operate if a very small steel or iron
XWHQVLOOHVVWKDQWKHPLQLPXPVL]HDFURVVWKHERWWRP
is placed on the cooking surface when the unit is turned
RQ²LWHPVVXFKDVVWHHOVSDWXODVFRRNLQJVSRRQV
knives and other small utensils.
Cookware “noise”
Slight sounds may be produced by different types
of cookware. Heavier pans such as enameled cast
iron produce less noise than a lighter weight multi-ply
stainless steel pan. The size of the pan, and the amount
of contents, can also contribute to the sound level.
When using adjacent elements that are set at certain
power level settings, magnetic fields may interact and
SURGXFHDKLJKSLWFKZKLVWOHRULQWHUPLWWHG³KXP´7KHVH
sounds can be reduced or eliminated by lowering or
raising the power level settings of one or both of the
HOHPHQWV3DQVWKDWFRPSOHWHO\FRYHUWKHHOHPHQWULQJ
will produce less sound.
$ORZ³KXPPLQJ´VRXQGLVQRUPDOSDUWLFXODUO\RQKLJK
settings.
Slight sounds, such as hums or buzzes, may be
produced by different types of cookware. This is normal.
Heavier and uniform material pans such as enameled
cast iron produce less sound than lighter weight multi-
layered stainless steel pans or pans that have bonded
disks on the bottom of the pan. The size of the pan, the
amount of contents in the pan, and the flatness of the
pan can also contribute to the sound level. Some pots
ZLOO³%X]]´ORXGHUGHSHQGLQJRQWKHPDWHULDO$³%X]]´
sound may be heard if the pan contents are cold. As the
SDQKHDWVWKHVRXQGZLOOGHFUHDVH,IWKHSRZHUOHYHOLV
reduced, the sound level will go down.
3DQVWKDWGRQRWPHHWWKHPLQLPXPVL]HUHTXLUHPHQWV
for the burner can produce louder sounds. They can
cause the controller to "search" for the pot and produce
a clicking and "zipping" sound. This can happen when
one burner is running or only when an adjacent burner
LVDOVRUXQQLQJ6HH8VHU0DQXDOIRUWKHPLQLPXPVL]HG
pots for each burner. Only measure the flat, magnetic
bottom of the pot.
8VHWKHPLQLPXPVL]HSDQIRUWKHHOHPHQW7KH
pan material is correct if a magnet sticks to the
bottom.
Min. Size
Min. Size
USING THE COOKTOP: +RZ,QGXFWLRQ&RRNLQJ:RUNV&RRNLQJ1RLVH

49-2001135 Rev. 0 15
USING THE COOKTOP: &KRRVLQJ7KH&RUUHFW&RRNZDUH7R8VH
Choosing The Correct Cookware To Use
Using the correct size cookware
The induction coils require a minimum pan size to
IXQFWLRQSURSHUO\,IWKHSDQLVUHPRYHGIURPWKHHOHPHQW
IRUPRUHWKDQVHFRQGVRUQRWGHWHFWHGWKH21
indicator for that element will flash and then turn off.
Cookware larger than the element ring may be used;
however, heat will only occur above the element.
)RUEHVWUHVXOWVWKHFRRNZDUHPXVWPDNH)8//FRQWDFW
with the glass surface.
'RQRWDOORZWKHERWWRPRIWKHSDQRUFRRNZDUHWRWRXFK
the surrounding metal cooktop trim or to overlap the
cooktop controls.
For best performance, match the pan size to the element
VL]H8VLQJDVPDOOHUSRWRQDODUJHUEXUQHUZLOOJHQHUDWH
less power at any given setting.
Suitable Cookware
8VHTXDOLW\FRRNZDUHZLWKKHDYLHUERWWRPVIRUEHWWHU
heat distribution and even cooking results. Choose
cookware made of magnetic stainless steel, enamel
coated cast iron, enameled steel and combinations of
these materials.
Some cookware is specifically identified by the
PDQXIDFWXUHUIRUXVHZLWKLQGXFWLRQFRRNWRSV8VHD
magnet to test if the cookware will work.
)ODWERWWRPHGSDQVJLYHEHVWUHVXOWV3DQVZLWKULPVRU
slight ridges can be used.
5RXQGSDQVJLYHEHVWUHVXOWV3DQVZLWKZDUSHGRU
curved bottoms will not heat evenly.
)RUZRNFRRNLQJXVHDIODWERWWRPHGZRN'RQRWXVHD
wok with a support ring.
8VHDIODWERWWRPHGZRN
8VHDJULGGOH
8VHIODWERWWRPHGSDQV
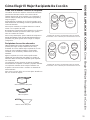
´ZLGHFRRNWRS
8VHWKHPLQLPXPUHFRPPHQGHGVL]HSDQVKRZQ
for each cooking element.
´ZLGHFRRNWRS
8VHWKHPLQLPXPUHFRPPHQGHGVL]HSDQVKRZQ
for each cooking element.
´0LQ'LD
3DQ6L]H
´0LQ'LD
3DQ6L]H
´0LQ
'LD3DQ6L]H
´0LQ'LD
3DQ6L]H
5-1/4´0LQ'LD
3DQ6L]H
´0LQ'LD
3DQ6L]H
´0LQ'LD
3DQ6L]H
´0LQ
'LD3DQ
Size
´0LQ'LD
3DQ6L]H

16 49-2001135 Rev. 0
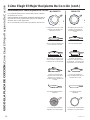
Choosing The Correct Cookware To Use (cont.)
Cookware not centered on
cooking element surface.
Curved or warped pan bottoms
or sides.
3DQGRHVQRWPHHWWKHPLQLPXP
size required for the cooking
element used.
Cookware centered correctly
on cooking element surface.
Flat pan bottom.
3DQVL]HPHHWVRUH[FHHGVWKH
recommended minimum size
for the cooking element used.
INCORRECT CORRECT
3DQERWWRPUHVWVRQFRRNWRS
trim or does not rest completely
on the cooktop surface.
Heavy handle tilts pan.
3DQLVSDUWLDOO\PDJQHWLF
on the bottom. 3DQLVFRPSOHWHO\PDJQHWLF
on the bottom.
3DQERWWRPUHVWVFRPSOHWHO\RQ
the cooktop surface.
3DQLVSURSHUO\EDODQFHG
Cookware recommendations
Cookware must fully contact the surface of the cooking
element.
8VHIODWERWWRPHGSDQVVL]HGWRILWWKHFRRNLQJHOHPHQW
and also to the amount of food being prepared.
,QGXFWLRQLQWHUIDFHGLVNVDUH127UHFRPPHQGHG
USING THE COOKTOP:&KRRVLQJ7KH&RUUHFW&RRNZDUH7R8VH

49-2001135 Rev. 0
USING THE COOKTOP: *ULGGOH RSWLRQDO DFFHVVRU\
Griddle (optional accessory)
Using the Griddle
CAUTION
Burn Hazard
Ŷ Griddle surfaces may be hot enough to cause burns during and after use. Place and remove the griddle
when it is cool and all surface units are off. Use oven mitts if you will touch the griddle while hot.
Failure to do so can result in burns.
Ŷ Place and remove the griddle only when griddle is cool and all surface burners are turned OFF.
%HIRUH XVLQJ WKLV FRRNZDUH IRU WKH ILUVW WLPH ZDVK LW WR PDNH VXUH LW LV FOHDQ 7KHQ VHDVRQ LW OLJKWO\ UXEELQJ FRRNLQJ
oil onto the cooking surface.
How To Place The Griddle
IMPORTANT: Always place and use your griddle at the
designated location on the cooktop.
IMPORTANT NOTES:
Ŷ Clean the griddle with a sponge and mild detergent
LQ ZDUP ZDWHU '2 127 XVH EOXH RU JUHHQ VFUXEELQJ
pads or steel wool.
Ŷ Avoid cooking extremely greasy foods and be careful
of grease spillover while cooking.
Ŷ 1HYHU SODFH RU VWRUH DQ\ LWHPV RQ WKH JULGGOH HYHQ
when it is not in use. The griddle can become heated
when using the surrounding surface units.
Ŷ Avoid using metal utensils with sharp points or rough
HGJHVZKLFKPLJKWGDPDJHWKHJULGGOH'RQRWFXW
foods on the griddle.
Ŷ 'R QRW XVH FRRNZDUH DV D VWRUDJH FRQWDLQHU IRU IRRG RU
RLO 3HUPDQHQW VWDLQLQJ DQGRU FUD]H OLQHV FRXOG UHVXOW
Ŷ Your griddle will discolor over time with use.
Ŷ 'R QRW FOHDQ WKH JULGGOH LQ D VHOIFOHDQLQJ RYHQ
Ŷ Always allow the cookware to cool before immersing in
water.
Ŷ 'RQRWRYHUKHDWWKHJULGGOH
Griddle Operation
To turn on the surface units for the entire griddle, use
WKH 6\QF %XUQHU FRQWURO IHDWXUH 7RXFK WKH Sync Burner
pad and then adjust power level to desired setting as
described on page 9.
Type of Food Cook Setting
Warming Tortillas 0HG/R
3DQFDNHV 0HG/R
Hamburgers Med
Fried Eggs
0HG/R
%UHDNIDVW 6DXVDJH /LQNV Med
+RW 6DQGZLFKHV VXFK DV *ULOOHG &KHHVH 0HG/R
Griddle settings are intended to be a guideline and may need to be
adjusted based on individual cooking preferences.

18 49-2001135 Rev. 0
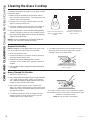
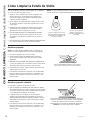
Cleaning the Glass Cooktop
To maintain and protect the surface of your glass cooktop,
follow these steps:
%HIRUHXVLQJWKHFRRNWRSIRUWKHILUVWWLPHFOHDQLW
with a ceramic cooktop cleaner. This helps protect the
top and makes cleanup easier.
2. Regular use of a ceramic cooktop cleaner will help
keep the cooktop looking new.
3. Shake the cleaning cream well. Apply a few drops of
a ceramic cooktop cleaner directly to the cooktop.
8VHDSDSHUWRZHORUDQRQVFUDWFKFOHDQLQJSDGIRU
ceramic cooktops to clean the entire cooktop surface.
8VHDGU\FORWKRUSDSHUWRZHOWRUHPRYHDOOFOHDQLQJ
UHVLGXH1RQHHGWRULQVH
NOTE:,WLVYHU\LPSRUWDQWWKDW\RX'2127KHDWWKH
cooktop until it has been cleaned thoroughly.
Burned-On Residue
NOTE:'$0$*(WR\RXUJODVVVXUIDFHPD\RFFXULI\RX
use scrub pads other than those recommended.
1. Allow the cooktop to cool.
2. Spread a few drops of a ceramic cooktop cleaner on
the entire burned residue area.
8VLQJDQRQVFUDWFKFOHDQLQJSDGIRUFHUDPLF
cooktops, rub the residue area, applying pressure as
needed.
,IDQ\UHVLGXHUHPDLQVUHSHDWWKHVWHSVOLVWHGDERYH
as needed.
5. For additional protection, after all residue has been
removed, polish the entire surface with a ceramic
cooktop cleaner and a paper towel.
Heavy, Burned-On Residue
1. Allow the cooktop to cool.
8VHDVLQJOHHGJHUD]RUEODGHVFUDSHUDWDSSUR[LPDWHO\
a 45° angle against the glass surface and scrape the
VRLO,WZLOOEHQHFHVVDU\WRDSSO\SUHVVXUHWRWKHUD]RU
scraper in order to remove the residue.
3. After scraping with the razor scraper, spread a few
drops of a ceramic cooktop cleaner on the entire burned
UHVLGXHDUHD8VHDQRQVFUDWFKFOHDQLQJSDGWRUHPRYH
any remaining residue.
4. For additional protection, after all residue has been
removed, polish the entire surface with a ceramic
cooktop cleaner and a paper towel.
Clean your cooktop after each
VSLOO8VHDFHUDPLFFRRNWRS
cleaner.
Ceramic
Cooktop
Cleaner
The ceramic cooktop scraper and all recommended supplies
DUHDYDLODEOHWKURXJKRXU3DUWV&HQWHU6HHLQVWUXFWLRQVXQGHU
³$VVLVWDQFH$FFHVVRULHV´VHFWLRQ
NOTE:'RQRWXVHDGXOORUQLFNHGEODGH
8VHDQRQVFUDWFKFOHDQLQJSDGIRU
ceramic cooktops.
For cleaning videos and
instructions, scan the QR code
with your device.
CARE AND CLEANING: Cleaning the Glass Cooktop

49-2001135 Rev. 0 19
CARE AND CLEANING: Cleaning the Glass Cooktop
Cleaning the Glass Cooktop (Cont.)
Metal Marks and Scratches
%HFDUHIXOQRWWRVOLGHSRWVDQGSDQVDFURVV\RXU
FRRNWRS,WZLOOOHDYHPHWDOPDUNLQJVRQWKHFRRNWRS
surface.
These marks are removable using a ceramic cooktop
cleaner with a non-scratch cleaning pad for ceramic
cooktops.
,ISRWVZLWKDWKLQRYHUOD\RIDOXPLQXPRUFRSSHU
are allowed to boil dry, the overlay may leave black
discoloration on the cooktop.
This should be removed immediately before heating
again or the discoloration may be permanent.
NOTE: Carefully check the bottom of pans for roughness
that would scratch the cooktop.
%HFDUHIXOQRWWRSODFHDOXPLQXPEDNLQJVKHHWVRU
aluminum frozen entrée containers on a hot cooktop
VXUIDFH,WZLOOOHDYHVKLQ\GRWVRUPDUNLQJVRQWKH
cooktop surface. These markings are permanent and
cannot be cleaned off.
Damage from Sugary Spills and Melted Plastic
Special care should be taken when removing hot substances to avoid permanent damage of the glass surface.
6XJDU\VSLOORYHUVVXFKDVMHOOLHVIXGJHFDQG\V\UXSVRUPHOWHGSODVWLFVFDQFDXVHSLWWLQJRIWKHVXUIDFHRI\RXU
FRRNWRSQRWFRYHUHGE\WKHZDUUDQW\XQOHVVWKHVSLOOLVUHPRYHGZKLOHVWLOOKRW6SHFLDOFDUHVKRXOGEHWDNHQZKHQ
removing hot substances.
%HVXUHWRXVHDQHZVKDUSUD]RUVFUDSHU
'RQRWXVHDGXOORUQLFNHGEODGH
1. Turn off all surface units. Remove hot pans.
2. Wearing an oven mitt:
D8VHDVLQJOHHGJHUD]RUEODGHVFUDSHUWRPRYH
the spill to a cool area on the cooktop.
b. Remove the spill with paper towels.
3. Any remaining spillover should be left until the surface
of the cooktop has cooled.
'RQ¶WXVHWKHVXUIDFHXQLWVDJDLQXQWLODOORIWKH
residue has been completely removed.
NOTE:,ISLWWLQJRULQGHQWDWLRQLQWKHJODVVVXUIDFHKDV
already occurred, the cooktop glass will have to be
UHSODFHG,QWKLVFDVHVHUYLFHZLOOEHQHFHVVDU\

20 49-2001135 Rev. 0
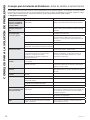
Troubleshooting tips ... %HIRUH\RXFDOOIRUVHUYLFH
6DYHWLPHDQGPRQH\5HYLHZWKHFKDUWVRQWKHIROORZLQJSDJHVILUVWDQG\RXPD\QRWQHHGWRFDOOIRUVHUYLFH,IDQHUURU
occurs in the control operation, a fault code will flash in the display. Record the error code and call for service. Check out
self-help videos and FAQ at GEAppliances.com/support.
Problem Possible Cause What To Do
Surface elements will not
maintain a rolling boil or
cooking is slow
,PSURSHUFRRNZDUHEHLQJXVHG 8VHSDQVWKDWDUHUHFRPPHQGHGIRU
induction, have flat bottoms and match the
size of the surface element.
Surface elements do not
work properly Cooktop controls improperly set. Check to be sure the correct control is set for
the surface element you are using.
Power arc ON indicator
blinking Wrong pan type. 8VHDPDJQHWWRFKHFNWKDWFRRNZDUHLV
induction compatible.
3DQLVWRRVPDOO %OLQNLQJ³21´LQGLFDWRU²SDQVL]HLVEHORZ
the minimum size for the element. See the
8VLQJWKHFRUUHFWVL]HFRRNZDUHVHFWLRQ
3DQQRWSRVLWLRQHGFRUUHFWO\ Center the pan in the cooking ring.
+, -, or control lock pads have been touched
before an element is turned on. See the Operating the Cooking Elements
section.
Scratches on cooktop
glass surface ,QFRUUHFWFOHDQLQJPHWKRGVEHLQJXVHG 8VHUHFRPPHQGHGFOHDQLQJSURFHGXUHV6HH
the Cleaning the glass cooktop section.
Cookware with rough bottoms being used or
FRDUVHSDUWLFOHVVDOWRUVDQGZHUHEHWZHHQWKH
cookware and the surface of the cooktop.
Cookware has been slid across the cooktop
surface.
To avoid scratches, use the recommended
cleaning procedures. Make sure bottoms
of cookware are clean before use, and use
cookware with smooth bottoms.
Areas of discoloration on
the cooktop Food spillovers not cleaned before next use. See the Cleaning the glass cooktop section.
Hot surface on a model with a light-colored
glass cooktop. This is normal. The surface may appear
discolored when it is hot. This is temporary
and will disappear as the glass cools.
Plastic melted to the
surface Hot cooktop came into contact with plastic
placed on the hot cooktop. See the Glass surface – potential for
permanent damage section in the Cleaning
the glass cooktop section.
Pitting (or indentation) of
the cooktop Hot sugar mixture spilled on the cooktop. Call a qualified technician for replacement.
Unresponsive keypad .H\SDGLVGLUW\ Clean the keypad.
A fuse in your home may be blown or the circuit
breaker tripped. Replace the fuse or reset the circuit breaker.
Object, such as utensil or debris, is on the
control interface. Remove object from control interface.
Liquid is on the control interface. Wipe control interface to remove liquid.
Pan detection/sizing not
working properly ,PSURSHUFRRNZDUHEHLQJXVHG 8VHDIODWLQGXFWLRQFDSDEOHSDQWKDWPHHWV
the minimum size for the element being used.
6HHWKH8VLQJ7KH&RUUHFW6L]H&RRNZDUH
section.
3DQLVLPSURSHUO\SODFHG Make sure the pan is centered on the
corresponding surface element.
Cooktop control improperly set. Check to see that the control is set properly.
Noise 6RXQGV\RXPD\KHDU%X]]LQJZKLVWOLQJDQG
humming. 7KHVHVRXQGVDUHQRUPDO6HH&RRNLQJ1RLVH
section.
TROUBLESHOOTING TIPS
La page charge ...
La page charge ...
La page charge ...
La page charge ...
La page charge ...
La page charge ...
La page charge ...
La page charge ...
La page charge ...
La page charge ...
La page charge ...
La page charge ...
La page charge ...
La page charge ...
La page charge ...
La page charge ...
La page charge ...
La page charge ...
La page charge ...
La page charge ...
La page charge ...
La page charge ...
La page charge ...
La page charge ...
La page charge ...
La page charge ...
La page charge ...
La page charge ...
La page charge ...
La page charge ...
La page charge ...
La page charge ...
La page charge ...
La page charge ...
La page charge ...
La page charge ...
La page charge ...
La page charge ...
La page charge ...
La page charge ...
La page charge ...
La page charge ...
La page charge ...
La page charge ...
La page charge ...
La page charge ...
La page charge ...
La page charge ...
La page charge ...
La page charge ...
La page charge ...
La page charge ...
-
 1
1
-
 2
2
-
 3
3
-
 4
4
-
 5
5
-
 6
6
-
 7
7
-
 8
8
-
 9
9
-
 10
10
-
 11
11
-
 12
12
-
 13
13
-
 14
14
-
 15
15
-
 16
16
-
 17
17
-
 18
18
-
 19
19
-
 20
20
-
 21
21
-
 22
22
-
 23
23
-
 24
24
-
 25
25
-
 26
26
-
 27
27
-
 28
28
-
 29
29
-
 30
30
-
 31
31
-
 32
32
-
 33
33
-
 34
34
-
 35
35
-
 36
36
-
 37
37
-
 38
38
-
 39
39
-
 40
40
-
 41
41
-
 42
42
-
 43
43
-
 44
44
-
 45
45
-
 46
46
-
 47
47
-
 48
48
-
 49
49
-
 50
50
-
 51
51
-
 52
52
-
 53
53
-
 54
54
-
 55
55
-
 56
56
-
 57
57
-
 58
58
-
 59
59
-
 60
60
-
 61
61
-
 62
62
-
 63
63
-
 64
64
-
 65
65
-
 66
66
-
 67
67
-
 68
68
-
 69
69
-
 70
70
-
 71
71
-
 72
72


