Panasonic FZ-B2 Le manuel du propriétaire
- Catégorie
- Des cahiers
- Taper
- Le manuel du propriétaire

Useful Information
Troubleshooting
Appendix
Getting Started
OPERATING INSTRUCTIONS
Basic Guide
Tablet Computer
Model No.
FZ-B2
series
Please read these instructions carefully before using this product, and save this
manual for future use.
Contents
Getting Started
Introduction .................................................2
Description of Parts ....................................4
First-time Operation ....................................7
Turning On/Off and Sleeping/Waking Up
.....10
Input Operation ......................................... 11
Useful Information
Handling and Maintenance .......................14
Troubleshooting
Troubleshooting (Basic) ............................21
Appendix
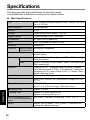
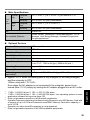
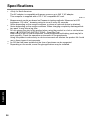
Specications ...........................................24
LIMITED WARRANTY ..............................27
Standard Limited Warranty .......................38

2
Getting Started
Introduction
Thank you for purchasing this Panasonic product. For optimum performance and
safety, please read these instructions carefully.
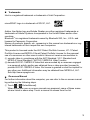
n
Terms and illustrations in these instructions
CAUTION
: Conditions that may result in minor or moderate
injury.
NOTE
: Useful and helpful information.
è
: Page in these Operating Instructions or in the
Reference Manual.
: Reference to the on-screen manuals.
l
Someillustrationsaresimpliedtohelpyourunderstandingandmaylookdif-
ferent from the actual unit.
l
If you do not log on as an owner, you cannot use some functions or cannot
display some screens.
l
Refer for the latest information about optional products to the catalogs, etc.
l
Screen messages are explained in [English (United States)].
(Depending on the language preference, some screen messages in these in-
structions are different from the actual screen messages. For example, [Aero-
plane mode] may be displayed instead of [Airplane mode] in some language
preference.)
n
Disclaimer
Computerspecicationsandmanualsaresubjecttochangewithoutnotice.
Panasonic Corporation assumes no liability for damage incurred directly or in-
directly from errors, omissions or discrepancies between the computer and the
manuals.

3
Getting Started
n
Trademarks
Intel is a registered trademark or trademark of Intel Corporation.
microSDHC Logo is a trademark of SD-3C, LLC.
Adobe, the Adobe logo and Adobe Reader are either registered trademarks or
trademarks of Adobe Systems Incorporated in the United States and/or other
countries.
Bluetooth
®
is a registered trademark owned by Bluetooth SIG, Inc., U.S.A. and
licensed to Panasonic Corporation.
Names of products, brands, etc., appearing in this manual are trademarks or reg-
istered trademarks of their respective own companies.
This product is licensed under the AVC Patent Portfolio License, VC-1 Patent
Portfolio License and MPEG-4 Visual Patent Portfolio License for the personal
use of a consumer or other uses in which it does not receive remuneration to
(i) encode video in compliance with the AVC Standard, VC-1 Standard and
MPEG-4 Visual Standard (“AVC/VC-1/MPEG-4 Video”) and/or
(ii) decode AVC/VC-1/MPEG-4 Video that was encoded by a consumer engaged
in a personal activity and/or was obtained from a video provider licensed to
provide AVC/VC-1/MPEG-4 Video. No license is granted or shall be implied for
any other use. Additional information may be obtained from MPEG LA, LLC.
See http://www.mpegla.com.
n
On-screen Manual
For further information about the computer, you can refer to the on-screen manual
by performing the following steps.
A
Touch
- [ OnlineManual].
When more than one on-screen manuals are prepared, name of those manu-
als are listed in above step. Touch a manual to access from the list.

4
Getting Started
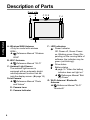
A: Wireless WAN Antenna
<Only for model with wireless
WAN>
è
Reference Manual “Wireless
WAN”
B: Wi-Fi Antenna
è
Reference Manual “Wi-Fi”
C: Ambient Light Sensor
The ambient light sensor is
equipped with an automatic bright-
ness adjustment function that ad-
justs the display screen. (
è
page 16)
Front Camera
è
Reference Manual “Photo
and Videos”
D: Camera Lens
E: Camera Indicator
F: LED Indicators
: Power Indicator
Off: Power off, Green: Power
on, Blinking green: Sleep (De-
pending on the running state of
software, the indicator may be
green (not blinking)).
: Drive status
: Battery status
è
page 15 “When the battery
indicator does not light on”
è
Reference Manual “Bat-
tery Power”
G: Wi-Fi Antenna / Bluetooth
Antenna
è
Reference Manual “Wi-Fi”
“Bluetooth”
Description of Parts
F
G
A
B
D E
C
A
Front side

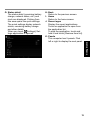
5
Getting Started
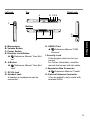
A: Microphone
B: Volume Button
C: Power Switch
D: Rotation Lock Button
è
Reference Manual “User But-
ton”
E: A Button
è
Reference Manual “User But-
tons”
F: DC-IN Jack
G: Headset Jack
A headset or headphone can be
connected.
H: USB3.0 Port
è
Reference Manual “USB
Devices”
I: Security Lock
A Kensington cable can be con-
nected.
For further information, read the
manual that comes with the cable.
J: Expansion Bus Connector
è
Reference Manual “Cradle”
K: External Antenna Connector
<Can be added to only model with
wireless WAN>
F
G
H
Left side Right side
EDCBA
I
J
K
Top
Bottom

6
Getting Started
Description of Parts
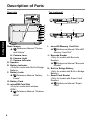
Rear Camera
è
Reference Manual “Photos
and Videos”
A: Camera Lens
B: Camera Light
C: Camera Indicator
D: Speaker
E: Battery Indicator
<Only for model with Built-in Bridge
Battery>
F: Battery Latch
è
Reference Manual “Battery
Power”
G: Battery Pack
H: microSIM Card Slot
<Only for model with wireless
WAN>
è
Reference Manual “Wireless
WAN”
I: microSD Memory Card Slot
è
Reference Manual “MicroSD
Memory Card Slot”
J: Barcode Reader
<Only for model with Barcode
Reader>
è
Reference Manual “Barcode
Reader”
K: Built-in Bridge Battery
<Only for model with Built-in Bridge
Battery>
L:
Smart Card Reader
<Only for model with Smart Card
Reader>
è
Reference Manual “Smart
Card”
A
B
C
D
E
F
G
HH
I
I
Rear side
J
K
JL
K
Top (optional)

7
Getting Started
n
Preparation
A
Check and identify the supplied accessories.
Ifyoudonotndthedescribedaccessories,contactPanasonicTechnical
Support.
• AC Adaptor . . . . . . 1
Model No: CF-AA6373A
• AC Cord . . . . . . . . 1 • Battery Pack . . . . . 1
Model No: FZ-VZSU94W
• Soft Cloth . . . . . . . . . . . . . . . . . . . . . . . . . . . . . . . . . . . . . . . . . . . . . 1
• OPERATING INSTRUCTIONS - Read Me First . . . . . . . . . . . . . . . 1
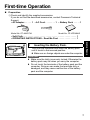
First-time Operation
1 Inserting the Battery Pack.
Turn over the computer and insert the battery pack
until it touch to the secured position.
l
Make sure no foreign objects are under the computer.
CAUTION
l
Make sure the latch is securely locked. Otherwise the
battery pack may fall when you carry the computer.
l
Do not touch the terminals of the battery pack and the
computer. Doing so can make the terminals dirty or
damaged, and may cause malfunction of the battery
pack and the computer.
1
㪉
㪈

8
Getting Started
First-time Operation
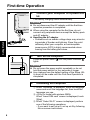
2 Connect your computer to a power out-
let.
The battery charging starts automatically.
CAUTION
l
DonotdisconnecttheACadaptoruntiltherst-time
operation procedure is completed.
l
Whenusingthecomputerforthersttime,donot
connect any peripheral device except the battery pack
and AC adaptor.
l
Handling the AC adaptor
Problems such as sudden voltage drops may arise dur-
ing periods of thunder and lightning. Since this could
adversely affect your computer, an uninterruptible
power source (UPS) is highly recommended unless
running from the battery pack alone.
3 Turn on the computer.
Press the power switch until the power indicator
lights.
CAUTION
l
Do not press the power switch repeatedly or do not
hold the power switch for four seconds or longer.
l
Any changes from the default setting of the Setup Util-
ity must not be made until the First-time Operation is
completed.
4 Initializing the computer
A
When “Welcome” is displayed, touch the language
name and scroll the language list, then touch the
language you use.
B
<Only for model with wireless WAN>
When “Insert SIM card” screen is displayed, touch
[Skip].
C
When “Select Wi-Fi” screen is displayed, perform
one of the following operations.
-Ifyouwanttosetupwi-,setupwi-byfollowing
the on-screen instructions.
㪈
㪉
2
3

9
Getting Started
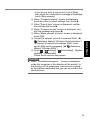
-Ifyoudonotwanttosetupwi-,touch[Skip],
thenwhentheconrmationmessageisdisplayed
touch [Skip anyway].
D
When “Google & location” screen is displayed,
touch the items to select settings, then touch
.
E
When“Date&time”screenisdisplayed,conrm
the settings and touch
.
F
When “Google services” screen is displayed, con-
rmthemessageandtouch
.
G
When “Make yourself at home” screen is displayed,
touch [OK].
H
Connecttonetworkviawi-orwirelessWAN.(
è
Reference Manual “Wireless Communication”)
To connect to internet via wireless WAN, insert-
ing the SIM card is necessary. (
è
Reference
Manual “Wireless WAN”)
I
Touch
- [ Settings] - [ About tablet] - [System
updates] - [Downloads].
Follow the on-screen instructions.
CAUTION
l
When “This tablet belongs to...” screen is displayed,
rotate this computer in the direction of the portrait. In
the direction of the landscape, input area is covered
bythesoftwarekeyboardandyoucannotconrmthe
inputted items.

10
Getting Started
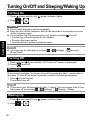
Turning On
A
Press
(power switch) until (power indicator) lights.
B
Drag
to .
CAUTION
l
Do not press the power switch repeatedly.
l
Once you turn off the computer, wait for ten seconds or more before you turn
on the computer again.
l
Do not perform the following operation until the drive indicator turns off.
Connecting or disconnecting the AC adaptor
Pressing the power switch
Touching buttons, screen or external mouse
NOTE
l
Lock type can be changed by touching
- [ Settings] - [ Security] -
[Screen lock].
Turning Off
A
Press and hold
(Power switch) until “Power off” screen is displayed.
B
Touch [
Power off].
Sleeping
At the time of purchase, the screen turns off automatically after 1 minute with no
operation. To turn off the screen manually, perform the following operation.
A
Press
(Power switch).
The screen turns off.
NOTE
l
The screen turns off automatically after 1 minute. You can change time to turn
the screen off by touching
- [ Settings] - [ Display] - [Sleep].
Waking Up
A
Press
(power switch) until (power indicator) lights.
B
Drag
to .
Turning On/Off and Sleeping/Waking Up

11
Getting Started
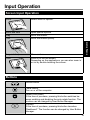
Input Operation
Screen Input Operation
Touch Select items or options.
Touch and hold Open special options.
Drag Scroll the screen.
Flick
Scroll the screen quickly.
Drag and drop Move an item.
Pinch
Zoom in or out the screen.
Depending on the applications, you can also zoom in
or out by double-touching the screen.
Buttons
Volume button
Power switch
Turn on or off the computer.
Rotate Lock button
At the time of purchase, pressing this button switches be-
tween enabling and disabling the auto-rotate function. The
function can be changed by User Button Manager.
A
A button
At the time of purchase, pressing this button launches
“Dashboard”. The function can be changed by User Button
Manager.

12
Getting Started
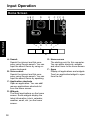
Input Operation
Home Screen
A B C D E F G
H I J
K
C C
A: Search
Search the internet and this com-
puter using Google search. You can
input the search terms by using on-
screen keyboard.
B: Voice search
Search the internet and this com-
puter using Google search. You can
input the search terms by speaking.
C: Application shortcuts
Open an application. You can add/
remove applications shortcuts to/
from the home screen.
D: Widgets
The small applications on the home
screen. Some widgets display the
latest information (clock, calendar,
weather, email, etc.) on the home
screen.
E: Home screen
The starting point for this computer.
You can place shortcuts, widgets
and other items to the home screen.
F: Apps
Display all applications and widgets.
Touch an application/widget to open
from the list.

13
Getting Started
G: Status detail
The status detail (remaining battery
charge, network status, etc.) and
clock are displayed. Flicking from
this area opens the quick settings.
The quick settings display network
status, remaining battery charge
and other details.
When you touch [
Settings], Set-
tings application is opened.
H: Back
Return to the previous screen.
I: Home
Return to the home screen.
J: Recent apps
Display the recent applications.
Touch an application to open from
the application list.
To stop the application, touch and
hold it and touch [Remove from list].
K: Panels
This computer has 5 panels. Flick
left or right to display the next panel.

14
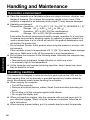
Useful Information
Handling and Maintenance
Operation environment
l
Placethecomputeronaatstablesurfacenotsubjecttoshock,vibration,and
danger of dropping. Do not place the computer upright or turn it over. If the
computer is exposed to an extremely strong impact, it may become damaged.
l
Operating environment
Temperature: Operation : -10
°C
to 50
°C
{14
°F
to 122
°F
} (IEC60068-2-1, 2)
*1
Storage : -20
°C
to 60
°C
{-4
°F
to 140
°F
}
Humidity: Operation : 30
%
to 80
%
RH (No condensation)
Storage : 30
%
to 90
%
RH (No condensation)
Even within the above temperature/humidity ranges, operation for a long time
in extreme environments, smoking nearby, or operation in places where oil is
used or where there is a lot of dust will result in the product deterioration and
will shorten the product life.
*1
Do not expose the skin to this product when using the product in a hot or cold
environment.
If the computer is wet in temperatures of 0
°C
{32
°F
} or below, freeze damage
may occur. Make sure to dry off the computer in such temperatures.
l
Do not place the computer in the following areas, otherwise the computer may
be damaged.
Near electronic equipment. Image distortion or noise may occur.
In extremely high or low temperature.
l
As the computer can become hot during operation, keep it away from items
that are sensitive to heat.
Handling cautions
This computer is designed to minimize shock to parts such as the LCD and the
ashmemorydrive,butnowarrantyisprovidedagainstanytroublecausedby
shock. Be extremely careful when handling the computer.
l
When carrying the computer:
Turn off the computer.
Remove all external devices, cables, Smart Cards and other protruding ob-
jects.
Do not drop or hit the computer against solid objects.
Do not grip the display part.
l
When you board an airplane, take the computer with you and never put it in
your checked luggage. When using the computer on airplane, follow the air-
line’s instructions.
l
When carrying a spare battery, put it in a plastic bag to protect its terminals.

15
Useful Information
l
The touchscreenisdesignedtobeusedbyangertip.Donotplaceanyob-
ject on its surface and do not press down strongly with sharp-pointed or hard
objects that may leave marks (e.g., nails, pencils and ball point pens).
l
Avoid any harmful substances such as oil from getting into the touchscreen.
The pointer may not work correctly.
l
Be careful not to get injured by dropping or getting hit when carrying the com-
puter.
l
Use only the dedicated stylus to touch the screen. Do not place any object on
its surface and do not press down strongly with sharp-pointed or hard objects
that may leave marks (e.g., nails, pencils and ball point pens).
l
Do not use the screen when dust or dirt (e.g., oil) is on the screen. Otherwise
foreign particles on the screen/dedicated stylus can scratch the screen surface
or obstruct the dedicated stylus operation.
l
Use the dedicated stylus only for touching the screen. Using it for any other
purpose may damage the dedicated stylus and result in scratches on the
screen.
n
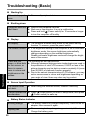
When the battery indicator does not light on
The battery indicator may not light on even if the AC adaptor and the battery pack
are correctly connected to the computer, due to the following reasons.
l
The AC adaptor’s protection function may be working. In this case, pull out the
AC cord and wait for more than 1 minute before reconnecting the AC cord.
n
When using peripheral devices
Follow these instructions and the Reference Manual to avoid any damage to the
devices. Carefully read the instruction manuals of the peripheral devices.
l
Usetheperipheraldevicesconformingtothecomputer’sspecications.
l
Connect to the connectors in the correct direction.
l
If it is hard to insert, do not try forcibly but check the connector’s shape, direc-
tion, alignment of pins, etc.
l
If screws are included, fasten them securely.
l
Remove the cables when you carry the computer. Do not pull the cables forc-
ibly.

16
Useful Information
Handling and Maintenance
n
Preventing your computer from unauthorized use via Wi-Fi/Bluetooth/
Wireless WAN
l
Before using Wi-Fi/Bluetooth/Wireless WAN, make the appropriate security set-
tings such as data encryption.
n
Sensors
This computer is equipped with four sensors (acceleration sensor, gyro sensor,
magnetic sensor, ambient light sensor), and you can use these sensors with any
software that is compatible.
As the accuracy of each sensor output is dependent on the operating environment
and other conditions, the results should only be used as a reference.
The acceleration sensor, gyro sensor, and magnetic sensor are located at the bot-
tom left of the LCD. The detection results of each sensor may vary depending on
the display mode, how you are holding the computer, the application software you
are using, and other factors.
l
Automatic brightness adjustment
The computer is equipped with an automatic brightness adjustment function
that adjusts the display screen based on the ambient light sensor. You can
conguretheautomaticadjustmentfunctionasfollows.
A
Touch
- [ Settings] - [ Display] - [Brightness].
B
Touch [AUTO] to select the automatic adjustment function.
The ambient light sensor is located at the top of LCD.
The ambient light cannot be detected properly if this area is obstructed or dirty.

17
Useful Information
l
Magnetic sensor
The magnetic sensor on the computer operates by detecting geomagnetism.
Therefore, the magnetic sensor may not function properly and it readings may
be inaccurate, especially in the following environments.
Inside or near steel structures such as buildings or bridges
Inside or near automobiles, or near train power lines
Near metallic furniture or appliances
When the AC adaptor or other peripheral devices are brought closer to the
computer
Nearmagnets,speakers,orotherobjectswithstrongmagneticelds
The magnetic directions indicated by the magnetic sensor may not be accurate
immediatelyafterpurchaseorinenvironmentswithpoormagneticelds.
In such cases, turn on the computer and move it as follows.
A
Hold the computer so that its display side is facing the ground and level.
B
While keeping the computer level, rotate it 90 degrees or more clockwise.
C
Return the computer to position
A
, and rotate it 90 degrees or more coun-
terclockwise.
D
Return the computer to position
A
.
E
Tilt the computer 90 degrees or more to the left so that the left side of the
computer tilts down.
F
Return the computer to position
A
, and tilt it 90 degrees or more to the right
so that the right side of the computer tilts down.
CAUTION
●Holdthecomputerrmlywhenmovingit.Strongshocksfromdroppingthe
computer may result in damage.

18
Useful Information
Handling and Maintenance
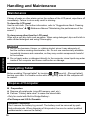
Maintenance
If drops of water or other stains get on the surface of the LCD panel, wipe them off
immediately. Failure to do so may result in staining.
To clean the LCD panel
Use the soft cloth. (For further information, refer to “Suggestions About Cleaning
the LCD Surface”
è
Reference Manual “Maintaining the performance of the
screen”.)
To clean areas other than the LCD panel
Wipe with a soft dry cloth such as gauze. When using detergent, dip a soft cloth in
water-diluted detergent and wring it thoroughly.
CAUTION
l
Do not use benzene, thinner, or rubbing alcohol since it may adversely af-
fect the surface causing discoloration, etc. Do not use commercially-available
household cleaners and cosmetics, as they may contain components harmful
to the surface.
l
Do not apply water or detergent directly to the computer, since liquid may enter
inside of the computer and cause malfunction or damage.
Encrypting Tablet
Before enabling “Encrypt tablet” by touching - [ Security] - [Encrypt tablet],
backup your data. If a trouble occurs while encrypting, data on this computer will
be erased.
Dispose of Computer
n
Preparation
l
Remove all peripherals (microSD memory card, etc.).
l
Perform “Factory data reset” to erase the stored data.
<Only for model with Built-in Bridge Battery>
<For Europe and U.S.A./Canada>
Attention Customers
Don't remove the battery by yourself. The battery must be removed by quali-
edprofessionals.
Whendisposingofthisproduct,besuretocontactqualied
professionals to remove the battery.

19
Useful Information
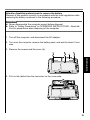
Attention Qualied professionals to remove the battery
Dispose of this product correctly in accordance with the local regulations after
removing the battery as shown in the following procedure.
CAUTION
l
Never disassemble the computer except before disposal.
l
Refer to “Safety Precautions” in OPERATING INSTRUCTIONS - Read Me
First for precautions when disposing of the computer.
1. Turn off the computer, and disconnect the AC adaptor.
2. Turn over the computer, remove the battery pack, and wait for about 3 min-
utes.
3. Remove the screws and the cover (A).
A
4. Pull out all cables from the connector on the cover side.

20
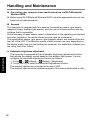
Useful Information
Handling and Maintenance
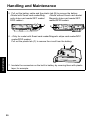
5. Pull out the battery cable and the plastic tab (B) to remove the battery.
<Model with Smart card reader/Mag-
netic stripe card reader/NFC reader/
RFID reader>
<Model without Smart card reader/
Magnetic stripe card reader/NFC
reader/RFID reader>
B
B
6. <Only for model with Smart card reader/Magnetic stripe card reader/NFC
reader/RFID reader>
Pull out the plastic tab (C) to remove the circuit from the battery.
C
7. Insulate the connectors on the built-in battery by covering them with plastic
tape, for example.
La page est en cours de chargement...
La page est en cours de chargement...
La page est en cours de chargement...
La page est en cours de chargement...
La page est en cours de chargement...
La page est en cours de chargement...
La page est en cours de chargement...
La page est en cours de chargement...
La page est en cours de chargement...
La page est en cours de chargement...
La page est en cours de chargement...
La page est en cours de chargement...
La page est en cours de chargement...
La page est en cours de chargement...
La page est en cours de chargement...
La page est en cours de chargement...
La page est en cours de chargement...
La page est en cours de chargement...
La page est en cours de chargement...
La page est en cours de chargement...
La page est en cours de chargement...
La page est en cours de chargement...
-
 1
1
-
 2
2
-
 3
3
-
 4
4
-
 5
5
-
 6
6
-
 7
7
-
 8
8
-
 9
9
-
 10
10
-
 11
11
-
 12
12
-
 13
13
-
 14
14
-
 15
15
-
 16
16
-
 17
17
-
 18
18
-
 19
19
-
 20
20
-
 21
21
-
 22
22
-
 23
23
-
 24
24
-
 25
25
-
 26
26
-
 27
27
-
 28
28
-
 29
29
-
 30
30
-
 31
31
-
 32
32
-
 33
33
-
 34
34
-
 35
35
-
 36
36
-
 37
37
-
 38
38
-
 39
39
-
 40
40
-
 41
41
-
 42
42


Panasonic FZ-B2 Le manuel du propriétaire
- Catégorie
- Des cahiers
- Taper
- Le manuel du propriétaire
dans d''autres langues
- italiano: Panasonic FZ-B2 Manuale del proprietario
- English: Panasonic FZ-B2 Owner's manual
Documents connexes
-
Panasonic FZ-G1 Windows 8 Mode d'emploi
-
Panasonic CF-U1 Manuel utilisateur
-
-
-
-
-
-
-
-