
Manually Sync Your Orbi Outdoor Satellite With Your Orbi Router
Place your Orbi router and satellite near each other during the syncing process. Aer your router and satellite are synced, place your satellite
outdoors.
1. Place your satellite in an area near your Orbi router.
2. Connect your satellite to a power source.
The Power LED on the back of the Orbi lights. If the Power LED does not light, press the Power On/O button.
3. Wait for the bottom Light LED to light white.
The following is the LED behavior during booting:
• Pulsing white. The satellite is booting.
• Solid white. The satellite finished booting and is ready to sync with your router.
4. Press the Sync button on the back of your satellite, and within two minutes, press the Sync button on the back of your Orbi router.
5. Wait for the satellite to sync with the router.
The bottom Light LED on the satellite lights white while it attempts to sync with your Orbi router. It might take about six minutes for
your satellite to sync.
Aer the bottom Light LED lights white, it lights one of the following colors for about three minutes and then turns o:
6. Move your satellite outdoors and connect it to a power source.
Note: The recommend temperature range for your satellite is 4°F to 122°F (-20°C to +50°C).
7. Make sure that the bottom Light LED lights blue to indicate a good connection to the router.
8. (Optional) Mount your satellite.
You can wall-mount your satellite or place it on a stand. For more information, see Wall-Mount the Satellite or Attach the Satellite to the
Stand on the other side of this quick start guide.
Note: Aer your satellite syncs with your router, the satellite’s Sync button is disabled for security reasons. If you press the Sync button
and the satellite’s ring LED pulses magenta, this LED behavior indicates that the Sync button is disabled. To enable the Sync button, log in
to the router and go to the Attached Devices page. For more information, see the user manual.
Quick Start Guide
Blue
The Orbi router and satellite successfully synced, and the connection between the router and satellite is good.
Amber
The Orbi router and satellite successfully synced, and the connection between the router and satellite is fair. Consider moving the
satellite closer to the router.
Magenta
The Orbi router and satellite failed to sync. Move the satellite closer to the router and try again.
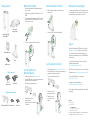
Orbi Outdoor Satellite Overview
Top Light LED
Bottom Light LED
LED On/O button
Sync button (also used for WPS connection)
Reset button
Power LED
Power On/O button
Power connector
2
1
3
4
5
6
May 2018
7
8
2
1
3
4
6
5
7
8

1. Use the wall-mount bracket as a template to mark three
holes on the wall.
2. Drill holes where you marked on the wall using a 5/32-inch
drill bit.
3. Place the wall-mount bracket where you drilled the holes and
secure the bracket to the wall using the stucco or concrete
screws or the wood screws.
4. Slide the Orbi satellite onto the wall-mount bracket.
Wall-Mount the Satellite Attach the Satellite to the Stand
1. Attach the wall-mount bracket to the stand using the
machine screws.
2. Slide the Orbi satellite onto the wall-mount bracket.
Lock the Satellite to the
Wall-Mount Bracket
1. Follow the instructions in Wall-Mount the Satellite.
2. Insert the Phillips screws or torx screws that came with your
package into the wall-mount bracket lock.
The screws must be flush with the lock.
3. Place the lock on top of the
wall-mount bracket.
4. Tighten the screws to secure the lock
to the bracket.
Lock the Satellite to the Stand
1. Follow the instructions in Attach the Satellite to the Stand.
2. Insert the Phillips screws or torx screws that came with your
package into the wall-mount bracket lock.
The screws must be flush with the lock.
3. Place the lock on top of
the wall-mount bracket.
4. Tighten the screws to
secure the lock to the
bracket.
Orbi Outdoor Satellite
(Model RBS50Y)
Power adapter
(varies by region)
Package Contents
Machine screws
Wall-mount bracket
Stand
Wall-mount bracket lock
Stucco or
concrete screws
Wood screws
Phillips screws
Torx screws
Wall-Mount Bracket Lock Items
Wall-Mount Screws
Support
Thank you for purchasing this NETGEAR product. You can visit
www.netgear.com/support to register your product, get help,
access the latest downloads and user manuals, and join our
community. We recommend that you use only ocial NETGEAR
support resources.
Si ce produit est vendu au Canada, vous pouvez accéder à ce
document en français canadien à
http://downloadcenter.netgear.com/other/.
(If this product is sold in Canada, you can access this document in
Canadian French at http://downloadcenter.netgear.com/other/.)
For the current EU Declaration of Conformity, visit
http://kb.netgear.com/11621.
For regulatory compliance information, visit
http://www.netgear.com/about/regulatory/.
See the regulatory compliance document before connecting the
power supply.
NETGEAR INTL LTD
Building 3, University Technology Centre
Curraheen Road, Cork, Ireland
NETGEAR, Inc.
350 East Plumeria Drive
San Jose, CA 95134, USA
© NETGEAR, Inc., NETGEAR and the NETGEAR Logo are trademarks of NETGEAR, Inc. Any
non-NETGEAR trademarks are used for reference purposes only.
Wall-Mount the Power Adapter
To mount the power adapter to the wall, insert two wood screws
into the wall (make sure to leave a portion of the screw thread
exposed) and place the power adapter over the screws.
-
 1
1
-
 2
2


Netgear RBS50Y-100NAS Manuel utilisateur
- Taper
- Manuel utilisateur
- Ce manuel convient également à
dans d''autres langues
- English: Netgear RBS50Y-100NAS User manual
Documents connexes
-
Netgear Orbi PRO SRS60 Quick Start
-
-
-
Netgear RBK13 Guide de démarrage rapide
-
-
-
Netgear Orbi Pro Tri-Band Mesh WiFi System (SRK60) -- Router & Extender Replacement covers up to 5,000 sq. ft., 2 Pack Manuel utilisateur
-
-
Netgear Orbi Compact Wall-Plug Whole Home Mesh WiFi System - WiFi router and wall-plug satellite extender Manuel utilisateur
-
Netgear Orbi RBK23 Manuel utilisateur