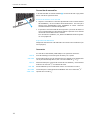
Sennheiser Audiobeam Le manuel du propriétaire
- Taper
- Le manuel du propriétaire

Bedienungsanleitung
Instructions for use
Notice d‘emploi
Instrucciones para el uso
A
ud
i
o
B
ea
m

2
Bedienungsanleitung .................................................................... 3
Instructions for use ..................................................................... 11
Notice d’emploi ............................................................................ 19
Instrucciones para el uso ........................................................... 27

3
Bedienungsanleitung
Inhalt
So funktioniert AudioBeam ............................................................................... 4
Ein Wort zu Ihrer Sicherheit ............................................................................... 4
Anschlüsse und Bedienelemente ...................................................................... 5
AudioBeam montieren ........................................................................................ 6
AudioBeam betriebsbereit machen .................................................................. 7
Störungen beheben ............................................................................................. 8
Zubehör .................................................................................................................. 8
Technische Daten ................................................................................................. 9
Sie haben die richtige Wahl getroffen!
Dieses Sennheiser-Produkt wird Sie lange Jahre durch Zuverlässigkeit,
Wirtschaftlichkeit und einfache Bedienung überzeugen. Dafür garantiert
Sennheiser mit seinem guten Namen und seiner in mehr als 50 Jahren
erworbenen Kompetenz als Hersteller hochwertiger elektro-akustischer
Produkte.
Nehmen Sie sich nun ein paar Minuten Zeit, um diese Anleitung zu lesen.
Wir möchten, dass Sie einfach und schnell in den Genuss dieser Technik
kommen.

So funktioniert AudioBeam
4
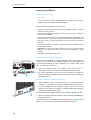
So funktioniert AudioBeam
AudioBeam ist ein akustischer Scheinwerfer. Das bedeutet:
!
AudioBeam überträgt Schall gerichtet und spotgenau – entweder direkt
oder über Reflexion an einer glatten Fläche. Damit ist es z. B. möglich,
dass in einer Kunstausstellung die Erklärung aus dem Bild oder der Skulp-
tur selbst spricht, ohne die Betrachter benachbarter Exponate zu stören.
! AudioBeam begrenzt Schall auf genau definierte Bereiche – benachbarte
Bereiche werden gezielt von Schall freigehalten. Damit kann z. B. auf
einem Messestand ein Video gleichzeitig in verschiedenen Sprachen
gezeigt werden. Die Zuschauer stellen sich einfach in den gewünschten
Sprachbereich.
AudioBeam verwendet eine neuartige Ultraschall-Übertragungs-Technik:
In einem Abstand von vier bis zehn Metern vor dem AudioBeam und in
einem Winkel von ca. 30° wird der gewünschte Audio-Schall erzeugt.
AudioBeam wird durch einen eingebauten Abstandssensor automatisch
abgeschaltet, sobald jemand näher als vier Meter herankommt.
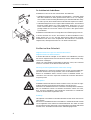
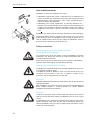
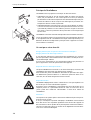
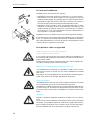
Ein Wort zu Ihrer Sicherheit
Mögliche Gefahr für Träger von Herzschrittmachern!
Mögliche Gefahr von Gehörschäden!
In einem Abstand von weniger als vier Metern vor AudioBeam, kann der
Ultraschall möglicherweise Herzschrittmacher stören und das Gehör mög-
licherweise schädigen!
Stellen Sie, insbesondere bei beweglicher Montage, sicher, dass niemand
näher als vier Meter an das Gerät herantreten kann.
Warnung vor lebensgefährlichem elektrischen Schlag!
Ist AudioBeam ans Stromnetz angeschlossen, können Sie einen lebensge-
fährlichen elektrischen Schlag erhalten, wenn Sie Audiobeam öffnen!
Öffnen Sie AudioBeam daher niemals! Lassen Sie defekte Geräte aus-
schließlich vom Fachmann reparieren. Andernfalls erlöschen Gewährleis-
tungsansprüche!
Feuergefahr!
AudioBeam entwickelt Wärme! Stellen Sie daher sicher, dass die Luft unge-
hindert durch die Lüftungsschlitze des Geräts zirkulieren kann!
Montieren Sie AudioBeam niemals in der Nähe von Heizquellen und betrei-
ben Sie AudioBeam niemals im direkten Sonnenlicht! Stellen Sie sicher,
dass zwischen AudioBeam und brennbaren Materialien ein Mindestab-
stand von einem Meter eingehalten wird!
Achtung!
Flüssigkeiten und elektrisch leitende Kleinteile können einen Kurzschluss
verursachen!
Benutzen Sie AudioBeam daher ausschließlich in trockenen Räumen. Halten
Sie Flüssigkeiten sowie elektrisch leitende Kleinteile vom Gerät und den
Anschlussbuchsen fern. Benutzen Sie zum Reinigen ein trockenes oder leicht
feuchtes Tuch. Verwenden Sie keine Löse- oder Reinigungsmittel.

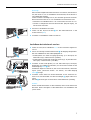
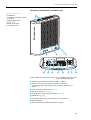
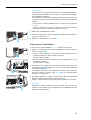
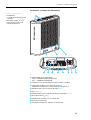
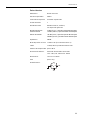
Anschlüsse und Bedienelemente
5
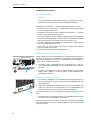
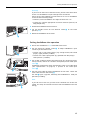
Anschlüsse und Bedienelemente
Lieferumfang:
! AudioBeam
! 3 Netzkabel mit Stecker
! Wechselgewinde
5
/
8
"
auf
3
/
8
"
! Bedienungsanleitung
! Garantiekarte
LED Betriebs-Anzeige: grün: AudioBeam betriebsbereit (standby)
rot: AudioBeam nicht betriebsbereit
Wahlschalter für Eingangs-Empfindlichkeit (+6 dBm, –14 dBm)
Ein/Aus-Schalter für Abstandssensor
(Bitte beachten Sie hierzu unbedingt die Warnung auf Seite 7!)
XLR-3-Buchse für Audio-Eingang INPUT
LED OVERLOAD
BNC-Buchse für Modulatorsignal-Ausgang OUTPUT
Wechselgewinde
5
/
8
"
auf
3
/
8
"
Anschlussbuchse für Netzkabel
Lüftungsschlitze
Drahtbügel zur Sicherung des Netzkabels
INPUT OUTPUT
OVERLOAD

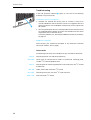
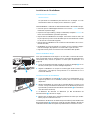
AudioBeam montieren
6
AudioBeam montieren
Der richtige Montageort
Warnung!
Falls die folgenden Standort-Bedingungen nicht eingehalten werden,
können Gefahren für Personen und für AudioBeam entstehen!
Befestigen Sie AudioBeam – auch bei beweglicher Montage – so, dass:
! der Ultraschall sich mindestens 1m ungehindert ausbreiten kann, bevor
er auf erste Gegenstände trifft
! der Weg des Schallsignals (inkl. Reflexionen) mindestens 4m beträgt,
bevor er einen Menschen erreichen kann
! zwischen AudioBeam und benachbarten Gegenständen ein Mindestab-
stand von 10 cm eingehalten wird, damit die Luft ungehindert durch die
Lüftungsschlitze oben und hinten am Gerät zirkulieren kann
! zwischen AudioBeam und brennbaren Materialien ein Mindestabstand
von einem Meter eingehalten wird
! keine Hitze, z. B. von Heizungen, Scheinwerfern, Lampen oder Sonnen-
licht, auf AudioBeam einwirkt
! das Gerät niemals mit Nässe in Kontakt kommt
AudioBeam punktgerichtet montieren
Damit AudioBeam stets auf den Zielbereich ausgerichtet bleibt, sollten Sie
das Gerät fest montieren. Verwenden Sie für die Wand- oder Deckenmon-
tage eine Montageplatte, für die freie Aufstellung einen Tischfuß oder ein
Stativ (siehe: „Zubehör“ auf Seite 8).
왘 Schrauben Sie die Montageplatte, den Tischfuß oder das Stativ am
Stativgewinde fest. Benutzen Sie dazu gegebenenfalls das Wechsel-
gewinde.
왘 Richten Sie AudioBeam mit Hilfe von biegsamen Hälsen und Kugelge-
lenken (siehe: „Zubehör“ auf Seite 8) genau auf den Zielbereich bzw.
die Reflexionsfläche aus.
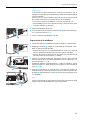
AudioBeam schwenkbar montieren
왘 Schrauben Sie AudioBeam am Stativgewinde an einem Antrieb bzw.
einer Schwenkvorrichtung fest. Benutzen Sie dazu gegebenenfalls das
Wechselgewinde.
왘 Nehmen Sie AudioBeam in Betrieb, wie auf Seite 7 beschrieben und
stellen Sie sicher, dass der Abstandssensor im Schwenkbetrieb nicht
auslöst (die LED Betriebs-Anzeige leuchtet ständig grün).
Falls der Abstandssensor auslöst (die LED Betriebs-Anzeige leuchtet
rot):
왘 Entfernen Sie bis zu einem Abstand von 4 m alle Gegenstände aus dem
Schwenkbereich, den AudioBeam überstreicht.
Falls der Abstandssensor trotzdem auslöst (die LED Betriebs-Anzeige
leuchtet wiederholt rot), müssen Sie den eingebauten Abstandssensor wie
folgt ausschalten:
INPUT OUTPUT
OVERLOAD

AudioBeam betriebsbereit machen
7
Warnung!
Wenn Sie den eingebauten Abstandssensor ausschalten, können Perso-
nen, die näher als 4 m an AudioBeam herankommen, durch den Ultra-
schall gefährdet werden!
Stellen Sie daher unbedingt sicher, dass über den gesamten Schwenk-
bereich niemand näher als 4 m an AudioBeam herankommen kann!
! Montieren Sie AudioBeam dazu z. B. in einer Höhe von mehr als 7 m.
! Treffen Sie nötigenfalls bauliche Maßnahmen (Absperrungen), um
Personen fernzuhalten.
왘 Trennen Sie AudioBeam vom Netz.
왘 Stellen Sie den Ein/Aus-Schalter für den Abstandssensor in die
untere Position (OFF).
왘 Schließen Sie AudioBeam wieder ans Netz an.
AudioBeam betriebsbereit machen
왘 Stellen Sie sicher, dass AudioBeam nicht an das Stromnetz angeschlos-
sen ist!
왘
Passen Sie wie folgt mit dem Wahlschalter
die Eingangs-Empfindlich-
keit von AudioBeam an das Audio-Quellgerät an:
! Audio-Quellen mit hoher Ausgangsspannung (z. B. Mischpult, CD-
oder DVD-Player): obere Position (+6 dBm)
! Audio-Quellen mit geringer Ausgangsspannung (z. B. portabler Mini-
CD-Player): untere Position (–14 dBm).
왘 Schließen Sie die Audio-Quelle (z. B. CD- oder DVD-Player, Mischpult,
Empfänger von kabellosem Mikrofon) mit einem XLR-3-Kabel an den
Audio-Eingang INPUT an.
AudioBeam beginnt automatisch, den Schall abzustrahlen, sobald ein
Signal (siehe „Technische Daten“ auf Seite 9) am Audio-Eingang
INPUT anliegt.
왘 Schließen Sie das Gerät mit einem Netzkabel an das Stromnetz an.
Sichern Sie das Netzkabel mit dem Drahtbügel gegen Herausrut-
schen.
Die LED leuchtet grün und das Gerät ist betriebsbereit (standby).
Hinweis:
Ziehen Sie den Netzstecker aus der Steckdose, wenn Sie das Gerät nicht
benutzen. Damit verlängern Sie die Lebensdauer von AudioBeam und
sparen Strom.
INPUT OUTPUT
OVERLOAD

Störungen beheben
8
Störungen beheben
Wenn die LED Betriebs-Anzeige rot leuchtet, kann eine der folgenden
Störungen vorliegen:
Der Abstandssensor hat ausgelöst
1. Jemand hat den Sicherheitsbereich von vier Metern vor AudioBeam
betreten und der Abstandssensor hat ausgelöst.
Nachdem die Person diesen Bereich wieder verlassen hat, schaltet sich
AudioBeam nach 30 Sekunden selbsttätig wieder ein.
2. Sie betreiben das Gerät schwenkbar und der Abstandssensor hat aus-
gelöst, weil sich Gegenstände oder Personen im Sensorbereich des ein-
gebauten Abstandssensors befinden.
Um das Problem zu beheben, siehe: „AudioBeam schwenkbar montie-
ren“ auf Seite 6.
Das Gerät ist defekt
Setzen Sie sich mit Ihrem Fachhändler oder unserem Kundendienst (siehe
letzte Seite) in Verbindung.
Zubehör
Sie erhalten folgendes Zubehör bei Ihrem Fachhändler:
GZP 10 Montageplatte zur Wand- und Deckenmontage
GZG 1029 Kugelgelenk zur beweglichen Montage auf Stativen oder in Verbindung
mit Montageplatte GZP 10, inkl. Wechselgewinde von
1
/
4
"
auf
3
/
8
"
MZT 14 Schraubsockel zur Befestigung von biegsamen Hälsen und Kugelgelenken
mit
3
/
8
"
Gewinde an Tischplatten
MZT 100 Tischfuß zur einfachen Aufstellung in Tischhöhe
MZT 1019 Traverse zur Montage von zwei AudioBeam mit
3
/
8
"
Innengewinde
SEMS 3134 Stativ mit
3
/
8
"
Gewinde

Technische Daten
9
Technische Daten
Modulation: Breitband AM
Träger-Frequenz: 40 kHz
Amplitudenbegrenzung
: Begrenzer-Verstärker
Audio-Kanäle: 1
Audio-Eingang: XLR-3F-Buchse, symmetrisch, galvanisch getrennt
Eingangspegel für +6 dBm (1,55 V) = obere Schalterposition
Vollaussteuerung: –14 dBm (150 mV) = untere Schalterposition
Einschaltschwelle: –46 dBm (4 mV) = obere Schalterposition
–66 dBm (0,4 mV) = untere Schalterposition
Impedanz: 600 Ω
Schalldruckpegel: 75 dB ± 5 dB (in 4 m Abstand)
Ausgang: 1 x BNC, 50 Ω kurzschlussfest
Verstärkerleistung: ca. 90 W
Spannungsversorgung
: Schaltnetzteil 110 - 240 V, 50 - 60 Hz max. 100 W
Abmessungen: 264 x 82 x 320 mm
Gewicht: ca. 4 kg
XLR-3-Beschaltung:
12
3
+NF
-NF

10

11
Instructions for use
Contents
How AudioBeam works ..................................................................................... 12
Safety instructions ............................................................................................ 12
Connections and operating controls .............................................................. 13
Mounting AudioBeam ....................................................................................... 14
Putting AudioBeam into operation ................................................................ 15
Troubleshooting ................................................................................................. 16
Accessories .......................................................................................................... 16
Specifications ...................................................................................................... 17
Thank you for choosing Sennheiser!
We have designed this product to give you reliable operation over many
years. Over half a century of accumulated expertise in the design and
manufacture of high-quality electro-acoustic equipment have made
Sennheiser a world-leading company in this field.
Please take a few moments to read these instructions carefully, as we want
you to enjoy your new Sennheiser product quickly and to the fullest.

How AudioBeam works
12
How AudioBeam works
AudioBeam is an acoustic spotlight. This means:
! AudioBeam is able to focus sound – either directly or via reflections on a
surface. This allows e.g. information in museums and at exhibitions to be
radiated directly from the exhibits – only visitors standing directly in
front of an exhibit are addressed.
! AudioBeam limits sound reproduction to precisely defined areas –
adjacent areas are kept sound-free.
This allows e.g.
the soundtrack from
a video to be projected in different languages, without the need for
headphones. The visitors simply have to enter the desired “language
area”.
AudioBeam uses state-of-the-art ultrasonic sound transmission technology:
The desired audible sound is created at a distance of four to up to ten
meters directly in front of AudioBeam and at an angle of approx. 30°. As
soon as someone comes closer than four meters to AudioBeam, a built-in
distance sensor automatically turns off the unit.
Safety instructions
Possible danger for persons with cardiac pacemakers!
Possible danger of hearing defects!
At a distance of less than four meters in front of AudioBeam, ultrasonic
frequencies may disturb the function of cardiac pacemakers and may
cause damage to the hearing!
Make sure that no-one can come closer than four meters to AudioBeam –
especially when mounting the unit movably or rotatably.
Warning of life-threatening electrical shock!
If AudioBeam is connected to the mains, opening AudioBeam may result in
a life-threatening electric shock!
If AudioBeam should be defective, repair must be carried out by your
Sennheiser service partner. If the unit is opened in breach of this
instruction, the warranty becomes null and void.
Risk of fire!
AudioBeam generates heat! Make sure that the air vents of the unit are not
covered or blocked!
Keep AudioBeam away from heat sources and never expose AudioBeam to
direct sunlight! Maintain a minimum distance of 1 meter between
AudioBeam and combustible materials.
Attention!
If liquids or small parts which conduct electricity find their way into the
interior or to the connecting sockets of AudioBeam, this can cause a short
circuit!
Use AudioBeam in dry rooms only and keep liquids and small parts which
conduct electricity away from the unit and its connecting sockets. For
cleaning AudioBeam, only use a dry or slightly damp cloth. Never use any
solvents or cleansing agents.

Connections and operating controls
13
Connections and operating controls
Delivery includes:
! AudioBeam
! 3 mains cables with plugs
! Interchangeable thread
5
/
8
"
to
3
/
8
"
! Instruction manual
! Document of warranty
LED operation indicator: green: AudioBeam is operational (standby)
red: AudioBeam is not operational
Sensitivity selector switch (+6 dBm, –14 dBm)
On/off switch for distance sensor
(it is vital to observe the warning on page 15!)
XLR-3 socket for audio input INPUT
OVERLOAD LED
BNC socket for modulator signal output OUTPUT
5
/
8
"
thread with adapter to
3
/
8
"
thread
IEC mains socket
Air vents
Steel clamp for securing the mains cable
INPUT OUTPUT
OVERLOAD

Mounting AudioBeam
14
Mounting AudioBeam
Correct mounting location
Warning!
Failure to comply with the following location conditions may result in
danger to persons and damage to AudioBeam!
When mounting AudioBeam, make sure that:
! the ultrasonic sound wave can travel undisturbed for at least 1 m before
it strikes the first surface.
! the sound (including the reflections) can travel for at least 4 m before it
strikes a human being
! a minimum distance of 10 cm is maintained between AudioBeam and
adjacent objects so that any heat generated can dissipate. Make sure
that the air vents at the top and rear of the unit are not covered or
blocked!
! a minimum distance of 1 meter is maintained between AudioBeam and
combustible materials
! AudioBeam is kept away from heat sources such as central heating
radiators, spot lights and lamps. Never expose AudioBeam to direct
sunlight.
! AudioBeam never gets damp or wet
Mounting AudioBeam in a fixed position
To ensure that AudioBeam is always orientated towards the correct area
of interest, you should mount AudioBeam fixedly. Use a mounting plate for
wall or ceiling mounting. For free installation, use a table or floor stand
(see: „Accessories“ on page 16).
왘 Screw the mounting plate or the table or floor stand to the
5
/
8
"
thread . If necessary, use the interchangeable thread to do this.
왘 By using a gooseneck or swivel joint (see: „Accessories“ on page 16),
directly orientate AudioBeam towards the correct area of interest or
the reflection area.
Mounting AudioBeam movably or rotatably
왘 Screw AudioBeam onto a drive mechanism or a rotating mechanism
using the
5
/
8
"
thread . Use the interchangeable thread if necessary.
왘 Start up AudioBeam as described on page 15 and ensure that the
distance sensor does not trigger in rotating mode (LED operation
indicator is constantly lit green).
If the distance sensor triggers (LED operation indicator lights up red):
왘 Remove all objects from the rotating range scanned by AudioBeam up
to a distance of 4m.
If the distance sensor still triggers (LED operation indicator lights up red
again), you must turn off the built-in distance sensor as follows:
INPUT OUTPUT
OVERLOAD

Putting AudioBeam into operation
15
Warning!
If you turn off the built-in distance sensor, persons who come closer
than 4 m to AudioBeam may be in danger from ultrasound.
Always ensure that nobody can come closer than 4 m to AudioBeam
across the entire rotating range!
! To do this, mount AudioBeam at a height of more than 7 m.
! If necessary, take the appropriate structural measures (barriers) to
keep people away.
왘 Disconnect AudioBeam from the mains.
왘 Set the On/Off switch for the distance sensor to the lower
position (OFF).
왘 Reconnect AudioBeam to the mains.
Putting AudioBeam into operation
왘 Ensure that AudioBeam is not connected to the mains!
왘 Use the sensitivity selector switch to adapt AudioBeam’s input
sensitivity to the audio source:
! Sources with a high output power (e.g. mixing console, CD or DVD
player): upper position (+6 dBm)
! Sources with a low output power (e.g. portable mini disk player):
lower position (–14 dBm)
왘 Use an XLR-3 cable to connect the audio source (e.g. CD or DVD player,
mixing console, receiver of a wireless microphone) to the audio input
INPUT .
AudioBeam automatically emits ultrasound as soon as an audio signal
(see “Specifications” on page 17) is present at the audio input
INPUT .
왘 Use the mains cable to connect AudioBeam to the mains. Secure the
mains cable with the steel clamp .
The LED lights up green, indicating that AudioBeam is ready for
operation (standby).
Note:
If you do not use the unit, pull the mains connector out of the wall
socket. This helps to increase the service life of AudioBeam and save
energy.
INPUT OUTPUT
OVERLOAD

Troubleshooting
16
Troubleshooting
If the LED operation indicator lights up red, one of the following
problems may have occured:
The distance sensor has triggered
1. Someone has entered the security area of 4 meters in front of or
around AudioBeam and the distance sensor has triggered. After the
person has left this area, AudioBeam automatically turns on again after
30 seconds.
2. You are operating the device in rotating mode and the distance sensor
has triggered because objects or persons are located within the sensor
range of the built-in distance sensor.
o solve the problem, see: „Mounting AudioBeam movably or rotatably“
on page 14.
AudiBeam is defective
Please contact your Sennheiser distributor or the Sennheiser Customer
Service (for address, see last page).
Accessories
The following accessories are available from your Sennheiser distributor:
GZP 10 Mounting plate for wall and ceiling mounting
GZG 1029 Swivel joint for attachment to stands or the GZP 10 mounting plate,
includes
1
/
4
"
interchangeable thread
MZT 14 Mounting bolt for mounting goosenecks and swivel joints with
3
/
8
"
thread
to table tops
MZT 100 Stable, metal table stand with
3
/
8
"
thread
MZT 1019 Mounting bar for two units with
3
/
8
"
internal thread
SEMS 3134 Floor stand with
3
/
8
"
thread

Specifications
17
Specifications
AudioBeam Master:
Modulation: wideband AM
Carrier frequency: 40 kHz
Peak limiter: limiter amplifier
Audio channels: 1
Audio input: XLR-3F socket, balanced, DC-isolated
Input level for max. peak SPL
: +6 dBm (1.55 V) = upper switch position
–14 dBm (150 mV) = lower switch position
Switching threshold: –46 dBm (4 mV) = upper switch position
–66 dBm (0.4 mV) = lower switch position
Impedance: 600 Ω
Sound pressure level: 75 dB ± 5 dB (at a distance of 4 m)
Output: 1 x BNC, 50 Ω shortcircuit-proof
Amplifier power: approx. 90 W
Power supply:
switchable power supply
110 - 240 V,
50 - 60 Hz max. 100 W
Dimensions: 264 x 82 x 320 mm
Weight: approx. 4 kg
XLR-3 pin assignment:
12
3
+NF
-NF

18

19
Notice d’emploi
Sommaire
Principe de l'AudioBeam ................................................................................... 20
Un mot pour votre sécurité .............................................................................. 20
Connexions et éléments de commande ......................................................... 21
Installation de l'AudioBeam ............................................................................. 22
Préparation de l'AudioBeam ............................................................................ 23
Guide de dépannage .......................................................................................... 24
Accessoires .......................................................................................................... 24
Caractéristiques techniques ............................................................................. 25
Merci d’avoir choisi Sennheiser !
Nous avons conçu ce produit pour une fiabilité maximale pendant de nom-
breuses années. Plus d’un demi-siècle d’expérience dans le domaine de la
conception et de la fabrication d’appareils électro-acoustiques de haute
qualité ont fait de Sennheiser un des principaux acteurs dans ce domaine.
Prenez le temps de lire ces instructions avec soin : elles vous permettront
d’exploiter rapidement votre nouvel appareil Sennheiser, à son maximum.

Principe de l'AudioBeam
20
Principe de l'AudioBeam
L'AudioBeam est un projecteur acoustique. En d'autres termes :
! AudioBeam transmet le son de manière ciblée et précise soit directe-
ment, soit par réflexion sur une surface plane. Il est ainsi par exemple
possible dans le cadre d'une exposition d'art d'entendre l'explication pro-
venant du tableau ou de la sculpture sans déranger les personnes con-
templant les œuvres situées à proximité.
! AudioBeam délimite avec précision le son aux zones définies en préser-
vant ainsi les zones avoisinantes de toute perturbation sonore. Ainsi est-
il possible de présenter un film vidéo en plusieurs langues à l'occasion
d'un salon. Il suffit aux spectateurs de se placer dans la zone linguistique
de leur choix.
L'AudioBeam utilise une nouvelle technique de transmission des ultrasons :
Le son souhaité est produit à une distance pouvant atteindre dix mètres et
à un angle d'environ 30°. L'AudioBeam est coupé automatiquement par un
détecteur de distance intégré dès qu'une personne s'approche à une dis-
tance inférieure à 4 mètres.
Un mot pour votre sécurité
Danger potentiel pour les porteurs de stimulateur cardiaque !
Danger potentiel de dommages auditifs !
A une distance inférieure à quatre mètres de l'AudioBeam, les ultrasons
peuvent perturber le fonctionnement des stimulateurs cardiaques et cau-
ser des dommages auditifs !
Assurez-vous, notamment en cas d'installation mobile, que personne ne
peut s'approcher à moins de quatre mètres de l'appareil.
Risque de tensions électriques létales !
Lorsque l'AudioBeam est branché sur le réseau électrique, l'ouverture de
l'AudioBeam peut provoquer une électrocution mortelle !
N'ouvrez dès lors jamais l'AudioBeam. Ne confiez la réparation d'un appa-
reil défectueux qu'exclusivement à un technicien spécialisé. Dans le cas
contraire, tous les droits de garantie seront annulés !
Risque d'incendie !
L'AudioBeam dégage de la chaleur ! Veillez dès lors à ne pas empêcher l'air
de circuler par les ouïes d'aération de l'appareil !
N'installez jamais l'AudioBeam à proximité d'une source de chaleur et ne
l'exposez jamais au rayonnement direct du soleil ! Assurez-vous de ne
jamais placer des matériaux inflammables à moins d'un mètre de
l'AudioBeam !
Attention !
Les liquides et les petites pièces conductrices d'électricité peuvent provo-
quer des courts-circuits !
Il est par conséquent impératif d'employer l'AudioBeam exclusivement
dans des locaux secs. Empêchez également tout contact de l'appareil et
des connexions avec les liquides et les petites pièces conductrices d'électri-
cité. Pour le nettoyage, utilisez un chiffon sec ou légèrement humide. N'uti-
lisez aucun solvant ou détergent.
La page est en cours de chargement...
La page est en cours de chargement...
La page est en cours de chargement...
La page est en cours de chargement...
La page est en cours de chargement...
La page est en cours de chargement...
La page est en cours de chargement...
La page est en cours de chargement...
La page est en cours de chargement...
La page est en cours de chargement...
La page est en cours de chargement...
La page est en cours de chargement...
La page est en cours de chargement...
La page est en cours de chargement...
La page est en cours de chargement...
La page est en cours de chargement...
-
 1
1
-
 2
2
-
 3
3
-
 4
4
-
 5
5
-
 6
6
-
 7
7
-
 8
8
-
 9
9
-
 10
10
-
 11
11
-
 12
12
-
 13
13
-
 14
14
-
 15
15
-
 16
16
-
 17
17
-
 18
18
-
 19
19
-
 20
20
-
 21
21
-
 22
22
-
 23
23
-
 24
24
-
 25
25
-
 26
26
-
 27
27
-
 28
28
-
 29
29
-
 30
30
-
 31
31
-
 32
32
-
 33
33
-
 34
34
-
 35
35
-
 36
36


Sennheiser Audiobeam Le manuel du propriétaire
- Taper
- Le manuel du propriétaire
dans d''autres langues
Documents connexes
-
Sennheiser MZT 14 Manuel utilisateur
-
-
-
Sennheiser 1015-T Manuel utilisateur
-
-
Sennheiser Directional Studio MKH 416 T Manuel utilisateur
-
-
-
-
Sennheiser SLT23460FC Manuel utilisateur