
WAC Lighting retains the right to modify the design of our products at any time as part of the company's continuous improvement program. SEP 2022 1
waclighting.com
Phone (800) 526.2588
Fax (800) 526.2585
Headquarters/Eastern Distribution Center
44 Harbor Park Drive
Port Washington, NY 11050
Central Distribution Center
1600 Distribution Ct
Lithia Springs, GA 30122
Western Distribution Center
1750 Archibald Avenue
Ontario, CA 91761
INSTALLATION INSTRUCTION
COLORSCAPING PATH LIGHT
6841 / 6861 / 6881
SAFETY INSTRUCTION
IMPORTANT: NEVER attempt any work without shutting o the electricity.
• Read all instructions before installing.
• System is intended for installation by a qualied electrician in accordance with the National Electrical Code and local regulations.
• Place the wall switch in the “OFF” position.
• Go to the main fuse box, or circuit breaker. Unscrew the fuse(s) or switch ”OFF” the circuit breaker switch(es) that control the power to the
space that you are working on.
WARNING: Risk of electric shock. Install all luminaries 10 feet (3.05 m) or more from a pool, spa, or fountain.
CAUTION:
All parts must be used as indicated in these instructions. Do not substitute any parts, leave parts out, or use any parts that are worn out
or broken. Failure to follow this instruction could invalidate the UL/cUL listing of this fixture.
AVERTISSEMENT
IMPORTANT : COUPEZ L’ÉLECTRICITÉ AVANT TOUTE MANIPULATION.
•Lisez toutes les instructions avant d’installer.
•Système est destiné à être installé par un électricien qualié en conformité avec le code national de l’électricité et les règlements locaux.
•Placez l’interrupteur mural en position d’arrêt (« OFF »).
•Accédez au panneau central de disjoncteurs ou de fusibles de votre demeure et placez l’interrupteur principal en position d’arrêt (« OFF »).
MISE EN GARDE
Toutes les pièces doivent être utilisées tel qu’il est indiqué dans ces instructions. Ne remplacez pas les pièces, n’en laissez pas de côté et ne les
utilisez pas si elles sont usées ou brisées. Le non-respect de ces instructions peut annuler l’homologation ETL/cETL du luminaire.
THIS INSTRUCTIONS APPLY TO THE MODELS BELOW:
Mounting Accessories (included in box)
9” Mounting Stake
Qty: 1pc
9000-ST9-BZ
14” Mounting Stake
Qty: 1pc
9000-ST14-BZ
Outdoor Rated Wire Nut
Qty: 2pcs
7EAC352401
Outdoor Rated Wire Nut
Qty: 2pcs
7EAC352401
68416861 6881
*Note: WAC Smart Transformer is required to power the fixture. (sold separately)

WAC Lighting retains the right to modify the design of our products at any time as part of the company's continuous improvement program. SEP 2022 2
waclighting.com
Phone (800) 526.2588
Fax (800) 526.2585
Headquarters/Eastern Distribution Center
44 Harbor Park Drive
Port Washington, NY 11050
Central Distribution Center
1600 Distribution Ct
Lithia Springs, GA 30122
Western Distribution Center
1750 Archibald Avenue
Ontario, CA 91761
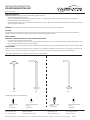
INSTALLATION
STEP 1:
1. Make sure your main power is o.
2. At the point of installation, mount the stake by placing
a piece of wood on the stake and hammering the wood.
Hammer till the bottom of the ring is ush with the ground.
3. In the case of hard soil, dig a hole and place the stake in
so that the bottom of the ring is ush with the ground.
Fill the rest of the hole with the removed soil and pack it
tight to secure the stake.
4. Screw the xture onto the stake provided, leading the wire
from the xture through the wire slot in the stake.
STEP 2:
5. Cut the power supply wire from the transformer at the
location of the xture.
6. Separate the power supply wire into two individual wires
by lightly pulling on each side so that a couple inches is
separated.
7. Strip o ½ inch of the insulating material from each wire and
connect one to each of the wires from the xture using the
outdoor rated direct burial wire nuts provided.
STEP 3:
8. Screw the xture onto the stake provided, leading the wire
from the xture through the wire slot in the stake.
9. If desired, bury your wire by digging a small trench. Close the
trench by applying an inward force to both sides of the trench.
10. Repeat steps for other xtures in the same electrical circuit.
11. Turn the main power supply back on and make sure the
xtures light up.
Hammer
Wood
Mounting Stake
Soil
Soil
WAC Smart
Transformer
Transformer
To Next Fixture
Mounting Stake
Mounting Stake
Fixture Wires
Supply Wire between Fixtures
Wire Slot
Path Lighting
Fixture
Path Light Fixture
Note: To install multiple xtures, also connect the power supply wire of each
additional xture to the connection described in 7 of the previous xture.
INSTALLATION INSTRUCTION
COLORSCAPING PATH LIGHT
6841 / 6861 / 6881

WAC Lighting retains the right to modify the design of our products at any time as part of the company's continuous improvement program. SEP 2022 3
waclighting.com
Phone (800) 526.2588
Fax (800) 526.2585
Headquarters/Eastern Distribution Center
44 Harbor Park Drive
Port Washington, NY 11050
Central Distribution Center
1600 Distribution Ct
Lithia Springs, GA 30122
Western Distribution Center
1750 Archibald Avenue
Ontario, CA 91761
INSTALLING THE SURFACE MOUNT ACCESSORY
Softscape Installation:
1. Attach the three removable spikes to the surface mount
accessory by screwing them in.
2. Using a piece of wood to buer the impact, hammer the
assembled mount into the soil till the bottom of the surface
mount accessory is ush with the ground.
3. Lead your wire through the wire slot and screw in your xture.
4. Connect xture wires to power supply wires as normal using
the outdoor rated direct burial wire nuts provided.
Hardscape Installation:
1. Mount the accessory to the surface using No. 10 Philips head
screws that are at least half an inch long.
2. If mounting on concrete or something similar, rst use
plastic anchors sized for No. 10 screws.
3. Create a route underneath the accessory for your wire to
travel through.
4. Lead your wire through the created route and screw your
xture onto the surface mount accessory.
Installing Fixture Caps:
Thread the xture cap into the stem body by rotating it clockwise.
Fixture
Surface Mount
Accessory
Wire Slot
Removable Spike
No.10 Mounting Screw
Surface Mount
Threaded Stud Cap
6841
INSTALLATION INSTRUCTION
COLORSCAPING PATH LIGHT
6841 / 6861 / 6881
-
 1
1
-
 2
2
-
 3
3


WAC Lighting 6841 Mode d'emploi
- Taper
- Mode d'emploi
- Ce manuel convient également à
dans d''autres langues
Documents connexes
-
WAC Lighting 5821 Mode d'emploi
-
-
-
-
-
-
-
-
WAC Lighting 1061-27SS Mode d'emploi
-