Danby DPA140HEAUWDB Le manuel du propriétaire
- Catégorie
- Climatiseurs mobiles
- Taper
- Le manuel du propriétaire
Ce manuel convient également à

DANBY PRODUCTS LIMITED, ONTARIO, CANADA N1H 6Z9
DANBY PRODUCTS INC., FINDLAY, OHIO, USA 45840
OWNER’S MANUAL
MANUEL DU PROPRIÉTAIRE
MANUAL DEL PROPIETARIO
PORTABLE AIR CONDITIONER
Owner’s Manual.............................1 - 12
CLIMATISEUR PORTABLE
Manuel du propriétaire.................13 - 24
AIRE ACONDICIONADO PORTÁTIL
Manual del propietario.................25 - 36
MODEL • MODÈLE • MODELO
DPA140HEAUWDB
DPA140HEBUBDB
2017.11.23

Welcome
Welcome to the Danby family. We are proud of our quality products and we believe in
dependable service. We suggest that you read this owner’s manual before plugging in your new
appliance as it contains important operation information, safety information, troubleshooting and
maintenance tips to ensure the reliability and longevity of your appliance.
Visit www.Danby.com to access self service tools, FAQs and much more. For additional assistance
call 1-800-263-2629.
Note the information below; you will need this information to obtain service under warranty.
You must provide the original purchase receipt to validate your warranty and receive service.
Model Number: _________________________________________________
Serial Number: _________________________________________________
Date of Purchase: _______________________________________________
Need Help?
Before you call for service, here are a few things you can do to help us serve you better.
Read this owner’s manual:
It contains instructions to help you use and maintain your appliance properly.
If you receive a damaged appliance:
Immediately contact the retailer or builder that sold you the appliance.
Save time and money:
Check the troubleshooting section at the end of this manual before calling. This section
will help you solve common problems that may occur.
1-800-26- Danby
(1-800-263-2629)
1

SAFETY REQUIREMENTS
This appliance is not intended for use by persons
(including children) whose physical, sensory or
mental capabilities may be different or reduced,
or who lack experience or knowledge, unless such
persons receive supervision or training to operate
the appliance by a person responsible for their
safety.
Children should be supervised to ensure that they
do not play with the appliance.
To avoid risk of electric shock, do not operate this
appliance in an area that is likely to accumulate
standing water. If this condition develops, disconnect
the power supply before stepping into the water.
Do not store or use combustible materials such as
gasoline or other fl ammable vapors or liquids in the
vicinity of this or any other appliance.
Do not insert fi ngers or other objects into grills or
openings in the appliance.
Do not cover or block the intake and exhaust
openings.
Do not operate the appliance without the fi lter
installed.
Do not operate the appliance near heat sources.
This appliance is intended for indoor, residential
applications only. Do not use this appliance
outdoors. Do not use this appliance for commercial
or industrial applications.
If the air conditioner is transported on its back or
side, it must be allowed to stand upright for 6 hours
before plugging in to avoid damage to internal
components.
Keep the appliance away from walls, furniture and
curtains with a clearance of at least 30 cm (12
inches) on all sides.
GROUNDING INSTRUCTIONS
This appliance must be grounded. Grounding
reduces the risk of electrical shock by providing an
escape wire for the electrical current.
This appliance has a cord that has a grounding
wire with a 3-prong plug. The power cord must be
plugged into an outlet that is properly grounded.
If the outlet is a 2-prong wall outlet, it must be
replaced with a properly grounded 3-prong wall
outlet. The serial rating plate indicates the voltage
and frequency the appliance is designed for.
WARNING - Improper use of the grounding
plug can result in a risk of electric shock.
Consult a qualifi ed electrician or service agent
if the grounding instructions are not completely
understood, or if doubt exists as to whether the
appliance is properly grounded.
Do not connect the appliance to extension cords,
adapters or together with another appliance in the
same wall outlet.
Do not splice the power cord. Do not under any
circumstances cut or remove the third ground prong
from the power cord.
If the power supply cord is damaged, it must be
replaced by the manufacturer, its service agent or
similar qualifi ed person in order to avoid hazard.
Important Safety Information
READ AND FOLLOW ALL SAFETY INSTRUCTIONS
SAVE THESE INSTRUCTIONS!
2

INSTALLATION INSTRUCTIONS
3
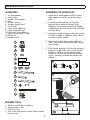
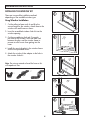
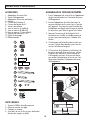
ASSEMBLING THE WINDOW KIT
1. Attach the air outlet adapter and the window
slider adapter onto either end of the exhaust
hose.
2. Insert the air outlet adapter into the lower
groove of the air outlet on the back of the
appliance. Ensure that the hook of the adapter
is aligned with the hole seat of the air outlet and
then slide down
3. Measure the window opening where the window
kit will be installed. Assemble as many sliders as
necessary to fi t the window.
4. If the length of the window requires all three
sliders, use two bolts to fasten the sliders at the
correct length.
5. If the window opening is less than the minimum
length of a single slider, use the slider that has
the hole in it and cut it to the correct length.
Make sure not to cut the end that has the hole
as this is necessary to attach the exhaust hose
adapter.
2
3
1
REQUIRED TOOLS
1. Medium sized Phillips screwdriver
2. Tape measure or ruler
3. Knife or scissors
4. Saw (in the event that the window sliders need to
be cut to size)
ACCESSORIES
1. Air outlet adapter
2. Exhaust hose
3. Window slider adapter
4. Bolts
5. Window slider A
6. Window slider B and C
7. Caster locks
8. Foam seal A (adhesive)
9. Foam seal B (adhesive)
10. Foam seal C (non-adhesive)
11. Security bracket and 2 screws
12. Drain hose
13. Remote control
1
2
3
4
5
6
7
8
9
10
11
12
13

INSTALLATION INSTRUCTIONS
4
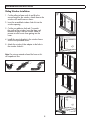
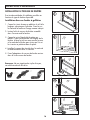
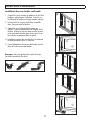
INSTALLING THE WINDOW KIT
There are two possible installation methods
depending on the available window type.
Hung Window Installation
1. Cut the adhesive foam seals A and B to the
correct length for the window. Attach them to the
window sash and frame as shown.
2. Insert the assembled window slider kit into the
window opening.
3. Cut the non-adhesive foal seal C to match
the width of the window. Insert the foam seal
between the glass and the window frame to
prevent air and insects from getting into the
room.
4. Install the security bracket in the window frame
with the two provided screws.
5. Attach the window slider adapter to the hole in
the window slider kit.
A
B
A
B
1
2
3
4
5
Note: Do not over extend or bend the hose as this
will impede air fl ow.

5
INSTALLATION INSTRUCTIONS
Sliding Window Installation
1. Cut the adhesive foam seals A and B to the
correct length for the window. Attach them to the
window sash and frame as shown.
2. Insert the assembled window slider kit into the
window opening.
3. Cut the non-adhesive foal seal C to match
the width of the window. Insert the foam seal
between the glass and the window frame to
prevent air and insects from getting into the
room.
4. Install the security bracket in the window frame
with the two provided screws.
5. Attach the window slider adapter to the hole in
the window slider kit.
B
B
A
A
1
2
3
4
5
Note: Do not over extend or bend the hose as this
will impede air fl ow.

OPERATING INSTRUCTIONS
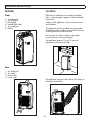
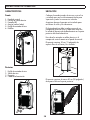
FEATURES
Front
1. Control panel
2. Air outlet grill
3. LED display
4. Handle (both sides)
5. Air intake grill
6. Rollers
Rear
1. Air intake grill
2. Air outlet
3. Drain outlet
4. Power cord
LOCATION
Place the air conditioner on a smooth, level fl oor
that is strong enough to support it and all included
accessories.
Make sure the appliance is level to minimize noise
and vibration.
The appliance must be installed near a grounded
receptacle and the overfl ow drain outlet on the rear
of the appliance must be accessible.
Do not cover air inlets or outlets or the remote
control receiver on the control panel.
The appliance requires 30 cm (12 inches) of
clearance on the front and sides.
The appliance requires at least 50 cm (20 inches) of
clearance on the back.
6
1
2
3
4
5
6
1
2
3
4

OPERATING INSTRUCTIONS
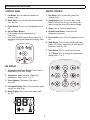
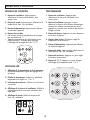
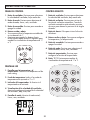
CONTROL PANEL
1. Fan Button: Press to select fan speed; low,
medium, high.
2. Mode Button: Press to select the desired mode;
cool, dry, fan.
3. Power Button: Press to turn the appliance on or
off.
4. Up and Down Buttons:
• Used to adjust the set temperature in 1°
increments.
• Press and hold both up and down buttons for 3
seconds to change the temperature display from
°C to °F.
7
1
2
3
4
1
3
2
45
LED DISPLAY
1. Temperature and Timer Display: Shows the set
temperature of the timer setting.
2. Temperature Scale: Indicates whether the
temperature scale is set to °C or °F.
3. Timer Indicator: Illuminates if the timer is
activated.
4. Fan Speed Display: Shows the current fan speed
setting; low, med, high.
5. Mode Display: Shows the current mode; cool,
dry, fan.
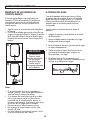
REMOTE CONTROL
1. Fan Button: Press to select fan speed; low,
medium, high.
2. Swing Button: Press to start the auto swing
feature. When auto swing is activated, press
again to stop the louver at the desired angle.
3. Sleep: Press to start the sleep function.
4. Up and Down Buttons: Used to set the
temperature and timer.
5. Power Button: Press to turn the appliance on or
off.
6. Mode Button: Press to select the desired mode.
Modes will cycle in sequence with each press of
the button; cool, dry, fan.
7. Timer Button: Press to set the timer function.
8. °C/°F Button: Press to change the temperature
display from °C to °F.
1
2
3
4
5
6
7
8

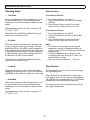
Operating Modes
• Cool Mode
Choose cool mode to set the cooling function. Use
the up and down arrows to choose the desired
temperature. Press the fan button to adjust the fan
speed.
The temperature can be set within a range of 18 -
32°C (64 - 90°F).
The exhaust hose should be installed during cool
mode to ensure the best results.
• Dry Mode
Choose dry mode to remove excess moisture from
the air during periods of high humidity. All water
pulled from the air will collect inside the appliance
and evaporate due to the heat from the compressor.
In especially humid conditions, it may be necessary
to empty the drain pan when it becomes full. Press
the fan button to adjust the fan speed.
The exhaust hose should be installed during dry
mode to ensure the best results.
• Fan Mode
Choose fan mode to run the internal fan without
engaging the cooling function. Press the fan button
repeatedly to choose the fan speed, low, med, high.
• Heat Mode
Choose heat mode to set the heating function. Use
the up and down arrows to choose the desired
temperature. Press the fan button to adjust the fan
speed.
The temperature can be set within a range of 13 -
27°C (55 - 81°F).
OPERATING INSTRUCTIONS
Timer Function
To set the turn off timer:
1. Ensure the appliance is turned on.
2. Press the timer button, the time on the display
will fl ash.
3. Press the timer button to select the desired
amount of hours before the unit turns off.
To set the turn on timer:
1. Ensure the appliance is turned off.
2. Press the timer button, the time on the display
will fl ash.
3. Press the timer button to select the desired
amount of hours before the unit turns on.
Notes:
• The display will revert back to showing the
temperature setting if the appliance does not
receive a signal within a 5 second period during
programming.
• Turning the appliance on or off at any time
or adjusting the timer setting to 0.0 hours will
cancel the timer settings.
• The timer can be set between 1 - 24 hours.
Sleep Function
The sleep function can be used to conserve energy
during sleeping hours.
When selected, the set temperature will increase
by 2 degrees over a 2 hours period. The appliance
will hold the new set temperature for 7 hours before
automatically returning to normal operation.
The sleep function can be canceled at any time by
pressing the sleep button.
8

OPERATING INSTRUCTIONS
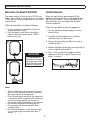
REPLACING THE REMOTE BATTERIES
The remote control will arrive with a CR2025 coin
battery pre-installed. It may be necessary to remove
a clear, plastic insulating strip before fi rst use of the
remote control.
Follow the steps below to replace the battery.
1. Use a screwdriver to remove the screw that
secures the battery cover.
2. Push the battery cover hook to the right to
release it from the remote control. Pull the
battery cover out.
9
IMPORTANT
Do not dispose of
batteries as unsorted
municipal waste. Refer
to local laws for proper
disposal of batteries.
Notes:
• The air conditioner will not respond if curtains,
doors or other materials block the signal from
the remote control to the appliance.
• If the infrared signal receiver on the indoor unit
is exposed to direct sunlight, the air conditioner
may not function properly. Use curtains to
prevent the sunlight from falling on the receiver.
• Do not allow the remote control to get wet.
• Do not expose the remote control to direct
sunlight or heat.
• Do not leave the battery in the remote control
if it is not going to be used for more than 2
months.
1
2
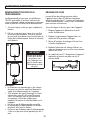
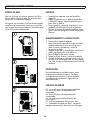
WATER DRAINAGE
When the internal drain pan becomes full the
appliance will beep 8 times and the digital display
will show error code P1. The air conditioning or
dehumidifying action will stop but the fan may
continue to operate.
Follow the steps below to drain the appliance.
1. Turn the appliance off and unplug it from the
power source.
2. Carefully move the appliance to a location
where the water can be drained.
3. Remove the drain plug and allow the water to
completely drain.
4. Replace the bottom drain plug, pressing fi rmly to
ensure a tight fi t and no leaks.
5. The P1 error symbol will disappear and the
appliance will resume regular function once
power is restored.

10
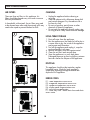
CLEANING
• Unplug the appliance before cleaning or
servicing.
• Clean the cabinet with a lukewarm damp cloth
and neutral detergent. Dry the cabinet with a
lint-free dry cloth.
• Do not use gasoline, paint thinner or other
chemicals to clean the appliance.
• Do not wash the appliance directly under a tap
or using a hose. It may cause electrical damage.
LONG-TERM STORAGE
1. Drain all water from the appliance.
2. Run the appliance on fan mode for half a day in
a warm room to dry the inside of the appliance
and prevent mold formation.
3. Turn off the appliance and unplug it, wrap the
cord and bundle it with tape.
4. Remove the battery from the remote control.
5. Clean the air fi lters and reinstall them.
6. Store the appliance in a cool, dark place.
Prolonged exposure to direct sunlight or extreme
heat can shorten the lifespan of the appliance.
DISPOSAL
This appliance should not be treated as regular
household waste. Check for local regulatory
compliance regarding the approved and safe
disposal of this appliance.
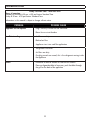
ERROR CODES
E1 - room temperature sensor error
E2 - evaporator temperature sensor error
E3 - condenser temperature sensor error
E4 - display panel communication error
E7 - zero crossing malfunction
P1 - water tray is full - attach drain hose and drain
excess water
CARE & MAINTENANCE
AIR FILTERS
There are three air fi lters in this appliance. Air
fi lters should be cleaned every two weeks to ensure
effi cient performance.
In households with animals, the air fi lters may need
to be cleaned more often and the external grills may
need to be wiped to prevent blocked air fl ow.
1
2
3

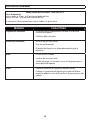
TROUBLESHOOTING
Danby Consumer Care: 1-800-263-2629
Hours of operation:
Monday to Thursday 8:30 am - 6:00 pm Eastern Standard Time
Friday 8:30 am - 4:00 pm Eastern Standard Time
Information in this manual is subject to change without notice.
PROBLEM POSSIBLE CAUSE
Appliance will not operate • Plug is not fully inserted into the wall outlet
• Blown fuse or circuit breaker
Insuffi cient cooling • Air fi lters are dirty
• Blocked air fl ow
• Appliance size is too small for application
Noise • The ground is not level
• Air fi lters are dirty
• Gurgling sounds are normal; this is the refrigerant moving inside
the appliance
Odors • Formation of mold or mildew on internal wet surfaces
• Place an algaecide tablet in base pan; push the tablet through
the grill on the back of the appliance
11

LIMITED IN-HOME APPLIANCE WARRANTY
This quality product is warranted to be free from manufacturer’s defects in material and workmanship, provided that the unit is used under the normal operating
conditions intended by the manufacturer.
This warranty is available only to the person to whom the unit was originally sold by Danby Products Limited (Canada) or Danby Products Inc. (U.S.A.) (hereafter
“Danby”) or by an authorized distributor of Danby, and is non-transferable.
TERMS OF WARRANTY
Plastic parts, are warranted for thirty (30) days only from purchase date, with no extensions provided.
First Year
During the rst twelve (12) months, any functional parts of this product found to be defective, will be repaired or replaced, at warrantor’s
option, at no charge to the ORIGINAL purchaser.
To obtain
Danby reserves the right to limit the boundaries of “In Home Service” to the proximity of an Authorized Service Depot. Any app liance
Service
requiring service outside the limited boundaries of “In Home Service” , it will be the consumer’s responsibility to transport the appliance (at
their own expense) to the original retailer (point of purchase) or a service depot for repair. See “Boundaries of In Home Serv ice” below.
Contact your dealer from whom your unit was purchased, or contact your nearest authorized Danby service depot, where service
must be performed by a qualied service technician.
If service is performed on the units by anyone other than an authorized service depot, or the unit is used for commercial appli cation, all
obligations of Danby under this warranty shall be void.
Boundaries of
If the appliance is installed in a location that is 100 kilometers (62 miles) or more from the nearest service center your unit must be
In Home Service
delivered to the nearest authorized Danby Service Depot, as service must only be performed by a technician qualied and certif ied for
warranty service by Danby. Transportation charges to and from the service location are not protected by this warranty and are t he
responsibility of the purchaser.
Nothing within this warranty shall imply that Danby will be responsible or liable for any spoilage or damage to food or other c ontents of this appliance, whether due
to any defect of the appliance, or its use, whether proper or improper.
EXCLUSIONS
Save as herein provided, Danby, there are no other warranties, conditions, representations or guarantees, express or implied, m ade or intended by Danby or its
authorized distributors and all other warranties, conditions, representations or guarantees, including any warranties, conditio ns, representations or guarantees
under any Sale of Goods Act or like legislation or statue is hereby expressly excluded. Save as herein provided, Danby shall no t be responsible for any damages
to persons or property, including the unit itself, howsoever caused or any consequential damages arising from the malfunction o f the unit and by the purchase of
the unit, the purchaser does hereby agree to indemnify and hold harmless Danby from any claim for damages to persons or propert y caused by the unit.
GENERAL PROVISIONS
No warranty or insurance herein contained or set out shall apply when damage or repair is caused by any of the following:
1) Power failure.
2) Damage in transit or when moving the appliance.
3) Improper power supply such as low voltage, defective house wiring or inadequate fuses.
4) Accident, alteration, abuse or misuse of the appliance such as inadequate air circulation in the room or abnormal operating con ditions
(extremely high or low room temperature).
5) Use for commercial or industrial purposes (ie. If the appliance is not installed in a domestic residence).
6) Fire, water damage, theft, war, riot, hostility, acts of God such as hurricanes, oods etc.
7) Service calls resulting in customer education.
8) Improper Installation (ie. Building-in of a free standing appliance or using an appliance outdoors that is not approved for out door application).
Proof of purchase date will be required for warranty claims; so, please retain bills of sale. In the event warranty service is required, present this document to our
AUTHORIZED SERVICE DEPOT.
Danby Products Limited
PO Box 1778, Guelph, Ontario, Canada N1H 6Z9
Telephone: (519) 837-0920 FAX: (519) 837-0449
Danby Products Inc.
PO Box 669, Findlay, Ohio, U.S.A. 45840
Telephone: (419) 425-8627 FAX: (419) 425-8629
04/09
1-800-263-2629
Warranty Service
In-home
Danby reserves the right to limit the boundaries of “In Home Service” to the proximity of an authorized service
depot. Any appliance requiring service outside the limited boundaries of “In Home Service”, will be the consumer’s
responsibility to transport at their own expense to the original point of purchase or a service depot for repair. If the
appliance is installed in a location that is 100 kilometers (62 miles) or more from the nearest service center, it must
be delivered to the nearest authorized Danby Service Depot by the purchaser.
Transportation charges to and from the service location are not protected by this warranty and are the
responsibility of the purchaser.
During the first twelve (12) months, any functional parts of this product found to be defective, will be repaired or
replaced, at warrantor’s option, at no charge to the original purchaser.
Contact the dealer where the unit was purchased, or contact the nearest authorized Danby service depot, where
service must be performed by a qualified service technician. If service is performed on the unit by anyone other
than an authorized service depot, all obligations of Danby under this warranty shall be void.
First 12 months
To obtain service
Boundaries of
in-home service
LIMITED “IN HOME” WARRANTY
This quality product is warranted to be free from manufacturer’s defects in material and workmanship, provided that the unit is used
under the normal operating conditions intended by the manufacturer.
This warranty is available only to the person to whom the unit was originally sold by Danby Products Limited (Canada) or Danby
Products Inc. (U.S.A.) (hereafter “Danby”) or by an authorized distributor of Danby, and is non-transferable.
TERMS OF WARRANTY
Plastic parts are warranted for thirty (30) days from the date of purchase, with no extensions provided.
Nothing within this warranty shall imply that Danby will be responsible or liable for any spoilage or damage to food or other
contents of this appliance, whether due to any defect of the appliance, or its use, whether proper or improper.
EXCLUSIONS
Save as herein provided, by Danby, there are no other warranties, conditions, representations or guarantees, express or implied, made
or intended by Danby or its authorized distributors and all other warranties, conditions, representations or guarantees, including any
warranties, conditions, representations or guarantees under any Sale of Goods Act or like legislation or statute is hereby expressly
excluded. Save as herein provided, Danby shall not be responsible for any damages to persons or property, including the unit itself,
howsoever caused or any consequential damages arising from the malfunction of the unit and by the purchase of the unit, the
purchaser does hereby agree to indemnify and hold harmless Danby from any claim for damages to persons or property caused by
the unit.
GENERAL PROVISIONS
No warranty or insurance herein contained or set out shall apply when damage or repair is caused by any of the following:
1) Power failure.
2) Damage in transit or when moving the appliance.
3) Improper power supply such as low voltage, defective house wiring or inadequate fuses.
4) Accident, alteration, abuse or misuse of the appliance such as inadequate air circulation in the room or abnormal operating
conditions (ie. extremely high or low room temperature).
5) Use for commercial or industrial purposes (ie. If the appliance is not installed in a domestic residence).
6) Fire, water damage, theft, war, riot, hostility, acts of God such as hurricanes, floods etc.
7) Service calls resulting in customer education.
8) Improper Installation (ie. Building-in of a free standing appliance or using an appliance outdoors that is not approved for outdoor
application, including but not limited to: garages, patios, porches or anywhere that is not properly insulated or climate controlled).
Proof of purchase date will be required for warranty claims; retain bills of sale. In the event that warranty service is required, present
the proof of purchase to our authorized service depot.
Warranty Service
In Home
Danby Products Limited
PO Box 1778, Guelph, Ontario, Canada N1H 6Z9
Telephone: (519) 837-0920 FAX: (519) 837-0449
Danby Products Inc.
PO Box 669, Findlay, Ohio, U.S.A. 45840
Telephone: (419) 425-8627 FAX: (419) 425-8629
1-800-263-2629
04/17

13
Bienvenue
Bienvenue à la famille Danby. Nous sommes fi ers de la qualité de nos produits et nous croyons
en le service fi able. Nous vous suggérons de lire ce manual d’utilisation avant de brancher
votre nouvel appareil car il contient des informations inportantes sur l’utilisation, la sécurité, le
dépannage et la maintenance, afi n d’assurer la fi abilité et la longévité de votre appareil.
Visitez www.Danby.com pour accéder aux outils d’autoservice, aux FAQ et bien plus encore. Pour
obtenir de l’aide supplémentaire, composez 1-800-263-2629.
Notez les informations ci-dessous; Vous aurez besoin de cette information pour obtenir un
service sous garantie.
Vous devez fournir le reçu d’achat original pour valider votre garantie et recevoir le service.
Numéro de modèle: _____________________________________________
Numéro de serie: _______________________________________________
Date d’achat: __________________________________________________
Besoin d’assistance?
Avant d’appeler pour service, voici quelques choses que vous pouvez faire pour nous
aider à mieux vous servir.
Lire ce manuel du propriétaire:
Il contient des instructions pour vous aider à utiliser et à maintenir votre appareil
correctement.
Si vous recevez un appareil endommagé:
Contactez immédiatement le revendeur ou l’entrepreneur qui vous a vendu l’appareil.
Gagnez du temps et de l’argent:
Avant d’appeler pour service, consultez la section de dépannage à la fi n de ce manuel.
Cette section vous aidera à résoudre les problèmes courants pouvant survenir.
1-800-26- Danby
(1-800-263-2629)

EXIGENCES DE SÉCURITÉ
Cet appareil n’est pas destiné à être utilisé par
des personnes (y compris des enfants) dont les
capacités physiques, sensorielles ou mentales
peuvent être différentes ou réduites, ou qui n’ont
pas d’expérience ou de connaissances, à moins
que ces personnes ne soient surveillées ou formées
pour faire fonctionner l’appareil par une personne
responsable de leur sécurité.
Les enfants devraient être surveillés pour s’assurer
qu’ils ne jouent pas avec l’appareil.
Pour éviter tout risque de choc électrique, ne pas
utiliser cet appareil dans une zone susceptible
d’accumuler de l’eau stagnante. Si cette condition
se développe, débranchez l’alimentation avant de
pénétrer dans l’eau.
Ne pas stocker ou utiliser des matériaux
combustibles tels que de l’essence ou d’autres
vapeurs ou liquides infl ammables à proximité de ce
ou d’un autre appareil.
Ne pas insérer de doigts ou d’autres objets dans
des grilles ou des ouvertures dans l’appareil.
Ne pas couvrir ou bloquer les ouvertures
d’admission et d’échappement.
N’utilisez pas l’appareil sans le fi ltre installé.
N’utilisez pas l’appareil à proximité de sources de
chaleur.
Cet appareil est destiné uniquement à des
applications résidentielles et intérieures. N’utilisez
pas cet appareil à l’extérieur. N’utilisez pas cet
appareil pour des applications commerciales ou
industrielles.
Si le climatiseur est transporté sur son dos
ou sur son côté, il doit être maintenu debout
pendant 6 heures avant de brancher pour éviter
d’endommager les composants internes.
Gardez l’appareil à l’écart des murs, des meubles
et des rideaux avec un jeu d’au moins 30 cm (12
pouces) sur tous les côtés.
INSTRUCTIONS DE MISE À LA TERRE
Cet appareil doit être mis à la terre. La mise à
la terre réduit le risque de choc électrique en
fournissant un câble d’échappement pour le courant
électrique.
Cet appareil possède un cordon doté d’un fi l de
mise à la terre avec une fi che à 3 broches. Le
cordon d’alimentation doit être branché sur une
prise correctement mise à la terre. Si la sortie
est une prise murale à 2 broches, elle doit être
remplacée par une prise murale à 3 broches
correctement mise à la terre. La plaque signalétique
en série indique la tension et la fréquence
auxquelles l’appareil est conçu.
AVERTISSEMENT - L’utilisation incorrecte de la
fi che de mise à la terre peut entraîner un risque
d’électrocution. Consultez un électricien qualifi é
ou un agent de service si les instructions de mise
à la terre ne sont pas complètement comprises ou
s’il existe un doute quant à savoir si l’appareil est
correctement mis à la terre.
Ne branchez pas l’appareil à des rallonges, des
adaptateurs ou à un autre appareil dans la même
prise murale.
Ne pas épisser le cordon d’alimentation. Ne coupez
ou retirez en aucun cas la troisième broche du
cordon d’alimentation.
Si le cordon d’alimentation est endommagé, il
doit être remplacé par le fabricant, son agent de
maintenance ou une personne qualifi ée similaire
afi n d’éviter tout risque.
Informations importantes de sécurité
LIRE ET SUIVRE TOUTES LES INSTRUCTIONS DE SÉCURITÉ
GARDEZ CES INSTRUCTIONS!
14

INSTRUCTIONS D’INSTALLATION
15
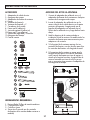
ASSEMBLAGE DU TROUSSE DE FENÊTRE
1. Fixez l’adaptateur de sortie d’air et l’adaptateur
de glissière de fenêtre sur l’extrémité du tuyau
d’échappement.
2. Insérez l’adaptateur de sortie d’air dans la
rainure inférieure de la sortie d’air à l’arrière
de l’appareil. Assurez-vous que le crochet de
l’adaptateur est aligné avec le siège du trou de
la sortie d’air, puis faites-le glisser vers le bas
3. Mesurez l’ouverture de la fenêtre où le kit
de fenêtre sera installé. Assembler autant de
curseurs que nécessaire pour s’adapter à la
fenêtre.
4. Si la longueur de la fenêtre nécessite les trois
curseurs, utilisez deux boulons pour fi xer les
curseurs à la bonne longueur.
5. Si l’ouverture de la fenêtre est inférieure à la
longueur minimale d’un seul curseur, utilisez
le curseur qui contient le trou et coupez-le
à la longueur correcte. Assurez-vous de ne
pas couper l’extrémité qui a le trou car il est
nécessaire d’attacher l’adaptateur de tuyau
d’échappement.
2
3
1
OUTILS REQUIS
1. Tournevis Phillips de taille moyenne
2. Ruban à mesurer ou règle
3. Couteau ou ciseaux
4. Scie (dans le cas où les curseurs de fenêtre
doivent être coupés en taille)
ACCESSORIES
1. Adaptateur de sortie d’air
2. Tuyau d’échappement
3. Adaptateur de curseur de fenêtre
4. Boulons
5. Curseur de la fenêtre A
6. Curseur de fenêtre B et C
7. Verrous de roulette
8. Joint en mousse A (adhésif)
9. Joint en mousse B (adhésif)
10. Joint en mousse C (non adhésif)
11. Support de sécurité et 2 vis
12. Tuyau de drainage
13. Télécommande
1
2
3
4
5
6
7
8
9
10
11
12
13

INSTRUCTIONS D’INSTALLATION
16
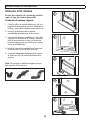
INSTALLATION DU TROUSSE DE FENÊTRE
Il existe deux méthodes d’installation possibles en
fonction du type de fenêtre disponible.
Installation dans une fenêtre à guillotine
1. Couper les joints de mousse adhésive A et B à la
longueur correcte pour la fenêtre. Fixez-les sur
le cadre de la fenêtre et l’image comme indiqué.
2. Insérez le kit de curseur de fenêtre assemblé
dans l’ouverture de la fenêtre.
3. Couper le joint d’étanchéité du pétre non
adhésif C pour correspondre à la largeur de la
fenêtre. Insérez le joint en mousse entre le verre
et le cadre de la fenêtre pour éviter que l’air et
les insectes ne pénètrent dans la pièce.
4. Installez le support de sécurité dans le cadre de
la fenêtre avec les deux vis fournies.
5. Fixez l’adaptateur du curseur de fenêtre au trou
dans le kit de curseur de fenêtre.
Remarque: Ne pas trop étendre ni plier le tuyau,
car cela entravera le fl ux d’air.
A
B
A
B
1
2
3
4
5

17
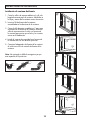
INSTRUCTIONS D'INSTALLATION
Installation dans une fenêtre coulissante
1. Couper les joints de mousse adhésive A et B à la
longueur correcte pour la fenêtre. Fixez-les sur
le cadre de la fenêtre et l’image comme indiqué.
2. Insérez le kit de curseur de fenêtre assemblé
dans l’ouverture de la fenêtre.
3. Couper le joint d’étanchéité du pétre non
adhésif C pour correspondre à la largeur de la
fenêtre. Insérez le joint en mousse entre le verre
et le cadre de la fenêtre pour éviter que l’air et
les insectes ne pénètrent dans la pièce.
4. Installez le support de sécurité dans le cadre de
la fenêtre avec les deux vis fournies.
5. Fixez l’adaptateur du curseur de fenêtre au trou
dans le kit de curseur de fenêtre.
Remarque: Ne pas trop étendre ni plier le tuyau,
car cela entravera le fl ux d’air.
B
B
A
A
1
2
3
4
5

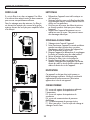
INSTRUCTIONS D’UTILISATION
EMPLACEMENT
Placez le climatiseur sur un plancher lisse et plat
qui est assez solide pour le supporter et tous les
accessoires inclus.
Assurez-vous que l’appareil est à niveau pour
minimiser les bruits et les vibrations.
L’appareil doit être installé près d’une prise de
mise à la terre et la sortie de vidange à l’arrière de
l’appareil doit être accessible.
Ne pas couvrir les entrées d’air ou les prises de
courant ou le récepteur de la télécommande sur le
panneau de commande.
L’appareil nécessite un dégagement de 30 cm (12
pouces) sur le devant et sur les côtés.
L’appareil nécessite au moins 50 cm (20 pouces) de
dégagement sur le dos.
18
CARACTÉRISTIQUES
Avant
1. Panneau de contrôle
2. Grille de sortie d’air
3. Affi chage LED
4. Poignée (des deux côtés)
5. Grille d’admission d’air
6. Rouleaux
Arrière
1. Grille d’admission d’air
2. Sortie d’air
3. Sortie de vidange
4. Cordon d’alimentation
1
2
3
4
5
6
1
2
3
4

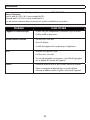
INSTRUCTIONS D’UTILISATION
19
PANNEAU DE CONTRÔLE
1. Bouton du ventilateur: Appuyez pour
sélectionner la vitesse du ventilateur; bas,
moyen, haut.
2. Bouton de mode: Appuyez pour sélectionner le
mode désiré; frais, sec, ventilateur.
3. Bouton d’alimentation: Appuyez pour allumer
ou éteindre l’appareil.
4. Boutons haut et bas:
• Utilisé pour ajuster la température de consigne
par incréments de 1°.
• Appuyez et maintenez les deux boutons haut
et bas pendant 3 secondes pour changer
l’affi chage de la température de °C à °F.
1
2
3
4
1
3
2
45
AFFICHAGE LED
1. Affi chage de la température et de la minuterie:
Affi che la température réglée du réglage de la
minuterie.
2. Échelle de température: Indique si l’échelle de
température est réglée sur °C ou °F.
3. Indicateur de minuterie: S’allume si la minuterie
est activée.
4. Affi chage de la vitesse du ventilateur: Affi che le
réglage actuel de la vitesse du ventilateur; bas,
med, haut.
5. Affi chage du mode: Affi che le mode actuel
frais, sec, ventilateur.
TÉLÉCOMMANDE
1. Bouton du ventilateur: Appuyez pour
sélectionner la vitesse du ventilateur; bas,
moyen, haut.
2. Bouton d’oscillation: Appuyez sur pour
démarrer la fonction d’oscillation automatique.
Lorsque le oscillation automatique est activé,
appuyez à nouveau pour arrêter le persienne à
l’angle souhaité.
3. Bouton de dormir: Appuyez sur pour démarrer
la fonction de dormir.
4. Boutons haut et bas: Utilisé pour régler la
température et la minuterie.
5. Bouton d’alimentation: Appuyez pour allumer
ou éteindre l’appareil.
6. Bouton de mode: Appuyez pour sélectionner le
mode désiré; frais, sec, ventilateur.
7. Bouton de minuterie: Appuyez sur pour régler
la fonction de minuterie.
8. Bouton de °C/°F: Appuyez sur pour changer
l’affi chage de la température de °C à °F.
1
2
3
4
5
6
7
8
La page est en cours de chargement...
La page est en cours de chargement...
La page est en cours de chargement...
La page est en cours de chargement...
La page est en cours de chargement...
La page est en cours de chargement...
La page est en cours de chargement...
La page est en cours de chargement...
La page est en cours de chargement...
La page est en cours de chargement...
La page est en cours de chargement...
La page est en cours de chargement...
La page est en cours de chargement...
La page est en cours de chargement...
La page est en cours de chargement...
La page est en cours de chargement...
La page est en cours de chargement...
La page est en cours de chargement...
La page est en cours de chargement...
La page est en cours de chargement...
-
 1
1
-
 2
2
-
 3
3
-
 4
4
-
 5
5
-
 6
6
-
 7
7
-
 8
8
-
 9
9
-
 10
10
-
 11
11
-
 12
12
-
 13
13
-
 14
14
-
 15
15
-
 16
16
-
 17
17
-
 18
18
-
 19
19
-
 20
20
-
 21
21
-
 22
22
-
 23
23
-
 24
24
-
 25
25
-
 26
26
-
 27
27
-
 28
28
-
 29
29
-
 30
30
-
 31
31
-
 32
32
-
 33
33
-
 34
34
-
 35
35
-
 36
36
-
 37
37
-
 38
38
-
 39
39
-
 40
40


Danby DPA140HEAUWDB Le manuel du propriétaire
- Catégorie
- Climatiseurs mobiles
- Taper
- Le manuel du propriétaire
- Ce manuel convient également à
dans d''autres langues
Documents connexes
-
Danby DPA140HE3BDB-6 Le manuel du propriétaire
-
-
-
-
-
-
-
-
-