Bella BLA14007 Mode d'emploi
- Catégorie
- Fondues, gourmets
- Taper
- Mode d'emploi
Ce manuel convient également à

LINKABLE
SLOW COOKER SYSTEM
SYSTÈME DE MIJOTEUSE
RACCORDABLE
SISTEMA DE COCCIÓN
LENTA ENLAZABLE
Instruction Manual
Recipe Guide
Manuel d’instructions
Guide de recettes
Manual de instrucciones
Guía de recetas
Register your product and get support at:
Pour vous inscrire et obtenir l’aide de votre produit:
Para registrar y obtener asistencia de su producto ir:
www.bellahousewares.com


Table of Contents
Important Safeguards ........................................................................................................................................ 4
Additional Important Safeguards .....................................................................................................................5
Notes on the Cord...............................................................................................................................................5
Notes on the Plug ...............................................................................................................................................5
Plasticizer Warning ............................................................................................................................................. 5
Electric Power......................................................................................................................................................5
Getting To Know Your BELLA Linkable Slow Cooker System ................................................................... 6-7
Introduction to the BELLA Linkable Slow Cooker System ............................................................................8
Stoneware Pot Care ............................................................................................................................................ 8
Before Using for the First Time ........................................................................................................................8
BELLA Linkable Slow Cooker System Assembly Instructions ..................................................................... 9
Operating Instructions ..................................................................................................................................... 10
Hints for Slow Cooking ............................................................................................................................... 10-11
User Maintenance Instructions ....................................................................................................................... 11
Care & Cleaning Instructions .......................................................................................................................... 11
Storing Instructions .......................................................................................................................................... 12
Recipes ..........................................................................................................................................................13-14
Warranty ............................................................................................................................................................15
Table des matières
Consignes de sécurité importantes ..........................................................................................................16-17
Consignes de sécurité importantes additionnelles ..................................................................................... 17
Remarques sur la che .................................................................................................................................... 18
Remarques sur le cordon ................................................................................................................................ 18
Avertissement de migration de plastiants ................................................................................................. 18
Alimentation électrique ...................................................................................................................................18
Caractéristiques du système de mijoteuse raccordable de Bella .........................................................19-20
Présentation du système de mijoteuse raccordable de Bella .................................................................... 21
Entretien des cocottes en grès ....................................................................................................................... 21
Avant la première utilisation ..........................................................................................................................21
Directives d’assemblage des mijoteuses de Bella ......................................................................................22
Mode d’emploi ..................................................................................................................................................23
Conseils pour la cuisson lente ...................................................................................................................23-24
Réparation .........................................................................................................................................................24
Entretien et nettoyage ................................................................................................................................24-25
Rangement ........................................................................................................................................................25
Recettes ....................................................................................................................................................... 26-27
Garantíe..............................................................................................................................................................28
Índice
Medidas de seguridad importantes ......................................................................................................... 29-30
Otras medidas de seguridad importantes ....................................................................................................30
Notas sobre el cable ......................................................................................................................................... 31
Notas sobre el enchufe ....................................................................................................................................31
Advertencia sobre los plasticantes .............................................................................................................31
Corriente eléctrica ............................................................................................................................................ 31
Descripción de la sistema de cocción lenta enlazable BELLA ............................................................. 32-33
Introducción a la sistema de cocción lenta enlazable BELLA ....................................................................34
Cuidado de la olla de cerámica de gres ........................................................................................................34
Antes de utilizar por primera vez ...................................................................................................................34
Instrucciones para armar el sistema de cocción lenta enlazable BELLA ................................................35
Instrucciones de funcionamiento ................................................................................................................... 36
Consejos para la cocción lenta ................................................................................................................. 36-37
Instrucciones de mantenimiento para el usuario ........................................................................................37
Instrucciones de cuidado y limpieza .........................................................................................................37-38
Instrucciones de almacenamiento .................................................................................................................38
Recetas .........................................................................................................................................................39-40
Garantía.............................................................................................................................................................. 41

4
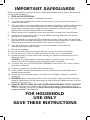
IMPORTANT SAFEGUARDS
When using electrical appliances, basic safety precautions should always be followed,
including the following:
1. READ ALL INSTRUCTIONS.
2. Do not touch hot surfaces. Use handles or knobs.
3. To protect against electrical shock, do not immerse cord, plugs or appliance in
water or other liquid.
4. This appliance is not intended for use by persons (including children) with reduced
physical, sensory or mental capabilities, or lack of experience and knowledge,
unless they have been given supervision or instruction concerning use of the
appliance by a person responsible for their safety.
5. Close supervision is necessary when any appliance is used by or near children.
6. Unplug from outlet when not in use and before cleaning. Allow to cool before
putting on, or taking off parts.
7. Do not operate any appliance with a damaged cord or plug or after the appliance
malfunctions or has been damaged in any manner. Return appliance to the nearest
authorized service facility for examination, repair or adjustment.
8. The use of accessory attachments not recommended by the appliance
manufacturer may cause injuries.
9. Do not use outdoors.
10. Do not let cord hang over edge of table or counter, or touch hot surfaces.
11. Do not place on or near a hot gas or electric burner, or in a heated oven.
12. Extreme caution must be used when moving an appliance containing hot oil or
other hot liquids.
CAUTION: To protect against damage or electric shock, do not cook in the
aluminum liner(s). Cook only in the stoneware pot(s) provided.
13. To disconnect, turn all OFF/LOW/HIGH/WARM control dials to OFF, then remove
plug from wall outlet.
14. Do not use appliance for other than intended use.
15. Avoid sudden temperature changes, such as adding refrigerated foods into a
heated stoneware pot.
16. Do not use any stoneware pot or any glass lid if chipped, cracked, or severely
scratched.
17. WARNING: When using more than 1 base unit, always make sure base units are
properly assembled with the tab along the side of the unit linked securely into the
groove of the next unit.
18. CAUTION: NEVER CARRY MULTIPLE INTERCONNECTED BASE UNITS, FILLED OR
EMPTY. Unplug unit. Following the detailed instructions in the section entitled:
“Care & Cleaning Instructions,” always disconnect all base units before moving to
serve or to clean. (See Figure 6.)
FOR HOUSEHOLD
USE ONLY
SAVE THESE INSTRUCTIONS

5
ADDITIONAL IMPORTANT
SAFEGUARDS
CAUTION, HOT SURFACES: This appliance generates heat and escaping steam during
use. Proper precautions must be taken to prevent the risk of burns, res or other
injury to persons or damage to property.
1. A person who has not read and understood all operating and safety instructions
is not qualied to operate this appliance. All users of this appliance must read and
understand this Instruction Manual before operating or cleaning this appliance.
2. If this appliance falls or accidentally becomes immersed in water, unplug it from
the wall outlet immediately.
Do not reach into the water!
3. When using this appliance, provide adequate air space above and on all sides for
air circulation. Do not operate this appliance while it is touching or near curtains,
wall coverings, clothing, dishtowels or other ammable materials.
4. Do not leave this appliance unattended during use.
5. If this appliance begins to malfunction during use, immediately turn all OFF/LOW/
HIGH/WARM control dials to OFF, then remove the plug from the outlet. Do not use
or attempt to repair a malfunctioning appliance!
6. The cord to this appliance should be plugged into a 120V AC electrical wall outlet.
7. Do not use this appliance in an unstable position.
8. Never use any stoneware pot on a gas or electric cooktop or on an open ame.
9. Lift off lid(s) carefully to avoid scalding, and allow water to drip into stoneware
pot(s).
Notes on the Plug
This appliance has a polarized plug (one blade is wider than the other). To reduce the
risk of electric shock, this plug will t in a polarized outlet only one way. If the plug
does not t fully into the outlet, reverse the plug. If it still does not t, contact
a qualied electrician. Do not modify the plug in any way.
Notes on the Cord
The provided short power-supply cord (or detachable power-supply cord) should be
used to reduce the risk resulting from becoming entangled in or tripping over a longer
cord. Do not use an extension cord with this product
Plasticizer Warning
CAUTION: To prevent Plasticizers from migrating from the nish of the counter top or
table top or other furniture, place NON-PLASTIC coasters or place mats between the
appliance and the nish of the counter top or table top. Failure to do so may cause the
nish to darken; permanent blemishes may occur or stains can appear.
Electric Power
If the electrical circuit is overloaded with other appliances, your appliance may not
operate properly. It should be operated on a separate electrical circuit from
other appliances.

6
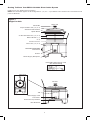
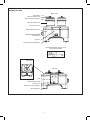
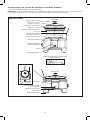
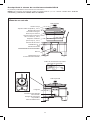
Getting To Know Your BELLA Linkable Slow Cooker System
Product may vary slightly from illustration.
NOTE: This illustration applies to all congurations: 1, 2, or 3 …up to 6 base units. All base units’ connections and
parts are identical.
Figure 1
Single Pot Unit
Power-Supply Cord
Connectors
Left side
Non-Skid Feet
Recessed Carry Handles
Foot Rests
Tab
Power-Supply Receptacle
Lid Handle
Tempered Glass Lid (1, 2, or 3)
Stoneware Pot Handles
Spoon Notch
2.5 QT. Stoneware Pot (1, 2, or 3)
Metal Lid Rest (1, 2,
or 3)
Aluminum Liner
Base Unit (1, 2, or 3)
Groove
Right side
OFF/LOW/HIGH/WARM
Control Dial
Detachable Power-Supply Cord
with Polarized Plug

7
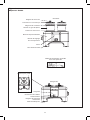
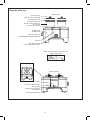
Figure 2
Double Pot Unit
Lid Handle
Tempered Glass Lid
Stoneware Pot Handles
1 QT. Stoneware Pot
Aluminum Liner
Double Pot Base Unit
Groove
Power-Supply Receptacle
Right side
OFF/LOW/HIGH/WARM
Control Dial
Detachable Power-Supply Cord
with Polarized Plug
Power-Supply Cord
Connectors
Left side
Non-Skid Feet
Recessed Carry Handles
Foot Rests
Tab

8
Introduction to the BELLA Linkable Slow Cooker System
This unique Bella Linkable slow cooker system expands from 1 to 2 to 3…up to 6 base units sharing 1 power-
supply cord. The single pot units are 2.5 quart capacity and the double pot units are 1 quart capacity (sold
separately). By linking any combination of single or double pot base units, you can prepare and serve an array
(up to 12!) of warm favorites. Each slow cooker pot has its own heating/warm control — so dishes can be slow
cooked to perfection or set to serve warm for hours. All base units, both single and double pot, stack on top of
each other for safe and easy compact storage.
Stoneware Pot Care
Like any ceramic, the stoneware pot may crack or break if not properly handled. To prevent damage, handle
with care!
WARNING: Failure to follow these instructions can cause breakage resulting in injury or property damage.
• ALWAYS USE POTHOLDERS OR OVEN MITTS WHEN HANDLING ANY HOT STONEWARE POT.
• DO NOT place any hot stoneware pot(s) on countertop. Use the base unit to serve. Keep hot stoneware
pot(s) in the base unit’s aluminum liner until cooled.
• DO NOT place any stoneware pot on range top burner, under a broiler, microwave browning element,
or in a toaster oven.
• DO NOT strike utensils against rim of any stoneware pot to dislodge food.
• DO NOT use stoneware pot(s) to pop corn, caramelize sugar, or make candy.
• DO NOT use abrasive cleaners, scouring pads, or any object that will scratch the stoneware pot(s)
or accessories.
• DO NOT use or repair any stoneware pot(s) or lid(s) that is chipped, cracked, or broken.
• DO NOT use stoneware pot(s) for reheating foods or for general food storage.
• Always place foods into the stoneware pot(s) at room temperature; then place stoneware pot(s) into the
aluminum liner before turning unit ON.
• NEVER heat stoneware pot(s) when empty.
Before Using for the First Time
1. Carefully unpack your slow cooker unit(s). Remove all packaging and materials from each base unit (1, 2,
or 3), stoneware pots (1, 2, or 3), glass lids (1, 2, or 3), metal lid rests (2.5 quart base units only) (1, 2, or 3),
and detachable power-supply cord.
2. It is necessary to operate every slow cooker once before placing food in the stoneware pot. Following the
detailed instructions in the section entitled: “BELLA Linkable Slow Cooker System Assembly Instructions,”
link units (2 or 3…up to 6) together.
3. Pour 1.5 cups of water into each of the 2.5 quart stoneware pots. Pour 3/4 cup of water into each of the
1 quart stoneware pots. Cover each stoneware pot with a glass lid.
4. Plug the detachable power-supply cord’s connectors into the receptacle on the right side of the
base unit 1.
5. Plug cord into a 120V AC electrical outlet.
6. Turn all control dials to HIGH and allow to heat for approximately 20 minutes. You will notice a slight odor;
this is normal and should quickly disappear.
7. Turn all control dials to OFF and allow to cool for 20 minutes.
8. Wearing oven mitts, grasp each of the stoneware pot handles carefully to lift and remove stoneware pots
from each aluminum liner; pour out the water from the stoneware pots.
9. Rinse all stoneware pots, dry thoroughly, and replace in each base unit’s aluminum liner.

9
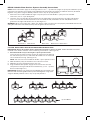
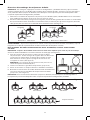
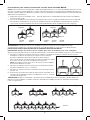
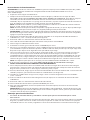
BELLA Linkable Slow Cooker System Assembly Instructions
NOTE: These instructions apply to all congurations: 2 or 3 … up to 6 units (single 2.5 quart pot or double 1 quart
pot) base units. All base unit (single pot and double pot) connections and parts are identical and may be linked
together using either single or double pot base units in any of up to 6 positions.
1. Determine the number of BELLA single 2.5 quart pot units and double 1 quart pot units needed.
Lock units (2 or 3…up to 6) together.
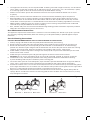
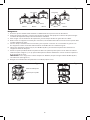
2. Lift base unit 2 to slide the tab (located on the left side) down into the groove on the right side of base
unit 1. If 3 units are connected, lift base unit 3 to slide the tab (located on the left side) down into the
groove on the right side of base unit 2. (See Figure 3.)
WARNING: When using more than 1 base unit, always make sure base units are properly assembled with the tab
along the side of the unit linked securely into the groove of the next unit.
CAUTION: NEVER CARRY MULTIPLE INTERCONNECTED BASE UNITS.
IMPORTANT: Always disconnect all base units before moving to serve or to clean. Follow detailed instructions
outlined in the section entitled: “Care & Cleaning Instructions.” (See Figure 6.)
3. Attach metal lid rest(s) to all single 2.5 quart pot base units.
Insert the lid rest posts into the 2 holes on each base unit behind
the stoneware pot. To use, slide each lid handle over its metal lid
rest to facilitate serving. (See Figure 4.)
NOTE: Lid rests are not included for double 1 quart pot base units.
4. Add stoneware pot(s) to each base unit’s aluminum liner.
5. Add lid(s) to cover stoneware pot(s) until use.
6. Plug the detachable power-supply cord’s connectors into the
receptacle on the right side of the assembled (1, 2, or 3 …up to 6)
base unit (See Figure 5.)
IMPORTANT! All base unit (single pot and double pot) connections are
identical and interchangeable and may be linked together using either
single or double pot base units in any of up to 6 positions.
Tab Tab
Groove Groove
Base Unit 1 Base Unit 2 Base Unit 1 Base Unit 2 Base Unit 3
Figure 3
Figure 4
Figure 5
1 Base 2 Bases 3 Bases
Up to 6 Bases

10
Operating Instructions
WARNING: When using more than 1 base unit, always make sure base units (single pot or double pot) are
properly assembled with the tab along the side of each base unit linked securely into the groove of the next unit.
1. Prepare recipe according to instructions.
2. Place food into the stoneware pot(s) and cover with glass lid(s). DO NOT FILL ANY STONEWARE POT TO
THE TOP WITH FOOD. For best results, the slow cooker(s) should be at least half-lled. When cooking
soups or stews, allow a 2-inch space between the food and the top of the stoneware pot, so ingredients
can come to a simmer.
NOTE: When cooking a meat and vegetable combination, place the vegetables in the bottom of the
stoneware pot rst. Then add the meat and other ingredients. NOTE: When cooking on HIGH, check
cooking progress, as some soups may come to boil. Remember that frequent lifting of the lid during
cooking delays the cook time.
WARNING: The stoneware pot(s) CANNOT stand the shock of sudden temperature changes. If any
stoneware pot is hot, DO NOT add cold food. Before cooking frozen food, add some warm liquid.
3. Plug the detachable power-supply cord’s connectors into the receptacle on the right side of the assembled
(1, 2, or 3 …up to 6) base unit (See Figure 5.).
4. Plug cord into a 120V AC electrical outlet.
5. Turn the appropriate control dial to select temperature setting: LOW or HIGH.
6. Cook according to recipe instructions.
7. When cooking time is complete, turn the control dial to WARM for serving.
8. To serve, using oven mitts, carefully remove any glass lid by grasping the lid knob and lifting the lid
slightly away from you. This will allow the steam to escape before removing the lid. Allow a few seconds
for all steam to escape.
9. Use a serving spoon to stir cooked food, if needed. Rest spoon in the spoon notch on the stoneware pot
rim (2.5 quart base units only) and replace lid. To serve food from any single 2.5 quart pot base unit, hang
each lid on the wire lid rest behind the stoneware pot. Replace each lid immediately after serving to
retain heat.
NOTE: Lid rests are not included for double 1 quart pot base units.
10. If food is ready to serve, but slow cooker base unit(s) need to be moved to another location,
NEVER CARRY MULTIPLE INTERCONNECTED BASE UNITS.
11. Wearing oven mitts, grasp each of the stoneware pot handles carefully to lift and remove stoneware pot(s)
(with lids) from each aluminum liner. Place lled and covered stoneware pots in a safe, heat-proof, at,
clean area.
12. First unplug, then, following the detailed instructions in the section entitled: “Care & Cleaning
Instructions,” disconnect all base units. (See Figure 6.)
13. Move all single base units to the new location, then reassemble. Link together (2 or 3…up to 6) units.
14. Replace lled stoneware pots (with lids) into each base unit’s aluminum liner.
15. Plug cord into a 120V AC electrical outlet.
16. Turn control dial(s) to WARM to serve.
17. Allow each base unit to cool completely before cleaning, see Care & Cleaning Instructions.
CAUTION: Even when turned OFF and unplugged, each base unit, aluminum liner, and stoneware pot
remains hot for some time after using; allow each unit to cool before cleaning or storing.
Hints for Slow Cooking
• Less tender, cheaper cuts of meat are better candidates for slow cooking than more expensive cuts.
• Meats will not brown during the slow cooking process. Browning fatty meats will reduce the amount of
fat and help to preserve color while adding richer avor. Heat a small amount of oil in a skillet and brown
meats prior to putting into the stoneware pot.
• Whole herbs and spices avor better in slow cooking than crushed or ground. Cut the recipe amount by
half. Add ground herbs during the last hour of slow cooking.
• When cooking in a slow cooker, remember that liquids do not boil away like they do in conventional
cooking. Reduce the amount of liquid in any recipe that is not designed for a slow cooker. The exceptions
to this rule would be rice and soups. Remember, liquids can always be added at a later time if necessary.
If a recipe results in too much liquid at the end of the cooking time, remove the cover and continue to cook
HIGH for 1 hour. Check every 15 minutes until the amount of liquid is reduced. Turn the control dial to OFF
when the desired consistency is achieved.
• Most recipes that call for uncooked meat and vegetables require about 6 to 8 hours on LOW
temperature setting.

11
• The higher the fat content, the less liquid needed. If cooking meat with a high fat content, use thick onion
slices under it so that the meat will not sit and cook in the fat. If necessary, use a slice of bread, a spoon,
or a straining spoon to skim off excess fat from top of foods before serving.
• Foods cut into uniform pieces will cook faster and more evenly than foods left whole such as roast
or poultry.
• Always use a meat thermometer to determine if meats have been cooked to proper temperature.
• Root vegetables such as carrots, potatoes, turnips and beets require longer cooking time than many
meats. Place them on the bottom of the slow cooker and cover with liquid. Check to see they are fork-
tender when meat temperature is reached. Remove meat and continue cooking vegetables if necessary.
• Add fresh dairy products (milk, sour cream or yogurt) prior to serving. Evaporated milk or condensed
creamed soups may be added at the start of cooking.
• Rice, noodles and pasta are not recommended for long cooking periods. Cook them separately and then
add to the slow cooker during the last 30 minutes.
User Maintenance Instructions
This appliance requires little maintenance. It contains no user serviceable parts. Do not try to repair it yourself.
Any servicing requiring disassembly other than cleaning, must be performed by a qualied appliance repair
technician.
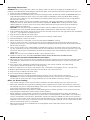
Care & Cleaning Instructions
CAUTION: NEVER IMMERSE BASE UNIT OR CORD IN WATER OR OTHER LIQUID.
1. Always unplug and allow to cool completely before disassembly and cleaning.
2. Remove plug from electrical outlet. Detach power-supply cord from the receptacle on the base unit.
3. Remove all stoneware pots and tempered glass lids and clean in the dishwasher. To avoid damage,
position the stoneware pots and glass lids in dishwasher rack so that they will not hit other items during
cleaning. To clean by hand, wash the stoneware pots and glass lids in warm, soapy water.
4. Avoid sudden, extreme temperature changes. For example, do not place a hot stoneware pot into cold
water or onto a wet surface.
5. Avoid hitting the stoneware pots and glass lids against the faucet or other hard surfaces.
CAUTION: Do not use any stoneware pot or any glass lid if chipped, cracked, or severely scratched.
6. If food sticks to any stoneware pot, ll with warm soapy water and allow to soak before cleaning.
A paste of baking soda may be used with a plastic scouring pad.
7. To remove water spots or mineral deposits, wipe stoneware pot with distilled white vinegar. For difcult
stains, pour a small amount into the stoneware pot and allow to soak. Rinse and dry thoroughly.
8. Disconnect all base units. If 3 units are connected, lift base unit 3 to slide the tab up and out of the groove
on the right side of base unit 2. Lift base unit 2 to slide the tab up and out of the groove on the right side of
base unit 1. (See Figure 6). Disconnect all base units before moving to clean.
9. Wipe interior and exterior of the each base unit and aluminum liner with a soft, slightly damp cloth or
sponge. Never use abrasive cleansers or scouring pads to clean the base unit or aluminum liner, as they
may damage the surfaces.
Tab
Groove
Base Unit 1 Base Unit 2
Tab
Groove
Base Unit 1 Base Unit 2 Base Unit 3
Figure 6

12
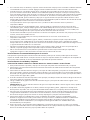
Storing Instructions
1. Make sure the power-supply cord is unplugged from the electrical outlet and detached from the
base unit.
2. Be sure all parts are clean and dry before storing. Never store any slow cooker base unit while it is hot
or wet.
3. Store slow cooker base unit(s) with each stoneware pot inside aluminum liner.
4. Remove each of the metal lid rests, wrap in a paper towel and store inside 1 of the stoneware pots.
5. Cover each lid with a paper towel, then replace each glass lid upside down over each stoneware pot to
store. Remove and store detachable power-supply cord in stoneware pot until use.
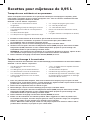
6. All units, both single 2.5 quart and double 1.0 quart pots, stack on top of each other for easy
compact storage.
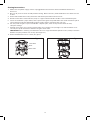
7. Position each upper unit’s 4 feet into the lower unit’s 4 foot rests (see Figure 7) and stack base units
securely on top of each other. Add the last glass lid to store.
IMPORTANT: When stacking a combination of 2 or 3 single and double pot base units, always stack the
double 1.0 quart pot base unit on top. (See Figure 8.)
8. Store stacked base units in a clean, dry place.
Figure 7
Non-Skid
Feet
Foot rests
Figure 8

13
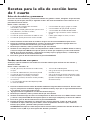
NOTE: When slow cooking on HIGH setting, it is very much like a covered pot on the stove top.
Foods will cook on HIGH in about half the time required for LOW cooking. Additional liquid may be
required as foods do boil on HIGH.
Sweet Potato Gumbo
Serves 4 to 6
• 3 cups sweet potato cubed 1-inch pieces
• 3 oz. soy chorizo (may substitute pork or beef)
• 1 cup chopped tomatoes (may substitute
canned)
• 1/2 cup chopped red onion
• 1-1/2 cups vegetable stock
• 1 pablano pepper, chopped
• 2 celery stalks, chopped
• 2 cups raw okra, sliced (may substitute
frozen)
1. Place all ingredients into stoneware pot.
2. Cover and cook on LOW for 6 to 7 hours.
3. Before the nal cooking hour, test gumbo for seasoning and add salt to taste. If a thinner gumbo
is desired, add more vegetable stock.
4. Turn control dial to WARM and serve with plenty of warm, crusty bread.
Chicago Style Italian Beef Sliders
Party Chicago Style!
Set out plenty of dipping bowls with gravy, small onion dinner rolls, creamy horseradish, even sliced
cheeses. Let guests prepare their own mini open-faced sandwiches, top with 2 slices of cheese.
Place under the broiler until cheese is melted. Top with peppers, onions, giardiniera and toasted roll.
Dip sliders in luscious gravy.
Makes 10 to 12 Sliders
• 2 - 2-1/2 lbs. boneless beef chuck roast
• 2 large onions, sliced in half
• 1/2 cup Italian giardiniera, drained
• 1/2 cup pepperoncini peppers. drained
• 1 tablespoon dry packaged Italian salad
dressing
• 1 cup low sodium beef broth
• 4 tablespoons ketchup
• 2 garlic cloves, minced
• 2 bay leaves
• creamy horseradish
• sliced cheese, provolone, mozzarella,
cheddar, if desired
• small onion dinner rolls
1. Trim any silverskin or excess fat pockets from roast. Place onions into the stoneware pot.
Add roast to the top.
2. Drain giardiniera and pepperoncini, mix with remaining ingredients and spread over roast.
3. Cover and cook on LOW for 8 - 10 hours, or HIGH for 6 - 8 hours.
4. Use 2 forks to shred the meat. Return and serve in stoneware pot with remaining gravy and
giardiniera vegetables, onions and peppers.
5. Turn control dial to WARM to serve
6. Guests can pile beef onto toasted dinner rolls slathered with creamy horseradish. Top with
cooked peppers, onions, giardiniera.
7. Serve with Maple Orange Butternut Squash.
2.5 Quart Slow Cooker
Recipes

14
Parmesan Artichoke Dip
Serve warm Parmesan Artichoke Dip with crackers, toast points, pita crisps, crostini, or raw veggies.
This deliciously warm, creamy dip is sure to be a party favorite.
Makes: 3 cups Serves: 12
• 1-1/2 cups marinated artichoke hearts, drained
• 3/4 (6 oz.) package chive cream cheese,
cubed, room temperature
• 1/2 cup shredded mozzarella cheese
• 1/2 cup freshly grated Parmesan-Reggiano
cheese
• 2 tablespoons plain Greek yogurt
• 2 teaspoons minced garlic powder
• 1 teaspoon dried dill
• Freshly ground black pepper or white pepper
to taste
• milk (to thin dip, if needed)
1. Coat the slow cooker stoneware pot with cooking spray.
2. Chop artichoke hearts into quarters or smaller. Add all ingredients except milk to the
stoneware pot.
3. Stir to combine, cover and cook until heated through.
4. Check dip after 1 hour on HIGH or 2 hours on LOW. Re-cover and cook on LOW until cheese is
melted completely and the dip is heated through.
NOTE: If the Parmesan Artichoke Dip becomes too thick, add milk, 1 tablespoon at a time until
desired consistency is achieved.
5. To serve, turn control dial to WARM.
Cheesy Mexican Fondue
Dip and swirl skewered food into the warm fondue for a fun and tasty treat.
Makes: 3 cups Serves: 12
• 4 oz. uncooked chorizo sausage, casing
removed
• 1/2 cup nely chopped yellow onion
• 1/2 cup Mexican seasoned stewed tomatoes,
drained, chopped
• 1 (4 oz. can) diced green chili peppers,
undrained
• 1 - 3 teaspoons minced chipotle peppers
in adobo sauce
• 1/2 cup chicken broth
• 8 oz. Monterey Jack cheese, shredded
• 8 oz. Mexican Chihuahua cheese, shredded
or crumbled (may substitute whole milk
mozzarella)
1. In a medium saucepan cook chorizo over medium heat until browned. Drain all but 1 tablespoon
of fat. Add chopped onion and continue cooking for 5 to 7 minutes or until tender.
2. Add all ingredients to the stoneware pot.
3. Stir to combine, cover and cook until heated through.
4. Check fondue after 1 hour on HIGH or 2 hours on LOW. Re-cover and cook on LOW until cheese is
melted completely and the dip is heated through.
5. To serve, turn control dial to WARM.
6. Prepare skewers using your favorite dipping foods. Cooked chicken chunks, steamed shrimp,
toasted cubes of bread, chunks of sweet bell peppers, zucchini, broccoli, celery, jicama and whole
cherry tomatoes work well.
HINT: Place cubes of French bread onto a baking sheet. Bake at 350ºF for 5 to 7 minutes or until
crisp and toasted.
1.0 Quart Slow Cooker
Recipes

15
Limited TWO-YEAR Warranty
SENSIO Inc. hereby warrants that for a period of TWO YEARS from the date
of purchase, this product will be free from mechanical defects in material and
workmanship, and for 90 days in respect to non-mechanical parts. At its sole
discretion, SENSIO Inc. will either repair or replace the product found to be defective,
or issue a refund on the product during the warranty period.
The warranty is only valid for the original retail purchaser from the date of initial retail
purchase and is not transferable. Keep the original sales receipt, as proof of purchase is
required to obtain warranty validation. Retail stores selling this product do not have the
right to alter, modify, or in any way revise the terms and conditions of the warranty.
EXCLUSIONS:
The warranty does not cover normal wear of parts or damage resulting from any of the
following: negligent use of the product, use of improper voltage or current, improper
routine maintenance, use contrary to the operating instructions, disassembly, repair,
or alteration by anyone other than qualied SENSIO Inc. personnel. Also, the warranty
does not cover Acts of God such as re, oods, hurricanes, or tornadoes.
SENSIO Inc. shall not be liable for any incidental or consequential damages caused
by the breach of any express or implied warranty. Apart from the extent prohibited
by applicable law, any implied warranty of merchantability or tness for a particular
purpose is limited in time to the duration of the warranty. Some states, provinces or
jurisdictions do not allow the exclusion or limitation of incidental or consequential
damages, or limitations on how long an implied warranty lasts, and therefore, the
above exclusions or limitations may not apply to you. The warranty covers specic
legal rights which may vary by state, province and/or jurisdiction.
HOW TO OBTAIN WARRANTY SERVICE:
You must contact Customer Service at our toll-free number: 1-866-832-4843.
A Customer Service Representative will attempt to resolve warranty issues over the
phone. If the Customer Service Representative is unable to resolve the problem, you will
be provided with a case number and asked to return the product to SENSIO Inc. Attach
a tag to the product that includes: your name, address, daytime contact telephone
number, case number, and description of the problem. Also, include a copy of the
original sales receipt. Carefully package the tagged product with the sales receipt,
and send it (with shipping and insurance prepaid) to SENSIO Inc.’s address. SENSIO
Inc. shall bear no responsibility or liability for the returned product while in transit to
SENSIO Inc.’s Customer Service Center.

16
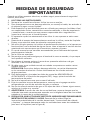
CONSIGNES DE SÉCURITÉ
IMPORTANTES
Respecter les consignes de sécurité de base au moment d’utiliser des appareils
électriques, y compris les suivantes
1. LIRE TOUTES LES INSTRUCTIONS.
2. Ne pas toucher les surfaces chaudes. Ne se servir que des poignées ou des
boutons de l’appareil.
3. Pour éviter les décharges électriques, ne pas immerger le cordon, la prise ou
l’appareil dans de l’eau ou dans d’autres liquides.
4. Cet appareil n’est pas destiné à être utilisé par des personnes (y compris les
enfants) dont les capacités physiques, sensorielles ou mentales sont limitées ou
qui ne possèdent ni l’expérience, ni les compétences nécessaires pour utiliser
l’appareil, à moins qu’elles soient supervisées ou qu’elles aient reçu des directives
d’utilisation adéquates de l’appareil par la personne responsable de leur sécurité.
5. Une surveillance étroite est nécessaire quand un appareil est utilisé par un enfant
ou près de lui.
6. Débrancher l’appareil de la prise murale lorsqu’il n’est pas utilisé et avant de le
nettoyer. Laisser l’appareil refroidir avant de poser ou d’enlever des pièces.
7. Ne pas utiliser l’appareil lorsque le cordon ou la che électrique sont
endommagés, après une défectuosité ou lorsque l’appareil a été endommagé de
quelque façon que ce soit. Apporter l’appareil au centre de service autorisé le plus
près pour un diagnostic, une réparation ou un réglage.
8. L’utilisation d’accessoires non recommandés par le fabricant de l’appareil peut
causer des blessures.
9. Ne pas utiliser l’appareil à l’extérieur.
10. Ne pas laisser le cordon pendre d’un bord de table ou d’un comptoir, ni entrer en
contact avec une surface chaude.
11. Ne pas poser l’appareil sur un élément de cuisinière électrique ou à gaz, ni à
proximité, ni dans un four chaud.
12. Être très prudent au moment de déplacer un appareil contenant de l’huile chaude
ou d’autres liquides chauds.MISE EN GARDE : Pour prévenir les dommages et les
décharges électriques, n’effectuer aucune cuisson directement dans les bases de
mijoteuses. Ne cuire les aliments que dans les cocottes en grès fournies.
13. Pour débrancher l’appareil, placer tous les boutons de réglage (OFF/LOW/HIGH/
WARM – arrêt, température basse, température élevée et réchaud) à la position
d’arrêt (OFF), puis retirer la che de la prise de courant.
14. Ne pas utiliser l’appareil à une n autre que celle pour laquelle il a été conçu.
15. Éviter de causer tout changement brusque de température, par exemple par l’ajout
d’aliments réfrigérés dans la cocotte en grès chauffée.
16. Ne pas utiliser une cocotte en grès ou un couvercle en verre s’ils sont ébréchés,
ssurés ou très égratignés.
17. AVERTISSEMENT : Si plus d’une mijoteuse est utilisée, s’assurer qu’elles sont bien
assemblées, et que la languette sur le côté de la première base est bien insérée
dans la fente de la suivante.
18. MISE EN GARDE : NE JAMAIS TRANSPORTER PLUSIEURS BASES ASSEMBLÉES,
QU’ELLES SOIENT PLEINES OU VIDES. Débrancher l’appareil. Suivre les directives
détaillées de la section Entretien et nettoyage. Toujours débrancher toutes
les bases avant de les déplacer pour servir la nourriture ou pour les nettoyer.
(Voir gure 6.)

17
CONSERVER CES CONSIGNES
POUR USAGE DOMESTIQUE
SEULEMENT
CONSIGNES DE SÉCURITÉ
IMPORTANTES ADDITIONNELLES
MISE EN GARDE! SURFACES CHAUDES : L’appareil dégage de la chaleur et de
la vapeur pendant son fonctionnement. Prendre les précautions nécessaires pour
prévenir les risques de brûlure et autres blessures ainsi que les risques d’incendie et
autres dommages matériels.
1. Une personne n’ayant pas lu et compris toutes les instructions portant sur
le fonctionnement et la sécurité n’est pas apte à faire fonctionner cet appareil.
Lire et comprendre le mode d’emploi avant d’utiliser ou de nettoyer l’appareil.
2. Débrancher immédiatement l’appareil s’il tombe ou s’il est immergé
accidentellement dans l’eau ou dans un autre liquide. Ne pas plonger la main
dans l’eau!
3. Pendant l’utilisation, veiller à ce qu’il y ait sufsamment d’espace au-dessus et
autour de l’appareil pour que l’air circule adéquatement. Ne pas utiliser l’appareil
s’il touche ou jouxte des rideaux, un revêtement mural, des vêtements, un linge à
vaisselle ou toute autre matière inammable.
4. Ne pas laisser l’appareil sans surveillance pendant qu’il est en marche.
5. Si l’appareil se met à fonctionner anormalement, placer immédiatement tous
les boutons de réglage (OFF/LOW/HIGH/WARM – arrêt, température basse,
température élevée et réchaud) à la position d’arrêt (OFF), puis retirer la che de la
prise de courant. Ne pas utiliser ni tenter de réparer l’appareil défectueux.
6. Le cordon de l’appareil doit être branché uniquement dans une prise de 120 V c.a.
7. Ne jamais utiliser l’appareil s’il est en position instable.
8. Ne jamais utiliser une cocotte en grès directement sur une plaque de cuisson au
gaz ou électrique ou sur une amme nue.
9. Retirer prudemment le couvercle an d’éviter les brûlures causées par la vapeur et
laisser l’eau s’égoutter dans la cocotte en grès.

18
Remarques sur la che
Cet appareil est doté d’une che polarisée (une broche est plus large que l’autre). Pour
réduire le risque de décharge électrique, la che s’insère d’une seule manière dans une
prise polarisée. Si la che ne s’insère pas complètement dans la prise, la tourner pour
l’insérer de l’autre côté. S’il est toujours impossible de l’insérer complètement dans la
prise, communiquer avec un électricien qualié. Ne jamais modier la che de quelque
façon que ce soit.
Remarques sur le cordon
Utiliser le cordon d’alimentation court (ou cordon d’alimentation amovible) fourni avec
l’appareil an de réduire le risque d’emmêlement ou de trébuchement que présente un
cordon long. Ne pas utiliser de rallonges.
Avertissement de migration de plastiants
MISE EN GARDE : Pour éviter la migration de plastiants vers le ni de comptoirs,
de tables ou de tout autre meuble, placer des sous-plats ou des napperons faits
de matière NON PLASTIQUE entre l’appareil et le dessus du comptoir ou de la table.
Si cette consigne n’est pas respectée, le ni de la surface pourrait noircir et des
ternissures permanentes ou des taches indélébiles pourraient se former.
Alimentation électrique
Si le circuit électrique est surchargé parce qu’il doit également alimenter d’autres
appareils, l’appareil pourrait ne pas fonctionner correctement. Il doit être alimenté par
un circuit électrique distinct de tout autre appareil.

19
Caractéristiques du système de mijoteuse raccordable de BELLA
L’appareil peut différer légèrement des illustrations.
REMARQUE : Cette illustration s’applique aux six bases de mijoteuse de l’ensemble. On peut en utiliser une seule
ou en assembler de deux à six. Tous les connecteurs et les pièces des bases sont identiques.
Figure 1
Mijoteuse simple
Poignée de couvercle
Couvercle en verre
trempé (un à trois)
Poignées de la cocotte
Fente pour cuillère
Cocotte en grès (une à trois)
de 2,4 L
Support de couvercle
en métal (un à trois)
Surface en aluminium
Base (une à trois)
Fente
Prise d’alimentation
Connecteurs du cordon
d’alimentation
Côté droit
Côté gauche
Pieds antidérapants
Poignées de transport
enchâssées
Bouton de réglage
de la température
Languette
Espaces pour pieds
Cordon d’alimentation amovible avec
che polarisée

20
Figure 2
Mijoteuse double
Base de mijoteuse double
Côté droit
Côté gauche
Espaces pour pieds
Cordon d’alimentation amovible
avec che polarisée
Poignée de couvercle
Couvercle en verre trempé
Poignées de la cocotte
Cocotte en grès de 0,95 L
Surface en aluminium
Fente
Prise d’alimentation
Connecteurs du cordon
d’alimentation
Pieds antidérapants
Poignées de transport
enchâssées
Bouton de réglage
de la température
Languette
La page est en cours de chargement...
La page est en cours de chargement...
La page est en cours de chargement...
La page est en cours de chargement...
La page est en cours de chargement...
La page est en cours de chargement...
La page est en cours de chargement...
La page est en cours de chargement...
La page est en cours de chargement...
La page est en cours de chargement...
La page est en cours de chargement...
La page est en cours de chargement...
La page est en cours de chargement...
La page est en cours de chargement...
La page est en cours de chargement...
La page est en cours de chargement...
La page est en cours de chargement...
La page est en cours de chargement...
La page est en cours de chargement...
La page est en cours de chargement...
La page est en cours de chargement...
La page est en cours de chargement...
La page est en cours de chargement...
La page est en cours de chargement...
-
 1
1
-
 2
2
-
 3
3
-
 4
4
-
 5
5
-
 6
6
-
 7
7
-
 8
8
-
 9
9
-
 10
10
-
 11
11
-
 12
12
-
 13
13
-
 14
14
-
 15
15
-
 16
16
-
 17
17
-
 18
18
-
 19
19
-
 20
20
-
 21
21
-
 22
22
-
 23
23
-
 24
24
-
 25
25
-
 26
26
-
 27
27
-
 28
28
-
 29
29
-
 30
30
-
 31
31
-
 32
32
-
 33
33
-
 34
34
-
 35
35
-
 36
36
-
 37
37
-
 38
38
-
 39
39
-
 40
40
-
 41
41
-
 42
42
-
 43
43
-
 44
44


Bella BLA14007 Mode d'emploi
- Catégorie
- Fondues, gourmets
- Taper
- Mode d'emploi
- Ce manuel convient également à
dans d''autres langues
- español: Bella BLA14007 Guía del usuario