
OPERATION MANUAL
MODE D’EMPLOI
BEDIENUNGSANLEITUNG
MANUAL DE INSTRUCCIONES
Read Instructions Before Using / Lire attentivement les instructions avant l’utilisation /
Bitte lesen Sie vor der Verwendung die Anleitung / Lea las instrucciones antes del uso
SUPREME
raw food dehydrator
SDC-S101

2

3
LANGUAGES
• English.............................................................................................................................4
• Français..........................................................................................................................20
• Deutsch..........................................................................................................................36
• Español...........................................................................................................................52

4
INTRODUCTION
Congratulations! You are now the proud owner of a Tribest® Sedona® Supreme Food Dehydrator.
With the advanced Tribest Sedona Supreme Food Dehydrator, you can enjoy the benets of
efciently and conveniently dehydrating your favorite fruits, vegetables, and meats, utilizing the
latest in digital dehydration technology and the revolutionary Two-Stage Temperature-Timer (TST)
feature. From apples to zucchini, breads to pates, and your favorite jerky recipes, you can set
Sedona Supreme to meet all your dehydrating needs.
The Tribest Sedona Supreme includes our latest innovation: the Two-Stage Sequential Tempera-
ture-Timer (TST). The TST allows you to easily set the Tribest Sedona Supreme to start at a higher
temperature, to kick-start the dehydration process. Then it automatically switches to a lower
temperature to nish off the job without raising the temperature of the food above the desired
level. The TST decreases the amount of time it takes to dehydrate your favorite recipes without
all the hassle.
The Tribest Sedona Supreme is the advanced solution to dehydration - offering you all the op-
tions you require to make the dehydration process as simple and as convenient as possible. With
the Tribest Sedona Supreme, you have complete control over setting the timer up to 99 hours
or switching to continuous mode for up to 120 hours of worry-free uninterrupted operation. The
new Tribest Sedona Supreme utilizes a 7 inch central single-fan heating mechanism, so that the
heated air is evenly circulated and distributed for uniform dehydration of your foods. Dehydrate up
to 9 trays of your favorite recipes using either the stainless steel or BPA-free trays.
The Tribest Sedona Supreme also offers you a convenient way to monitor your foods with a see
through glass window at the front of the unit. As an added convenience, there is an internal LED
light that switches on when you open the glass door to check on the dehydration process. The
washable and reusable Air Filter helps prevent dust from being blown all over your food during
dehydration.
Be sure to carefully unpack your Tribest Sedona Supreme and check that all of the parts are
included with your package. Also take the time to become familiar with the functions of the unit
before you begin dehydrating foods. It is a good idea to press each button to check their function-
ality – making you aware of what each button controls. The included trays make your dehydration
experience easier while also enhancing the versatility of the machine.
We recommend that you wash all of the trays with warm water and a mild detergent before you
rst use your Tribest Sedona Supreme. Now you are ready to begin dehydrating with your Tribest
Sedona Supreme. We hope you enjoy your new dehydrator, as it helps you better preserve the
nutrition from your favorite fruits and vegetables and helps you continue your journey to better
health.
Please take the time to thoroughly read through the entire operation manual for proper use and
care instructions. Following the instructions in this manual will ensure that your Tribest Sedona
Supreme Food Dehydrator operates optimally for years to come.

5
EN
TABLE OF CONTENTS
Introduction..........................................................................................................................4
Important Safeguards............................................................................................................6
Safety Tips............................................................................................................................7
Parts List..............................................................................................................................8
Set-Up..................................................................................................................................9
Operating Instructions.........................................................................................................12
Cleaning and Maintenance..................................................................................................14
Troubleshooting...................................................................................................................15
Tips for Dehydrating............................................................................................................16
Drying Times Chart.............................................................................................................18
Product Information.............................................................................................................19

6
IMPORTANT SAFEGUARDS
When using electrical appliances, basic safety precautions should always be followed
including the following:
1. Read all instructions.
2. Do not touch hot surfaces. Use handles or knobs.
3. To protect against electrical shock do not immerse cord, plugs, in water or other liquid.
4. Close supervision is necessary when any appliance is used by or near children.
5. Unplug from outlet when not in use and before cleaning. Allow to cool before putting on or
taking off parts.
6. Do not operate any appliance with a damaged cord or plug or after the appliance
malfunctions or has been damaged in any manner. Return appliance to the nearest
authorized service facility for examination, repair, or adjustment.
7. The use of accessory attachments not recommended by the appliance manufacturer may
cause injuries.
8. Do not use outdoors
9. Do not let cord hang over edge of table or counter or touch hot surfaces.
10. Do not place on or near a hot gas or electric burner, or in a heated oven.
11. Extreme caution must be used when moving an appliance containing hot oil or other hot
liquids.
12. Always attach plug to appliance first, then plug cord into the wall outlet. To disconnect, turn
any control to “off”, then remove plug from wall outlet.
13. Do not use appliance for other than intended use.
SAVE THESE INSTRUCTIONS
WARNING
1. To prevent electric shock, unplug before cleaning.
2. To ensure continued protection against risk of electric shock, connect to properly earthed
outlets only.
3. Do not immerse in water.

7
EN
SAFETY TIPS
To avoid any possible damage or injury, please follow the basic safety tips:
1. Do not clean the main body directly with water. Always use a damp towel.
2. Do not use in a humid room such as a bathroom. Always operate the machine in a well
ventilated setting.
3. Always use a separate outlet that has a minimum of 10 amps. Don’t plug into an extension
cord and then into an outlet.
4. Do not block the air vents while operation.
5. Do not expose to high temperatures over 176°F (80°C).
6. Plug in with the main switch OFF.
7. Do not attempt to dehydrate any substances that contain glass or metal powders, dust, or
shards.
8. To avoid deterioration of food, remove the dehydrated food immediately after the dehydration
process is completed.
9. Store dehydrated foods in a proper place.
TIP: For best results, store in a suitable airtight container.
TIP: Very thickly cut food can restrict airflow. If the food in the tray is touching or close to
touching the bottom of the tray above it, please remove the tray above it so that airflow is not
restricted. Not all trays need to be used while the machine is in operation.

8
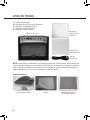
PARTS LIST
• 1 Main Body
• 9 BPA Free Stainless Steel Mesh Trays
• 1 BPA Free Debris Mat
• 1 Detachable Power Cord
• 1 Operation Manual
Sedona Non-Stick PTFE
Drying Sheets
(Polytetrauoroethylene)
Sedona PP (Polypropylene)
Drying Sheets Sedona Silicone
Drying Sheets
NOTE: Each unit is packaged with sponge tray holders. Please make sure to remove the sponge
tray holders before using the Sedona Combo. The sponge tray holders were designed to keep
your trays in place during transportation. They are not intended to be used with the normal
operation of the Sedona.
Optional Parts
Main Body
Debris Mat
Power Cord
Mesh Tray

9
EN
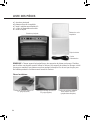
SET-UP
1. POWER Switch is used to turn the dehydrator on and off.
2. MODE button allows you to choose one of three settings. The lights to the right of the MODE
button indicate which mode is activated.
• When the top RED light is lit, only FAST mode is activated.
• When the bottom GREEN light is lit, only RAW mode is activated.
• When both the top RED and bottom GREEN light are lit, the Two-Stage Sequential
Temperature-Timer is activated (both FAST and RAW mode are activated).
The three settings:
a) FAST mode: The average internal temperature levels will be maintained at the indicated
temperature. As the heating element cycles on and off, internal temperature will rise and
fall. The indicated temperature is the average temperature maintained by the dehydrator.
b) RAW mode: Internal temperature will never go above the indicated temperature. Indicated
temperature is not the average temperature, indicated temperature is the maximum
temperature that the machine will go up to. This is useful for preserving certain vital
nutrients that can degrade at high temperatures.
c) COMBO mode: Uses the Two-Stage Sequential Temperature-Timer to set the two
temperature/time settings. It starts at a higher temperature for a set time (FAST mode)
then automatically drops down to a lower temperature for a set amount of time.
• FAST mode: The rst temperature setting and is set at a higher temperature to
encourage more initial dehydrating, less spoiling/fermenting of foods.
• RAW mode: The second temperature setting and is set at lower temperatures for longer
times.
3. SET button has two functions:
• It enables you to set the temperature and the time.
- When initially setting the temperature, press the SET button once and the 3 digit of the
TEMP window will ash.
- When you press the SET button once more, the 2 digit TIMER window will ash.
• Once the temperature and the time is set, the SET button turns on two internal LED lights
while the machine is in operation.
a) Press the SET button once – While the TEMP window ashes, set the desired
temperature by using the 10 or 1 buttons to select your desired temperature.
b) When the TEMP window displays your desired temperature, press the SET button again
to nalize your temperature setting. Your desired temperature is now set up, and the
TIMER window will ash.
c) When the TIMER window ashes, set the desired hours by using the 10 or 1 buttons to
select the desired time, then press the SET button to nalize your choice.

10
NOTE:
• The stand-by time is 5 seconds. After you press the SET button, if you do not begin to set
the temperature or timer setting within 5 seconds, the set-up mode will be cancelled.
• For faster and more accurate setting of the temperature and time, the dehydrator has 2
separate buttons of 10 and 1. The buttons under the 10 represent increments of ten,
whereas the buttons under the 1 represent increments of one.
• You may set the dehydrating time up to 99 hours.
• The dehydrator has a Continuous Operation (“Co”) dehydration function which allows you to
continuously dehydrate for more than 99 hours. To enable this function, press and hold the
10 Up button until Co is displayed.
• The Co function will dehydrate for a maximum of 120 hours.
• The default setting of the dehydrator is 45°C (113°F) for 10 hours.
• The dehydrator will save your settings for next use even when you turn off the dehydrator.
While the machine is operating, the SET button also turns on two internal LED lights so you
can see inside the machine without opening the door. While the machine is running, press
the SET button, and small LED lights in the top, turn on for up to 10 seconds, creating a
small beeping sound twice. The lights turn off automatically.
4. UP/DOWN buttons (10 and 1) are for setting the temperature or the hours for the timer.
The 10 Up/Down buttons will change the setting by 10 hours or degrees. The 1 Up/Down
buttons will change the setting by 1 hour or degree. Press and hold down the buttons for
continuous scrolling.
5. TEMPERATURE display is used for two separate functions:
• Setting Desired Temperature- During set up this display will be used to set the desired
temperature of the drying compartment.
NOTE: The condition of the inowing air may adversely affect the actual compartment
temperature. The actual compartment temperature may read a +/- 5°C (9°F) difference.
The difference is registered by the thermal sensor, thus regulating the heating mechanism
activity.
• Temperature Display- Will display your desired temperature setting.
NOTE: While the temperature displayed by the Temperature Display is set to the desired
setting, the actual temperature in the drying chamber may uctuate up to ±5°C (41°F).
6. TIMER display will show the total number of hours set for each desired temperature.
This timer automatically counts down, showing the time remaining for dehydrating.
7. °F/°C button will enable you to select the temperature display mode (Fahrenheit or Celsius).
NOTE: The default setting of Sedona Supreme is in Celsius (°C). Once you set the machine to
Celsius or Fahrenheit, the Sedona Supreme will remember your setting even after you turn off
the dehydrator.

11
EN
8. START/PAUSE button is to start or pause operation.
NOTE:
• While dehydrator is in operation, if you open the door, the power supply to both the heating
coil and the fan will be cut-off. The Sedona Supreme will automatically restart as soon as
the door is closed.
• You will hear a beeping sound when the buttons are pressed, when the door is opened, and
when the assigned time is over.
• To change the temperature and/or timer while the dehydrator is running, press the START/
PAUSE button to pause the dehydrator, then press the SET button and change the
temperature and/or time. Then press START/PAUSE button to re-start the dehydrator.
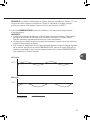
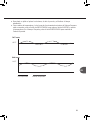
Then press START/PAUSE button to re-start the Sedona Combo.
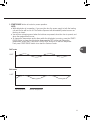
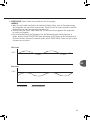
FAST mode
150°F
RAW mode
118°F
Set Temperature Internal Temperature

12
OPERATING INSTRUCTIONS
For your safety and to protect your dehydrator, please follow the instructions below:
1. Always keep the dehydrator on a level surface.
• Keep the dehydrator at least 10 cm away from walls, other appliances or furniture.
2. Open the door to insert trays into the dehydrator. Hold the tray in the horizontal position and
push the tray into the proper slots.
• Place the food evenly and neatly on each tray as close as possible (remember dehydrating
removes water and/or shrinks food). For best results, cut the food into even slices.
• It is recommended to use separate trays for each type of food.
• Double check whether all the trays are properly loaded.
3. Plug into an outlet that has 10 amp capacity.
4. Turn the main switch ON.
5. There are three settings to choose with the dehydrator:
• TWO-STAGE SEQUENTIAL TEMPERATURE-TIMER (TST) Use Only
The Two-Stage Sequential Temperature-Timer (TST), a dual timer mode that allows for both
FAST mode and RAW mode to be set one after the other. This is the default setting of the
machine when it is turned on. FAST mode is set rst and then RAW mode is set next. When the
program is started, FAST mode will kick start the dehydration process and then RAW mode will
nish off dehydration.
1. Turn the dehydrator on, both the RED and GREEN lights to the right of the MODE button will
be lit. (Red=FAST mode, Green=RAW mode.)
2. Press the F°/C° button to choose Fahrenheit or Celsius.
3. Press the SET button to set FAST mode to your desired temperature using the UP/DOWN 10
or 1 buttons.
4. Press SET again to set the desired time using the UP/DOWN 10 or 1 buttons for FAST mode.
5. Press SET again to set the desired temperature using the UP/DOWN 10 or 1 buttons for RAW
mode.
6. Press SET again to set the desired time using the UP/DOWN 10 or 1 buttons for RAW mode.
7. Press SET to nalize settings.
8. Press the START/PAUSE button to begin operation.
NOTE: During FAST mode the upper red light blinks - while the higher temperature operates
rst for the desired set time. RAW mode, the lower green light blinks- automatically lowers the
temperature to the second setting for the remaining dehydrating time.
• FAST Mode Use Only
This setting holds and maintains a higher temperature (e.g. 155°F) for faster dehydrating.
1. Set the dehydrator to FAST mode by pressing the MODE button once to change the default
Two-Stage Sequential Temperature-Timer (TST) to FAST mode. (A RED light lit to the upper
right of the MODE button indicates that the dehydrator is set at FAST mode.)
2. Press the F°/C° button to choose Fahrenheit or Celsius.
3. Press the SET button to set your desired temperature using the UP/DOWN 10 or 1 buttons.
4. Press the SET button to set your desired time using the UP/DOWN 10 or 1 buttons.
5. Press the SET button again to nalize your settings. The numbers will stop ashing.
6. Press the START/PAUSE button to begin operation.

13
EN
• RAW Mode Use Only
The RAW mode operates in a way such that when the heat sensor reaches the set temperature,
heating assembly will cut off to sustain a drying environment lower than indicated temperature
to protect from overheating your food.
1. Set the Sedona Combo to RAW mode by pressing the MODE button two times. (A GREEN light
to the lower right of the MODE button will indicate that the unit is set on RAW mode.)
2. Press the F°/C° button to choose Fahrenheit or Celsius.
3. Press the SET button to set your desired temperature using the UP/DOWN 10 or 1 buttons.
4. Press the SET button again to set your desired time using the UP/DOWN 10 or 1 buttons.
5. Press the SET button again to nalize your settings. The numbers will stop ashing.
6. Press the START/PAUSE button to begin operation.
7. The dehydrator will beep and automatically switch to stand-by mode after the set time has
expired.
8. Turn the main switch OFF after dehydration has nished.
NOTE:
• dehydrator is designed to evenly distribute warm air from the rear to the front of the unit.
Depending on the climate and temperature of the air owing into the unit from the rear,
there may be a slight difference in temperature between the trays and inside the drying
compartment.
• Because heat rises naturally, it is normal for the top trays to be exposed to more heat than the
trays in the center or on the bottom. For best results, rotate the trays periodically.

14
CLEANING AND MAINTENANCE
1. Clean the trays and tray sheets with a mild detergent under warm water after each use.
WARNING: The trays are NOT dishwasher safe.
2. To clean the main body, first unplug the machine and then clean with a damp towel. Do not
rinse the dehydrator with running water or submerge the dehydrator in water.
3. For easier screen/tray cleaning – cover with wet paper towels and soak for a short while.
4. Make sure the trays and tray sheets are thoroughly dried before inserting them back into the
dehydrator.
5. Keep your dehydrator and parts in a safe place out of reach of children.

15
EN
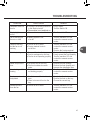
TROUBLESHOOTING
SYMPTOM LIKELY CAUSE REMEDY
Dehydrator does not
turn on •
The plug is incorrectly positioned
in the electrical outlet.
• The machine is not switched on.
• Plug in again.
• Turn the switch ON.
Display lights are
not on • The machine is not switched on • Turn the switch ON
Fan is working but
there is no heat • Heating system is out
of order. • Turn the machine OFF and
contact the nearest service
center.
Heater is working
but the fan is not
working
• The fan is out of order.
• Foreign material is stuck
on the fan.
• Turn the machine OFF and
contact the nearest service
center.
• Remove the foreign material.
Not dehydrating • Too much food on the tray.
• Food is overlapped on the tray.
• The fan is not operating properly
• Reduce the food quantity.
• Evenly spread the food quantity
• Turn the machine OFF and
contact the nearest service
center.
Water drops on the
door • Too much food on the tray.
• The food contains too much
water.
• Reduce the food quantity.
• Reduce the food quantity and
increase the dehydration time.
Over heating or little
heating • Temperature control system is
not working properly. • Turn the machine OFF and
contact the nearest service
center.
Foods are not evenly
dehydrated
• The thickness of the food is not
even.
• There is too much food on the
tray.
• Evenly slice the food
• Reduce the food on the tray
• Choose the correct tray
Abnormal sound
from the fan • The fan is out of order. • Turn the machine OFF and
contact the nearest service
center.

16
TIPS FOR DEHYDRATING
When dehydrating fruits, vegetables, nuts, or spices keep these tips in mind:
• It’s best to use fruits and vegetables that are in season, grown organically/locally (for more
avor, keeps prices down, availability up.)
• Use fruits or vegetables with appropriate hardness, with no soft spots that discolor during
dehydrating.
• Remove unwanted parts: stalks, cores, unwanted seeds, rinds that are not wanted, or outside
skins, peel if desired.
• Keep the slices the same size: this will help the dehydrating time stay the same as well.
• When using spice (e.g. BBQ or salty avors) coat foods with something wet, sticky, or oily to
help the spices/avorings adhere to the food. Olive oil, miso, liquid marinades, or sweeteners
like honey or agave work well.
• Store in airtight glass containers to keep the food dried longer.
• To re-hydrate, if you over dry, put a moist paper towel, add a lettuce leaf into the container, or
lightly mist the foods with water to re-hydrate back to the desired texture.
FRUITS:
• Fruit chips are tasty and a good way to save extra produce for camping, hiking, or for later
use.
• Use crisp fruits, or fruits not overly ripened for best results.
• Most fruits lose their sweetness when dehydrated-especially banana chips, so putting a
desired spice (e.g. cinnamon, nutmeg, or vanilla) or sweetener (e.g. agave, stevia, or maple
syrup) on top of each ‘chip’ can sweeten the nished food.
• Make sure to take remove cores, seeds, and other inedible parts (peels, etc.).
• When using larger pieces (e.g. a small apple, pitted fruits, or bananas) keep them the same
size to keep the drying time the same.
GRAINS:
• Best to soak/sprout grains before dehydrating – two or three days is sufcient.
• Grains can be sprouted and dried back in order to make a sprouted our.
• Savory or sweet crackers and breads can be made by combining the grains with spices, herbs,
vegetables, dried fruits, or even the pulp from juices. The best part of making these foods is
that you can improvise. It is not like baking, where exact measurements are necessary for
success.
• Grain recipes are done best in the COMBO mode.
NUTS:
• Soak nuts initially in enough water to cover entirely, then add a splash of hydrogen peroxide
into the soaking water, and rinse thoroughly after 5 minutes (this gets rid of unwanted mold.)
• Softer nuts, (e.g. cashews or pecans, hardly need any soaking) just the initial soak/rinse (as
mentioned above with hydrogen peroxide) to remove unwanted molds.
• The harder nuts (e.g. almonds, brazil nuts) need to be soaked for longer (between 6 – 12
hours), after the initial soaking/rinsing.

17
EN
• Drying soaked nuts keeps them fresh longer, without the enzymes that coat the nuts (that’s
why nuts need rinsing) that inhibit/block digestion. They can take up to 48 hours to fully dehy
drate, depending on the size of the nut, the weather (more humidity takes longer), and how
long the nut has soaked.
• After a nut has been soaked and dried – it can be ground into a ‘our’ and used in other
recipes.
SEEDS:
• Soak seeds to remove the coating that protects them from automatically sprouting into a plant.
If you want you can sprout some seeds (e.g. sunower seeds)
• If you want to make a our, soak and dry the seeds so that you can grind them.
• Soaked seeds combine well with all the foods (vegetables, fruits, nuts, or grains) in many
dehydrated recipes – they act as a thickener, as well as their own lovely avors.
• Combine to make ‘cereals’ or granolas.
• The RAW mode is ne for solo seed snacks.
• For crackers/cereals/breads use the COMBO mode.
SPICES:
• When using fresh herbs, remove the stems and stalks or anything else inedible.
• Find, create your own combinations, or look at your favorite spice bottles and use that as a
guide.
• Dried spices are done best in the RAW mode.
VEGETABLES:
• Dried vegetables – carrots, corn, zucchini, mushrooms, etc, can be great foods to use for
soups later in the year, when the food is out of season, or to take on camping/hiking trips.
• Cut into uniform sizes/shapes when dehydrating.
• Take off skins, seeds, and other unwanted parts before dehydrating.
• Some vegetables (e.g. onions) get more spicy/hot avored when dehydrated and some get
sweeter. Test different foods to see what happens to the foods you enjoy.
• Vegetable ‘chips’ are done best in the RAW mode.
Be your own food ‘alchemist’ and make up your own favorite recipes. Be inspired by recipes, and
then create your own.

18
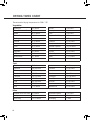
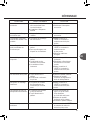
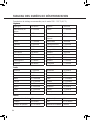
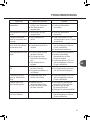
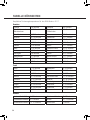
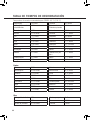
DRYING TIMES CHART
Recommended drying temperature for RAW: 118°
Aparagus 5-6 hours Onions 4-8 hours
Beans, Green or Wax 8-12 hours Parsnips 7-11 hours
Beets 8-12 hours Peas 4-8 hours
Broccoli 10-14 hours
Peppers / Hot Peppers
4-8 hours
Cabbage 7-11 hours Popcorn 4-8 hours
Carrots 6-10 hours Potatoes 6-14 hours
Celery 3-10 hours Pumpkin 7-11 hours
Corn 6-10 hours Summer Squash 10-14 hours
Cucumber 4-8 hours Tomatoes 5-9 hours
Eggplant 4-8 hours Turnips 8-12 hours
Greens 3-7 hours Winter Squash 7-11 hours
Mushrooms 3-7 hours Yams 7-11 hours
Okra 4-8 hours Zucchini 7-11 hours
Vegetables
Apples 7-15 hours Nectarines 8-16 hours
Apricots 20-28 hours Peaches 8-16 hours
Bananas 6-10 hours Pears 8-16 hours
Berries 10-15 hours Persimmons 11-19 hours
Cherries 13-21 hours Pineapple 10-18 hours
Cranberries 10-12 hours Prune Plums 22-30 hours
Figs 22-30 hours Rhubarb 6-10 hours
Grapes 22-30 hours Strawberries 7-15 hours
Kiwi 7-15 hours Watermelon 8-10 hours
Fruit
Leather and Fruit Rolls 4-6 hours Herbs and Spices 2-4 hours
Jerky 4-6 hours Nuts 10-14 hours
Fish Jerky 12-14 hours Recrisping 1 hour
Other

19
EN
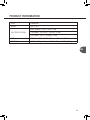
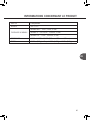
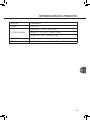
PRODUCT INFORMATION
ITEM Dehydrator
MODEL SDC-S101
NRTL Models : 120V~, 60Hz, 570W
ELECTRICITY RATING CE Models : 220-240V~, 50/60Hz, 570W
PSE Model : 100V~, 50/60Hz, 570W
SIZE 12.2” x 14.56” x 19.68” (310mm x 370mm x 500mm)
WEIGHT 15.9lbs (7.2kg) + Tray set 3.3lbs(1.5Kg) = 19.2lbs(8.7Kg)

INTRODUCTION
Félicitations ! Vous pouvez être er d’être désormais le propriétaire d’un déshydrateur d’aliments crus
Tribest Sedona Supreme. Grâce au déshydrateur d’aliments crus Tribest Sedona Supreme, vous pouvez
proter des avantages d’une déshydratation efcace et pratique de vos fruits et légumes préférés, en util-
isant la toute dernière technologie numérique de déshydratation et le thermostat/minuterie à deux paliers
révolutionnaire. Des pommes aux courgettes, des pains aux pâtés, des crackers à vos recettes de charqui
préférées, vous pouvez utiliser le Sedona Supreme pour tous vos besoins de déshydratation.
Le Tribest Sedona Supreme introduit notre toute dernière innovation : le thermostat/minuterie séquentiel
à deux paliers. Celui-ci vous permet de régler facilement le Tribest Sedona Supreme pour qu’il démarre
à une température plus élevée an de lancer le processus de déshydratation. Puis, il passe automa-
tiquement à une température plus basse pour nir la déshydratation sans augmenter la température de
l’aliment au-delà du seuil souhaité. Le thermostat/minuterie réduit le temps nécessaire pour déshydrater
vos recettes préférées à base d’aliments crus, en toute facilité.
Le Tribest Sedona Supreme est la solution de déshydratation la plus avancée. Elle vous offre toutes les
options dont vous avez besoin pour rendre ce processus aussi simple et pratique que possible. Avec le
Tribest Sedona Supreme, vous avez le contrôle total sur le réglage du minuteur jusqu’à 99 heures, ou sur
l’enclenchement du mode continu pour obtenir jusqu’à 150 heures de fonctionnement ininterrompu sans le
moindre problème. Comme le Tribest Sedona Supreme utilise deux mécanismes chauffants indépendants,
l’air chaud est distribué et circule de manière régulière pour déshydrater vos aliments uniformément. La
technologie à double ventilation vous permet d’économiser de l’électricité, lorsque vous voulez seule-
ment déshydrater une fournée plus petite, en éteignant l’un des mécanismes chauffants indépendants.
Déshydratez jusqu’à 9 plateaux de fruits et de légumes ou divisez la machine en deux compartiments de 4
plateaux pour obtenir de plus petites fournées de vos aliments déshydratés préférés.
Le Tribest Sedona Supreme vous offre également une manière pratique de surveiller vos aliments avec sa
fenêtre de visualisation en verre sur le devant de l’appareil. Pour plus de commodité, il dispose maintenant
de deux lumières DEL internes qui, une fois allumées, permettent de voir à l’intérieur de l’appareil sans
interrompre le processus de déshydratation.
N’oubliez pas de déballer soigneusement votre Tribest Sedona Supreme et de vérier que toutes les pièces
sont incluses. Prenez également le temps de vous familiariser avec toutes les fonctions de l’appareil avant
de commencer à déshydrater des aliments. Il est recommandé d’appuyer sur chaque bouton pour vérier
qu’il fonctionne et pour vous aider à découvrir ce que contrôle chaque bouton. Les plateaux inclus facilitent
votre expérience de déshydratation tout en améliorant la polyvalence de la machine.
Nous vous recommandons de laver tous les plateaux à l’eau chaude avec un détergent doux avant la
première utilisation du Tribest Sedona Supreme. Vous êtes maintenant prêt à déshydrater avec Tribest
Sedona Supreme. Nous espérons que vous appréciez votre nouveau déshydrateur, qui vous aide à mieux
préserver les qualités nutritives de vos fruits et légumes préférés et vous accompagne sur le chemin d’une
meilleure santé.
Veuillez prendre le temps de lire attentivement la totalité du mode d’emploi pour découvrir les instruc-
tions concernant l’utilisation et l’entretien de l’appareil. Suivez les instructions de ce manuel pour vous
assurer que votre déshydrateur d’aliments Tribest Sedona Supreme fonctionnera parfaitement pendant de
nombreuses années.
20
La page est en cours de chargement...
La page est en cours de chargement...
La page est en cours de chargement...
La page est en cours de chargement...
La page est en cours de chargement...
La page est en cours de chargement...
La page est en cours de chargement...
La page est en cours de chargement...
La page est en cours de chargement...
La page est en cours de chargement...
La page est en cours de chargement...
La page est en cours de chargement...
La page est en cours de chargement...
La page est en cours de chargement...
La page est en cours de chargement...
La page est en cours de chargement...
La page est en cours de chargement...
La page est en cours de chargement...
La page est en cours de chargement...
La page est en cours de chargement...
La page est en cours de chargement...
La page est en cours de chargement...
La page est en cours de chargement...
La page est en cours de chargement...
La page est en cours de chargement...
La page est en cours de chargement...
La page est en cours de chargement...
La page est en cours de chargement...
La page est en cours de chargement...
La page est en cours de chargement...
La page est en cours de chargement...
La page est en cours de chargement...
La page est en cours de chargement...
La page est en cours de chargement...
La page est en cours de chargement...
La page est en cours de chargement...
La page est en cours de chargement...
La page est en cours de chargement...
La page est en cours de chargement...
La page est en cours de chargement...
La page est en cours de chargement...
La page est en cours de chargement...
La page est en cours de chargement...
La page est en cours de chargement...
La page est en cours de chargement...
La page est en cours de chargement...
La page est en cours de chargement...
La page est en cours de chargement...
-
 1
1
-
 2
2
-
 3
3
-
 4
4
-
 5
5
-
 6
6
-
 7
7
-
 8
8
-
 9
9
-
 10
10
-
 11
11
-
 12
12
-
 13
13
-
 14
14
-
 15
15
-
 16
16
-
 17
17
-
 18
18
-
 19
19
-
 20
20
-
 21
21
-
 22
22
-
 23
23
-
 24
24
-
 25
25
-
 26
26
-
 27
27
-
 28
28
-
 29
29
-
 30
30
-
 31
31
-
 32
32
-
 33
33
-
 34
34
-
 35
35
-
 36
36
-
 37
37
-
 38
38
-
 39
39
-
 40
40
-
 41
41
-
 42
42
-
 43
43
-
 44
44
-
 45
45
-
 46
46
-
 47
47
-
 48
48
-
 49
49
-
 50
50
-
 51
51
-
 52
52
-
 53
53
-
 54
54
-
 55
55
-
 56
56
-
 57
57
-
 58
58
-
 59
59
-
 60
60
-
 61
61
-
 62
62
-
 63
63
-
 64
64
-
 65
65
-
 66
66
-
 67
67
-
 68
68


dans d''autres langues
- English: Tribest SDC-S101-B User guide
- español: Tribest SDC-S101-B Guía del usuario
- Deutsch: Tribest SDC-S101-B Benutzerhandbuch