Franklin Brass D8017W Guide d'installation
- Taper
- Guide d'installation

CP1660-XXX
level
nivel
niveau
Phillips screwdriver
destornillador Phillips
tournevis Phillips
tape measure
cinta métrica
mètre à ruban
pencil
lápiz
crayon
safety glasses
anteojos de seguridad
lunettes de sécurité
1/4 in. carbide drill bit
broca de carburo de 0,6 cm
foret au carbure 0,6 cm dia.
3/32 in. drill bit
broca de 0,24 cm
foret 0,24 cm diamètre
1/4 in. drill bit
broca de 0,6 cm
foret 0,6 cm diamètre
electric drill
taladro electrico
perceuse électrique
TOOLS REQUIRED • HERRAMIENTAS NECESARIAS • OUTILS REQUIS
TOWEL RING
APPROXIMATE ASSEMBLY TIME: ten (10) minutes
TOOLS REQUIRED (not included): 3/32 in. drill bit, 1/4 in. carbide drill bit (installation on tile), 1/4 in. drill bit (installation on sheetrock),
electric drill, Phillips screwdriver, level, pencil, tape measure, safety glasses
INSTALLATION INSTRUCTIONS:
1. Place the towel ring on the wall in the desired location. Mark the top center of the post on the wall, Fig. 1. Measure 7/8 in. downward
from the mark and mark the screw location. On ceramic tile, try to locate the mounting hole locations on a grout line. If mounting into
ceramic tile, place masking tape on the mounting area before marking the location to prevent the drill bit from sliding across the tile. To
drill through ceramic tile, obtain a 1/4 in. diameter carbide drill bit.
2. For installation on sheetrock without wood wall studs:
Drill a 1/4 in. hole in the wall, Fig. 2. Push in the plastic anchor until flush with the wall. Note which end of the steel mounting bracket is
marked UP. Screw the bracket through the top hole to the wall, Fig. 3a. Mark the center of the bottom hole on the wall. Swing the
bracket out of the way. Drill a 1/4 in. hole and insert the anchor. Screw in the bottom mounting screw. Do not overtighten the mounting
screws.
For installation on sheetrock with wood wall studs:
Drill a 3/32 in. diameter hole for easy screw mounting, Fig. 2. DO NOT USE PLASTIC ANCHORS. Note which end of the steel
mounting bracket is marked UP. Screw the bracket through the top hole to the wall, Fig. 3b. Mark the center of the bottom hole on the
wall. Drill a 3/32 in. diameter hole. Screw in the bottom mounting screw. Do not overtighten the mounting screws.
3. Slip the post over the mounting bracket, Figs. 4a and 4b. Push flush with the wall.
4. If the fixture is loose on the wall, the bracket can be bent to tighten the fit, Fig. 5. Carefully bend the upper left corner of the
bracket towards the wall as illustrated. Adjust again if necessary.
Note: Sheetrock or hollow doors may require molly or toggle bolts (not included).
TOALLERO DE ARGOLLA
APROXIMADO TIEMPO DE MONTAJE: diez (10) minutos
HERRAMIENTAS NECESARIAS (no incluidas): broca de 0,24 cm, broca de carburo de 0,6 cm (instalación sobre los azulejos), broca
de 0,6 cm (instalación sobre el panel de yeso), taladro eléctrico, destornillador Phillips, nivel, lápiz, cinta métrica, anteojos de seguridad
INSTRUCCIONES DE INSTALACION:
1. Ponga lo toallero de argolla en la pared en la posición deseada. Marque el centro superior del poste en la pared, Fig. 1. Mida 2,2 cm
hacia abajo desde la marca y marque la posición del tornillo. Si instala sobre azulejo, trate que los agujeros queden sobre las líneas
de union del azulejo. Para taladrar a través del azulejo use una broca con punta de carburo de 0,6 cm y use masking tape para evitar
que la broca se resbale.
2. Para instalacion sobre el panel de yeso sin montantes de pared de madera:
Taladre un hueco de 0,6 cm en la pared, Fig. 2. Introduzca lo anclaje de pared de plástico hasta que esté a ras con la pared. Observe
qué extremo de la placa de montaje de acero está marcado UP (ARRIBA). Atornille la placa de montaje a la pared a través del hueco
superior, Fig. 3a. Marque el centro del hueco inferior en la pared. Gire la placa de montaje hacia un lado. Taladre un hueco de 0,6 cm
y inserte el anclaje. Atornillo en el tornillo de montage inferior. No apretarlo fuertemente los tornillos de montaje.
Para instalacion sobre el panel de yeso con montantes de pared de madera:
Taladre un hueco de 0,24 cm de díametro para lo montaje fácil de tornillo, Fig. 2. NO USE LOS ANCLAJES DE PARED DE
PLASTICO. Observe qué extremo de la placa de montaje de acero está marcado UP (ARRIBA). Atornille la placa de montaje a la
pared a través del hueco superior, Fig. 3b. Marque el centro del hueco inferior en la pared. Taladre un hueco de 0,24 cm de díametro.
Atornillo en el tornillo de montage inferior. No apretarlo fuertemente los tornillos de montaje.
3. Deslice lo poste sobre la placa de montaje, Figs. 4a y 4b. Introduzca hasta que estén a ras con la pared.
4. Si el accesorio esté suelto en la pared, la placa de montaje se puede inclinar para apretarlo, Fig. 5. Con mucho cuidado doble
la esquina superior izquierda de la placa de montaje hacia la pared como se muestra. Ajuste nuevamente si fuese necesario.
Nota: El panel de yeso o las puertas huecas podrán necesitar tornillos Molly o pernos de fiador (no incluido).
ANNEAU PORTE-SERVIETTES
APROXIMATIF TEMPS DE MONTAGE: dix (10) minutes
OUTILS REQUIS (non fournis): foret 0,24 cm diamètre, foret au carbure 0,6 cm diamètre (l'installation sur le carreau de céramique),
foret 0,6 cm diamètre (l'installation sur le panneau de gypse), perceuse électrique, tournevis Phillips, niveau, crayon, mètre à ruban,
lunettes de sécurité
INSTRUCTIONS POUR L'INSTALLATION:
1. Placez l'anneau porte-serviettes sur le mur où vous voulez installer. Marquez le centre supérieur du montant, Fig. 1. A partir de la
marque du haut, mesurez 2,2 cm vers le bas et marquez la position de la vis de fixation. Sur les carreaux de céramique, essayez de
faire correspondre les trous de fixation avec un joint de coulis. Si vous devez percer les carreaux de céramique, appliquez du
ruban-cache sur ceux-ci pour empêcher le foret de glisser. Utilisez un foret en carbure de 0,6 cm pour percer dans des carreaux en
céramique.
2. Pour l'installation sur le panneau de gypse sans les montants en bois:
Percez un trou de 0,6 cm dans le mur, Fig. 2. Enfoncez la cheville de plastique dans le mur pour que le tête soit à ras le mur. Notez à
quel bout la fixation d'acier est marqué "UP". Insérez la vis dans le trou supérieur de la fixation et la vissez au mur, Fig. 3a. Marquez le
centre du trou inférieur sur le mur. Poussez la fixation de côté, percez un trou et y insérez la cheville. Vissez la vis de fixation inférieure.
Ne trop serrez pas les vis de fixation.
Pour l'installation sur le panneau de gypse avec les montants en bois:
Percez un trou de 0,24 cm de diamètre pour le support facile de vis, Fig. 2. N'UTILISEZ PAS LES CHEVILLES DE PLASTIQUE. Notez
à quel bout la fixation d'acier est marqué "UP". Insérez la vis dans le trou supérieur de la fixation et la vissez au mur, Fig. 3b. Marquez
le centre du trou inférieur sur le mur. Percez un trou de 0,24 cm de diamètre. Vissez la vis de fixation inférieure. Ne trop serrez pas les
vis de fixation.
3. Insérez le montant sur la fixation au mur, Figs. 4a et 4b. Poussez pour que le tout soit bien aligné contre le mur.
4. Si l'appareil fixe est desserré sur le mur, cambrez la fixation pour serrer, Fig. 5. Avec soin, cambrez le coin supérieur gauche
de la fixation vers le mur comme illustré. Si nécessaire, réglez encore.
Note: Des boulons "molly" ou à ailettes seront peut-être nécessaire pour l'installer sur du panneau de gypse ou une porte creuse
(non fournis).
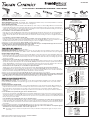
Fig. 5
FRONT VIEW / VISTA FRONTAL / VUE FRONTALE
UP
UPPER LEFT
CORNER
ESQUINA
SUPERIOR
IZQUIERDA
COIN
SUPÉRIEUR
GAUCHE
Fig. 2
Fig. 3a Fig. 3b
UP
UP
Fig. 1
TOP CENTER OF POST
CENTRO SUPERIOR DEL POSTE
CENTRE SUPÉRIEUR DU MONTANT
7/8 in.
2,2 cm
UP
FRONT VIEW / VISTA FRONTAL / VUE FRONTALE
WOOD
WALL STUD
MONTANTE
DE PARED
DE MADERA
MONTANT
EN BOIS
MOUNTING
SCREWS
TORNILLOS
DE MONTAJE
VIS DE
FIXATION
Fig. 4b
SIDE VIEW / VISTA LATERAL / VUE LATÉRALE
SHEETROCK WITH WOOD WALL STUD
PANEL DE YESO CON MONTANTE DE PARED DE MADERA
PANNEAU DE GYPSE AVEC MONTANT EN BOIS
MOUNTING BRACKET
PLACA DE MONTAJE
FIXATION
SHEETROCK
PANEL DE YESO
PANNEAU DE GYPSE
Fig. 4a
SIDE VIEW / VISTA LATERAL / VUE LATÉRALE
SHEETROCK WITHOUT WOOD WALL STUD
PANEL DE YESO SIN MONTANTE DE PARED DE MADERA
PANNEAU DE GYPSE SANS MONTANT EN BOIS
MOUNTING
SCREWS
TORNILLOS
DE MONTAJE
VIS DE
FIXATION
ANCHORS
ANCLAJES
DE PARED
CHEVILLES
MOUNTING BRACKET
PLACA DE MONTAJE
FIXATION
SHEETROCK
PANEL DE YESO
PANNEAU DE GYPSE
©2007 Liberty Hardware
®
Manufacturing Corporation, A MASCO COMPANY
Made in China / Hecho en China / Fabriqué en Chine
-
 1
1

