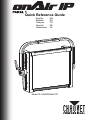
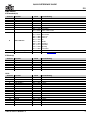
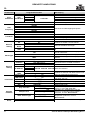
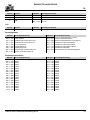
Chauvet Professional onAir IP Panel 1 Guide de référence
- Catégorie
- Stroboscopes
- Taper
- Guide de référence

Model ID: ONAIRPANEL1IP
Quick Reference Guide
English EN
Español ES
Français FR
Deutsch DE
Nederlands NL

1
EN
QUICK REFERENCE GUIDE
onAir IP Panel 1 QRG Rev. 8
About This Guide
The onAir IP Panel 1 Quick Reference Guide (QRG) has basic product information such as mounting, menu options, and
DMX values. Download the User Manual from www.chauvetprofessional.com for more details.
Disclaimer
The information and specifications contained in this QRG are subject to change without notice.
LIMITED WARRANTY
FOR WARRANTY REGISTRATION AND COMPLETE TERMS AND CONDITIONS PLEASE VISIT OUR WEBSITE.
For Customers in the United States and Mexico: www.chauvetlighting.com/warranty-registration.
For Customers in the United Kingdom, Republic of Ireland, Belgium, the Netherlands, Luxembourg, France, and
Germany: www.chauvetlighting.eu/warranty-registration.
Chauvet warrants that this product shall be free from defects in material and workmanship under normal use, for the
period specified in, and subject to the exclusions and limitations set forth in the full limited warranty on our website. This
warranty extends only to the original purchaser of the product and is not transferable. To exercise rights under this
warranty, you must provide proof of purchase in the form of an original sales receipt from an authorized dealer that shows
the product name and date of purchase. THERE ARE NO OTHER EXPRESS OR IMPLIED WARRANTIES. This
warranty gives you specific legal rights. You may also have other rights that vary from state to state and country to
country. This warranty is valid only in the United States, United Kingdom, Republic of Ireland, Belgium, the Netherlands,
Luxembourg, France, Germany and Mexico. For warranty terms in other countries, please consult your local distributor.
Safety Notes
These Safety Notes include important information about installation, use, and maintenance.
• The luminaire should be positioned so that prolonged staring into the luminaire at a distance closer than 19.7 in
(50 cm) is not expected.
• If the external flexible cable or cord of this luminaire is damaged, it shall be replaced by a special cord or cord
exclusively available from the manufacturer or his service agent.
• The light source contained in this luminaire shall only be replaced by the manufacturer or his service agent or a
similar qualified person.
• The luminaire is intended for professional use only.
• DO NOT open this product. It contains no user-serviceable parts.
• DO NOT look at the light source when the product is on.
• To eliminate unnecessary wear and improve its lifespan, during periods of non-use completely disconnect the
product from power via breaker or by unplugging it.
• CAUTION: When transferring product from extreme temperature environments, (e.g. cold truck to warm humid
ballroom) condensation may form on the internal electronics of the product. To avoid causing a failure, allow
product to fully acclimate to the surrounding environment before connecting it to power.
• CAUTION: This product’s housing may be hot when lights are operating.
• Mount this product in a location with adequate ventilation, at least 20 in (50 cm) from adjacent surfaces.
• DO NOT leave any flammable material within 7.87 in (20 cm) of this product while operating or connected to power.
• USE a safety cable when mounting this product overhead.
• DO NOT submerge this product (IP65). Regular outdoor operation is fine.
• DO NOT operate this product if the housing, lenses, or cables appear damaged.
• DO NOT connect this product to a dimmer or rheostat.
• ONLY connect this product to a grounded and protected circuit.
• ONLY use the hanging/mounting bracket or the handles to carry this product.
• In the event of a serious operating problem, stop using immediately.
• The maximum ambient temperature is 113 °F (45 °C). Do not operate this product at higher temperatures.
• The minimum startup temperature is -4°F (-20°C). Do not start the product at lower temperatures.
• The minimum ambient temperature is -22°F (-30°C). Do not operate the product at lower temperatures.
FCC Compliance
This device complies with Part 15 Part B of the FCC Rules. Operation is subject to the following two conditions:
1. This device may not cause harmful interference, and
2. This device must accept any interference received, including interference that may cause undesired operation.
Any changes or modifications not expressly approved by the party responsible for compliance could void the user's
authority to operate the equipment.
RF Exposure Warning for North America, and Australia
Warning! This equipment complies with FCC radiation exposure limits set forth for an uncontrolled environment. This
equipment should be installed and operated with a minimum distance of 20cm between the radiator and your body. This
transmitter must not be co-located or operating in conjunction with any other antenna or transmitter.
Contact
Outside the U.S., U.K., Ireland, Benelux, France, Germany, or Mexico, contact your distributor to request support or
return a product. Refer to Contact Us at the end of this QRG for contact information.
What is Included
• onAir IP Panel 1
• Seetronic Powerkon IP65 cable
• Omega bracket with mounting hardware
•Junior pin
• Quick Reference Guide

EN
2
onAir IP Panel 1 QRG Rev. 8
QUICK REFERENCE GUIDE
AC Power
This product has an auto-ranging power supply that can work with an input voltage range of 100–240 VAC, 50/60 Hz.
Power Linking
You can link up to 7 onAir IP Panel 1 products at 100 V, 8 products at 120 V, 15 products at 208 V, 16 products at
230 V, or 17 products at 240 V. Never exceed this number. Power linking cords can be purchased separately.
AC Plug
DC Power
This product has a 3-pin IP65 XLR power input port that can work with an input voltage of 28 V DC which is SELV voltage
supplied by short-circuit-proof power supply.
Signal Connections
The onAir IP Panel 1 will work with a controller or controller software using a wired DMX connection, a wireless
Lumenradio CRMX™ connection, or an Ethernet connection, If using other Art-Net™ or sACN-compatible products with
the onAir IP Panel 1, each can be controlled individually on a single network. See the User Manual for information about
how to connect and configure the product for these signals.
Control Personalities
The onAir IP Panel 1 uses DMX, CRMX™, Art-Net™, and sACN for its control personalities: 1Ch, 3Ch, 4Ch, 5Ch,
6Ch, 8Ch1, 8Ch2, 10Ch, 11Ch, 15Ch1, 15Ch2, 16Ch, XYBasic(6), and XYExtended(10).
DMX Connection
The onAir IP Panel 1 will work with a DMX controller using a 5-pin DMX data connection or a wireless CRMX™
connection. A DMX Primer is available from www.chauvetprofessional.com.
Art-Net™ Connection
Art-Net™ is an Ethernet protocol that uses TCP/IP which transfers a large amount of DMX512 data using an Neutrik®
etherCON® RJ45 connection over a large network. An Art-Net™ protocol document is available from
www.chauvetprofessional.com. Chauvet Professional recommends using unicast Art-Net™ for best results.
Art-Net™ designed by and copyright Artistic Licence Holdings Ltd.
sACN Connection
Also known as ANSI E1.31, Streaming-ACN is an Ethernet protocol that uses the layering and formatting of Architecture
for Control Networks to transport DMX512 data over IP or any other ACN compatible network.
RDM (Remote Device Management)
Remote Device Management, or RDM, is a standard for allowing DMX-enabled devices to communicate bi-directionally
along existing DMX cabling. Check the DMX controller’s User Manual or with the manufacturer as not all DMX controllers
have this capability. The onAir IP Panel 1 supports RDM protocol that allows feedback to make changes to menu map
options. Download the User Manual from www.chauvetprofessional.com for more details.
USB Software Update
The onAir IP Panel 1 allows for software update through USB using the built-in USB port. To update the software using
USB flash drive, do the following:
1. Power on the fixture and plug the flash drive into the USB port.
2. Once the flash drive has been detected, the message “Upgrade Firmware” will be displayed. Press <ENTER>.
• If a different message appears on the display, search for the updated software in the Main Menu (Update
Firmware) and select from Only This Unit, Multiple Units, or Other Fixture Type. A list of the software
update files will be displayed.
3. Select the file that needs to be uploaded. The message "Are you sure?" will be displayed. Press <ENTER>.
4. If the selected file is correct, the upgrade will be completed. Restart the fixture.
• If the selected file is incorrect, the upgrade will fail, and the display will go back to the main interface. Repeat
steps 1-3 using the correct file.
Connection Wire (U.S.) Wire (Europe) Screw Color
AC Live Black Brown Yellow/Brass
AC Neutral White Blue Silver
AC Ground Green/Yellow Green/Yellow Green
If AC power and DC power are input to the product at the same time, the product will automatically
give priority to AC power input.
To eliminate unnecessary wear and improve its lifespan, during periods of non-use completely
disconnect the product from power via breaker or by unplugging it.
The “Other Fixture Type” option can only be selected for connected products compatible with the
Upload 03 (the first 2 digits of the item code must be 03).
!

3
EN
QUICK REFERENCE GUIDE
onAir IP Panel 1 QRG Rev. 8
Wireless Operation
In optimal conditions, the onAir IP Panel 1 can operate up to 300 m (900 ft) away from the CRMX™ transmitter, The
CRMX™ receiver in the onAir IP Panel 1 must be paired with the CRMX™ transmitter for wireless operation.
Initial Setup
1. Turn the CRMX™ transmitter on.
2. Connect the CRMX™ transmitter to a DMX controller.
3. Place the onAir IP Panel 1 within 300 m from the CRMX™ transmitter.
4. Turn the onAir IP Panel 1 on.
Configuration
1. From the onAir IP Panel 1’s control panel, go to DMX Address.
2. Select the start address, as with any other DMX compatible product.
3. Go to Wireless Setting > Receive On/Off.
4. Select On. (The Signal Strength Indicator will show a ? in front of the bars)
5. Press the reset button on the CRMX™ transmitter. (The Signal Strength Indicator on the onAir IP Panel 1 will
show a ϟ in front of the bars for 3 seconds while a connection is established.)
Product Pairing
If the onAir IP Panel 1 has already been paired with the CRMX™ transmitter, the Signal Strength Indicator on top of the
display will show the strength of the signal. In this case, the onAir IP Panel 1 is ready to work in Wireless mode.
Pairing the onAir IP Panel 1 and a New CRMX™ Transmitter
1. From the onAir IP Panel 1 control panel, go to Wireless Setting > Receive Reset.
2. Select Yes.
3. From the CRMX™ transmitter, press <RESET>. The signal indicator on the transmitter will flash.
4. Once the transmitter has found the onAir IP Panel 1, the signal indicator on the CRMX™ transmitter will
illuminate solid.
5. The display screen on the onAir IP Panel 1 will show the strength of the signal.
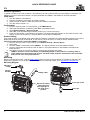
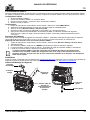
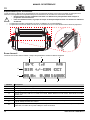
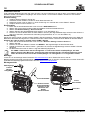
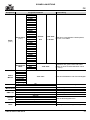
Mounting
Before mounting this product, read the Safety Notes. Make sure the mounting clamps are capable of supporting the
weight of the product. For our CHAUVET Professional line of mounting clamps, go to http://trusst.com/products.
Mounting Diagram
CRMX™ operation can be interrupted or inhibited by people or liquid masses, including water or
snow, between the transmitter and receiver. For best results, keep the area between the transmitter
and receiver clear of any liquid masses.
Safety cable
Omega
bracket
Mounting
clamp
Secure the safety
cable using the
passageways on
the back of the
product Junior pin
Junior pin screw

EN
4
onAir IP Panel 1 QRG Rev. 8
QUICK REFERENCE GUIDE
Accessory Slots
The onAir IP Panel 1 has 2 accessory slots that can be accessed by pressing the accessory slot tabs inward and opening
the hinged accessory slot cover.
• The back slot is for a diffuser or intensifier.
• The front slot is for accessories such as a honeycomb or barndoors.
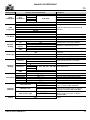
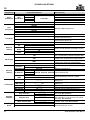
Home Screen
The home screen of the onAir IP Panel 1 shows the current settings and status of the product.
• Do not use when the diffuser is removed. The diffuser cannot be removed when the fixture is
powered on.
• For fixed mounted luminaires, the risk group shall not exceed RG1 at the distance obtaining 500 lx.
Number Description
1Current product temperature
2Current wireless signal status
3Current preset or preset bank
4Middle line shows current control mode. Shows DIM +/-GRN CCT in CCT mode, DIM HUE SAT in HSV
mode, DIM X Y in XY Control mode, Master Mode in master mode, Slave Mode in slave mode, etc.
5Bottom line shows details of the current control mode
6Current dimmer or intensity value (00.0–100%) in CCT, HSV, or XY Control mode
7
Current +/- green value (-0.25–+0.25) in CCT mode, hue value (000–360°) in HSV mode, or X value
(0.00–0.850) in XY Control mode
8Current color temperature (2800–8000K) in CCT mode, saturation value (000–255) in HSV mode, or Y
value (0.00–0.850) in XY Control mode
!
876
5
4
321

5
EN
QUICK REFERENCE GUIDE
onAir IP Panel 1 QRG Rev. 8
Control Panel Description
Menu Map
Refer to the onAir IP Panel 1 product page on
www.chauvetprofessional.com
for the latest menu map.
Button/Knob Function
<MENU> Exits from the current menu or function
<ENTER> Enables the currently displayed menu or sets the currently selected value into the selected function
<UP> Navigates upwards through the menu list or increases the numeric value when in a function
<DOWN> Navigates downwards through the menu list or decreases the numeric value when in a function
<DIM/INTENSITY> Increases or decreases the dimmer value or intensity
<HUE> Increases or decreases the hue value or X value
<CCT/SATURATION>
Increases or decreases the color temperature, saturation, or Y value
<PRESET A/B> Toggles between A presets (built-in) and B presets (custom)
<PRESET> (x8) Selects a preset. Hold for 3 seconds to save the current look to the selected B preset.
Main Level Programming Levels Description
Protocol
DMX512
Sets the control protocolArtnet
sACN
DMX
Address 001–509* Selects DMX address (*Highest channel
restricted to personality chosen)
DMX Channel
1Ch
Preset CCTs Hue <-25–25> 1-channel: selects a preset CCT and hue
Manual Color
Mixer
Red <000–255>
1-channel: combine red, green, blue, and
white to make a custom color (0–100%)
Green <000–255>
Blue <000–255>
White <000–255>
3Ch 3-channel: dimmer, color temperature, hue
4Ch 4-channel: RGBW
5Ch 5-channel: 16-bit dimmer, color temperature,
hue, strobe
6Ch 6-channel: dimmer, RGBW, strobe
8Ch1 8-channel: RGBW 1 and 2
8Ch2 8-channel: 16-bit RGBW
10Ch 10-channel: dimmer, RGBW 1 and 2, strobe
11Ch 11-channel: dimmer, RGBW, strobe, color
temperature, hue, effect macros and speed,
control
15Ch1 15-channel: 16-bit dimmer, 16-bit RGBW,
strobe, color temperature, hue, effect
macros and speed
15Ch2 15-channel: dimmer, RGBW 1 and 2, strobe,
color temperature, hue, effect macros and
speed, control
16Ch 16-channel: 16-bit RGBW 1 and 2
XYBasic(6) 6-channel: 16-bit dimmer, 16-bit X, 16-bit Y
XYExtended(10) 10-channel: 16-bit dimmer, 16-bit X, 16-bit Y,
strobe, effect macros and speed, control
Static
CCT Control Correlated color temperature control
HSV Control Hue, saturation, value control
XY Control X and Y coordinate control
Preset CCTs
2800K
Dimmer
Hue
<000–255>
<-25–25>
Selects preset color temperature, dimmer
and hue
2900K
3000K
3100K
3200K
3300K
3400K

EN
6
onAir IP Panel 1 QRG Rev. 8
QUICK REFERENCE GUIDE
Static
(cont.)
Preset CCTs
(cont.)
3500K
Dimmer
Hue
<000–255>
<-25–25>
Selects preset color temperature, dimmer
and hue
3600K
3700K
3800K
3900K
4000K
4100K
4200K
4300K
4400K
4500K
4600K
4700K
4800K
4900K
5000K
5100K
5200K
5300K
5400K
5500K
5600K
5700K
6000K
6500K
7000K
7500K
8000K
Manual Color
Mixer
Red
<000–255> Combine red, green, blue, and white to
make custom color (0–100%)
Green
Blue
White
Effect
Macros
Color Chase
<001–100> Selects effect macro and speed
Police Car
Firetruck
Fire
Clouds
Fireworks
Paparazzi
Lightning
Red Shift On Enables or disables red shift
Off
Master/Slave Master Standalone mode
Slave Slave mode
DMX Loss
Hold Last Holds last signal received
Stop DMX Holds output
Blackout Blacks out the product
Dimmer
Curve
S Curve
Sets the dimmer curve
Linear
Square
Inverse Square
Dimmer
Mode
Off Instantaneous dimmer
Dimmer 1–3 Dimmer mode, fast (1) to slow (3)
Main Level Programming Levels Description

7
EN
QUICK REFERENCE GUIDE
onAir IP Panel 1 QRG Rev. 8
Color
Calibration
Off Color calibration off
User
Calibration
Red
<125–255>
Sets maximum red LED value
Green Sets maximum green LED value
Blue Sets maximum blue LED value
White Sets maximum white LED value
Factory Calibration Color calibration set by factory
LED
Frequency
600Hz
Sets the Pulse Width Modulation frequency
1200Hz
2000Hz
4000Hz
6000Hz
25KHz
Fan Mode
Auto Sets the fan to auto mode
On Sets the fan to always on
Off Sets the fan to always off
Silent Sets the fan to silent
Wireless
Setting
Receive On/
Off
Off Enables/disables CRMX™
On
Receive
Reset
No Resets wireless receiver
Yes
Wireless To
DMX
No Enables/disables wireless to DMX
Yes
Back Light
10S
Turns off display after 10 seconds of inactivity
30S Turns off display after 30 seconds
2Min Turns off display after 2 minutes of
Always On Display always on
Ethernet
Setting
Universe 000–255 (Art-net™) Sets the Art-Net™ or sACN universe
001–256 (sACN)
Start Channel 001–512 Sets the starting channel
IP Address
2
000–255 . 000–255 . 000–255
Sets the IP address10
239
Ethernet To
DMX
No Enables/disables Ethernet to DMX
Yes
Information
Fixture Hours
<_ _ _ _ _H> Shows total hours the product has been
powered on
LED Hours <_ _ _ _ _H> Shows total hours the LEDs have been
powered on
Disp Version <V_._ _> Shows current display version
Drv Version <V_._ _> Shows current driver version
Net Version <V_._ _> Shows current net version
UID 21A40139_ _ _ _ Shows product UID
Upgrade
Firmware
Only This Unit _ _ _ _ _ _.CHL Selects an update file for this product, or
shows “No such file!”
...
Multiple Units _ _ _ _ _ _.CHL Selects an update file for this and connected
onAir IP Panel 2 products, or shows
“No such file!”
...
Other Fixture Type _ _ _ _ _ _.CHL Selects an update file for other connected
products, or shows “No such file!”
...
Factory
Reset
No Resets the product to factory default settings
Yes
Main Level Programming Levels Description

EN
8
onAir IP Panel 1 QRG Rev. 8
QUICK REFERENCE GUIDE
DMX Values
XYExtended(10)
XYBasic(6)
16Ch
Channel Function Value Percent/Setting
1 Dimmer 000 255 0–100%
2 Fine dimmer 000 255 0–100%
3 X coordinate 000 255 0–100%
4 Fine X coordinate 000 255 0–100%
5 Y coordinate 000 255 0–100%
6 Fine Y coordinate 000 255 0–100%
7Strobe 000 010 No function
011 255 Strobe, slow to fast
8 Effect macros
000 010 No function
011 039 Color chase
040 068 Police car
069 096 Firetruck
097 125 Fire
126 154 Clouds
155 182 Fireworks
183 211 Paparazzi
212 240 Lightning
241 255 No function
9 Effect macro speed 000 255 Speed, slow to fast
10 Control 000 255 See the Control Chart
Channel Function Value Percent/Setting
1 Dimmer 000 255 0–100%
2 Fine dimmer 000 255 0–100%
3 X coordinate 000 255 0–100%
4 Fine X coordinate 000 255 0–100%
5 Y coordinate 000 255 0–100%
6 Fine Y coordinate 000 255 0–100%
Channel Function Value Percent/Setting
1Red 1 000 255 0–100%
2Fine red 1 000 255 0–100%
3Green 1 000 255 0–100%
4 Fine green 1 000 255 0–100%
5Blue 1 000 255 0–100%
6 Fine blue 1 000 255 0–100%
7White 1 000 255 0–100%
8 Fine white 1 000 255 0–100%
9Red 2 000 255 0–100%
10 Fine red 2 000 255 0–100%
11 Green 2 000 255 0–100%
12 Fine green 2 000 255 0–100%
13 Blue 2 000 255 0–100%
14 Fine blue 2 000 255 0–100%
15 White 2 000 255 0–100%
16 Fine white 2 000 255 0–100%

9
EN
QUICK REFERENCE GUIDE
onAir IP Panel 1 QRG Rev. 8
15Ch2
15Ch1
Channel Function Value Percent/Setting
1 Dimmer 000 255 0–100%
2Red 1 000 255 0–100%
3Green 1 000 255 0–100%
4Blue 1 000 255 0–100%
5White 1 000 255 0–100%
6Red 2 000 255 0–100%
7Green 2 000 255 0–100%
8Blue 2 000 255 0–100%
9White 2 000 255 0–100%
10 Strobe 000 010 No function
011 255 Strobe, slow to fast
11 Color temperature 000 255 See the Color Temperature Chart
12 Hue 000 001 0
002 255 -25–+25
13 Effect macros
000 010 No function
011 039 Color chase
040 068 Police car
069 096 Firetruck
097 125 Fire
126 154 Clouds
155 182 Fireworks
183 211 Paparazzi
212 240 Lightning
241 255 No function
14 Effect macro speed 000 255 Speed, slow to fast
15 Control 000 255 See the Control Chart
Channel Function Value Percent/Setting
1 Dimmer 000 255 0–100%
2 Fine dimmer 000 255 0–100%
3Red 000 255 0–100%
4Fine red 000 255 0–100%
5Green 000 255 0–100%
6Fine green 000 255 0–100%
7Blue 000 255 0–100%
8 Fine blue 000 255 0–100%
9White 000 255 0–100%
10 Fine white 000 255 0–100%
11 Strobe 000 010 No function
011 255 Strobe, slow to fast
12 Color temperature 000 255 See the Color Temperature Chart
13 Hue 000 001 0
002 255 -25–+25

EN
10
onAir IP Panel 1 QRG Rev. 8
QUICK REFERENCE GUIDE
11Ch
10Ch
14 Effect macros
000 010 No function
011 039 Color chase
040 068 Police car
069 096 Firetruck
097 125 Fire
126 154 Clouds
155 182 Fireworks
183 211 Paparazzi
212 240 Lightning
241 255 No function
15 Effect macro speed 000 255 Speed, slow to fast
Channel Function Value Percent/Setting
1 Dimmer 000 255 0–100%
2Red 000 255 0–100%
3Green 000 255 0–100%
4Blue 000 255 0–100%
5White 000 255 0–100%
6Strobe 000 010 No function
011 255 Strobe, slow to fast
7 Color temperature 000 255 See the Color Temperature Chart
8Hue 000 001 0
002 255 -25–+25
9 Effect macros
000 010 No function
011 039 Color chase
040 068 Police car
069 096 Firetruck
097 125 Fire
126 154 Clouds
155 182 Fireworks
183 211 Paparazzi
212 240 Lightning
241 255 No function
10 Effect macro speed 000 255 Speed, slow to fast
11 Control 000 255 See the Control Chart
Channel Function Value Percent/Setting
1 Dimmer 000 255 0–100%
2Red 1 000 255 0–100%
3Green 1 000 255 0–100%
4Blue 1 000 255 0–100%
5White 1 000 255 0–100%
6Red 2 000 255 0–100%
7Green 2 000 255 0–100%
8Blue 2 000 255 0–100%
9White 2 000 255 0–100%
10 Strobe 000 010 No function
011 255 Strobe, slow to fast
Channel Function Value Percent/Setting

11
EN
QUICK REFERENCE GUIDE
onAir IP Panel 1 QRG Rev. 8
8Ch2
8Ch1
6Ch
5Ch
4Ch
Channel Function Value Percent/Setting
1Red 000 255 0–100%
2Fine red 000 255 0–100%
3Green 000 255 0–100%
4Fine green 000 255 0–100%
5Blue 000 255 0–100%
6 Fine blue 000 255 0–100%
7White 000 255 0–100%
8 Fine white 000 255 0–100%
Channel Function Value Percent/Setting
1Red 1 000 255 0–100%
2Green 1 000 255 0–100%
3Blue 1 000 255 0–100%
4White 1 000 255 0–100%
5Red 2 000 255 0–100%
6Green 2 000 255 0–100%
7Blue 2 000 255 0–100%
8White 2 000 255 0–100%
Channel Function Value Percent/Setting
1 Dimmer 000 255 0–100%
2Red 000 255 0–100%
3Green 000 255 0–100%
4Blue 000 255 0–100%
5White 000 255 0–100%
6Strobe 000 010 No function
011 255 Strobe, slow to fast
Channel Function Value Percent/Setting
1 Dimmer 000 255 0–100%
2 Fine dimmer 000 255 0–100%
3 Color temperature 000 255 See the Color Temperature Chart
4Hue 000 001 0
002 255 -25–+25
5Strobe 000 010 No function
011 255 Strobe, slow to fast
Channel Function Value Percent/Setting
1Red 000 255 0–100%
2Green 000 255 0–100%
3Blue 000 255 0–100%
4White 000 255 0–100%

EN
12
onAir IP Panel 1 QRG Rev. 8
QUICK REFERENCE GUIDE
3Ch
1Ch
Control Chart
Color Temperature Chart
Channel Function Value Percent/Setting
1 Dimmer 000 255 0–100%
2 Color temperature 000 255 See the Color Temperature Chart
3Hue 000 001 0
002 255 -25–+25
Channel Function Value Percent/Setting
1 Dimmer 000 255 0–100% (color set through display menu)
Value Percent/Setting Value Percent/Setting
000 007 No function 072 079 Dimmer mode 1 (fast)
008 015 Reset dimmer 080 087 Dimmer mode 2
016 023 Red shift on 088 095 Dimmer mode 3 (slow)
024 031 Red shift off 096 103 Fan mode auto
032 039 S-curve dimmer 104 111 Fan mode on
040 047 Linear dimmer 112 119 Fan mode off
048 055 Square dimmer 120 127 Fan mode silent
056 063 Inverse square dimmer 128 255 Reserved for future use
064 071 Dimmer mode off
Value Percent/Setting Value Percent/Setting
000 005 No function 125 131 4500K
006 012 2800K 132 138 4600K
013 019 2900K 139 145 4700K
020 026 3000K 146 152 4800K
027 033 3100K 153 159 4900K
034 040 3200K 160 166 5000K
041 047 3300K 167 173 5100K
048 054 3400K 174 180 5200K
055 061 3500K 181 187 5300K
062 068 3600K 188 194 5400K
069 075 3700K 195 201 5500K
076 082 3800K 202 208 5600K
083 089 3900K 209 215 5700K
090 096 4000K 216 222 6000K
097 103 4100K 223 229 6500K
104 110 4200K 230 236 7000K
111 117 4300K 237 243 7500K
118 124 4400K 244 255 8000K

13
ES
GUÍA DE REFERENCIA RÁPIDA
onAir IP Panel 1 GRR Rev. 8
Acerca de Esta Guía
La Guía de Referencia Rápida (GRR) del onAir IP Panel 1 contiene información básica sobre el producto, como montaje,
opciones de menú y valores DMX. Descargue el Manual de Usuario de www.chauvetprofessional.com para información más detallada.
Exención de Responsabilidad
La información y especificaciones contenidas en esta GRR están sujetas a cambio sin previo aviso.
GARANTÍA LIMITADA
PARA VER EL REGISTRO DE GARANTÍA Y LOS TÉRMINOS Y CONDICIONES COMPLETOS, VISITE NUESTRO SITIO WEB.
Para clientes en los Estados Unidos y México: www.chauvetlighting.com/warranty-registration.
Para clientes en Reino Unido, República de Irlanda, Bélgica, Países Bajos, Luxemburgo, Francia y Alemania:
www.chauvetlighting.eu/warranty-registration.
Chauvet garantiza que este producto estará libre de defectos de material y mano de obra en condiciones de uso normales, durante el
periodo especificado, sujeto siempre a las exclusiones y limitaciones establecidas en la garantía limitada completa de nuestro sitio web.
Esta garantía se concede únicamente al comprador original del producto y no es transferible. Para ejercer los derechos que otorga
esta garantía, usted debe proporcionar una prueba de compra en forma de un recibo de compra original, expedido por un distribuidor
autorizado, donde figure el nombre del producto y la fecha de compra. NO EXISTEN OTRAS GARANTÍAS EXPRESAS NI IMPLÍCITAS.
Esta garantía le otorga derechos legales específicos. Es posible que a usted le asistan otros derechos, que variarán dependiendo del
estado o del país. Esta garantía solamente es válida en los Estados Unidos, Reino Unido, República de Irlanda, Bélgica, Países Bajos,
Luxemburgo, Francia, Alemania y México. Para conocer los términos de garantía en otros países, consulte a su distribuidor local.
Notas de Seguridad
• La luminaria debe colocarse de forma que no sea previsible que se mire fijamente hacia ella a una distancia menor de 19,7” (50 cm).
• Si se daña el cable externo flexible de esta luminaria, se sustituirá con un cable especial o con un cable disponible
exclusivamente a través del fabricante o de su agente de servicio técnico.
• Solo el fabricante, su agente de servicio o un técnico de similar cualificación podrán reemplazar la fuente de luz
contenida en esta luminaria.
• La luminaria está destinada exclusivamente a un uso profesional.
• NO abra este producto. No contiene piezas reparables por el usuario.
• NO mire a la fuente de luz cuando el producto esté encendido.
• Para evitar un desgaste innecesario y alargar su vida útil, desconecte complemente el producto de la alimentación,
mediante el interruptor o desenchufándolo, durante los periodos en los que no se use.
• CUIDADO: La carcasa de este producto está caliente cuando las luces están en funcionamiento.
• Monte este producto en una ubicación con ventilación adecuada, al menos a 20'' (50 cm) de superficies adyacentes.
• NO deje ningún material inflamable a menos de 7,87” (20 cm) de este producto mientras esté funcionando o
conectado a la alimentación.
•
Cuidado: cuando transfiera el producto desde ambientes con temperatura extrema (p. ej., del remolque frío de un camión
a una sala de baile con calor y humedad), puede formarse condensación en la electrónica interna del producto. Para evitar
que se produzca una avería, deje que el producto se aclimate completamente al ambiente antes de conectar la alimentación.
• USE un cable de seguridad cuando monte este producto en lo alto.
• NO sumerja este producto (IP65). La operación temporal en exteriores es correcta.
• NO ponga en funcionamiento este producto si sospecha que la carcasa, lentes o cables están dañados.
• NO conecte este producto a un atenuador o reostato.
• Conecte este producto SOLO a un circuito con toma de tierra y protegido.
• Use SOLAMENTE los soportes de colgar/montar o las asas para mover este producto.
• En caso de un problema grave de funcionamiento, deje de usarlo inmediatamente.
• La máxima temperatura ambiente es de 113 °F (45 °C). No haga funcionar este producto a temperaturas más altas.
• La temperatura de inicio máxima es de -4 °F (-20 °C). No ponga en funcionamiento el producto a temperaturas más bajas.
• La temperatura ambiente mínima es de -22 °F (-30 °C). No haga funcionar el producto a temperaturas más bajas.
Cumplimiento de la FCC
Este dispositivo cumple la parte 15, parte B de las normas FCC. El funcionamiento está supeditado al cumplimiento de estas dos condiciones:
1. Este dispositivo no puede causar interferencias perjudiciales; y
2. Este dispositivo debe aceptar cualquier interferencia recibida, incluyendo las interferencias que puedan causar
un funcionamiento no deseado.
Cualquier cambio o modificación que no haya sido expresamente autorizado por la parte responsable de conformidad
puede anular la potestad del usuario para hacer funcionar el equipo.
Advertencia de exposición a RF para América del Norte y Australia
¡Advertencia!
Este equipo cumple los límites FCC de exposición a radiación establecidos para un entorno no controlado.
Este equipo debe instalarse y manejarse con una distancia mínima de 20 cm entre el radiador y su cuerpo. Este
transmisor no se debe situar junto a ninguna otra antena o transmisor ni hacerse funcionar en combinación con ellos.
Contacto
Fuera de EE. UU., Reino Unido, Irlanda, Benelux, Francia, Alemania o México póngase en contacto con su distribuidor
para solicitar asistencia o devolver un producto. Consulte Contact Us al final de este GRR para información de contacto.
Qué va Incluido
• 4 onAir IP Panel 1
• Cable de Seetronic Powerkon IP65
• Soporte omega con materiales de montaje
• Pin junior
• Guía de Referencia Rápida

ES
14
onAir IP Panel 1 GRR Rev. 8
GUÍA DE REFERENCIA RÁPIDA
Corriente Alterna
Este producto tiene una fuente de alimentación con detección automática que puede funcionar con un rango de tensión
de entrada de100 a 240 VCA, 50/60 Hz.
Alimentación en cadena
Puede enlazar hasta 7 productos onAir IP Panel 1 a 100 V, 8 productos a 120 V, 15 productos a 208 V, 16 productos a
230 V o 17 productos a 240 V. Los cables de alimentación en cadena se pueden adquirir por separado.
Enchufe CA
Corriente continua
Este producto dispone de un puerto de entrada XLR IP65 de 3 pines que funciona con una tensión de entrada de 28 V
CC, la cual es tensión SELV suministrada por una fuente de alimentación con protección contra cortocircuitos.
Conexiones de señal
Puede enlazar el onAir IP Panel 1 a un controlador o software controlador usando una conexión DMX cableada, una
conexión CRMX™ de Lumenradio inalámbrica o una conexión Ethernet. Si está usando otros productos compatibles con
Art-Net™ o sACN, el onAir IP Panel 1 puede controlar cada uno individualmente en una sola red. Consulte el Manual de
usuario para obtener información sobre cómo conectar y configurar el producto para estas señales.
Personalidades de control
El onAir IP Panel 1 usa DMX, CRMX™, Art-Net™ y sACN-Net para sus personalidades de control: 1Ch, 3Ch, 4Ch,
5Ch, 6Ch, 8Ch1, 8Ch2, 10Ch, 11Ch, 15Ch1, 15Ch2, 16Ch, XYBasic(6), y XYExtended(10).
Conexión DMX
El onAir IP Panel 1 funcionará con un controlador DMX usando una conexión serie DMX de 5 pines o una conexión
CRMX™ inalámbrica. Hay un Manual DMX disponible en www.chauvetprofessional.com.
Conexión Art-Net™
Art-Net™ es un protocolo Ethernet que utiliza TCP/IP para transferir gran cantidad de datos DMX512 usando una
conexión etherCON RJ45 sobre una red de gran tamaño. Hay disponible un documento sobre el protocolo Art-Net™
desde www.chauvetprofessional.com. Chauvet Professional recomienda la utilización de modo Unicast para mejores
resultados. Art-Net™ diseñado y copyright por Artistic Licence Holdings Ltd.
Conexión sACN
También conocido como ANSI E1.31, el streaming ACN es un protocolo Ethernet que usa las capas y formato de Architecture for Control
Networks (arquitectura para redes de control) para transportar datos DMX512 sobre IP o cualquier otra red compatible con ACN.
RDM (gestión remota del dispositivo)
Remote Device Management (gestión remota del dispositivo) o RDM, es un estándar que permite a los dispositivos con
capacidad DMX una comunicación bidireccional por un cableado DMX existente. El onAir IP Panel 1 admite protocolo
RDM, que posibilita información para supervisar cambiar las opciones del mapa de menú. Descargue el manual de
usuario de www.chauvetprofessional.com para una información más detallada.
Actualización de software USB
El onAir IP Panel 1 permite la actualización de software por USB utilizando el puerto USB incorporado. Para actualizar el
software utilizando una unidad USB, haga lo siguiente:
1. Encienda el aparato y conecte la unidad USB al puerto USB.
2. Una vez detectada la unidad, aparecerá el mensaje “Upgrade Firmware (Actualizar firmware)”. Pulse <ENTER>.
• Si aparece un mensaje diferente en la pantalla, busque el software actualizado en el menú (Update
Firmware) y seleccione de Only This Unit, Multiple Units o Other Fixture Type. Se mostrará una lista de
los archivos de software actualizados.
3. Seleccione el archivo que necesite cargarse. Aparecerá el mensaje “Are you sure? (¿Está seguro?)”. Pulse <
ENTER
>.
4. Si el archivo seleccionado es correcto, se completará la mejora. Reinicie el aparato.
• Si el archivo seleccionado es incorrecto, la mejora fallará y la pantalla volverá a la interfaz principal. Repita
los pasos 1–3 utilizando el archivo correcto.
Conexión Cable (EE.UU.) Cable (Europa) Color del tornillo
CA Cargado Negro Marrón Amarillo/Latón
CA Neutro Blanco Azul Plata
CA Tierra Verde/Amarillo Verde/Amarillo Verde
Si entra en el producto al mismo tiempo alimentación de CA y CC, el producto dará prioridad
inmediatamente a la entrada de alimentación de CA.
Para evitar un desgaste innecesario y alargar su vida útil, desconecte complemente el producto de la
alimentación, mediante el interruptor o desenchufándolo, durante los periodos en los que no se use.
La opción “Other Fixture Type” solo se puede seleccionar para productos conectados compatibles
con la Upload 03 (los primeros 2 dígitos del código del artículo deben ser 03).
!

15
ES
GUÍA DE REFERENCIA RÁPIDA
onAir IP Panel 1 GRR Rev. 8
Funcionamiento inalámbrica
En condiciones óptimas, el onAir IP Panel 1 puede funcionar a una distancia de hasta 300 m (900 ft) del transmisor
CRMX™. El receptor CRMX™ del onAir IP Panel 1 tiene que estar emparejado con el transmisor CRMX™ para el
funcionamiento inalámbrica.
Configuración inicial
1. Encienda el transmisor CRMX™.
2. Conecte el transmisor CRMX™ a un controlador DMX.
3. Sitúe el onAir IP Panel 1 a una distancia de hasta 300 m del transmisor CRMX™.
4. Encienda el onAir IP Panel 1.
Configuración
1. Desde el panel de control del onAir IP Panel 1 vaya a DMX Address.
2. Seleccione la dirección de inicio, al igual que con cualquier otro producto compatible con DMX.
3. Vaya a Wireless Setting > Receive On/Off.
4. Seleccione On. (en el indicador de potencia de señal aparecerá una ? delante de las barras)
5.
Pulse el botón de reinicio del transmisor W-DMX. (en el indicador de potencia de señal del onAir IP Panel 1
aparecerá ϟ delante de las barras durante 3 segundos mientras se establece la conexión.)
Emparejamiento de productos
Si el onAir IP Panel 1 ya se ha emparejado con el transmisor CRMX™, el indicador de potencia de señal en la parte
superior de la pantalla mostrará la potencia de la señal. En este caso, el onAir IP Panel 1 está listo para funcionar en
modo inalámbrica.
Emparejar el onAir IP Panel 1 con un nuevo transmisor CRMX™
1. Desde el panel de control del onAir IP Panel 1’s vaya a Wireless Setting > Receive Reset.
2. Seleccione Yes.
3. Desde el transmisor CRMX™, pulse <RESET>. El indicador de señal del transmisor parpadeara.
4. Una vez que el transmisor haya encontrado el onAir IP Panel 1, el indicador de señal del transmisor CRMX™ se
iluminara de forma constante.
5. La pantalla del onAir IP Panel 1 mostrará la intensidad de la señal.
Montaje
Antes de montar este producto, lea las Notas de Seguridad. Asegúrese de que las abrazaderas de montaje son capaces
de soportar el peso del producto. Para nuestra línea Chauvet de abrazaderas de montaje, visite http://trusst.com/
productcategory/truss-clamps/.
Diagrama de Montaje del Producto
Masas líquidas entre el transmisor y el receptor, como agua, nieve o personas, pueden interrumpir o
impedir el funcionamiento por CRMX™. Para mejores resultados, mantenga la zona entre el
transmisor y el receptor sin ninguna masa líquida.
Soporte
omega
Asegure el cable
de seguridad
usando el pasador
de la parte inferior
del aparato Pin junior
Tornillo de
pin junior
Cable de
seguridad
Abrazadera
de Montaje

ES
16
onAir IP Panel 1 GRR Rev. 8
GUÍA DE REFERENCIA RÁPIDA
Ranuras de accesorios
El onAir IP Panel 1 tiene 2 ranuras de accesorios a las que se puede acceder presionando hacia adentro las pestañas
de las ranuras de accesorios y abriendo la tapa articulada de la ranura de accesorios.
• La ranura posterior es para un difusor o intensificador.
• La ranura delantera es para accesorios como estructuras apanaladas o viseras.
Pantalla de inicio
La pantalla de inicio del onAir IP Panel 1 muestra la configuración actual y el estado del producto.
• No lo utilice si se ha retirado el difusor. El difusor no se puede quitar mientras el aparato está
encendido.
• Para luminarias de montaje fijo, el grupo de riesgo no debe superar RG1 a la distancia a la que se
obtienen 500 lux.
Numero Descripción
1Temperatura actual del producto
2Estado actual de la señal inalámbrica
3Preconfiguración o banco de preconfiguraciónes actual
4La línea del medio muestra el modo de control actual. Muestra “DIM +/-GRN CCT” en modo CCT, “DIM
HUE SAT” en modo HSV, “DIM X Y” en modo XY Control, “Master Mode” en modo Maestro, “Slave
Mode” en modo Esclavo, etc.
5La línea inferior muestra detalles del modo de control actual
6Valor actual de atenuador o intensidad (00.0–100%) en modo CCT, HSV, o XY Control
7Valor actual de +/- verde (-0,25–+0,25) en modo CCT, valor de tono (000–360) en modo HSV), o valor de
X (0.00–0.850) en modo XY Control
8Temperatura de color actual (2800–8000 K) en modo CCT, valor de saturación (000–255) en modo HSV,
o valor de Y (0.00–0.850) en modo XY Control
!
876
5
4
321

17
ES
GUÍA DE REFERENCIA RÁPIDA
onAir IP Panel 1 GRR Rev. 8
Descripción del Panel de Control
Mapa de Menú
Consulte la página del producto onAir IP Panel 1 en
www.chauvetprofessional.com
para ver el último mapa de menú.
Botón/mando
Función
<MENU> Sale del menú o función actual
<ENTER>
Habilita el menú actual o configura el valor seleccionado actualmente dentro de la función seleccionada
<UP> Navega hacia arriba por la lista de menú o aumenta el valor numérico cuando está en una función
<DOWN> Navega hacia abajo por la lista de menú o disminuye el valor numérico cuando está en una función
<DIM/INTENSITY> Aumenta o disminuye el valor del atenuador o la intensidad
<HUE> Aumenta o disminuye el valor del tono o el valor X
<CCT/SATURATION>
Aumenta o disminuye la temperatura de color, la saturación, o el valor Y
<PRESET A/B> Cambia entre las preconfiguraciónes A (integradas) y las preconfiguraciónes B (personalizadas)
<PRESET> (x8) Selecciona una preconfiguración. Mantenga pulsado 3 segundos para guardar la apariencia actual
a la preconfiguración B seleccionada.
Nivel Principal
Niveles de Programación Descripción
Protocol
DMX512
Selecciona el protocolo de controlArtnet
sACN
DMX
Address 001–509* Selecciona la dirección de inicio (*canal más
alto restringido a la elección de personalidad)
DMX Channel
1Ch
Preset CCTs Hue <-25–25> 1 canal: selecciona una CCT y tono
Manual Color
Mixer
Red <000–255> 1 canal: combina rojo, verde, azul y blanco
para generar un color personalizado (0–
100%)
Green <000–255>
Blue <000–255>
White <000–255>
3Ch
3 canales: atenuador, temperatura de color, tono
4Ch 4 canales: RGBW
5Ch 5 canales: atenuador de 16 bits, temperatura
de color, tono, estroboscopio
6Ch 6 canales: atenuador, RGBW, estroboscopio
8Ch1 8 canales: RGBW 1 y 2
8Ch2 8 canales: 16-bit RGBW
10Ch
10 canales: atenuador, RGBW 1 y 2, estroboscopio
11Ch 11 canales: atenuador, RGBW,
estroboscopio, temperatura de color, tono,
macros de efectos y velocidad, control
15Ch1 15 canales: atenuador de 16 bits, RGBW de
16 bits, estroboscopio, temperatura de color,
tono, macros de efectos y velocidad
15Ch2 15 canales: atenuador, RGBW 1 y 2,
estroboscopio, temperatura de color, tono,
macros de efectos y velocidad, control
16Ch 16 canales: RGBW de 16 bits 1 y 2
XYBasic(6) 6 canales: atenuador de 16 bits, X de 16
bits, Y de 16 bits
XYExtended(10) 10 canales: atenuador de 16 bits, X de 16
bits, Y de 16 bits, estroboscopio, macros de
efectos y velocidad, control
Static
CCT Control
Control de temperatura de color correlacionado
HSV Control Control de tono, saturación, valor
XY Control Control coordinado X e Y
Preset CCTs
2800K
Dimmer
Hue
<000–255>
<-25–25>
Seleccionada una temperatura de color
preestablecida, atenuador y tono
2900K
3000K
3100K
3200K
3300K

ES
18
onAir IP Panel 1 GRR Rev. 8
GUÍA DE REFERENCIA RÁPIDA
Static
(cont.)
Preset CCTs
(cont.)
3400K
Dimmer
Hue
<000–255>
<-25–25>
Seleccionada una temperatura de color
preestablecida, atenuador y tono
3500K
3600K
3700K
3800K
3900K
4000K
4100K
4200K
4300K
4400K
4500K
4600K
4700K
4800K
4900K
5000K
5100K
5200K
5300K
5400K
5500K
5600K
5700K
6000K
6500K
7000K
7500K
8000K
Manual Color
Mixer
Red
<000–255> Combina rojo, verde, azul y blanco para
generar un color personalizado (0–100%)
Green
Blue
White
Effect
Macros
Color Chase
<001–100> Seleccionada un macro de efecto y
velocidad
Police Car
Firetruck
Fire
Clouds
Fireworks
Paparazzi
Lightning
Red Shift On Activa/desactiva
el cambio a rojo
Off
Master/Slave Master Modo autónomo
Slave Modo esclavo
DMX Loss
Hold Last Mantiene la última señal recibida
Stop DMX Mantiene la salida actual
Blackout Pone el dispositivo en blackout
Dimmer
Curve
S Curve
Configura la curva del atenuador
Linear
Square
Inverse Square
Dimmer
Mode Off Atenuador lineal
Dimmer 1–3 Modos de atenuador rápido (1) a lento (3)
Nivel Principal
Niveles de Programación Descripción

19
ES
GUÍA DE REFERENCIA RÁPIDA
onAir IP Panel 1 GRR Rev. 8
Color
Calibration
Off Desactiva el calibración de color
User
Calibration
Red
<125–255>
Establece el valor máximo de LED rojo
Green Establece el valor máximo de LED verde
Blue Establece el valor máximo de LED azul
White Establece el valor máximo de LED blanco
Factory Calibration La calibración del color configurada de
fábrica
LED
Frequency
600Hz
Selecciona la frecuencia de emisión PWM
1200Hz
2000Hz
4000Hz
6000Hz
25KHz
Fan Mode
Auto Establece el ventilador a modo automático
On Establece el ventilador a siempre encendido
Off Establece el ventilador a siempre apagado
Silent Establece el ventilador a silencioso
Wireless
Setting
Receive On/
Off
Off Activa/desactiva CRMX™
On
Receive
Reset No Restablece el receptor inalámbrico
Yes
Wireless To
DMX No Activa/desactiva CRMX™ a DMX
Yes
Back Light
10S Retro-iluminación se apaga después de 10
segundos de inactividad
30S Retro-iluminación se apaga después de 30
segundos
2Min
Retro-iluminación se apaga después de 2 minutos
Always On
Retro-iluminación de la pantalla siempre activa
Ethernet
Setting
Universe 000–255 (Art-net™) Configura el universo de Art-Net™ o sACN
001–256 (sACN)
Start Channel 001–512 Configura la canal de inicio
IP Address
2
000–255 . 000–255 . 000–255
Configurar la dirección IP10
239
Ethernet To
DMX No Activa/desactiva ethernet a DMX
Yes
Information
Fixture Hours
<_ _ _ _ _H> Muestra el nombre total de las horas del
producto
LED Hours <_ _ _ _ _H> Muestra el total de horas de LED
Disp Version <V_._ _> Muestra instalada la versión de pantalla
Drv Version <V_._ _> Muestra instalada la versión de controladora
Net Version <V_._ _> Muestra instalada la versión de red
UID 21A40139_ _ _ _ Muestra la UID del producto
Upgrade
Firmware
Only This Unit _ _ _ _ _ _.CHL Muestra los archivos de actualización para
este producto, o muestra “No such file!”
...
Multiple Units _ _ _ _ _ _.CHL Muestra los archivos de actualización para
este producto y productos onAir IP Panel 2
conectados, o muestra “No such file!”
...
Other Fixture Type _ _ _ _ _ _.CHL Muestra los archivos de actualización para
otros productos conectados, o muestra
“No such file!”
...
Factory
Reset No Reinicia a la configuración de fábrica
Yes
Nivel Principal
Niveles de Programación Descripción
La page est en cours de chargement...
La page est en cours de chargement...
La page est en cours de chargement...
La page est en cours de chargement...
La page est en cours de chargement...
La page est en cours de chargement...
La page est en cours de chargement...
La page est en cours de chargement...
La page est en cours de chargement...
La page est en cours de chargement...
La page est en cours de chargement...
La page est en cours de chargement...
La page est en cours de chargement...
La page est en cours de chargement...
La page est en cours de chargement...
La page est en cours de chargement...
La page est en cours de chargement...
La page est en cours de chargement...
La page est en cours de chargement...
La page est en cours de chargement...
La page est en cours de chargement...
La page est en cours de chargement...
La page est en cours de chargement...
La page est en cours de chargement...
La page est en cours de chargement...
La page est en cours de chargement...
La page est en cours de chargement...
La page est en cours de chargement...
La page est en cours de chargement...
La page est en cours de chargement...
La page est en cours de chargement...
La page est en cours de chargement...
La page est en cours de chargement...
La page est en cours de chargement...
La page est en cours de chargement...
La page est en cours de chargement...
La page est en cours de chargement...
La page est en cours de chargement...
La page est en cours de chargement...
La page est en cours de chargement...
La page est en cours de chargement...
La page est en cours de chargement...
La page est en cours de chargement...
La page est en cours de chargement...
-
 1
1
-
 2
2
-
 3
3
-
 4
4
-
 5
5
-
 6
6
-
 7
7
-
 8
8
-
 9
9
-
 10
10
-
 11
11
-
 12
12
-
 13
13
-
 14
14
-
 15
15
-
 16
16
-
 17
17
-
 18
18
-
 19
19
-
 20
20
-
 21
21
-
 22
22
-
 23
23
-
 24
24
-
 25
25
-
 26
26
-
 27
27
-
 28
28
-
 29
29
-
 30
30
-
 31
31
-
 32
32
-
 33
33
-
 34
34
-
 35
35
-
 36
36
-
 37
37
-
 38
38
-
 39
39
-
 40
40
-
 41
41
-
 42
42
-
 43
43
-
 44
44
-
 45
45
-
 46
46
-
 47
47
-
 48
48
-
 49
49
-
 50
50
-
 51
51
-
 52
52
-
 53
53
-
 54
54
-
 55
55
-
 56
56
-
 57
57
-
 58
58
-
 59
59
-
 60
60
-
 61
61
-
 62
62
-
 63
63
-
 64
64


Chauvet Professional onAir IP Panel 1 Guide de référence
- Catégorie
- Stroboscopes
- Taper
- Guide de référence