Sony SRS-PC3DW Manuel utilisateur
- Catégorie
- Haut-parleurs
- Taper
- Manuel utilisateur

SRS-PC3DW.3-858-430-11.EFGS Page 1
SRS-PC3DW.3-858-430-11.EFGS Page 1
POWER
English
3-858-430-11(1)
Active Super
Woofer
SRS-PC3DW
Sony Corporation © 1996 Printed in Japan
Operating Instructions
Mode d’emploi
Bedienungsanleitung
Manual de instrucciones
Before operating the unit, please read this manual
thoroughly and retain it for future reference.
WARNING
To prevent fire of shock hazard, do not expose the
unit to rain or moisture.
To avoid electrical shock, do not open the cabinet.
Refer servicing to qualified personnel only.
Features
The Sony SRS-PC3DW is a compact-size woofer
equipped with a built-in power amplifier. This
woofer is designed for use with your speaker
equipped with a built-in power amplifier to
produce a dynamic sound of 25W output.
•The magnetically shielded design of the speaker
should have little effect on a PC monitor or
recorded tapes, etc. when placed close to them.
•The TURN OVER control to adjust the point
where the bass level of the woofer and the
connected speaker are balanced.
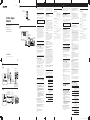
Connections (See fig. A)
Connecting to the active speaker
with output for woofer (SRS-PC41/
PC51/PC71 etc.) 1
You can adjust the volume of the woofer which is
linked to the volume of the connected speaker.
When connecting to the INPUT 2, 3
Use the connecting cord (Stereo mini plug ˜
Stereo mini plug) (not supplied).
Connecting to the active speaker
without output for woofer
(SRS-PC21 etc.) 2
When the speaker is connected to a monaural jack
of a radio, etc. the sound may not come through
the right connected speaker. When you use the
optional Sony plug adaptor PC-236HG, sound will
come through both connected speakers.
Connecting to a stereo phono type
headphones jack
Use the optional RK-G138HG connecting cord.
Notes
• You can connect phono and stereo mini plugs to the
INPUT 1,2 and 3 jacks. If you use these types of jacks at
the same time, you will have to adjust the volume of the
components because you will get the sound from all of
them.
• If your personal computer does not have audio output
jacks, you will have to install a sound board, etc.
Consult qualified personnel for details.
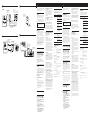
Power Source (See fig. B)
How to Use (See fig. C)
1 Turn the active speaker on.
2 Set the POWER switch to ON of the rear
side .
3 Press the STANDBY switch (Ø ON).
The power indicator lights up.
4 Adjust the volume with the VOLUME
control.
Adjust the balance of the volume between the
woofer and the active speaker.
5 Use the TURN OVER control to find the
point where the bass level of the
woofer and the connected speaker are
well balanced.
When connecting to the active speaker
with output for woofer
If the volume is adjusted once, the volume of the
woofer is adjusted automatically as it is linked to
the volume level of the active speaker.
When connecting to the active speaker
without output for woofer
Adjust the volume of the active speaker and the
woofer.
Playing the active speaker
See the operating instructions of the active
speaker.
A
1
2
xxx
B
C
Do not install the appliance in a confined space,
such as a bookcase or built-in cabinet.
to a wall outlet
à une prise murale
Woofer (rear)
Caisson de grave (arrière)
Power indicator
Voyant
d’alimentation
Active speaker (left)
Enceinte amplifiée (gauche)
Woofer (front)
Caisson de grave
(avant)
Active speaker (right)
Enceinte amplifiée
(droite)
Active speaker
(not supplied)
Enceinte amplifiée
(non fournie)
to output for woofer
(OUTPUT(WOOFER) etc.)
à la sortie du caisson de grave
(OUTPUT (WOOFER) etc.)
(rear)
(arrière)
(front)
(avant)
Woofer
Caisson de grave
Specifications
Amplifier section
Rated output 25 W
Input INPUT 1 (rear): Phono jacks
INPUT 2 (rear): Stereo mini jack
INPUT 3 (front): Stereo mini jack
Input impedance 4.7 kilohm (1 kHz)
Output AUDIO OUT (Stereo mini jack)
Impedance 22 kilohm (1 kHz)
Speaker section
System Low-range, bass-reflex type
Speaker unit Magnetically shielded, 90 mm (3
5
/8 in.)
dia.
Nominal impedance
4 ohm
Speaker sensitivity
83 dB/Wm
General
Power requirements
220 – 230 V AC, 50 Hz
Power consumption
25 W
Dimensions Approx. 132 mm x 271 mm x 222 mm
(w/h/d) (5
1
/4 x 10
3
/4 x 8
3
/4 in.) not
including projecting parts and controls
Mass Approx. 3 kg (6 lb. 10 oz)
AC cord length 2 m (78
3
/8 in.)
Supplied accessories
Connecting cord (stereo mini plug ˜
two phono plugs, 2 m) (1)
Please ask the dealer for detailed information about the
optional accessories available in your country.
Design and specifications are subject to change without
notice.
After listening, press the STANDBY switch (ø
OFF) of the front . The power indicator goes off.
Then, set POWER switch to OFF of the rear.
Precautions
On operating voltage
Operate the unit only on 220 – 230 V AC, 50 Hz.
On safety
•The nameplate indicating operating voltage,
power consumption, etc. is located on the rear
exterior of the woofer.
•Unplug the unit from the wall outlet when it is
not to be used for an extended period of time. To
disconnect the cord, pull it out by grasping the
plug. Never pull it out by the cord.
•Should any solid object or liquid fall into the unit,
disconnect the AC power cord, and have the unit
checked by qualified personnel before operating
it any further.
•The mains switch is located on the rear exterior.
On installation
•Do not leave the unit in a location near heat
sources, moisture, rain, or mechanical shock.
•Although this speaker system is magnetically
shielded, do not leave recorded tapes, watches,
personal credit cards, or floppy disks using
magnetic coding in front of the unit for an
extended period for precaution.
On cleaning the cabinet
Clean the cabinet with a soft cloth slightly
moistened with water or mild detergent solution.
Do not use alcohol, benzine, or thinner as they may
mar the finish.
If the TV picture or monitor display is
magnetically distorted
Although this woofer is magnetically shielded,
there may be cases that the picture on some TV
sets/personal computer sets may become
magnetically distorted. In such a case, turn off the
power of the TV set/personal computer set once,
and after 15 to 30 minutes turn it on again. For the
personal computer set, take the appropriate
measures such as data storage before turning it off.
When there seems to be no improvement, locate
the woofer further away from the TV set/personal
computer set. Furthermore, be sure not to place
objects in which magnets are attached or used near
the TV set/personal computer set, such as audio
racks, TV stands, toys, etc. These may cause
magnetic distortion to the picture due to their
interaction with the woofer.
If you have any questions or problems concerning
your system that are not covered in this manual,
please consult your nearest Sony dealer.
Troubleshooting
Should any problem persist after you have made
the following checks, consult your nearest Sony
service facility.
Avant la mise en service de ce système, veuillez
lire attentivement ce mode d’emploi et le conserver
pour toute référence ultérieure.
AVERTISSEMENT
Afin d’éviter tout risque d’incendie ou de choc
électrique, ne pas exposer ce système à la pluie ni à
l’humidité.
Afin d’éviter tout risque de choc électrique, ne pas
ouvrir le coffret. Pour toute réparation, faire appel
à un professionnel seulement.
Caractéristiques
Le Sony SRS-PC3DW est un système de caisson de
grave compact, intégrant un amplificateur. Ce
caisson est conçu pour être utilisé avec des
enceintes amplifiées et fournit un son dynamique
d’une puissance de 25 W.
•Le caisson de grave est blindé magnétiquement
et ne devrait pas affecter le moniteur PC ni les
cassettes enregistrées, etc. se trouvant à
proximité.
•La commande TURN OVER sert à ajuster le
niveau d’équilibre du grave du caisson et des
enceintes raccordées.
Connexions (Voir fig. A)
Connexion à une enceinte active
avec sortie pour caisson de grave
(SRS-PC41/PC51/PC71, etc.) 1
Vous pouvez ajuster le volume du caisson en
même temps que le volume de l’enceinte
raccordée.
Connexion avec INPUT 2,3
Utilisez le cordon de liaison (minifiche stéréo ˜
minifiche stéréo) (non fourni)
Connexion à une enceinte active
sans sortie pour caisson de grave
(SRS-PC21, etc.) 2
Si l’enceinte est raccordée à une prise
monophonique d’une radio, par exemple, le son
peut ne pas sortir sur le haut-parleur raccordé au
canal droit. Si vous utilisez l’adaptateur de fiche
Sony PC-236HG, disponible en option, le son
sortira par les deux enceintes raccordées.
Connexion à une prise casque stéréo de
type cinch
Utilisez le cordon de liaison RK-G138HG proposé
en option.
Remarques
• Vous pouvez brancher des fiches cinch et minifiches
stéréo aux prises INPUT 1, 2 et 3. Si vous utilisez ces
différents types de fiches en même temps, vous devrez
ajuster le volume des composants, car ils fourniront
directement le son.
• Si votre ordinateur n’a pas de prises de sortie audio,
vous devrez installer une carte son, etc. Consultez une
personne qualifiée à ce sujet.
Source d’alimentation
(Voir fig. B)
Utilisation (Voir fig. C)
1 Allumez l’enceinte active.
2 Réglez l’interrupteur POWER sur ON à
l’arrière du caisson.
3 Appuyez sur le commutateur STANDBY
(Ø ON).
Le voyant d’alimentation s’allume.
4 Ajustez le volume avec la commande
VOLUME.
Equilibrez le volume du caisson et celui de
l’enceinte active.
5 Utilisez la commande TURN OVER pour
trouver le point où le niveau de grave
du caisson et celui de l’enceinte
raccordée est équilibré.
Si vous raccordez l’enceinte active avec
sortie pour caisson de grave
Une fois que vous avez ajusté le volume, le volume
du caisson de grave est automatiquement réglé
avec celui de l’enceinte.
Français
Ne pas installer cet appareil dans un espace
confiné, tel qu’une étagère ou un placard mural.
to INPUT 1 (phono jacks) or
INPUT 2, 3 (stereo mini jack)
à INPUT 1 (prises cinch) ou
INPUT 2, 3 (minijack stéréo)
Si vous raccordez l’enceinte active sans
sortie pour caisson de grave
Ajustez le volume de l’enceinte active et du caisson
de grave.
Utilisation de l’enceinte active
Voir le mode d’emploi de l’enceinte active.
Quand vous n’écoutez plus, appuyez sur le
commutateur STANDBY (ø OFF) à l’avant du
caisson. Le voyant d’alimentation s’éteint. Réglez
ensuite l’interrupteur POWER sur OFF à l’arrière
du caisson.
Précautions
Tension de fonctionnement
Faites fonctionner le caisson sur le courant secteur
de 220 – 230 V, 50 Hz uniquement.
Sécurité
•La plaque signalétique indiquant la tension de
fonctionnement, la consommation et autres
informations se trouve à l’arrière du caisson.
•Débranchez le caisson de la prise murale si vous
prévoyez de ne pas l’utiliser pendant longtemps.
Pour débrancher le cordon, tirez sur la fiche. Ne
jamais tirer sur le cordon proprement dit.
•Si un solide ou un liquide pénétrait à l’intérieur
du caisson, débranchez le cordon d’alimentation
secteur et faites vérifier le caisson par un
professionnel avant de le remettre en service.
•L’interrupteur d’alimentation se trouve à l’arrière
du caisson.
Installation
•Ne laissez pas le caisson près d’une source de
chaleur ou dans un endroit exposé au soleil, à
l’humidité, à la pluie ou à des chocs mécaniques.
•Bien que le caisson soit blindé magnétiquement,
ne laissez jamais de cassettes enregistrées,
montres, cartes de crédit ou disquettes à code
magnétique longtemps devant le caisson, par
mesure de précaution.
Ne ttoyage du cottret
Si le coffret du caisson est sale, nettoyez-le avec un
chiffon doux légèrement imprégné d’eau ou d’une
solution détergente douce. N’utilisez jamais
d’alcool, de benzine ou de diluant qui pourraient
abîmer la finition.
Si l’image de votre téléviseur ou moniteur
présente des distorsions dues au
magnétisme
Bien que ce caisson soit blindé magnétiquement,
l’image de votre téléviseur ou moniteur risque de
présenter des distorsions. Dans ce cas, mettez le
téléviseur hors tension, puis rallumez-le au bout
de 15 à 30 minutes. Avant d’éteindre l’ordinateur,
sauvegardez vos données, ou prenez les mesures
appropriées.
S’il n’y a aucune amélioration, eloignez les
enceintes du téléviseur ou de l’ordinateur. Veillez
aussi à ne pas poser d’objet ayant un aimant,
comme un meuble de chaîne ou de téléviseur, des
jouets, etc près du téléviseur ou de l’ordinateur.
Leur interaction risque de provoquer des
distorsions.
Pour toute question ou tout problème au sujet de
ce caisson, non couverts dans ce manuel, adressez-
vous à votre revendeur Sony le plus proche.
Guide de dépannage
Si le problème persiste après les vérifications
suivantes, consultez un centre de dépannage Sony.
Spécifications
Section amplificateur
Puissance de sortie
25 W
Entrée INPUT 1 (arrière): Prises cinch
INPUT 2 (arrière): Minifiche stéréo
INPUT 3 (avant): Minifiche stéréo
Impédance 4,7 kilohms (1 kHz)
Sortie AUDIO OUT (minijack stéréo)
Impédance 22 ohms (1 kHz)
Section caisson
Système Type bass reflex, plage grave
Haut-parleur Blindage magnétique, 90 mm (3
5
/8 po.)
dia.
Impédance nominale
4 ohms
Sensibilité 83 dB/Wm
Généralités
Alimentation Secteur 220 – 230 V, 50 Hz
Consommation 25 W
Dimensions hors tout
Env. 132 x 271 x 222 mm (l/h/p)
(5
1
/4 x 10
3
/4 x 8
3
/4 po.) parties faisant
saillie er commandes non comprises
Poids Env. 3 kg (6 li. 10 on.)
Longueur de cordon
2 m (78
3
/8 po.)
Accessoires fournis
Cordon de liaison (minifiche stéréo ˜
deux fiches cinch, 2 m) (1)
Demandez-lui des informations détaillées sur les
accessoires disponibles dans votre pays.
La conception et les spécifications sont modifiables sans
préavis.
Trouble
No sound at all
No sound but
bass sound
Distortion
Cause and/or remedy
Connect the AC power cord to
a wall outlet.
Set the POWER switch to ON.
Press the STANDBY switch
(Ø ON).
Turn the VOLUME control
clockwise.
Increase the sound volume
with the volume control on the
connected equipment.
Check the connected
equipment.
•Is the equipment turned on?
•Is operation of the connected
equipment correct?
Check to see if the active
speaker is connected correctly.
Turn down the volume of the
connected equipment.
Turn down the VOLUME
control.
Problème
Pas de son
Pas de son sauf
les graves
Distorsion
Cause et/ou solution
Branchz le cordon
d’alimentation secteur sur une
prise murale.
Réglez l’interrupteur POWER
sur ON.
Appuyer sur l’interrupteur
STANDBY (Ø ON).
Tournez la commande
VOLUME dans le sens des
aiguilles d’un montre.
Augmentez le niveau sonore
avec la commande de volume
sur l’appareil raccordé.
Vérifiez l’appareil raccordé.
•Est-ce que l’appareil est sous
tension?
•Est-ce que l’appareil raccordé
fonctionne correctement?
Vérifiez si l’enceinte active est
raccordée correctement.
Diminuez le volume sur
l’appareil raccordé.
Baissez le niveau de la
commande VOLUME.
Personal computer,
Discman, WALKMAN, etc.
Ordinateur personnel,
Discman, WALKMAN, etc.
to INPUT 2
(stereo mini jack)
à INPUT 2
(minijack stéréo)
to INPUT 1 (phono jacks)
à INPUT 1 (prises cinch)
Woofer
(rear)
Caisson de
grave
(arrière)
to an audio output jack
à une prise de sortie audio
345
La page est en cours de chargement...
-
 1
1
-
 2
2


Sony SRS-PC3DW Manuel utilisateur
- Catégorie
- Haut-parleurs
- Taper
- Manuel utilisateur
dans d''autres langues
- English: Sony SRS-PC3DW User manual
- español: Sony SRS-PC3DW Manual de usuario
- Deutsch: Sony SRS-PC3DW Benutzerhandbuch
Documents connexes
-
Sony SRS-PC71 Manuel utilisateur
-
-
-
-
-
-
-
-
-