
2003 Sony Corporation Printed in Korea
A
English
Français
AVERTISSEMENT
Pour éviter tout risque d’incendie ou d’électrocution,
ne pas exposer cet appareil à la pluie ou à l’humidité.
Pour prévenir tout risque d’incendie, ne couvrez pas les
orifices d’aération de l’appareil avec des journaux,
nappes, rideaux, etc. Et ne placez pas de bougies
allumées sur l’appareil.
Pour prévenir tout risque d’incendie ou d’électrocution,
ne posez aucun objet rempli de liquide, comme un vase,
sur l’appareil.
Pour prévenir tout risque d’électrocution, n’ouvrez
jamais le coffret. Adressez-vous à un personnel qualifié
uniquement pour toute intervention sur l’appareil.
N’installez pas l’appareil dans un espace confiné
comme dans une bibliothèque ou un meuble
encastré.
NOTICE POUR LES CLIENTS AU CANADA
ATTENTION
POUR EVTER LES CHOCS ELECTRIQUES,
INTRODUIRE LA LAME LA PLUS LARGE DE LA
FICHE DANS LA BORNE CORRESPONDANTE DE LA
PRISE ET POUSSER JUSQU’AU FOND.
A propos de ce manuel
Le SA-VS700ED est un système acoustique 5.1 voies
composé de deux enceintes avant dotées d’un caisson de
grave actif, de deux enceintes surround et d’une enceinte
centrale. Il prend en charge les systèmes Sony Digital
Cinema Sound, Dolby* Pro Logic, et Dolby Digital etc. Il
est par conséquent réservé au visionnage de films.
* “Dolby” et le symbole double D sont des marques de
commerce de Dolby Laboratories.
Précautions
Sécurité
• Avant de mettre le système en service, assurez-vous
que sa tension de fonctionnement est identique à celle
de l’alimentation secteur locale.
• Le système n’est pas isolé de la source d’alimentation
secteur tant qu’il reste branché sur la prise murale,
même s’il a été éteint.
• Débranchez le système s’il ne doit pas être utilisé
pendant longtemps. Pour débrancher le cordon, tirez
sur la fiche. Ne jamais tirer sur le cordon proprement
dit.
• Si un liquide ou un solide pénètre dans le système,
débranchez le cordon d’alimentation du système et
faites vérifier le système par un professionnel avant de
l’utiliser à nouveau.
• Le cordon d’alimentation secteur doit être remplacé
seulement dans un centre de service compétent.
Fonctionnement
• Ne pas faire fonctionner le système acoustique
continuellement à une puissance dépassant sa
puissance d’entrée maximale.
• Si la polarité des liaisons d’enceintes n’est pas correcte,
les graves seront faibles et la position des différents
instruments de musique indistincte.
• Le contact des fils d’enceinte dénudés au niveau des
bornes de l’enceinte peut provoquer un court-circuit.
• Avant de raccorder les enceintes, éteignez
l’amplificateur pour éviter d’endommager le système
acoustique.
• Le volume sonore ne doit pas être élevé au point que
le son en soit déformé.
Si les couleurs sur un écran de télévision
sont anormales
Les enceintes avant ne sont pas isolées contre les
interférences magnétiques, il est donc possible que
l’image du téléviseur soit déformée par ce type
d’interférences.
Si les couleurs sont anormales…
c Mettez le téléviseur hors tension, puis remettez-le
sous tension 15 à 30 minutes plus tard.
Si les couleurs restent anormales…
c Eloignez les enceintes du téléviseur.
Si un sifflement se produit
Repositionnez les enceintes ou réduisez le volume sur
l’amplificateur.
Emplacement
• N’installez pas les enceintes en position inclinée.
• N’installez pas les enceintes aux endroits suivants :
— Extrêmement chauds ou froids
— Poussiéreux ou sales
— Très humides
— Sujets à des vibrations
— Exposés à la lumière directe du soleil
• Prenez les précautions nécessaires lors de l’installation
de l’enceinte sur un plancher traité (ciré, huilé, verni,
etc.) pour éviter l’apparition de taches ou la
décoloration du sol.
• Evitez de vous appuyer ou de vous suspendre à
l’enceinte car vous risquez de la faire tomber.
Nettoyage
Nettoyez les coffrets d’enceintes avec un chiffon doux
légèrement imprégné d’une solution détergente neutre
ou d’eau. Ne pas utiliser de tampons abrasifs, de poudre
à récurer ou de solvants, comme l’alcool ou la benzine.
Pour toute question ou difficulté concernant votre
système acoustique, veuillez consulter votre revendeur
Sony.
About this manual
The SA-VS700ED is a 5.1 channel speaker system
consisting of two front speakers containing active
subwoofer, two surround speakers, and one center
speaker. It supports Sony Digital Cinema Sound, Dolby*
Pro Logic, and Dolby Digital, etc., and is thus
gearedtowards the enjoyment of movies.
* “Dolby” and the double-D symbol are trademarks of
Dolby Laboratories.
Precautions
On safety
• Before operating the system, be sure that the operating
voltage of the system is identical with that of your local
power supply.
• The unit is not disconnected from the AC power source
(mains) as long as it is connected to the wall outlet,
even if the unit itself has been turned off.
• Unplug the system from the wall outlet if it is not to be
used for an extended period of time. To disconnect the
cord, pull the cord by grasping the plug. Never pull
the cord itself.
• Should any liquid or solid object fall into the system,
unplug the system’s power cord and have the system
checked by qualified personnel before operating it any
further.
• AC power cord must be changed only at the qualified
service shop.
On operation
• Do not drive the speaker system with a continuous
wattage exceeding the maximum input power of the
system.
• If the polarity of the speaker connections are not
correct, the bass tones will be weak and the position of
the various instruments obscure.
• Contact between bare speaker wires at the speaker
terminals may result in a short-circuit.
• Before connecting, turn off the amplifier to avoid
damaging the speaker system.
• The volume level should not be turned up to the
point of distortion.
If you encounter color irregularity on a
nearby TV screen
The front speakers are not magnetically shielded and the
picture on the TV sets may become magnetically
distorted.
If color irregularity is observed...
c Turn off the TV set, then turn it on again in 15 to 30
minutes.
If color irregularity is observed again...
c Place the speakers further away from the TV set.
If howling occurs
Reposition the speakers or turn down the volume on the
amplifier.
On placement
• Do not set the speakers in an inclined position.
• Do not place the speakers in locations that are:
— Extremely hot or cold
— Dusty or dirty
— Very humid
— Subject to vibrations
— Subject to direct sunlight
• Use caution when placing the speaker on a specially
treated (waxed, oiled, polished, etc.) floor, as staining
or discoloration may result.
• Do not lean or hang on the speaker, as the speaker may
fall down.
On cleaning
Clean the speaker cabinets with a soft cloth lightly
moistened with a mild detergent solution or water. Do
not use any type of abrasive pad, scouring powder or
solvent such as alcohol or benzine.
If you have any questions or problems concerning your
speaker system, please consult your nearest Sony dealer.
Home Theater Speaker System
SA-VS700ED
4-249-491-12(1)
WARNING
To prevent fire or shock hazard, do not expose the
unit to rain or moisture.
To prevent fire, do not cover the ventilation of the
apparatus with news papers, table-cloths, curtains, etc.
And don’t place lighted candles on the apparatus.
To prevent fire or shock hazard, do not place objects
filled with liquids, such as vases, on the apparatus.
To avoid electrical shock, do not open the cabinet. Refer
servicing to qualified personnel only.
Do not install the appliance in a confined space, such
as a bookcase or built-in cabinet.
NOTICE FOR THE CUSTOMERS IN THE USA
This symbol is intended to alert the user to
the presence of uninsulated “dangerous
voltage” within the product’s enclosure
that may be of sufficient magnitude to
constitute a risk of electric shock to
persons.
This symbol is intended to alert the user to
the presence of important operating and
maintenance (servicing) instructions in the
literature accompanying the appliance.
CAUTION
You are cautioned that any changes or modification not
expressly approved in this manual could void your
authority to operate this equipment.
The shielded interface cable recommended in this
manual must be used with this equipment in order to
comply with The limits for a digital device pursuant to
Subpart B of Part 15 of FCC Rules.
Note to CATV system installer:
This reminder is provided to call CATV system installer’s
attention to Article 820-40 of the NEC that provides
guidelines for proper grounding and, in particular,
specifies that the cable ground shall be connected to the
grounding system of the building, as close to the point of
cable entry as practical.
CAUTION
Use of this applicance with some systems may present a
shock or fire hazard. Do not use with any units which
have the following marking located near output.
WARNING: HAZARDOUS ENERGY!
WARNING
This equipment has been tested and found to comply
with the limits for a Class B digital device, pursuant to
Part 15 of the FCC Rules. These limits are designed to
provide reasonable protection against harmful
interference in a residential installation. This equipment
generates, uses, and can radiate radio frequency energy
and, if not installed and used in accordance with the
instructions, may cause harmful interference to radio
communications. However, there is no guarantee that
interference will not occur in a particular installation. If
this equipment does cause harmful interference to radio
or television reception, which can be determined by
turning the equipment off and on, the user is encouraged
to try to correct the interference by one or more of the
following measures:
— Reorient or relocate the receiving antenna.
— Increase the separation between the equipment and
receiver.
— Connect the equipment into an outlet on a circuit
different from that to which the receiver is connected.
— Consult the dealer or an experienced radio/TV
technician for help.
NOTICE FOR THE CUSTOMERS IN CANADA
CAUTION
TO PREVENT ELECTRIC SHOCK, MATCH WIDE
BLADE OF PLUG TO WIDE SLOT, FULLY INSERT.
Owner’s Record
The model and serial numbers are located on the
rear of the unit. Record the serial number in the
space provided below. Refer to them whenever
you call upon your Sony dealer regarding this
product.
Model No. SA-VS700ED
Serial No.
ENERGY STAR
®
is a U.S. registered
mark.
As
ENERGY STAR
®
Partner, Sony
Corporation has determined that this
product meets the
ENERGY STAR
®
guidelines for energy efficiency.
ENERGY STAR
®
est une marque
déposée aux Etats-Unis.
En tant que partenaire d’
ENERGY
STAR
®
, Sony atteste que son produit
répond aux recommandations
d’
ENERGY STAR
®
en matière
d’économie d’énergie.
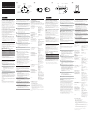
Hooking up the system
Connect the speaker system to the speaker output
terminals of an amplifier.
Make sure power to all components (included the
subwoofer) is turned off before starting the hook-up.
Usual Hookup (B)
Usually, connect by this method.
Connect SUB WOOFER IN and SUB WOOFER OUT of
the front speakers with the subwoofer connecting cord.
Notes (C)
• Make sure the plus (+) and the minus (–) terminals on
the speakers are matched to the corresponding plus (+)
and minus (–) terminals on the amplifier.
• Be sure to tighten the screws of the speaker terminals
securely as loose screws may become a source of noise.
• Make sure all connections are firm. Contact between
bare speaker wires at the speaker terminals may cause
a short-circuit.
• For details regarding the connections on the amplifier
side, refer to the manual that was provided with your
amplifier.
Tip
Black or black striped wires are minus (–) in polarity, and
should be connected to the minus (–) speaker terminals.
eE Ee
E
e
WOOFER OUT
FRONT
CENTER
SURROUND
R
R
L
L
Ee
E e E e
E eE e
SUB WOOFER
OUT
SUB WOOFER
IN
SUB WOOFER
IN
B
Front (Right)/
Subwoofer
Enceinte avant
(droite)/Caisson
de grave
Front (Left)/
Subwoofer
Enceinte avant
(gauche)/
Caisson de
grave
Surround (Right)
Enceinte surround
(droite)
Surround (Left)
Enceinte surround
(gauche)
Amplifier
Amplificateur
Center
Enceinte
centrale
5m
10m
This Class B digital apparatus complies with Canadian
ICES-003.
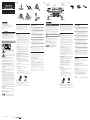
Assembling the surround
speakers (A)
1 Screw the stand pipe fully into the hole
in the stand base until it stops.
2 Lay the speaker stand down, then feed
the speaker cord through the underside
of the base and out from the other end
of the pipe.
3 Pass the speaker cord through the hole
in the bottom of the speaker and
connect to the speaker terminals.
4 Insert the stand pipe fully into the hole
in the bottom of the surround speaker.
5 Turn the speaker to the desired angle,
then secure it by tightening the screw
until the speaker is fixed.
6 Run the speaker cord out through the
slot in the base of the speaker stand, and
then stand it up again.
Notes
• When inserting the stand pipe into the hole in the
bottom of the speaker cord to a minimum so it does not
stick out.
• Make sure to secure the speaker with the screw, or the
speaker may drop, causing an accident.
C
1
4
23
56
Screws
Vis
Except for European model
Cet appareil numérique de la classe B est conforme à la
norme NMB-003 du Canada.
Modèles autres que pour I’Europe
Installation des enceintes
surround (A)
1 Vissez complètement le tube du support
dans l’orifice de la base du support
jusqu’à ce que vous ne puissiez plus
visser.
2 Mettez le support d’enceinte en position
horizontale, puis faites passer le cordon
dans l’assiette de la base et faites-le
ressortir à l’autre extrémité du tube.
3 Passez le cordon de l’enceinte dans
l’orifice situé dans la partie inférieure de
l’enceinte et raccordez-le aux bornes de
l’enceinte.
4 Insérez complètement le tube du
support dans l’orifice situé dans la
partie inférieure de l’enceinte.
5 Orientez l’enceinte selon l’angle de
votre choix, puis fixez-le en serrant la
vis jusqu’à ce que l’enceinte ne bouge
plus.
6 Faites passer le cordon de l’enceinte à
travers la fente de la base du support
d’enceinte, puis redressez ce dernier.
Remarques
• Lorsque vous insérez le tube du support dans l’orifice
situé dans la partie inférieure de l’enceinte, ajustez le
cordon au minimum de sorte qu’il ne dépasse pas.
• Pensez à fixer fermement l’enceinte avec la vis, sinon
elle risquerait de tomber et de provoquer un accident.
Raccordement du système
acoustique
Raccordez le système acoustique aux bornes d’enceintes
de l’amplificateur.
Avant de raccorder les cordons, assurez-vous que tous
les appareils (caisson de grave compris) sont hors
tension.
Raccordement habituel (B)
Utilisez généralement cette méthode pour procéder aux
raccordements.
Raccordez SUB WOOFER IN et SUB WOOFER OUT des
enceintes avant à l’aide du cordon de raccordement du
caisson de grave.
Remarques (C)
• Assurez-vous que les bornes plus (+) et moins (–) des
enceintes correspondent aux bornes plus (+) et (–) de
l’amplificateur.
• Veillez à bien serrer les vis des bornes d’enceintes, car
des vis desserrées peuvent être une source de parasites.
• Veillez à insérer à fond les fils dans les bornes. Le
contact des fils d’enceinte dénudés au niveau des
bornes de l’enceinte peut provoquer un court-circuit.
• Pour les raccordements côté amplificateur, reportez-
vous au manuel fourni avec l’amplificateur.
Conseil
Les fils noirs ou rayés noirs ont une polarité négative (–)
et doivent être reliés aux bornes moins (–) des enceintes.
5m
5m
5m
5m
10m

English
D
ON/STANDBY indicator
Voyant ON/STANDBY
AA
BB
Front (Right)
Enceinte avant
(droite)
Français
Front (Left)
Enceinte
avant
(gauche)
Home Theater Speaker System
SA-VS700ED
Emplacement des enceintes
Position de chaque enceinte (D)
Chaque enceinte doit être dirigée vers la position d’écoute.
L’effet surround sera bien meilleur si toutes les enceintes sont à
égale distance de la position d’écoute.
Placez les enceintes avant à égale distance à gauche et à
droite du téléviseur. Installez chaque enceinte avant à
1,5 m
(4 pi 11
1
/
8
po)
au moins l’une de l’autre.
Placez l’enceinte centrale le plus près possible de l’écran.
L’emplacement des enceintes
surround
dépend en grande
partie de la grandeur de la pièce. Les enceintes
surround
peuvent être installées sur les deux côtés de la position d’écoute
A ou derrière la position d’écoute B.
Positionnement de l’enceinte centrale
(E)
Installez l’enceinte centrale sur le support d’enceinte
fourni et placez-la le plus près possible de l’écran. Ne
la placez cependant pas sur le téléviseur, sans quoi elle
risquerait de tomber.
L’enceinte doit être dirigée directement vers l’auditeur
pour obtenir un son de qualité optimale.
L’angle de l’enceinte centrale peut être réglé.
L’angle de réglage varie selon la façon dont l’enceinte est
montée sur le support.
Raccordement du cordon
d’alimentation secteur
• Raccordez le cordon d’alimentation secteur du enceinte
avant (caisson de grave actif) et de l’amplificateur à une
prise murale.
• Assurez-vous que l’alimentation vers l’enceinte avant
(caisson de grave actif) est coupée avant de brancher ou
de débrancher tout cordon d’alimentation.
Réglage de l’amplificateur
Lors du raccordement à un amplificateur avec des
décodeurs internes multivoies (Dolby Digital, DTS**,
etc.), utilisez les menus de configuration de
l’amplificateur pour spécifier les paramètres de votre
système acoustique.
Consultez le tableau suivant pour les réglages
appropriés. Pour plus d’informations sur les réglages
proprement dits, reportez-vous au manuel fourni avec
l’amplificateur.
En cas de “ Raccordement habituel (B)”
(Réglage des enceintes)
Pour les/le Réglez sur
Enceintes avant SMALL
Enceinte centrale SMALL
Enceintes surround SMALL
Caisson de grave ON (ou YES)
Il est recommandé de régler la fréquence de
recouvrement des canaux avant, central et surround sur
120 Hz. réglez-la aux alentours de 120 Hz si votre AV
AMP dispose d’une fonction de réglage de la fréquence
de recouvrement des enceintes.
** “DTS” et “DTS Digital Surround” sont des marques
commerciales déposées de Digital Theater Systems, Inc.
Specifications
For the U.S. model
AUDIO POWER SPECIFICATIONS
POWER OUTPUT AND TOTAL HARMONIC
DISTORTION:
With 3 ohms loads both subwoofer driven, from 20 - 200
Hz; rated 250 watts minimum RMS power, with no more
than 0.8% total harmonic distortion from 250 milliwatts
to rated output.
SA-VF700ED (Front speakers/Subwoofer)
Speaker system 2 way and built-in
subwoofer
Speaker units Subwoofer: 11 cm (4
3
/
8
in.), cone type
Woofer: 8 cm (3
1
/
4
in.),
cone type
Tweeter: 2.5 cm (1 in.),
dome type
Enclosure type Bass reflex
Rated impedance 8 ohms
Power handling capacity
Maximum input power: 170 watts
Sensitivity level 88 dB (1 W, 1 m)
Frequency range 20 Hz - 70,000 Hz
Inputs
SUBWOOFER IN: input pin jack
General
Power requirements
North American model: 120 V AC, 60 Hz
European model: 220 - 230 V AC, 50/60 Hz
Power consumptions 50 watts
1 watt (standby mode)
Dimensions (w/h/d) Approx. 300 × 1,200 × 300
mm (11
7
/
8
× 47
1
/
4
×
11
7
/
8
in.)
Mass AMP SIDE: Approx. 18.0
kg (39 lb 12 oz)
NON AMP SIDE:
Approx. 16.5 kg
(36 lb 7 oz)
SS-CN700ED (Center speaker)
Speaker system 2 way, magnetically
shielded
Speaker units Woofer: 8 cm (3
1
/
4
in.),
cone type
Tweeter: 2.5 cm (1 in.),
dome type
Enclosure type Bass reflex
Rated impedance 8 ohms
Power handling capacity
Maximum input power: 170 watts
Sensitivity level 88 dB (1 W, 1 m)
Frequency range 60 Hz - 70,000 Hz
Dimensions (w/h/d) Approx. 270 × 97 × 120
mm (10
3
/
4
× 3
7
/
8
× 4
3
/
4
in.)
When used supplied
speaker stand: Approx.
270 × 108-118 × 120 mm
(10
3
/
4
× 4
3
/
8
− 4
3
/
4
×
4
3
/
4
in.)
Mass Approx. 2.5 kg
(5 lb 8.19 oz)
When used supplied
speaker stand: Approx.
3.0 kg (6 lb 9.83 oz)
SS-SR700ED (Surround speakers)
Speaker system 2 way, magnetically
shielded
Speaker units Woofer: 8 cm (3
1
/
4
in.),
cone type
Tweeter: 2.5 cm (1 in.),
dome type
Enclosure type Bass reflex
Rated impedance 8 ohms
Power handling capacity
Maximum input power: 170 watts
Sensitivity level 88 dB (1 W, 1 m)
Frequency range 60 Hz - 70,000 Hz
Dimensions (w/h/d) Approx. 97 × 270 × 120
mm (3
7
/
8
× 10
3
/
4
× 4
3
/
4
in.)
When attached supplied
speaker stand: Approx.
270 × 1,200 × 270 mm (10
3
/
4
× 47
1
/
4
× 10
3
/
4
in.)
Mass Approx. 2.5 kg
(5 lb 8.19 oz)
When attached supplied
speaker stand: Approx.
6.3 kg (13 lb 14.23 oz)
Supplied accessories
Center speaker stand (1)
Surround speaker pipes (2)
Surround speaker bases (2)
Screws (for the surround speaker stands) (2)
Audio connecting cord, 5 m (16 ft
1
/
2
in.) (1)
Subwoofer connecting cord, 5 m (16 ft
1
/
2
in.) (1)
Speaker connecting cords (for the front(L/R), center
speakers), 5 m (16 ft
1
/
2
in.) (3)
Speaker connecting cords(for the surround speakers),
10 m (32 ft 9
3
/
4
in.) (2)
Design and specifications are subject to change without
notice.
Listening to the sound (F)
First, turn down the volume on the amplifier. The
volume should be set to minimum before you begin
playing the program source.
1 Turn on the amplifier and select the
program source.
2 Press POWER on the front speaker
(subwoofer).
The ON/STANDBY indicator on the
front speaker (subwoofer) lights up
green.
3 Play the program source.
Power turns on and off automatically — Auto
power on/off function
(G)
When the subwoofer is on (i.e, the ON/STANDBY
indicator lights up green) and there is no signal input for
a few minutes, the ON/STANDBY indicator changes to
red and the subwoofer enters power saving mode. While
in this mode a signal is input to the subwoofer, the
subwoofer automatically turns on (auto power on/off
function).
To turn this feature off, Set the POWER SAVE switch
located on the rear panel of the front speaker (subwoofer)
to OFF (F).
Note
If you turn down the volume level of the amplifier too
low, the auto power on/off function may activate,
causing the subwoofer to enter power saving mode.
Positioning the speakers
Location of each speaker (D)
Each speaker should face the listening position. Better
surround effect will result if all speakers are set at the
same distance from the listening position.
Place the front speakers at an equal distance to the left
and right of the television. Place each front speaker 1.5 m
(4 ft 11
1
/
8
in.) or more apart.
Locate the center speaker as close to the screen as
possible.
The placement of surround speakers greatly depends on
the configuration of the room. The surround speakers
may be placed on both sides of the listening position A
or behind the listening position B.
Positioning the center speaker (E)
Put the center speaker on the supplied speaker stand and
locate the center speaker as close to the screen as
possible. Do not place the center speaker on the top of
the TV sets, as the speaker may fall down.
For optimum listening enjoyment, the speaker should
face directly towards the listener.
The angle of the center speaker is adjustable.
The adjustment angle varies, depending on which way it
is mounted on the stand.
Connecting the AC power cord
• Connect the AC power cord from the front speaker
(active subwoofer) and from your amplifier to a wall
outlet.
• Make sure that power to the front speaker (active
subwoofer) is turned off before you plug in or unplug
any power cord.
Ecoute du son (F)
Réduisez d’abord le volume sur l’amplificateur. Le volume doit
être réduit au maximum avant l’écoute de la source.
1
Allumez l’amplificateur et sélectionnez
la source.
2
Appuyez sur POWER sur l’enceinte
avant (caisson de grave).
Le voyant ON/STANDBY de l’enceinte
avant (caisson de grave) s’allume en vert.
3
Reproduisez la source.
Le caisson de grave s’allume et s’éteint
automatiquement
— Marche et arrêt automatiques
(G)
Si le caisson de grave est en service (c’est-à-dire le voyant
ON/STANDBY est allumé en vert) mais qu’aucun signal
n’est entré pendant quelques minutes, le voyant ON/
STANDBY deviendra rouge et le caisson de grave se
mettra en mode d’économie d’énergie. Lorsqu’un signal
est transmis au caisson de grave dans ce mode, le caisson
s’allume automatiquement (fonction de marche/arrêt
automatique).
Pour désactiver cette fonction, réglez le commutateur
POWER SAVE situé sur le panneau arrière de l’enceinte
avant (caisson de grave) sur OFF (F).
Remarque
Si vous réduisez trop le volume de l’amplificateur, la fonction
de marche/arrêt automatique peut entrer en service et mettre le
caisson en mode
d’économie d’énergie
.
Réglage du caisson de grave
(F)
Vous pouvez régler le son du caisson de grave en
fonction du son des enceintes avant. Le renforcement des
sons graves vous donnera une impression d’espace
accrûe.
1 Réglez le niveau du caisson de grave.
Tournez SW LEVEL de façon à mieux
percevoir les sons graves. Pour augmenter le
niveau du caisson de grave, tournez la
commande dans le sens horaire. Pour le
réduire, tournez la commande dans le sens
anti-horaire.
2 Réglez BOOST * sur ON.
*BOOST
BOOST est généralement réglé sur ON. Selon votre
logiciel, il est possible que des parasites ou des
distorsions soient généré(e)s. En pareil cas, réglez
BOOST sur OFF.
3 Sélectionnez la polarité des phases.
Utilisez le sélecteur PHASE pour sélectionner
NORMAL ou REVERSE pour la polarité des
phases.
4 Répétez les étapes 1 à 3 pour procéder
au réglage en fonction vos préférences.
Une fois le caisson de grave réglé selon vos
préférences, utilisez la commande de volume
de l’amplificateur pour ajuster le volume du
caisson de grave sur celui des autres
enceintes. Vous n’avez pas besoin d’ajuster
les réglages du caisson de grave lorsque vous
modifiez le niveau de volume de
l’amplificateur.
5 Appuyez sur POWER sur l’enceinte
avant (caisson de grave).
Le voyant ON/STANDBY de cette
dernière s’allume en vert.
6 Reproduisez la source du programme.
Remarques
• Si le son est déformé lorsque vous activez le
renforcement des graves à partir de votre amplificateur
(comme DBFB, GROOVE, l’égaliseur graphique, etc.),
désactivez le renforcement des graves et ajustez le son.
• Ne réglez pas le niveau du caisson de grave au
maximum. Vous risqueriez d’affaiblir le son des
graves. De plus, des parasites externes pourraient être
perçus.
• Si vous sélectionnez NORMAL ou REVERSE avec le
sélecteur PHASE, la polarité est inversée et peut
permettre une meilleure reproduction des graves dans
certains environnements d’écoute (selon le type
d’enceintes avant et la position du caisson de grave). La
profondeur et la précision du son peuvent également
être modifiées et avoir un impact sur votre perception
du champ sonore. Sélectionnez la configuration
diffusant le son que vous préférez en position normale
d’écoute.
POWERSW LEVEL
F
G
Center
Enceinte
centrale
Setting the amplifier
When connecting to an amplifier with internal multi
channel decoders (Dolby Digital, DTS**, etc.), you should
use the setup menus for the amplifier to specify the
parameters of your speaker system.
See the table below for the proper settings. For details on
the setting procedure, refer to the manual that was
provided with your amplifier.
When “Usual Hookup (B)” is used
(Speaker setup)
For Set to
Front speakers SMALL
Center speaker SMALL
Surround speakers SMALL
Subwoofer ON (or YES)
Speaker crossover frequency of Front, Center, and
Surround channel is recommended at 120 Hz. Set it close
to 120 Hz if your AV AMP has speaker crossover
frequency adjustment function.
** “DTS” and “DTS Digital Surround” are registered
trademarks of Digital Theater Systems, Inc.
Notes
• If the sound distorts when you turn on the bass
reinforcement from your amplifier (such as, DBFB,
GROOVE, the graphic equalizer, etc.), turn off the bass
reinforcement and adjust the sound.
• Do not turn the level of the subwoofer to maximum.
Doing so may weaken the bass sound. Moreover,
extraneous noise may be heard.
• Selecting NORMAL or REVERSE with the PHASE
selector reverses the polarity and may provide better
bass reproduction in certain listening environments
(depending on the type of front speakers and the
position of the subwoofer). It may also change the
depth and tightness of the sound, and effect the feeling
of the sound field. Select the setting that provides the
sound you prefer when listening in your normal
listening position.
• Some amplifier functions for enhancing the sound may
cause distortion in the subwoofer. If such distortion
occurs, turn off those functions.
• To enjoy high-quality sound, do not turn the
subwoofer level too high.
Troubleshooting
Should you encounter a problem with your speaker
system, check the following list and take the indicated
measures. If the problem persists, consult your nearest
Sony dealer.
There is no sound from the speaker system.
•Make sure all the connections have been
correctly made.
•Make sure the volume on the amplifier has
been turned up properly.
•Make sure the program source selector on the
amplifier is set to the proper source.
•Check if headphones are connected. If they
are, disconnect them.
There is distortion in the front speaker
(subwoofer) sound output.
•Check if any sound-enhancing functions have
been activated on the amplifier. If they have,
turn them off.
There is hum or noise in the speaker output.
•Make sure all the connections have been
correctly made.
•Make sure none of the audio components are
positioned too close to the TV set.
E
Adjusting the subwoofer (F)
You can adjust the sound of the subwoofer to suit the
sound of your front speakers. Reinforcing the bass sound
gives you a greater sense of atmosphere.
1 Adjust the level of the subwoofer.
Turn the SW LEVEL so that you can hear the
bass sound a little more than before. To
increase the subwoofer level, turn the control
clockwise. To decrease the subwoofer level,
turn the control counterclockwise.
2 Set BOOST* to ON.
*BOOST
BOOST is usually set to ON. Depending on your
software, it may cause noise or distortion. Should
this occur, set BOOST to OFF.
3 Select the phase polarity.
Use the PHASE selector to select NORMAL
or REVERSE for phase polarity.
4 Repeat steps 1 to 3 to adjust to your
preference.
Once you have adjusted the subwoofer to the
settings you desire, use the volume control
on the amplifier to adjust the volume of the
subwoofer with that of the other speakers.
You don’t need to adjust the subwoofer
settings when you change the volume level
of the amplifier.
5 Press POWER on the front speaker
(subwoofer).
The ON/STANDBY indicator on the
front speaker (subwoofer) lights up
green.
6 Play the program source.
13º
7º
The sound has suddenly stopped.
•Make sure all the connections have been
correctly made. Contact between bare
speaker wires at the speaker terminals may
cause a short-circuit.
BOOST PHASE POWER SAVE
Surround (Left)
Enceinte surround
(gauche)
Surround (Right)
Enceinte
surround
(droite)
Guide de dépannage
En cas de problème, veuillez vérifier les points de la liste
suivante et prendre les mesures nécessaires. Si le problème
persiste, consultez votre revendeur Sony.
Le système acoustique n’émet aucun son.
• Assurez-vous que tous les raccordements ont été
effectués correctement.
• Assurez-vous que le volume de l’amplificateur est
réglé correctement.
• Assurez-vous que le sélecteur de source de
l’amplificateur est réglé sur la source correcte.
• Vérifiez si un casque n’est pas raccordé et le cas
échéant, débranchez-le.
Le son émis par l’enceinte avant (caisson de
grave) est déformée.
• Vérifiez si une fonction d’amplification du son n’a
pas été activée sur l’amplificateur et, le cas
échéant, désactivez-la.
Bourdonnement ou bruit sur la sortie d’enceintes.
• Assurez-vous que tous les raccordements ont été
effectués correctement.
• Assurez-vous qu’aucun des appareils audio ne se
trouve trop près du téléviseur.
Le son est coupé subitement.
• Assurez-vous que tous les raccordements ont été
effectués correctement. Le contact des fils
d’enceinte dénudés au niveau des bornes de
l’enceinte peut provoquer un court-circuit.
Spécifications
SA-VF700ED (Enceintes avant/Caisson de
grave)
Système acoustique Caisson de grave 2 voies
et intégré
Enceintes Caisson de grave : 11 cm
(4
3
/
8
po), à cône
Grave : 8 cm (3
1
/
4
po), à
cône
Aigu : 2,5 cm (1 po), type
dôme
Type de caisson Bass-reflex
Impédance nominale 8 ohms
Tenue en puissance
Capacité maximale : 170 watts
Niveau de sensibilité 88 dB (1 W, 1 m)
Plage de fréquences 20 Hz - 70 000 Hz
Entrées
SUBWOOFER IN: prise d’entrée
Généralités
Alimentation
Mod
è
le nord-américain : CA 120 V, 60 Hz
Mod
è
le européen : CA 220 - 230 V, 50/60 Hz
Consommation 50 watts
1 W (mode standby)
Dimensions (l/h/p) Approx. 300 × 1 200 × 300
mm (11
7
/
8
× 47
1
/
4
×
11
7
/
8
po)
Poids Côté AMP : Approx. 18.0
kg (39 li. 12 on.)
Côté NON AMP :
Approx. 16,5 kg (36 li. 7
on.)
SS-CN700ED (Enceinte centrale)
Système acoustique 2 voies, à blindage
magnétique
Enceintes Grave : 8 cm (3
1
/
4
po), à
cône
Aigu : 2,5 cm (1 po), type
dôme
Type de caisson Bass-reflex
Impédance nominale 8 ohms
Tenue en puissance
Capacité maximale : 170 watts
Niveau de sensibilité 88 dB (1 W, 1 m)
Plage de fréquences 60 Hz - 70 000 Hz
Dimensions (l/h/p) Approx. 270 × 97 × 120
mm (10
3
/
4
× 3
7
/
8
×
4
3
/
4
po)
Avec le support d’enceinte
fourni :
Approx. 270 ×
108-118 × 120 mm (10
3
/
4
×
4
3
/
8
- 4
3
/
4
× 4
3
/
4
po)
Poids Approx. 2,5 kg (5 li. 8,19
on.)
Avec le pied d’enceinte
fourni : Approx. 3,0 kg (6
li. 9,83 on.)
SS-SR700ED (Enceintes surround)
Système acoustique 2 voies, à blindage
magnétique
Enceintes Grave : 8 cm (3
1
/
4
po), à
cône
Aigu : 2,5 cm (1 po), type
dôme
Type de caisson Bass-reflex
Impédance nominale 8 ohms
Tenue en puissance
Capacité maximale : 170 watts
Niveau de sensibilité 88 dB (1 W, 1 m)
Plage de fréquences 60 Hz - 70 000 Hz
Dimensions (l/h/p) Approx. 97 × 270 × 120
mm (3
7
/
8
× 10
3
/
4
×
4
3
/
4
po)
Avec le support d’enceinte
fourni :
Approx. 270 ×
1 200 × 270 mm (10
3
/
4
×
47
1
/
4
× 10
3
/
4
po)
Poids Approx. 2,5 kg (5 li. 8,19
on.)
Avec le pied d’enceinte
fourni : Approx. 6,3 kg
(13 li. 14,23 on.)
Accessoires fournis
Support de l’enceinte centrale (1)
Tubes d’enceinte surround (2)
Bases d’enceinte surround (2)
Vis (pour le support d’enceinte surround) (2)
Cordon de raccordement audio, 5 m (16 pi
1
/
2
po) (1)
Cordon de raccordement caisson de grave, 5 m (16 pi
1
/
2
po) (1)
Cordons de raccordement des enceintes (pour les
enceintes avant (L/R) et centrale), 5 m (16 pi
1
/
2
po)
(3)
Cordons de raccordement des enceintes (pour les
enceintes surround), 10 m (32 pi 9
3
/
4
po) (2)
La conception et les spécifications sont sujettes à
modification sans préavis.
25º
13º
• Certaines fonctions de l’amplificateur peuvent
provoquer des distorsions au niveau du caisson de
grave. En pareil cas, désactivez-les.
• Pour bénéficier d’un son de haute qualité, ne réglez pas
le volume du caisson de grave trop haut.
SUB WOOFER IN
BOOSTSW LEVEL
MIN MAX
ON
OFF
AUTO
OFF
PHASE
POWER SAVE
NORM
POWER
REVERSE
-
 1
1
-
 2
2


Sony SA-VS700ED Le manuel du propriétaire
- Taper
- Le manuel du propriétaire
- Ce manuel convient également à
dans d''autres langues
- English: Sony SA-VS700ED Owner's manual
Documents connexes
-
Sony sa ft 3 h Manuel utilisateur
-
-
-
Sony SA-VE556H Manuel utilisateur
-
Sony SA-VE545H Mode d'emploi
-
Sony SA-VS300H Manuel utilisateur
-
Sony sa ve356t Le manuel du propriétaire
-
-
Sony SA-VE835ED Mode d'emploi
-