
PROLINE II LIMITED WARRANTY
ProLine II chairs are warranted from the date of purchase against failure due to material and workmanship as follows:
• Lifetime on component parts including pneumatic cylinder, control mechanism, base and casters.
• 3 Years on upholstery fabric and foam against wear and deterioration.
•Leatherisnotwarrantedagainstroutinescratchingandscufng,asleatherissubjecttominorblemishesinuse.
To make a warranty claim, contact Parts Department. Provide model number, proof of purchase, description of the problem and obtain return authorization. At it’s
optionOfceStarProductswill:
(a)Supplycompatiblecomponentsofcurrentmanufacture.
(b) Repair the customer’s component. The customer must prepay freight on any components returned to the factory. Return freight on
componentsstillinwarrantywillbepaidbyOfceStarProducts.
*All warranties are limited to the original purchaser for normal commercial usage dened as a standard forty hour work week by persons weighing 400 lbs.
or less. The 54666 is for persons weighing 300 lbs. or less. The 7103M, 7602R, 7605R, 7600R, 81108, 81308 & 81608 are for persons weighing 400 lbs. or
less. This warranty will not cover labor, freight or damage from misuse, abuse, negligence, alteration, accident, vandalism, rusting, acts of nature or any other
event beyond the control of Ofce Star Products. The warranty does not cover cosmetic damage that may result from normal use. Liability for incidental or
consequential damages is excluded. The user assumes all risk of injury resulting from use of this product. When usage is more than 40 hours per week, a ve
year warranty on all parts applies. Fabric is warranted for one year. This warranty gives you specic legal rights, and you may also have other rights which vary
from state to state. All ProLine II are built to meet or exceed ANSI BIFMA standards.
It is the customer’s responsibility to prepay freight on any components returned to the factory. Return freight on components covered by
warranty will be paid by Ofce Star Products.
Ourqualitystandardsareamongthehighestintheindustry.Sometimes,nomatterhowhardwetry,therearetimeswhenpartsaredamagedormissing.Our
PartsDepartmentwilldoeverythingpossibletopromptlyremedytheproblem.Contactusviae-mailparts.department@ofcestar.net,byFax1-909-930-5629,or
tollfreepartsnumber1-800-950-7262,MondaythroughFriday8:00a.m.-3:30pm.PacicTime.
©OfficeStarProductsjuillet,2023
39200 / 39203
BIG & TALL DELUXE HIGH BACK CHAIR
OPERATING INSTRUCTIONS
39200 / 39203
FAUTEUIL BIG & TALL DELUXE À HAUT DOSSIER
INSTRUCTIONS DE MONTAGE
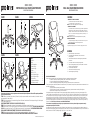
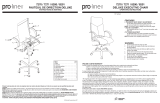
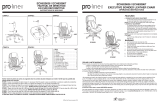
FEATURES
• PNEUMATIC SEAT HEIGHT ADJUSTMENT
Toraiseseatremovepressurefromseatandliftlever(1).
Tolowerseatheightsitonchairandliftlever(1).
NOTE: It is normal for chair to slightly lower under body weight.
• LOCKING TILT ADJUSTMENT
Forindividualcomfort,thischairhasbeenequippedwithanadjustmentthat
willallowtheusertochangethetensionofthetiltingfeature.Turnknob(2)
clockwise to increase tension and counter-clockwise to decrease or ease the
tension.Tolock,returnchairtotheuprightpositionandpushlever(1)in.To
unlockpulllever(1)out.
NOTE:Becarefulnottoloosenthebacktiltadjustmentknobcompletely.
ARM HEIGHT ADJUSTMENT
ToadjustArmHeight,pushbutton(3)toallowthearmstomoveupordown
freely. Release button (3) once desired height is reached.
• ARM FLIP UP AND DOWN
Toiparmsup,simplypulluponarm.Tolowerarm,simplypulldownonarm.
WARNING
1. Usethisproductonlyonepersonatatime.
2. Donotusethischairunlessallbolts,screws,andknobsare
securely tightened.
3. Check that all bolts, screws, and knobs are tight every three months
or as needed.
4. Do not overturn back tilt knob when decreasing tension.
5. Disposeofpackingmaterialproperly.Donotuseplasticcoverashead
covering. It may cause suffocation.
6. Donotusechairasastepladder.
7. Usethischairforitsintendedpurposeonly.
8. Usemilddetergentonlyforcleaning.
1
3
2
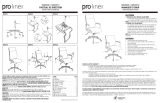
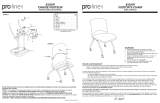
PIÈCES QTÉ
1. Roulette . . . . . . . . . . . . . . . . . . . . . . . 5
2. Base .........................1
3. Vérin Pneumatique ...............1
4.PlaqueduSiège .................1
5.CoussinduSiège ................1
6. Dossier........................1
7.Bras(7Let7R) ..................2
8.VispourPlaqueduSiège...........2
9.VispourPlaqueduSiège...........2
10. Vis pour Bras ..................8
11. Capuchons en Plastique ..........8
12. Clé Allen (non montré)............1
11
11
9
4
4
3
2
1
3
8
5
ÉTAPE 1 ÉTAPE 2 ÉTAPE 3
ÉTAPE 4 ÉTAPE 5
7R
6
10
7L
10
5
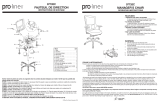
Enlever toutes les pièces du carton, les organiser selon les numéros de pièce indiqués sur la liste et vérier que les quantités des
pièces reçues sont correctes.
ÉTAPE 1Insérercinqroulettes(1)danslabase(2).Poussezfortjusqu’àcequevousentendiezousentiezlaroulette(1)s’enclencher.Insérerle
vérinpneumatique(3)danslabase(2).
ÉTAPE 2Fixezlaplaquedusiège(4)aucoussindusiège(5)aveclaècheversl’avantdufauteuil.Fixezlaplaquedusiège(4)àl’aidedequatre
vispourplaquedesiège(8et9).
SERREZ COMPLÈTEMENT TOUTES LES VIS À L’AIDE D’UNE CLÉ ALLEN (12).
ÉTAPE 3Placezlesiègeassemblésurledessusduvérinpneumatique(3)etappliquezunepressionverslebas.
ÉTAPE 4Fixezlesbras(7Let7R)aucoussindusiège(5)àl’aidededeuxvispourbras(10)pourchaquebras(7).NE SERREZ PAS COMPLÈTEMENT
LES VIS.Fixezledossier(6)auxbras(7Let7R)àl’aidededeuxvispourbras(10)pourchaquebras(7).APPLIQUEZ UNE PRESSION FERME
POUR ALIGNER ET SERRER COMPLÈTEMENT TOUTES LES VIS À L’AIDE D’UNE CLÉ ALLEN (12).
ÉTAPE 5 Recouvrezlestrousdesbras(7Let7R)àl’aidedequatrecapuchonsenplastique(11)pourchaquebras(7).
ATTENTION : ASSUREZ-VOUS QUE TOUTES LES VIS SONT COMPLÈTEMENT SERREES AVANT D’UTILISER LA CHAISE.

GARANTIE LIMITÉE PROLINE II
LesfauteuilsProLineIIsontgarantisàcompterdeladated’achatcontrelesdéfaillancesentraînéespardesvicesdematériauxetdefabricationcommesuit:
•Garantieàviesurlespièces,dontlevérinpneumatique,lemécanismedecommande,labaseetlesroulettes.
• Garantie de 3 ans sur le tissu d’ameublement et la mousse contre l’usure et la détérioration.
•Lecuirn’estpasméritercontrelegrattementderoutineetéraer,commetoutcuirestsujetauxdéfautsmineursdansl’usage.
Pourfaireuneréclamationdegarantie,contacterleservicedespièces.Fournirlenumérodemodèle,preuvedepaiement,etunedescriptionduproblème.
Àsadiscrétion,OfceStarProducts:
(a)fourniradespiècescompatiblesdeproduitscourants
(b)répareralapièceduclient.Leclientdoitpayerd’avancelesfraisdetransportdetoutepièceretournéeàl’usine.Lesfraisdetransportderetour
pourdespiècesencoresousgarantieserontpayésparOfceStarProducts.
*Toutes les garanties sont limitées à l’acheteur original et à l’usage commercial normal déni comme l’usage pendant une semaine de travail standard de
quarante heures par des personnes pesant 400 lb ou moins. Le 54666 est pour des personnes pesant 300 lb ou moins. Les 7103M, 7602R, 7605R, 7600R,
81108, 81308 et 81608 sont pour des personnes pesant 400 lb ou moins. Cette garantie ne couvre pas la main d’oeuvre, le transport ou les dégâts entraînés
par la mauvaise utilisation, la négligence, la modication, les accidents, le vandalisme, la rouille, les catastrophes naturelles ou tout autre événement
indépendant de la volonté Produits Ofce Star. La garantie ne couvre pas des dégâts superciels qui pourraient se produire au cours de l’utilisation normale.
La responsabilité de dommages indirects ou accessoires est exclue. L’utilisateur accepte tout risque de blessure résultant de l’utilisation de ce produit. Si
l’usage dépasse 40 heures par semaine, une garantie de cinq ans sur toutes les pièces est applicable. Le tissu est garanti pendant un an. Cette garantie vous
accorde des droits spéciques reconnus par la loi, et vous pouvez avoir d’autres droits qui varient d’un état et d’une province à l’autre.
Tous les fauteuils ProLine II répondent ou dépassent les normes ANSI BIFMA.
C’est la responsabilité du client de payer d’avance les frais de transport de toute pièce retournée à l’usine. Les frais de transport de retour pour
des pièces encore sous garantie seront payés par Produits Ofce Star.
Nosnormesdequalitésontparmilesplusélevéesdel’industrie.Detempsentemps,malgrénosefforts,ilarrivequedespiècessoientendommagées
oumanquantes.Notredépartementdepiècesferatoutsonpossiblepourréglerleproblèmepromptement.Contactez-nousparcourrielà
parts.department@ofcestar.net,partélécopieà1-909-930-5629ouànotrenumérosansfraispourleservicedespiècesà1-800-950-7262,dulundiau
vendredide8hà15h30,heureduPacique.
©OfficeStarProductsJuly,2023
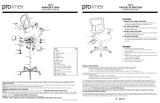
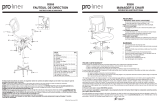
PART QTY
1. Caster ........................5
2. Base .........................1
3. Pneumatic Cylinder ...............1
4.SeatPlate......................1
5.SeatCushion ...................1
6. Backrest.......................1
7.Arms(7L&7R)..................2
8.SeatPlateScrew.................2
9.SeatPlateScrew.................2
10.ArmScrew ....................8
11. Plastic Caps ...................8
12. Allen Wrench (not shown) .........1
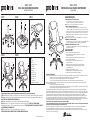
CARACTÉRISTIQUES
• RÉGLAGE PNEUMATIQUE DE LA HAUTEUR DU SIÈGE
Pourreleverlesiège,retirezlapressiondusiègeetsoulevezlelevier(1).
Pourabaisserlesiège,asseyez-voussurlefauteuiletsoulevezlelevier(1).
NOTE:Ilestnormalquelachaises’abaisselégèrementsouslepoidsducorps.
• RÉGLAGE DE L’INCLINAISON VERROUILLABLE
Pourunconfortindividuel,cettechaiseaétééquipéed’unréglagequipermettraà
l’utilisateurdemodierlatensiondelafonctiond’inclinaison.Tournezlebouton(2)dans
le sens des aiguilles d’une montre pour augmenter la tension et dans le sens inverse des
aiguilles d’une montre pour diminuer ou relâcher la tension. Pour verrouiller, remettez
lefauteuilenpositionverticaleetpoussezlelevier(1)versl’intérieur.Pourdéverrouiller,
tirezlelevier(1)versl’extérieur.
NOTE:Veillezànepasdesserrercomplètementleboutonderéglagedel’inclinaisondudossier.
• RÉGLAGE DE LA HAUTEUR DES BRAS
Pourréglerlahauteurdesbras,appuyersurlebouton(3)pourpermettreauxbrasde
monteretdedescendrelibrement.Lâcherlebouton(3)àlahauteurdésirée.
• POUR PLIER LE BRAS VERS LE HAUT ET LE BAS
Pour relever les bras, tirez simplement le bras sur le haut. Pour abaisser le bras, tirez
simplement le bras vers le bas.
AVERTISSEMENT
1. Seuleunepersonneàlafoispeututiliserceproduit.
2. Nepasutilisercefauteuilàmoinsquetouteslesvisettouslesboulons
et boutons soient resserrés.
3. Vérieràtouslestroismoisouaubesoinquetouteslesvisettousles
boulons et boutons sont resserrés.
4. Ne pas trop tourner le bouton d’inclinaison du dossier lors de la
diminution de la tension.
5. Éliminerlesmatériauxdeconditionnementd’unemanièreconvenable.
Nepasutiliserlacouvertureenplastiquepourcouvrirlatêteàcause
du risque d’étouffement.
6. Nepasutiliserlefauteuilcommeunescabeau.
7. Cefauteuilnedoitservirqu’àl’usagepourlequelilaétéconçu.
8. N’utiliserqu’undétergentliquidedouxpourlenettoyage.
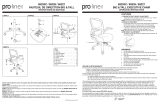
Remove all parts from carton, separate by part numbers indicated on parts list, and verify part quantities.
STEP 1InsertveCasters(1)intoBase(2).PushharduntilyoufeelorheartheCaster(1)snapintoplace.InsertPneumaticCylinder(3)intoBase(2).
STEP 2AttachSeatPlate(4)toSeatCushion(5)withthearrowtowardsthefrontofthechair.SecureSeatPlate(4)usingfourSeatPlateScrews(8&9).
FULLY TIGHTEN ALL SCREWS USING ALLEN WRENCH (12).
STEP 3 Place the assembled seat on top of Pneumatic Cylinder (3) and apply downward pressure.
STEP 4AttachArms(7L&7R)toSeatCushion(5)usingtwoArmScrews(10)foreachArm(7).DO NOT FULLY TIGHTEN SCREWS.
AttachBackrest(6)toArms(7L&7R)usingtwoArmScrews(10)foreachArm(7).APPLY FIRM PRESSURE TO ALIGN AND FULLY TIGHTEN
ALL SCREWS USING ALLEN WRENCH (12).
STEP 5 CoverholesinArms(7L&7R)usingfourPlasticCaps(11)foreachArm(7).
ATTENTION: MAKE SURE ALL SCREWS ARE FULLY TIGHTENED BEFORE USING CHAIR.
39200 / 39203
FAUTEUIL BIG & TALL DELUXE À HAUT DOSSIER
MODE D’EMPLOI
39200 / 39203
BIG & TALL DELUXE HIGH BACK CHAIR
ASSEMBLY INSTRUCTIONS
STEP 1 STEP 2 STEP 3
STEP 4 STEP 5 1
3
2
11
11
9
4
4
3
2
1
3
8
5
7R
6
10
7L
10
5
-
 1
1
-
 2
2


Pro-Line II 39203 Mode d'emploi
- Taper
- Mode d'emploi
- Ce manuel convient également à
dans d''autres langues
Documents connexes
-
 Pro-Line II 98346 Mode d'emploi
-
 Pro-Line II 920351C-R107 Mode d'emploi
-
 Pro-Line II 7270 Guide d'installation
-
 Pro-Line II 69226-EC3 Mode d'emploi
-
 Pro-Line II 97720C-30 Mode d'emploi
-
 Pro-Line II 62200C-R107 Mode d'emploi
-
 Pro-Line II ECH620867-EC2 Mode d'emploi
-
 Pro-Line II 92555-9276 Mode d'emploi
-
 Pro-Line II 29024-104 Mode d'emploi
-
 Pro-Line II 83220R-30 Mode d'emploi


