Jenn-Air JMC6224HL Le manuel du propriétaire
- Catégorie
- Micro-ondes
- Taper
- Le manuel du propriétaire
Ce manuel convient également à

JENNAIR
®
SMALL BUILT-IN SPEED OVEN
PETIT FOUR À CUISSON RAPIDE
ENCASTRÉ JENNAIR
®
W11320668B
Use & Care Guide
For questions about features, operation/performance, parts, accessories, or service in the U.S.A., call:
1-800-JENNAIR (1-800-536-6247) or visit our website at www.jennair.com.
In Canada, call: 1-800-JENNAIR (1-800-536-6247) or visit our website at www.jennair.ca.
Guide d’utilisation et d’entretien
Pour des questions à propos des caractéristiques, du fonctionnement/rendement, des pièces, accessoires ou dépannage,
composer le: 1800JENNAIR (1800536-6247) ou visitez notre site Web au www.jennair.com.
Au Canada, composer le: 1800JENNAIR (1800536-6247) ou visiter notre site Web au www.jennair.ca.

2
TABLE OF CONTENTS TABLE DES MATIÈRES
SÉCURITÉ DU FOUR À MICRO-ONDES ..................................16
Spécicationsélectriques ..........................................................18
COMMANDES DU FOUR À MICRO-ONDES .............................18
Tableau tactile ............................................................................19
Afchage ....................................................................................19
Afchage du menu .....................................................................19
Réglage et mode démonstration ...............................................19
UTILISATION DU FOUR À MICRO-ONDES ...............................19
Caractéristiques des aliments ....................................................19
Guide de cuisson .......................................................................20
Ustensiles de cuisson et vaisselle .............................................20
Papier d’aluminium et métal ......................................................21
Puissance de cuisson au four àmicro-ondes ...........................21
PIÈCES ET CARACTÉRISTIQUES ..............................................21
Plateau rotatif .............................................................................21
Grille de cuisson par convection ...............................................21
Plat à croustiller et poignée ........................................................22
Plaque de cuisson ......................................................................22
Cuiseur-vapeur ...........................................................................22
Cooking Modes (modes de cuisson) .........................................23
Defrost (Décongélation) ..............................................................23
Steam Cook (Cuisson à la vapeur) ............................................23
Popcorn (maïs éclaté) ................................................................23
Assisted Cooking (Cuissonassistée) .........................................24
Favorites (Favoris) ......................................................................24
Convect Modes (modes de convection) ....................................24
Degré de cuisson .......................................................................24
Settings (réglages) ......................................................................25
ENTRETIEN DU FOUR À MICRO-ONDES .................................26
Nettoyage général ......................................................................26
DÉPANNAGE .................................................................................27
ASSISTANCE OU DÉPANNAGE ..................................................28
Aux É.-U. ....................................................................................28
Au Canada ..................................................................................28
Accessoires ................................................................................28
MICROWAVE OVEN SAFETY .......................................................3
Electrical Requirements ...............................................................5
MICROWAVE OVEN CONTROL ....................................................5
Touch Panel ..................................................................................6
Display ..........................................................................................6
Display Navigation .......................................................................6
Setup and Demo Mode ................................................................ 6
MICROWAVE OVEN USE ............................................................... 6
Food Characteristics ....................................................................6
Cooking Guidelines ......................................................................7
Cookware and Dinnerware...........................................................7
Aluminum Foil and Metal .............................................................8
Microwave Cooking Power ..........................................................8
PARTS AND FEATURES ................................................................8
Turntable ....................................................................................... 8
Convection Rack ..........................................................................8
Crisper Pan and Handle ...............................................................9
Baking Tray ................................................................................... 9
Steamer Vessel .............................................................................9
Cooking Modes ..........................................................................10
Defrost ........................................................................................10
Steam Cook ...............................................................................10
Popcorn ...................................................................................... 10
Assisted Cooking .......................................................................11
Favorites .....................................................................................11
Convect Modes ..........................................................................11
Doneness ...................................................................................11
Settings ......................................................................................12
MICROWAVE OVEN CARE ..........................................................13
General Cleaning ........................................................................13
TROUBLESHOOTING ..................................................................14
ASSISTANCE OR SERVICE .........................................................15
In the U.S.A. ...............................................................................15
In Canada ...................................................................................15
Accessories ................................................................................15

3
MICROWAVE OVEN SAFETY
You can be killed or seriously injured if you don't immediately
You
can be killed or seriously injured if you don't
follow
All safety messages will tell you what the potential hazard is, tell you how to reduce the chance of injury, and tell you what can
happen if the instructions are not followed.
Your safety and the safety of others are very important.
We have provided many important safety messages in this manual and on your appliance. Always read and obey all safety
messages.
This is the safety alert symbol.
This symbol alerts you to potential hazards that can kill or hurt you and others.
All safety messages will follow the safety alert symbol and either the word “DANGER” or “WARNING.”
These words mean:
follow instructions.
instructions.
DANGER
WARNING

4
SAVE THESE INSTRUCTIONS
IMPORTANT SAFETY INSTRUCTIONS
■ Liquids, such as water, coffee, or tea are able to be
overheated beyond the boiling point without appearing to be
boiling. Visible bubbling or boiling when the container is
removed from the microwave oven is not always present.
THIS COULD RESULT IN VERY HOT LIQUIDS
SUDDENLY BOILING OVER WHEN THE CONTAINER IS
DISTURBED OR A SPOON OR OTHER UTENSIL IS
INSERTED INTO THE LIQUID.
To reduce the risk of injury to persons:
– Do not overheat the liquid.
– Stir the liquid both before and halfway through heating it.
– Do not use straight-sided containers with narrow necks.
– After heating, allow the container to stand in the
microwave oven for a short time before removing the
container.
– Use extreme care when inserting a spoon or other utensil
into the container.
■ Do not store the microwave oven outdoors. Do not use this
product near water - for example, near a kitchen sink, in a
wet basement, or near a swimming pool, and the like.
■ See door surface cleaning instructions in the “Oven Care”
section.
■ To reduce the risk of fire in the oven cavity:
– Do not overcook food. Carefully attend the microwave
oven if paper, plastic, or other combustible materials are
placed inside the oven to facilitate cooking.
– Remove wire twist-ties from paper or plastic bags before
placing bags in oven.
– If materials inside the oven should ignite, keep oven door
closed, turn oven off, and disconnect the power cord, or
shut off power at the fuse or circuit breaker panel.
– Do not use the cavity for storage purposes. Do not leave
paper products, cooking utensils, or food in the cavity
when not in use.
When using electrical appliances basic safety precautions should be followed, including the following:
WARNING:
To reduce the risk of burns, electric shock,
fire, injury to persons, or exposure to excessive microwave
energy:
■ Read all instructions before using the microwave oven.
■ Read and follow the specific “PRECAUTIONS TO AVOID
POSSIBLE EXPOSURE TO EXCESSIVE MICROWAVE
ENERGY” found in this section.
■ The microwave oven must be grounded. Connect only to
properly grounded outlet. See “GROUNDING
INSTRUCTIONS” found in this section.
■ Install or locate the microwave oven only in accordance
with the provided Installation Instructions.
■ Some products such as whole eggs in the shell and sealed
containers – for example, closed glass jars – may explode
and should not be heated in the microwave oven.
■ Use the microwave oven only for its intended use as
described in this manual. Do not use corrosive chemicals
or vapors in the microwave oven. This type of oven is
specifically designed to heat, cook, or dry food. It is not
designed for industrial or laboratory use.
■ Oversized foods or oversized metal utensils should not be
inserted in the microwave oven as they may create a fire or
risk of electric shock.
■
Do not clean with metal scouring pads. Pieces can burn off
the pad and touch electrical parts involving a risk of electric
shock.
■ Do not store any materials, other than manufacturer's
recommended accessories, in this oven when not in use.
■
Do not operate the microwave oven if it has a damaged
cord or plug, if it is not working properly, or if it has been
damaged or dropped.
■
Do not deep fry in oven. Microwavable utensils are not
suitable and it is difficult to maintain appropriate deep frying
temperatures.
■ Do not use paper products when appliance is operated in
the “PAN BROWN” mode.
■ Do not cover racks or any other part of the oven with metal
foil. This will cause overheating of the oven.
■ As with any appliance, close supervision is necessary
when used by children.
■
The microwave oven should be serviced only by qualified
service personnel. Contact nearest authorized service
company for examination, repair, or adjustment.
■ Do not cover or block any openings on the microwave
oven.
PRECAUTIONS TO AVOID POSSIBLE EXPOSURE TO
EXCESSIVE MICROWAVE ENERGY
(a) Do not attempt to operate this oven with the door open
since open-door operation can result in harmful exposure
to microwave energy. It is important not to defeat or
tamper with the safety interlocks.
(b) Do not place any object between the oven front face and
the door or allow soil or cleaner residue to accumulate on
sealing surfaces.
(c) Do not operate the oven if it is damaged. It is particularly
important that the oven door close properly and that
there is no damage to the:
(1) Door (bent),
(2) Hinges and latches (broken or loosened),
(3) Door seals and sealing surfaces.
(d) The oven should not be adjusted or repaired by anyone
except properly qualied service personnel.

5
Electrical Requirements
The microwave oven is connected to a 110 V side of the 240 V
circuit required for the lower oven. If the incoming voltage to the
microwave oven is less than 110 V, cooking times may be longer.
Have a qualied electrician check your electrical system.
MICROWAVE OVEN CONTROL
KEYPAD FEATURE INSTRUCTIONS
Settings Microwave Oven Use
Functions
Enables you to personalize the audible tones and microwave oven and oven
operation to suit your needs. See the “Settings” and “More Modes” sections.
Home Home Screen If pressed once, it enables the user to return to the “Cooking Methods” and “Assisted
Cooking” screen. If pressed twice, the time of day is displayed.
Favorites Favorites Allows you to save the cycles that you use on a frequent basis.
Light Oven Light Press the Light keypad to turn the light on and off. When the oven door is opened,
the oven light will automatically turn on.
Power Oven Function Power The Power keypad turns the oven on and wakes it from Sleep mode.
Cancel Oven Function
Cancel
The Cancel keypad turns the microwave oven on and wakes it from Sleep mode. If
the microwave oven is already on, the Cancel keypad stops any microwave oven
function except the Clock, Timer, and Control Lock.
For a permanently connected microwave oven:
The microwave oven must be connected to a grounded,
metallic, permanent wiring system, or an equipment
grounding conductor should be run with the circuit
conductors and connected to the equipment grounding
terminal or lead on the microwave oven.
GROUNDING INSTRUCTIONS
SAVE THESE INSTRUCTIONS
This device complies with Part 18 of the FCC Rules.
This device complies with Industry Canada ICES-001.
CANCEL
Light
Settings
Home
Favorites

6
Touch Panel
The touch panel houses the control menu and function controls.
The touch keypads are very sensitive and require only a light
touch to activate. Scroll up, down, left, or right to explore the
different options and features.
For more information about the individual controls, see their
respective sections in this manual.
Display
The display is for both the menu and oven function controls. The
touch panel allows you to scroll through the microwave oven
menus. The display is very sensitive and requires only a light
touch to activate and control.
When a microwave oven is in use, the display will show the
clock, mode, microwave oven temperature, kitchen timer, and
microwave oven timer, if set. If the microwave oven timer is not
set, you can set it from this screen.
After approximately 2 minutes of inactivity, the display will go
into sleep mode and the display will dim. When the oven is in
operation, the display will remain bright.
During use, the display will show menus and the appropriate
selections for the options being chosen.
Display Navigation
If the microwave oven is off, touch the Oven Power or the
Microwave Power keypad for the desired oven to activate the
menu. From this screen, all automatic cooking programs can
be activated, all manual cooking programs can be set, options
can be adjusted, and instructions, preparation, and tips can be
accessed.
Setup and Demo Mode
1. Select STORE DEMO MODE to enter Demo Mode.
2. Follow the prompts on the display screen to select a
language, accept the terms of service and set the time.
NOTE: The display screen will show the time and date (default
screen/standby mode).
3. If you selected Store Demo Mode, select TRY THE PRODUCT
to explore various features and options of the product.
4. Select the Settings keypad.
To exit Demo Mode, see the “Settings” section.
MICROWAVE OVEN USE
A magnetron in the microwave oven produces microwaves which
reect off the metal oor, walls, and ceiling and pass through the
turntable and appropriate cookware to the food. Microwaves are
attracted to and absorbed by fat, sugar, and water molecules
in the food, causing them to move, producing friction and heat,
which cooks the food.
■ To avoid damage to the microwave oven, do not lean on or
allow children to swing on the microwave oven door.
■ To avoid damage to the microwave oven, do not operate
microwave oven when it is empty.
■ Baby bottles and baby food jars should not be heated in
microwave oven.
■ Clothes, owers, fruit, herbs, wood, gourds, paper, including
brown paper bags and newspaper, should not be dried in
microwave oven.
■ Parafn wax will not melt in the microwave oven because it
does not absorb microwaves.
■ Use oven mitts or pot holders when removing containers from
microwave oven.
■ Do not overcook potatoes. At the end of the recommended
cook time, potatoes should be slightly rm. Let potatoes stand
for 5 minutes. They will nish cooking while standing.
■ Do not cook or reheat whole eggs inside the shell. Steam
buildup in whole eggs may cause them to burst, requiring
signicant cleanup of microwave oven cavity. Cover poached
eggs and allow a standing time.
Food Characteristics
When microwave cooking, the amount, size and shape, starting
temperature, composition, and density of the food affect cooking
results.
Amount of Food
The more food heated at once, the longer the cook time needed.
Check for doneness and add small increments of time if
necessary.
Size and Shape
Smaller pieces of food will cook more quickly than larger pieces,
and uniformly shaped foods cook more evenly than irregularly
shaped food.
Starting Temperature
Room temperature foods will heat faster than refrigerated foods,
and refrigerated foods will heat faster than frozen foods.
Composition and Density
Foods high in fat and sugar will reach a higher temperature, and
will heat faster than other foods. Heavy, dense foods, such as
meat and potatoes, require a longer cook time than the same size
of a light, porous food, such as cake.

7
Cooking Guidelines
Covering
Covering food helps retain moisture, shorten cook time, and
reduce spattering. Use the lid supplied with cookware. If a lid is
not available, wax paper, paper towels, or plastic wrap approved
for microwave ovens may be used. Plastic wrap should be
turned back at one corner to provide an opening to vent steam.
Condensation on the door and cavity surfaces is normal during
heavy cooking.
Stirring and Turning
Stirring and turning redistributes heat evenly to avoid overcooking
the outer edges of food. Stir from outside to center. If possible,
turn food over from bottom to top.
Arranging
If heating irregularly shaped or different sized foods, arrange the
thinner parts and smaller sized items toward the center. If cooking
several items of the same size and shape, place them in a ring
pattern, leaving the center of the ring empty.
Piercing
Before heating, use a fork or small knife to pierce or prick foods
that have a skin or membrane, such as potatoes, egg yolks,
chicken livers, hot dogs, and sausage. Prick in several places to
allow steam to vent.
Shielding
Use small, at pieces of aluminum foil to shield the thin pieces
of irregularly shaped foods, bones, and foods such as chicken
wings, leg tips, and sh tails. See the “Aluminum Foil and Metal”
rst.
Standing Time
Food will continue to cook by the natural conduction of heat even
after the microwave cooking cycle ends. The length of standing
time depends on the volume and density of the food.
Cookware and Dinnerware
Cookware and dinnerware must t on the turntable. Always
use oven mitts or pot holders when handling because any dish
may become hot from heat transferred from the food. Do not
use cookware and dinnerware with gold or silver trim. Use the
following chart as a guide, then test before using.
MATERIAL RECOMMENDATIONS
Aluminum Foil,
Metal
See the “Aluminum Foil and Metal” section.
Browning Dish Bottom must be at least 3/16" (5 mm)
above the turntable. Follow manufacturer’s
recommendations.
Ceramic Glass,
Glass
Acceptable for use.
China,
Earthenware
Follow manufacturer’s recommendations.
Melamine Follow manufacturer’s recommendations.
Paper: Towels,
Dinnerware,
Napkins
Use nonrecycled and those approved by the
manufacturer for microwave oven use.
Plastic: Wraps,
Bags, Covers,
Dinnerware,
Containers
Use those approved by the manufacturer for
microwave oven use.
Pottery and Clay Follow manufacturer’s recommendations.
Silicone
Bakeware
Follow manufacturer’s recommendations.
Straw, Wicker,
Wooden
Containers
Do not use in microwave oven.
Wax Paper Acceptable for use.
To Test Cookware or Dinnerware for Microwave Use:
1. Place cookware or dinnerware in microwave oven with 1 cup
(250 mL) of water beside it.
2. Cook at 100% cooking power for 1 minute.
Do not use cookware or dinnerware if it becomes hot and the
water stays cool.

8
Aluminum Foil and Metal
Always use oven mitts or pot holders when removing dishes from
the microwave oven.
Aluminum foil and some metal can be used in the microwave
oven. If not used properly, arcing (a blue ash of light) can occur
and cause damage to the microwave oven.
OK for Use
Racks and bakeware supplied with the microwave oven (on
some models), aluminum foil for shielding, and approved meat
thermometers may be used with the following guidelines:
■ To avoid damage to the microwave oven, do not allow
aluminum foil or metal to touch the inside cavity walls, ceiling,
or oor.
■ Always use the turntable.
■ To avoid damage to the microwave oven, do not allow contact
with another metal object during microwave cooking.
Do Not Use
Metal cookware and bakeware, gold, silver, pewter, nonapproved
meat thermometers, skewers, twist ties, foil liners such as
sandwich wrappers, staples and objects with gold or silver trim or
a metallic glaze should not be used in the microwave oven.
Microwave Cooking Power
Many recipes for microwave cooking specify which cooking
power to use by power levels (watt).
Use the following chart as a general guide for the suggested
cooking power of specic foods.
NAME USE
900 W Quick-heating convenience foods and foods with
high water content, such as soups, beverages, and
most vegetables.
750 W Cooking vegetables. Heating cream soups. Cooking
small, tender pieces of meat, ground meat, poultry
pieces, and sh llets.
650 W Cooking ham, whole poultry, and pot roasts. Heating
rice, pasta or stirrable casseroles.
Cooking and heating foods that need a cook power
lower than high. For example, whole sh, and meat
loaf.
500 W Cooking sensitive foods such as cheese and egg
dishes, pudding, and custards.
Cooking non-stirrable casseroles, such as lasagna.
350 W Melting chocolate. Heating bread, rolls, and
pastries. Simmering stews.
Cooking non-stirrable casseroles, such as lasagna.
160 W Defrosting bread, sh, meats, poultry, and
precooked foods.
90 W Softening butter, cheese, and ice cream.
PARTS AND FEATURES
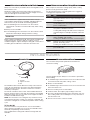
Turntable
The turntable rotates in both directions to help cook food more
evenly. Do not operate the microwave oven without having the
turntable in place. See the “Assistance or Service” section to
reorder any of the parts.
The raised, curved lines in the center of the turntable bottom t
between the three spokes of the hub. The hub turns the turntable
during microwave oven use. The rollers on the support should t
inside the turntable bottom ridge.
NOTE: The microwave oven cooling fan may continue to run for
several minutes after the cooking cycle has been completed. The
microwave cooking does not continue beyond the end of cooking
cycle.
To Turn On/Off
For best microwave oven performance, it is recommended to
always leave the turntable on. If necessary, the turntable can be
turned off (except during an auto function).
This is helpful when cooking with a dish that is larger than the
turntable.
Convection Rack
The convection rack provides optimal heat circulation for
convection cooking.
The rack will become hot. Always use oven mitts or pot holders
when handling.
■ To avoid damage to the microwave oven, do not allow the rack
to touch the inside cavity walls, ceiling, or oor.
■ Always use the turntable.
■ To avoid damage to the microwave oven, do not store the rack
in the microwave oven.
■ Two-level cooking is not recommended.
■ For best results, do not place popcorn bags on the rack.
■ The rack is designed specically for this microwave oven. For
best cooking results, do not attempt to use any other rack in
this microwave oven.
■ See the “Accessories” section to reorder.
A
B
C
A. Turntable
B. Support and rollers
C. Hub

9
Crisper Pan and Handle
The crisper pan, with its nonstick surface and detachable handle,
has been specically designed for microwave use, and is ideal for
pan-frying (pan-browning) foods in the microwave oven.
■ The crisper pan will become hot. Always use the handle and
oven mitts or pot holders when handling. Place gripping end
on the edge of pan, squeeze handle, and lift pan.
■ To avoid damage to the microwave oven, do not allow the
crisper pan or handle to touch the inside cavity walls, ceiling,
or oor.
■ To avoid damage to the microwave oven, do not use another
metal object with the crisper pan.
■ To avoid damage, do not place hot crisper pan directly on
heat-sensitive surfaces.
■ The crisper pan is designed specically for this microwave
oven. Do not use it in any other microwave oven.
■ Use only wooden or plastic cooking utensils to help avoid
scratches.
See the “Accessories” section to reorder.
Baking Tray
The baking tray can be used only with convection cooking.
■ To avoid damage to the microwave oven, do not use in
combination with microwave cooking.
■ The baking tray will become hot. Always use oven mitts or pot
holders when handling.
See the “Accessories” section to reorder.
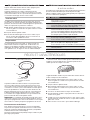
Steamer Vessel
■ The steamer vessel will become hot. Always use oven mitts or
pot holders when handling.
■ The steamer vessel is designed to be used only in the
microwave oven. To avoid damaging the steamer vessel, do
not use in a convectional- or combination-type oven, with
any other convection or crisp function, or on electric or gas
burners.
■ Do not use plastic wrap or aluminum foil when covering the
food.
■ Always place the steamer vessel on the glass turntable. Check
that the turntable turns freely before starting the microwave
oven.
■ Do not remove lid while the steamer vessel is inside the
microwave oven as the rush of steam will disrupt the sensor
settings.
■ To avoid scratching, use plastic utensils.
■ Do not overll with water.
Lid: Always use the lid when steaming. Place directly over the
insert and base or just the base.
Insert: Use when steam cooking to keep foods such as sh and
vegetables out of the water. Place insert with food directly over
the base. Do not use when simmering.
Base: For steam cooking, place water in base. For simmering
foods such as rice, potatoes, pasta, and vegetables, place food
and water/liquid in base. The steamer base has been designed
also to be used in combination with the special steam clean
function. See "Cleaning Section" for more information.
See the “Accessories” section to reorder.
A
B
C
A. Lid
B. Insert
C. Base

10
Cooking Modes
To set a Cooking Mode, follow these steps:
1. Press the Home Button or touch the display.
2. Select the Cooking Modes option.
3. Select the desired cooking function from the list. See the
following table for descriptions.
4. Follow the on-screen prompts to set the time, temperature
and the other settings.
5. In some functions it is possible set the preheat option. In the
temperature screen selection press the icon, in the upper right
corner, to set the preheat.
6. Press START to begin. If preheating is on, a tone will sound
and a message appears when preheating is complete.
7. Press Cancel button to stop the cycle.
COOKING FUNCTION SUGGESTED USAGE
Microwave For quickly cooking and reheating
food or drinks.
Browning Browning and crisping foods on
both sides.
Broil Browning and grilling foods on
one side.
Broil + MW Quickly cooking foods and
crisping the exterior.
Convect Broil Browning and thoroughly cooking
foods. Turn food during cooking.
Convect Broil + MW Quickly browning and cooking
foods.
Rapid Preheat Quickly preheating food before
beginning a True Convect cycle.
True Convect Cooking dishes similar to a
traditional oven.
True Convect, No Preheat Cooking dishes similar to a
traditional oven without preheat.
True Convect + MW Quickly cooking dishes similar to
a traditional oven.
Specialty Functions:
Keep Warm
Keep already-cooked food warm.
Specialty Functions:
Proong
Proong bread dough.
Defrost
The Defrost feature can be used, or the microwave oven can be
manually set to defrost by using 160 W cook power.
■ Unwrap foods and remove lids (from fruit juice) before
defrosting. Remove any metal twist-ties and replace them with
strings or elastic bands.
■ If food is foil wrapped, remove foil and place it in a suitable
container.
■ Slit or pierce plastic pouches or packaging. Slit the skins, if
any, of frozen food such as sausage.
■ Bend plastic pouches of food to ensure even defrosting.
■ Always underestimate defrosting time. If defrosted food is
still icy in the center, return it to the microwave oven for more
defrosting.
■ The length of defrosting time varies according to how solidly
the food is frozen.
■ Shallow packages will defrost more quickly than deep blocks.
■ Separate food pieces as soon as possible during or at the end
of a cycle for more even defrosting.
■ Use small pieces of aluminum foil to shield parts of food such
as chicken wings, leg tips and sh tails. See the “Aluminum
Foil and Metal” section rst.
Steam Cook
Steam Cook is a sensor cooking function that uses microwaves
to steam food. Use Steam for foods such as vegetables, sh and
potatoes.
■ Times and cooking powers have been preprogrammed for
steaming a number of food types.
■ Use the provided microwave-safe steamer.
■ Use 1/2 cup (125 mL) water or as directed in the steamer
instructions.
Popcorn
NOTE: During Popcorn function, as with all microwave cooking
functions, the microwave oven should be attended at all times.
The microwave oven uses the sensor to determine sizes that can
be popped: 1.75-3.5 oz (50-99 g) bags.
■ To avoid damage to the microwave oven, do not use regular
paper bags or glass utensils.
■ Pop only one package of popcorn at a time.
■ Follow manufacturer’s instructions when using a microwave
popcorn popper.
■ For best cooking results, do not try to pop unpopped kernels.
■ Use fresh bags of popcorn for optimal results.
■ Cooking results may vary by brand and fat content.
WARNING
Food Poisoning Hazard
Do not let food sit in oven more than one hour before
or after cooking.
Doing so can result in food poisoning or sickness.

11
Assisted Cooking
Assisted cooking functions enable you to prepare a wide variety
of dishes, choosing from those shown in the list. Most cooking
settings are automatically selected by the appliance in order to
achieve the best results.
Functions are displayed by food categories in the FOOD list and
by recipe features in the LIFESTYLE menu.
Once you have selected a function, simply indicate the
characteristic of the food (quantity, weight, etc.) you want to cook
to achieve the perfect result.
Favorites
The Favorites feature stores the microwave settings for your
favorite recipe.
As you continue to utilize your Favorites tool, your product will
rene and tailor suggestions towards your cooking cravings/
needs.
NOTE: A select set of Favorites and suggestions may be
automatically shown on the Home screen based on your meal
times.
To save a recipe, select the Favorites keypad (heart icon), and
follow the prompts on the screen to customize your favorites.
Add an image or name to the favorite to customize it to your
preferences.
Convect Modes
Convection cooking uses the convection element, the broil
element, and the fan. Hot air is circulated throughout the
microwave oven cavity by the fan. The constantly moving air
surrounds the food to heat the outer portion quickly.
■ The convect function may be used to cook small amounts of
food on a single rack.
■ Always use the convection grid placed on turntable or baking
tray.
■ Do not cover turntable or convection grid or baking tray with
aluminum foil.
■ Do not use light plastic containers, plastic wrap, or paper
products. All heatproof cookware or metal utensils can be
used in convection cooking. Round pizza pans are excellent
for convection cooking.
■ Use convection cooking for items such as soufes, breads,
cookies, angel food cakes, pizza, and most meats and sh.
Convection temperatures and times differ from those of standard
cooking. The oven can automatically reduce standard recipe
temperatures and times for convection cooking.
The conversion may not be exact because foods are grouped in
general categories. Use the following chart as a guide.
Convection Chart
Setting Foods
Baked Goods Biscuits, breads: quick and yeast
Cakes and Cookies
Casseroles: including frozen entrées
and soufés
Fish
Meats Baked potatoes
Chicken: whole and pieces
Meatloaf
Roasts: pork, beef, and ham
Turkey and large poultry are not included
because their cook times vary.
Other Foods Convenience foods: french fries, nuggets,
sh sticks, pizza
Pies: fruit and custard
Doneness
1. Switch on the oven by selecting the ON/HOME button or
touching the display.
2. Select the Assisted Cooking.
3. Select Food list.
4. Choose the food to cook from the list.
5. Select the quantity of food you want to cook. (Weight is
requested in Oz).
6. Select the level of doneness you would prefer. Doneness
selection will modify the cooking time in order to adjust the
internal doneness of your food to the desired level of cooking.
7. Press START to begin the preheat cycle.
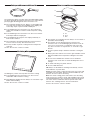
B
C
D
A
A. Broil element
B. Convection fan
C. Convection element
D. Convection grid

12
Settings
The Settings keypad allows you access to functions and
customization options for your oven. These settings allow you to
set the clock, turn the audible signals and prompts on and off,
adjust the oven calibration, change the language, and more.
Select the Settings keypad to view the Settings features:
■ Kitchen Timer
■ Light
■ Turntable
■ Mute
■ Control Lock
Tools Available Selections
Kitchen Timer Set a kitchen timer by manually entering the
desired time into the keypad.
1. Select KITCHEN TIMER.
2. Manually input the time to the desired
timer length.
3. Select START.
4. Select the Cancel keypad to end the
Kitchen Timer.
Light Select the Light to turn the light on and off.
When the oven door is opened, the oven
light will automatically turn on.
Turntable Turn the turntable on or off.
Mute Select MUTE keypad to mute or unmute the
oven sounds.
Control Lock The Control Lock shuts down the control
panel keypads to avoid unintended use of
the microwave oven(s). The Control Lock
will remain set after a power failure, if set
before the power failure occurs. When the
control is locked, only the Microwave Oven
Power, Settings, and Microwave Oven Light
keypads will function.
The Control Lock is preset unlocked, but
can be locked.
To Lock or Unlock Control:
1. Check that the microwave oven is off.
2. Select CONTROL LOCK.
3. “Control Lock” will display.
4. Scroll up to unlock.
5. No keypads will function with the
controls locked.
Preferences
Times and Dates
Set time and date preferences.
Your Meal Times
Adjust when breakfast/lunch/dinner is shown
■ Time
■ Date
■ Time Format (AM/PM vs 24 hour [Military Time])
Sound Volume
Set sound volume preferences.
■ Timers and Alerts
■ Buttons and Effects
Display Settings
Set the screen brightness.
■ Display Brightness: Set the display brightness
■ Emphasize Info When I Am Far: Turn on or off
Regional
Set regional preferences.
■ Language: English or French
Info
■ Service and Support: Displays model number, Customer
Support contact info, and Diagnostics.
■ Store Demo Mode: Select Store Demo Mode to toggle Demo
Mode off and on.
Start Demo Mode
1. Select the Settings keypad.
2. Scroll and select INFO.
3. Select STORE DEMO MODE and select ON.
NOTE: The display screen will show the time (default screen/
standby mode).
4. Select the Settings keypad.
5. Select TRY THE PRODUCT.
If the unit is in Demo Mode after power up, follow these steps
to exit Demo Mode.
To Exit Demo Mode:
1. Select TRY THE PRODUCT.
2. Select the Settings keypad.
3. Scroll and select INFO.
4. Select STORE DEMO MODE and select OFF.
5. Select YES on the conrmation screen.
■ Restore Factory: This will restore your product to the original
factory default settings.

13
MICROWAVE OVEN CARE
General Cleaning
IMPORTANT: Before cleaning, make sure all controls are off and
the oven is cool. Always follow label instructions on cleaning
products.
Soap, water, and a soft cloth or sponge are suggested rst unless
otherwise noted.
Microwave Oven Door And Exterior
The area where the oven door and frame touch when closed
should be kept clean.
Cleaning Method:
■ Mild, nonabrasive soaps and detergents:
Rinse with clean water and dry with soft, lint-free cloth.
■ Glass cleaner and paper towels or nonabrasive plastic
scrubbing pad:
Apply glass cleaner to towel, not directly to surface.
Stainless Steel
NOTE: To avoid damage to stainless steel surfaces, do not use
soap-lled scouring pads, abrasive cleaners, Cooktop Cleaner,
steel-wool pads, gritty washcloths or some paper towels.
Rub in direction of grain to avoid damaging.
Cleaning Method:
■ Stainless Steel Cleaner and Polish 31462 (not included):
See the “Assistance or Service” section to order.
■ All-purpose cleaner:
Rinse with clean water and dry with soft, lint-free cloth.
■ Vinegar for hard water spots.
Control Panel
To avoid damage to the control panel, do not use abrasive
cleaners, steel-wool pads, gritty washcloths, or some paper
towels.
Cleaning Method:
■ Glass cleaner and soft cloth or sponge: Apply glass cleaner to
soft cloth or sponge, not directly on panel.
■ All-Purpose Appliance Cleaner Part Number 31662
(not included):
See the “Assistance or Service” section to order.
DIAMOND CLEAN
The action of the steam released during this special cleaning
cycle allows dirt and food residues to be removed with ease.
Activate the “Diamond Clean” function for an optimum cleaning
of the internal surfaces. Pour a cup of drinking water into the
supplied steamer bottom (3) only or on a microwave proof
container and activate the function.
Required accessories: Steamer.
Microwave Oven Cavity
To avoid damage to the microwave oven cavity, do not use
soap-lled scouring pads, abrasive cleaners, cooktop cleaner,
steelwool pads, gritty washcloths or some paper towels.
On stainless steel models, rub in direction of grain to avoid
damaging.
The area where the oven door and frame touch when closed
should be kept clean.
Cleaning Method:
Average soil
■ Mild, nonabrasive soaps and detergents:
Rinse with clean water and dry with soft, lint-free cloth.
Heavy soil
■ Mild, nonabrasive soaps and detergents:
Heat 1 cup (250 mL) of water for 2 to 5 minutes in oven.
Steam will soften soil. Rinse with clean water and dry with
soft, lint-free cloth.
■ Diamond Clean function:
Pour a cup of water into the base of the supplied steamer
vessel or in a microwave safe container, activate the
"Diamond Clean" function.
The action of the steam released during this special cleaning
cycle allows dirt and food residues to be easily removed with
a sponge or lint-free cloth.
Odors
■ Lemon juice or vinegar:
Heat 1 cup (250 mL) of water with 1 tbs (15 mL) of either
lemon juice or vinegar for 2 to 5 minutes in oven.
Turntable
Replace turntable immediately after cleaning. Do not operate the
microwave oven without the turntable in place.
Cleaning Method:
■ Mild cleanser and scouring pad
■ Dishwasher

14
TROUBLESHOOTING
First try the solutions suggested here. If you need further assistance or more recommendations that may help you avoid a service call,
refer to the warranty, or visit producthelp.jennair.com. In Canada, visit www.jennair.ca.
Contact us by mail with any questions or concerns at the address below:
Please include a daytime phone number in your correspondence.
PROBLEM POSSIBLE CAUSES AND/OR SOLUTIONS
Nothing will operate Household fuse is blown, or a circuit breaker is tripped: Replace the fuse or reset the circuit breaker.
If the problem continues, call an electrician.
Display shows
messages
Error code (display shows letter followed by number): Clear the display. If the message reappears, call
for service. See the “Assistance or Service” section.
Demo Mode (product is in Demo Mode): See the “Settings” section to exit Demo Mode.
Microwave oven will not
operate
The door is not completely closed: Firmly close the door.
The electronic microwave oven control is not set correctly: See the lower oven Use and Care Guide.
The Control Lock is set (on some models): See the lower oven Use and Care Guide.
The magnetron is not working properly: Heat 1 cup (250 mL) of cold water for 2 minutes at 900 W
cooking power. If water does not heat, call for service. See the “Assistance or Service” section.
Microwave oven makes
humming noise
This is normal and occurs when the transformer in the magnetron cycles on.
Microwave oven door
looks wavy
This is normal and will not affect performance.
Turntable will not
operate
The turntable is not properly in place: Make sure turntable is correct side up and is sitting securely on the
turntable support.
The turntable support is not operating properly: Remove turntable. Remove and replace turntable support.
Replace turntable. Put in 1 cup (250 mL) of water, then restart microwave oven. If it is still not working, call
for service. See the “Assistance or Service” section. Do not operate the microwave oven without turntable
and turntable support working properly.
Turntable rotates both
directions
This is normal and depends on motor rotation at beginning of cycle.
Display shows time
countdown, but is not
operating
The Minute Timer is in use: See the lower oven Use and Care Guide.
Tones are not sounding Tones are disabled: See the lower oven Use and Care Guide.
Cooking times seem too
long
The cooking power is not set properly: See “Cooking Power” in the “Microwave Oven Use” section.
Large amounts of food are being heated: Larger amounts of food need longer cooking times.
The incoming voltage is less than that specied in the “Parts and Features” section: Have a qualied
electrician check the electrical system of the house.
In the U.S.A.:
JennAir Brand Home Appliances
Customer eXperience Center
553 Benson Road
Benton Harbor, MI 49022-2692
In Canada:
JennAir Brand Home Appliances
Customer eXperience Centre
200 – 6750 Century Ave.
Mississauga, Ontario L5N 0B7

15
ASSISTANCE OR SERVICE
If you need service
Please refer to the warranty.
If you need replacement parts
If you need to order replacement parts, we recommend that you
use only factory specied parts. These factory specied parts
will t right and work right because they are made with the same
precision used to build every new JennAir
®
appliance.
To locate factory specied parts in your area, call us or your
nearest JennAir designated service center.
In the U.S.A.
Call the Customer eXperience Center toll-free: 1-800-JENNAIR
(1-800-536-6247).
Our consultants provide assistance with:
■ Features and specications on our full line of appliances.
■ Installation information.
■ Use and maintenance procedures.
■ Repair parts sales.
■ Specialized customer assistance (Spanish speaking, hearing
impaired, limited vision, etc.).
■ Referrals to local dealers, repair parts distributors and service
companies. JennAir designated service technicians are trained
to fulll the product warranty and provide after-warranty
service anywhere in the United States.
To locate the JennAir designated service company in your area,
you can also look in your telephone directory Yellow Pages.
For further assistance
If you need further assistance, you can write with any questions
or concerns at:
JennAir Brand Home Appliances
Customer eXperience Center
553 Benson Road
Benton Harbor, MI 49022-2692
Please include a daytime phone number in your correspondence.
In Canada
Call the JennAir Canada LP Customer eXperience Centre
toll-free: 1-800-JENNAIR (1-800-536-6247).
Our consultants provide assistance with:
■ Use and maintenance procedures.
■ Repair parts sales.
■ Referrals to local dealers, repair parts distributors and service
companies. JennAir designated service technicians are trained
to fulll the product warranty and provide after-warranty
service anywhere in Canada.
For further assistance
If you need further assistance, you can write with any questions
or concerns at:
JennAir Brand Home Appliances
Customer eXperience Centre
200 - 6750 Century Ave.
Mississauga, ON L5N 0B7
Please include a daytime phone number in your correspondence.
Accessories
To order accessories, visit our website at www.jennair.com.
Porcelain Broiler Pan and Grid
Order Part Number 4396923
Affresh
®
Stainless Steel Cleaner
(stainless steel models)
Order Part Number W10355016
Affresh
®
Kitchen and Appliance Cleaner
Order Part Number W10355010
Microwave Steamer
Order Part Number 8205262RB
Crisper Plate Cover
Order Part Number 461967739083

16
SÉCURITÉ DU FOUR À MICRO-ONDES
CONSERVEZ CES INSTRUCTIONS
Lors de l’utilisation d’appareils électroménagers, il convient d’observer certaines précautions élémentaires dont les suivantes :
IMPORTANTES INSTRUCTIONS DE SÉCURITÉ
AVERTISSEMENT : Pour réduire le risque de
brûlures, de choc électrique, d’incendie, de blessures aux
personnes et l’exposition excessive à l’énergie des
micro-ondes :
■ Lire toutes les instructions avant d’utiliser le four à
micro-ondes.
■ Lire et observer les instructions spécifiques de
“PRÉCAUTIONS CONTRE LE RISQUE D’EXPOSITION
EXCESSIVE À L’ÉNERGIE DES MICRO-ONDES”
présentées dans cette section.
■ Le four à micro-ondes doit être relié à la terre. Brancher
l’appareil uniquement sur une prise de courant
convenablement reliée à la terre. Voir les “INSTRUCTIONS
DE MISE À LA TERRE” présentées dans cette section.
■ Installer ou placer le four à micro-ondes uniquement selon
les instructions d’installation fournies.
■ Certains produits, comme les oeufs entiers dans leur
coquille et les récipients fermés – par exemple les bocaux
en verre fermés – peuvent exploser et on ne doit pas les
faire chauffer dans un four à micro-ondes.
■ Utiliser cet appareil uniquement pour les usages auxquels il
est destiné, tels qu’ils sont décrits dans ce manuel. Ne pas
utiliser de vapeurs ou de produits chimiques corrosifs dans
le four à micro-ondes. Ce type de four est spécifiquement
conçu pour chauffer, cuire ou sécher des aliments. Il n’est
pas conçu pour usage industriel ou de laboratoire.
■ Des aliments et des ustensiles de cuisson en métal de taille
excessive ne doivent pas être placés dans le four à
micro-ondes car ils peuvent créer un incendie ou un risque
de choc électrique.
■ Ne pas nettoyer avec un tampon à récurer en métal. Des
parties se détachant du tampon peuvent toucher des
pièces électriques, causant un risque de choc électrique.
■ Ne pas remiser dans le four non utilisé des articles autres
que les accessoires recommandés par le fabricant.
■ Ne pas faire fonctionner le four à micro-ondes si le cordon
d’alimentation ou la fiche de branchement est endommagé,
s’il ne fonctionne pas correctement, s’il a subi des
dommages ou s’il est tombé sur le plancher.
■ Ne pas frire dans le four. Les ustensiles allant au four à
micro-ondes ne conviennent pas et il est difficile de
maintenir des températures de friture appropriées.
■ Ne pas utiliser des produits en papier lorsque l’appareil
fonctionne au mode “PAN BROWN” (brunissement).
■ Ne pas couvrir les grilles ou toute autre partie du four avec
du papier métallique. Un surchauffage du four surviendra.
■ Comme pour tout appareil ménager, les enfants ne
devraient utiliser ce four que sous une supervision
adéquate.
■ Tous les travaux de service doivent être exécutés
exclusivement par un personnel d’entretien qualifié.
Contacter un centre de service autorisé pour les opérations
d’inspection, de réparation ou de réglage.
■ Ne pas couvrir ou obstruer une ouverture quelconque du
four à micro-ondes.

17
CONSERVEZ CES INSTRUCTIONS
Lors de l’utilisation d’appareils électroménagers, il convient d’observer certaines précautions élémentaires dont les suivantes :
IMPORTANTES INSTRUCTIONS DE SÉCURITÉ
AVERTISSEMENT : Pour réduire le risque de
brûlures, de choc électrique, d’incendie, de blessures aux
personnes et l’exposition excessive à l’énergie des
micro-ondes :
■ Lire toutes les instructions avant d’utiliser le four à
micro-ondes.
■ Lire et observer les instructions spécifiques de
“PRÉCAUTIONS CONTRE LE RISQUE D’EXPOSITION
EXCESSIVE À L’ÉNERGIE DES MICRO-ONDES”
présentées dans cette section.
■ Le four à micro-ondes doit être relié à la terre. Brancher
l’appareil uniquement sur une prise de courant
convenablement reliée à la terre. Voir les “INSTRUCTIONS
DE MISE À LA TERRE” présentées dans cette section.
■ Installer ou placer le four à micro-ondes uniquement selon
les instructions d’installation fournies.
■ Certains produits, comme les oeufs entiers dans leur
coquille et les récipients fermés – par exemple les bocaux
en verre fermés – peuvent exploser et on ne doit pas les
faire chauffer dans un four à micro-ondes.
■ Utiliser cet appareil uniquement pour les usages auxquels il
est destiné, tels qu’ils sont décrits dans ce manuel. Ne pas
utiliser de vapeurs ou de produits chimiques corrosifs dans
le four à micro-ondes. Ce type de four est spécifiquement
conçu pour chauffer, cuire ou sécher des aliments. Il n’est
pas conçu pour usage industriel ou de laboratoire.
■ Des aliments et des ustensiles de cuisson en métal de taille
excessive ne doivent pas être placés dans le four à
micro-ondes car ils peuvent créer un incendie ou un risque
de choc électrique.
■ Ne pas nettoyer avec un tampon à récurer en métal. Des
parties se détachant du tampon peuvent toucher des
pièces électriques, causant un risque de choc électrique.
■ Ne pas remiser dans le four non utilisé des articles autres
que les accessoires recommandés par le fabricant.
■ Ne pas faire fonctionner le four à micro-ondes si le cordon
d’alimentation ou la fiche de branchement est endommagé,
s’il ne fonctionne pas correctement, s’il a subi des
dommages ou s’il est tombé sur le plancher.
■ Ne pas frire dans le four. Les ustensiles allant au four à
micro-ondes ne conviennent pas et il est difficile de
maintenir des températures de friture appropriées.
■ Ne pas utiliser des produits en papier lorsque l’appareil
fonctionne au mode “PAN BROWN” (brunissement).
■ Ne pas couvrir les grilles ou toute autre partie du four avec
du papier métallique. Un surchauffage du four surviendra.
■ Comme pour tout appareil ménager, les enfants ne
devraient utiliser ce four que sous une supervision
adéquate.
■ Tous les travaux de service doivent être exécutés
exclusivement par un personnel d’entretien qualifié.
Contacter un centre de service autorisé pour les opérations
d’inspection, de réparation ou de réglage.
■ Ne pas couvrir ou obstruer une ouverture quelconque du
four à micro-ondes.
CONSERVEZ CES INSTRUCTIONS
IMPORTANTES INSTRUCTIONS DE SÉCURITÉ
■ Les liquides tels que l’eau, le café ou le thé peuvent
trop chauffer – au-delà du point d’ébullition – sans
sembler bouillir. Il n’y a pas toujours des bulles ou une
ébullition lorsqu’on retire le récipient du four à
micro-ondes. À CAUSE DE CECI, DES LIQUIDES
TRÈS CHAUDS POURRAIENT DÉBORDER
LORSQU’ON BOUGE LE RÉCIPIENT OU QUE L’ON
UTILISE UNE CUILLÈRE OU UN AUTRE USTENSILE
POUR LE REMUER.
Pour réduire le risque de blessures corporelles :
– Ne pas trop faire chauffer le liquide.
– Remuer le liquide avant et pendant le chauffage.
– Ne pas utiliser de récipients à parois droites avec des
ouvertures étroites.
– Une fois chaud, laisser le récipient dans le four à
micro-ondes un moment avant de le retirer.
– Faire très attention lorsqu’on utilise une cuillère ou un
autre ustensile dans le récipient.
■ Ne pas remiser le four à micro-ondes à l’extérieur. Ne pas
utiliser cet appareil près de l’eau, comme par exemple près
d’un évier de cuisine, un sous-sol mouillé ou près d’une
piscine ou autres endroits semblables.
■ Voir les instructions de nettoyage de la surface de la porte
à la section “Entretien du four à micro-ondes”.
■ Pour réduire le risque d’incendie dans la cavité du four :
– Ne pas faire cuire les aliments excessivement. Surveiller
attentivement le four à micro-ondes après y avoir placé
des produits en papier, en plastique ou autres matériaux
combustibles pour faciliter la cuisson des aliments.
– Enlever les attaches métalliques des sachets en papier
ou en plastique avant de placer les sachets dans le four.
– En cas d’inflammation de matériaux placés à l’intérieur
du four, maintenir la porte du four fermée, arrêter le four
et débrancher le cordon de courant électrique, ou
interrompre l’alimentation électrique au niveau du tableau
de distribution (fusible ou disjoncteur).
– Ne pas utiliser la cavité du four comme espace de
rangement. Ne pas laisser dans le four des produits en
papier, ustensiles de cuisine ou produits alimentaires,
lorsqu’il n’est pas utilisé.
PRÉCAUTIONS CONTRE LE RISQUE D’EXPOSITION
EXCESSIVE À L’ÉNERGIE DES MICRO-ONDES
(a) Ne pas tenter de faire fonctionner ce four lorsque la porte
est ouverte, car ceci pourrait susciter une exposition
dangereuse à l’énergie des micro-ondes. Il est important
de ne pas entraver le fonctionnement correct du dispositif
de verrouillage de sécurité.
(b) Ne pas placer d’objet entre la surface avant du four et la
porte, et ne jamais laisser des souillures ou résidus de
produits de nettoyage s’accumuler sur les surfaces
d’étanchéité.
(c) Ne pas faire fonctionner le four lorsqu’il est endommagé. Il
est particulièrement important que la porte du four ferme
convenablement et que les composants suivants ne soient
pas endommagés :
(1) Porte (déformation),
(2) Charnières et dispositif de verrouillage (brisés ou
desserrés),
(3)
Joints de porte et surfaces d’étanchéité.
(d) Seul un personnel d’entretien qualifié est habilité à
exécuter des réparations ou réglages sur cet appareil.

18
Spécifications électriques
Le four à micro-ondes doit être connecté au côté 110 V du circuit
à 240 V requis de l’alimentation électrique du four inférieur. Si la
tension d’entrée du four à micro-ondes est de moins de 110 V,
les temps de cuisson peuvent être prolongés. Demander à un
électricien qualié de vérier votre système électrique.
COMMANDES DU FOUR À MICRO-ONDES
CLAVIER FONCTION INSTRUCTIONS
Settings (Réglages) Utilisation des
fonctions du four
àmicro-ondes
Permet de personnaliser les signaux sonores et le fonctionnement du four à micro-
ondes et du four selon les préférences de l’utilisateur. Voir les sections «Réglages»
et «Plus de modes».
Home (accueil) Écran d’accueil En appuyant une fois, l’utilisateur peut accéder à l’écran des méthodes de cuisson et
de la cuisson assistée. L’heure est afchée en appuyant deux fois.
Favorites (Favoris) Favoris Permet à l’utilisateur d’enregistrer les programmes qu’il utilise le plus souvent.
Light (éclairage) Lampe du four Appuyer sur la touche Light (éclairage) pour allumer ou éteindre la lampe. La lampe
du four s’allume automatiquement à l’ouverture de la porte.
Alimentation Fonction
d’alimentation
La touche Alimentation met le four en marche ou le réveille lorsqu’il est en mode veille.
Cancel (annuler) Annulation
de la fonction
d’alimentation
La touche Cancel (annuler) met le four à micro-ondes en marche ou le réveille lorsqu’il
est en mode veille. S’il est déjà en marche, cette touche annule toute fonction du four à
micro-ondes, sauf l’horloge, la minuterie et le verrouillage des touches.
Pour un four à micro-ondes raccordé en
permanence :
Le four à micro-ondes doit être raccordé à un système
de câblage permanent en métal relié à la terre, ou le
câblage d'alimentation doit inclure un conducteur de
liaison à la terre connecté à la borne ou à un fil de
liaison à la terre sur le four à micro-ondes.
INSTRUCTIONS DE LIAISON
À LA TERRE
CONSERVER CES INSTRUCTIONS
Ce dispositif est conforme à la section 18 des règlements FCC.
Ce dispositif est conforme à la norme ICES-001 d’Industrie Canada.
CANCEL
Light
Settings
Home
Favorites

19
Tableau tactile
Le tableau tactile regroupe le menu de commande et les
commandes des différentes fonctions. Le panneau tactile est
trèssensible, il suft d’un léger toucher pour l’activer. Naviguer
vers le haut, le bas, la gauche ou la droite pour explorer les
différentes options et fonctions.
Pour plus d’information sur chaque commande, voir leurs
sections respectives dans ce manuel.
Affichage
L’afchage est pour le menu et les commandes de fonctionnement
du four. L’écran tactile permet de faire déler les menus du four
à micro-ondes. L’afchage est très sensible; il suft d’un léger
toucher pour l’activer et sélectionner les commandes.
Lorsque le four à micro-ondes est utilisé, l’afchage indique
l’horloge, le mode, la température du four à micro-ondes, la
minuterie de cuisine et la minuterie du four à micro-ondes, si
réglée. Si la minuterie du four à micro-ondes n’est pas réglée,
onpeut la régler à partir de cet écran.
Après environ 2 minutes d’inactivité, l’afchage passe au mode
de veille et l’afchage s’assombrit. Lorsque le four fonctionne,
l’afchage reste lumineux.
Au cours de l’utilisation, l’afchage indique les menus et les
sélections appropriées pour les options choisies.
Affichage du menu
Si le four à micro-ondes est fermé, appuyer sur la touche
d’alimentation du four à micro-ondes pour activer le menu
du fourdésiré. À partir de cet écran, tous les programmes de
cuisson automatique peuvent être activés; tous les programmes
de cuisson manuels peuvent être réglés; les options peuvent être
réglées et les instructions, les directives de préparation et les
conseils sont accessibles.
Réglage et mode démonstration
1. Sélectionner STORE DEMO MODE (mode de démonstration
en magasin) pour activer ce mode.
2. Suivre les instructions à l’écran pour sélectionner une langue,
accepter les modalités et régler l’heure.
REMARQUE: L’écran afche l’heure et la date (écran par
défaut/mode Veille).
3. Si Store Demo Mode (mode démonstration en magasin) est
sélectionné, sélectionner TRY THE PRODUCT (essayer le
produit) pour découvrir diverses caractéristiques et options
duproduit.
4. Sélectionner la touche Settings (réglages).
Pour quitter le mode Demo (démonstration), voir la section
«Réglages».
UTILISATION DU FOUR À MICRO-ONDES
Un magnétron dans le four produit des micro-ondes qui
rebondissent sur le plancher, les parois et la voûte en métal et
passent à travers le plateau rotatif et les ustensiles de cuisson
appropriés pour atteindre l’aliment. Les micro-ondes sont attirées
vers et absorbées par le gras, le sucre et les molécules d’eau
dans les aliments et font déplacer ces molécules, en produisant
une friction et une chaleur qui fait cuire les aliments.
■ An d’éviter d’endommager le four à micro-ondes, ne pas
laisser les enfants s’appuyer sur la porte du four à micro-
ondes ou s’y balancer.
■ An d’éviter d’endommager le four à micro-ondes, ne pas le
faire fonctionner lorsqu’il est vide.
■ Les biberons et les petits pots d’aliments pour bébé ne doivent
pas être chauffés dans le four à micro-ondes.
■ Les vêtements, eurs, fruits, herbes, bois, coloquintes,
papiers, y compris les sacs en papier brun et les journaux,
nedoivent pas être séchés dans le four à micro-ondes.
■ La parafne ne fondra pas dans le four, car elle n’absorbe pas
les micro-ondes.
■ Utiliser des mitaines de four ou des maniques pour enlever les
contenants du four.
■ Ne pas faire cuire les pommes de terre excessivement. À la n
de la durée de cuisson recommandée, les pommes de terre
devraient être légèrement fermes. Laisser les pommes de terre
reposer pendant 5 minutes. Elles achèveront de cuire pendant
cette période.
■ Ne pas faire cuire ou réchauffer des œufs entiers avec leur
coquille. L’accumulation de vapeur dans les œufs entiers
peutles faire éclater et obligera à nettoyer en profondeur la
cavité du four à micro-ondes. Recouvrir les œufs pochés et
leslaisser reposer.
Caractéristiques des aliments
Lors de la cuisson au four à micro-ondes, la quantité, la taille, la
forme, la température de mise en marche, la composition et la
densité de l’aliment affectent les résultats de cuisson.
Quantité d’aliments
La quantité d’aliments chauffés à la fois a une incidence sur
la durée de cuisson. Vérier le degré de cuisson et rallonger
légèrement la durée si nécessaire.
Taille et forme
Des aliments de petite taille cuiront plus vite que de gros
morceaux, et des aliments uniformes cuiront de façon plus
également que des aliments de forme irrégulière.
Température de mise en marche
Les aliments à température ambiante chaufferont plus vite que les
aliments réfrigérés, et les aliments réfrigérés chaufferont plus vite
que les aliments surgelés.
Composition et densité
Les aliments à haute teneur en gras et en sucre atteindront une
température plus élevée et chaufferont plus vite que les autres.
Les aliments lourds et denses, comme la viande et les pommes
de terre, demandent un temps de cuisson plus long que les
aliments de même taille, mais plus léger et poreux, comme
lesgâteaux.

20
Guide de cuisson
Recouvrement
Recouvrir les aliments aide à retenir l’humidité, réduire le temps
de cuisson et limiter les éclaboussures. Utiliser le couvercle
fourni avec l’ustensile de cuisson. S’il n’y a pas de couvercle,
du papier parafné, un essuie-tout ou des emballages en
plastique approuvés pour les micro-ondes peuvent être utilisés.
L’emballage en plastique doit être replié à un coin pour laisser
échapper la vapeur. La condensation sur les surfaces de la porte
et de la cavité est normale pendant une cuisson intense.
Remuer et tourner
Remuer et tourner les aliments redistribue la chaleur de manière
uniforme pour éviter la cuisson excessive des bords externes
des aliments. Mélanger de l’extérieur vers le centre. Si possible,
retourner les aliments.
Disposition
S’il s’agit d’aliments de formes irrégulières ou de dimensions
différentes, les parties plus minces et les morceaux plus petits
doivent être disposés près du centre. Si l’on cuit plusieurs
aliments de même taille et de même forme, les placer en
formedecercle, en laissant le centre du cercle vide.
Perforation
Avant le chauffage, utiliser une fourchette ou un petit couteau
pour percer les aliments qui ont une peau ou une membrane,
comme les pommes de terre, jaunes d’œufs, foies de poulet,
hot dogs et saucisses. Percer plusieurs endroits pour laisser
échapper la vapeur.
Protection
Utiliser du papier d’aluminium en petits morceaux pour protéger
les parties minces des aliments de forme irrégulière, les os et
les aliments comme les ailes et pilons de poulet, ainsi que les
queues de poisson. Voir d’abord la section «Papier d’aluminium
et métal».
Temps de repos
Les aliments continuent à cuire par conduction naturelle de
la chaleur même lorsque le programme du micro-ondes est
terminé. La durée du repos dépend du volume et de la densité
del’aliment.
Ustensiles de cuisson et vaisselle
La vaisselle et les ustensiles de cuisson doivent pouvoir être
placés sur le plateau rotatif. Toujours utiliser des mitaines de four
ou des poignées lors de la manipulation, car les plats peuvent
devenir chauds puisqu’ils sont en contact avec des aliments.
Ne pas utiliser des ustensiles de cuisson ou de la vaisselle avec
garniture en or ou en argent. Utiliser le tableau suivant comme
guide, ensuite faire un test avant utilisation.
MATÉRIAU RECOMMANDATIONS
Papier d’aluminium,
métal
Voir la section «Papier d’aluminium et
métal».
Plat brunisseur La partie inférieure doit se trouver au
moins à 3/16po (5mm) au-dessus
du plateau tournant. Suivre les
recommandations du fabricant.
Vitrocéramique,
verre
Peut être utilisé.
Porcelaine, terre
cuite
Suivre les recommandations du fabricant.
Mélamine Suivre les recommandations du fabricant.
Papier: Chiffons,
vaisselle, serviettes
de table
Utiliser des produits non recyclés et ceux
qui sont approuvés par le fabricant pour
l’utilisation dans un four à micro-ondes.
Plastique:
Emballages,
sacs, couvercles,
vaisselle,
contenants
Utiliser des produits approuvés par le
fabricant pour l’utilisation dans un four
àmicro-ondes.
Poterie et argile Suivre les recommandations du fabricant.
Ustensiles de
cuisson en silicone
Suivre les recommandations du fabricant.
Paille, osier,
contenants en bois
Ne pas utiliser au four à micro-ondes.
Papier parafné Peut être utilisé.
Pour vérifier si la vaisselle ou l’ustensile de cuisson
peut être utilisé dans un tiroir à micro-ondes :
1. Placer l’ustensile de cuisson ou la vaisselle dans le four à
micro-ondes avec une tasse (250ml) d’eau à côté de l’article.
2. Faire cuire à la puissance de cuisson maximale pendant
1minute.
Ne pas utiliser cet ustensile de cuisson ou cet article de vaisselle
s’il devient chaud alors que l’eau demeure froide.
La page est en cours de chargement...
La page est en cours de chargement...
La page est en cours de chargement...
La page est en cours de chargement...
La page est en cours de chargement...
La page est en cours de chargement...
La page est en cours de chargement...
La page est en cours de chargement...
-
 1
1
-
 2
2
-
 3
3
-
 4
4
-
 5
5
-
 6
6
-
 7
7
-
 8
8
-
 9
9
-
 10
10
-
 11
11
-
 12
12
-
 13
13
-
 14
14
-
 15
15
-
 16
16
-
 17
17
-
 18
18
-
 19
19
-
 20
20
-
 21
21
-
 22
22
-
 23
23
-
 24
24
-
 25
25
-
 26
26
-
 27
27
-
 28
28


Jenn-Air JMC6224HL Le manuel du propriétaire
- Catégorie
- Micro-ondes
- Taper
- Le manuel du propriétaire
- Ce manuel convient également à
dans d''autres langues
- English: Jenn-Air JMC6224HL Owner's manual
Documents connexes
Autres documents
-
Whirlpool WOC75EC7HV Manuel utilisateur
-
Yes WOC75EC7HV Manuel utilisateur
-
Whirlpool W11417283 Mode d'emploi
-
Whirlpool W11417283A Mode d'emploi
-
KitchenAid KMCC5015GBS Le manuel du propriétaire
-
-
-
-
 Euro-Pro Microwave Oven K5345B Manuel utilisateur
-
KitchenAid KOCE507EWH Manuel utilisateur
