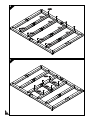
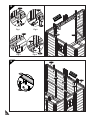
Duramax Building Products 30214 Mode d'emploi
- Taper
- Mode d'emploi

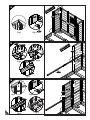
• Solidité Assurée en Toute Saison
• Ne se cabosse pas, ne rouille pas, ne moisit pas et ne se pique pas
• P
romenade debout dans l’abri
• Pas besoin de peinture
• Larges doubles portes de 61’’
• Montage facile
• Testé contre les vents violents
• Charge de neige testée 54 livres/pieds2
• Possibilité de cadenas (Verrou non inclus)
• Fondation inclue, plancher de bois ou de ciment nécessaire
• Fenêtre incassable incluse
Call us for any missing or damaged parts.
Do not retur
n to the store.
Requires two people and takes about 4-5 hours for Installation.
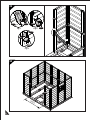
(FR) Votre solution pour des remises d’entreposage sans entretien.
(FR) Dimensions du bâtiment :
Taille
approximative
Stockage
Dimension extérieure
Dimension intérieure
10 Pieds x 8 Pieds
79 Carré pieds
480 Pieds cube
Toit de bord au bord
Dimension de base
Ouverture de
porte
3.2 Mètre x
2.4 Mètre
7.3 Mètre carré
13.6 Mètre cube
Largeur
Profondeur
Hauteur
pouce
cm
125 3/8
318.4
pouce
cm
94 1/4
239.3
127 7/8
324.8
97
246.5
91
231.2
pouce
cm
123 3/8
313.3
pouce
cm
92 1/4
234.3
60 5/8
154
71 1/2
181.6
73
185.5
Mur à mur
Secteur
Volume
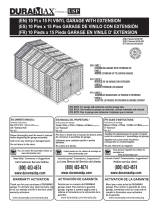
(EN)
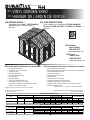
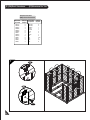
VINYL GARDEN SHED
A Product of
TM
ALL PURPOSE VINYL GARDEN SHEDS
(FR)
HANGAR DE JARDIN DE VINYLE
Ver: 2.01
(EN) OWNER’S MANUAL /
Instructions for Assembly ‘10 Ft WoodSide’
Size 10 Ft x 8 Ft / 3.2 m x 2.4 m (Approx.)
(FR) GUIDE D’INSTRUCTIONS /
Mode d’emploi pour Assemblage
‘10 Pieds WoodSide’
Mesures
10 Pieds x 8 Pieds / 3.2 Mètre x 2.4 Mètre (Approx.)
Ver: 2.01
(EN) Customer
Ser
vice Hotline
(800) 483-4674
www.duramaxbp.com
(FR) Service
Hotline Client.
(800) 483-4674
www.duramaxbp.com
• All Weather Durable PVC
• W
on’t Dent, Rust, Rot or Mildew
• Tall Walk In Shed
• Never Needs Painting
• 61 Inch Wide Double Doors
• Easy Assembly
• High Wind Tested
• Snow Load Tested 18lbs/sq. foot
• Pad Lock Ready (Lock not included)
• Foundation included, Wood or Cement floor needed
• Shatter Proof Window included
(EN)Your Total Solution To Maintenance Free Storage Sheds.
(EN) Building Dimensions :
Approximate
Size
Storage
Exterior Dimension
Interior Dimension
10 Ft x 8 Ft
79 Sq. Ft
480 Cu.Ft
Roof Edge to Edge
Base Dimension
Door Opening
3.2 m x 2.4 m
7.3 Sq.m
13.6 Cu.m
Width
Depth
Height
inch cm
125 3/8
318.4
inch cm
94 1/4
239.3
127 7/8
324.8
97
246.5
91
231.2
inch cm
123 3/8
313.3
inch
cm
92 1/4
234.3
60 5/8
154
71 1/2
181.6
73
185.5
Wall to Wall
Area Volume
Appelez-nous pour toute les pièces manquantes ou endommagées.
Ne pas retourner au magasin.
Il faut deux personnes et ça prend 4-5 heures pour l’installation.

(EN) Duramax Garden Shed
Limited Fifteen Y
ear Warranty
U.S. Polymer Inc. will send a replacement part free of charge, in the event of material defects and or workmanship for a period
of fifteen years from the date of purchase.
This warranty is extended only to the original purchaser
. A purchase receipt or other proof of date of original purchase will be
required before warranty service is rendered. In no event shall we pay the cost of flooring, labor, installation or any other costs
related thereto.
This warranty only covers failures due to defects in material or workmanship which occurs during normal use and does not
extend to color change arising due to normal weathering or to damage resulting from misuse or neglect, commercial use, failure
to follow assembly instructions and the owner’s manual (including proper anchoring of the shed), painting, forces of nature and
other causes which is beyond our control.
Claims under this warranty must be made within the warranty period by calling 1-800-483-4674 or mail in a dated sales slip and
clear photograph of the part to:
U.S. Polymers, Inc.
1057 S. Vail Ave,
Montebello, CA 90640.
We reserve the right to discontinue or change components. If a component has been discontinued or is not available,
U.S. P olymers, Inc. reserves the right to substitute a component of equal quality as may be compatible.
Limits and Exclusions
There are no express warranties except as listed above. The warrantor shall not be liable for incidental or consequential damages
resulting from the use of this product, or arising out of any br each of this warranty. All express warranties are limited to the
warranty period set forth above . Some states do not allow the exclusion or limitation on how long an implied warranty lasts,
so the above limitations may not apply to you.
This warranty gives you specific legal rights and you may also have other rights which vary from state to state or country to
country.
1
(FR) Duramax Abri D’entreposage
Garantie Quinze Ans
U
.S. P
olymer Inc. remplacera sans frais toute pièce en cas de defaut de fabrication ou de matière pour une periode de quinze
ans (A compter de la date d’achat).
La garantie est seulement étendue à l’acheteur original. Une facture d’achat ou autre preuve confirmant la date de transaction
séra exigée avant que le service de garantie vous soit accordée. En aucun cas, deverons-nous payer les frais de foundation,
main d’oeuvre, installation ou tout autre cout exterieur à la garantie.
La garantie s’applique contre tous defauts de fabrication ou de matière dès lors que l’installation est conformé aux preconisations
du fabriquant decrites dans la notice d’assemblage à l’exception d’une mauvaise utilisation, de l’usure, de decoloration due
aux intemperies, utilisation commerciale et d’incidents materiels exterieurs concernant le dit produit.
T
outes reclamations doivent être faites durant la periode de garantie en telephonant au 1-800-483-4674 ou en expediant une
facture d’achàt date et une photographie de la piece à:
U
.S. P
olymers, Inc.
1057 S. V
ail A
ve,
Montebello, CA 90640.
Nous nous reservons le droit de discontinuer ou de changer les pièces si l’une des pièces a été discontinuée ou n’est pas
disponible. U
.S. P
olymers Inc. se reserve le droit de changer une pièce de qualité égale a la pièce d’origine.
Limitation et Exclusions
Il n’y a d’autre garantie excepteé celle mentionnée ci-dessus. Le garant n’est pas responsible des degâts materiels ou des
accidents consecutifs à une installation non conforme aux dispositions légales et reglementaires du pays de mise en service.
En aucun cas, cette garantie ne donne droit a des indemnités ou
a des dommages et interets.T
outes garanties sont limiteés
pour une periode mentionneé ci-dessus certains pays ne permettent pas la limitation et l’exclusion concernant la durée de
garantie, ceci pourrait donc ne pas s’adresser a vous.
Cette garantie vous donne des droits legaux specifiques et vous pourriez aussi avoir d’autre droits qui varient d’un pays a
l’autre.

2
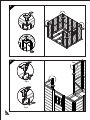
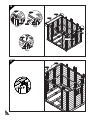
(EN) SAFETY & PRECAUTIONS
(FR) SÉCURITÉ ET PRÉCAUTIONS
(EN)Before You Begin...
1. Check your local building codes regarding footings, location, etc.
2. Select a site that allows enough working space around the shed.
3. Determine building foundation and anchor system.
4. Read and understand the Owner’s manual enclosed in the package.
5. Follow all directions and dimensions thoroughly.
6. Follow the steps given in the manual carefully for correct assembly.
7. Make sure all parts are present before you start assembling.
8. BE SAFE : Follow safety instructions and avoid injury.
(See inside page).
9. GROUND MUST BE EVEN : Make sure the foundation frame lies flat on
the ground. If the earth bed is uneven, remove sod and other debris and
level it with a flat shoval.
10. Separate contents of the carton by the part number and review the list.
Be sure you have all the necessary parts for your shed.
Refer Owner’s manual for part list.
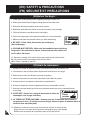
CAUTION
Sharp
Edges
(FR)Avant de commencer...
1. Vérifiez vos codes de bâtiment locaux concernant des poses, la position, etc.
2. Choisissez un site qui laisse assez d'espace de travail autour du hangar.
3. Déterminez la base de bâtiment et ancrez le système.
4. Lisez et comprenez le manuel du propriétaire inséré dans le paquet.
5. Suivez toutes les consignes et dimensions complètement.
6. Suivez les étapes du manuel soigneusement pour l'assemblée correcte.
7. Assurez-vous que toutes les pièces sont présentes avant que vous commenciez avec
le montage.
8. SOYEZ SÛR : Suivez les consignes de sécurité et évitez les
dommages. (Voir la page intérieure).
9. LA TERRE DOIT ÊTRE UNIFORME : Assurez-vous que la charpente de la fondation
est plate sur la terre. Si le lit de la terre est inégal, enlevez le gazon et d'autres débris et
nivelez-la avec une pelle platel.
10. Séparez le contenu du carton par le numéro de la pièce et révisez la liste.
Soyez sûr que vous avez toutes les pièces nécessaires pour votre hangar.
Référez-vous au manuel du propriétaire pour la liste des pièces.
ATTENTION
Bords
pointus

3
(EN) SAFETY & PRECAUTIONS
(EN) For your own safety, please read and follow these instructions during the shed assembly.
1. (EN) Always wear work gloves, long sleeves and eye protection
during assembly of the shed. Some pieces of the shed contain
sharp edges and can cause injury.
2. (EN) Be cautious with the tools used for the assembly
of the shed. Familiarize yourself with the operation
of all the power tools.
3. (EN) Children and pets should be kept away from the
assembly site to avoid any distractions and accidents.
4. (EN) When using a step ladder, make sure it is on even ground and fully open
with the safety latch in place. Never concentrate your full weight on the
roof or any part of the shed.
5. (EN) Do not attempt to assemble the shed on a windy day. Shed
panels can be whipped across by the wind making the
worksite difficult and dangerous.
(FR) Pour votre propre sûreté, svp lisez et suivez ces instructions pendant le montage.
(FR) Portez toujours les gants de travail, les longues manches et la
protection d'oeil pendant le montage du hangar.Quelques morceaux
du hangar contiennent le dièse les bords et peuvent causer des
dommages.
(FR) Soyez prudent avec les outils utilisés pour le montage
du hangar. Familiarisez-vous avec le fonctionnement
de toutes machines-outils.
(FR) Des enfants et des animaux de compagnie ne devraient pas
être permis au site de montage afin d’éviter tous les distractions
et accidents.
(FR) En utilisant une échelle, assurez-vous qu'il est sur la terre égale et s'ouvre
entièrement avec le verrou de sûreté en place. Ne concentrez jamais votre
plein poids sur le toit ou n'importe quelle partie du ha
ngar.
(FR) N'essayez pas d'assembler le hangar un jour venteux. Des panneaux
de hangar peuvent être fouettés par le vent rendant le chantier
difficile et dangereux.
(FR) SÉCURITÉ ET PRÉCAUTIONS

4
(EN) IMPORTANT
(EN) Wear eye protection when using any form of power tools. Do not use voltage power tools in a wet or damp enviornment to avoid
electric shock.
(EN) Do not use any part of the shed as a means of personal support while attaching components during assembly.
(EN) The shed must be constructed on a solid base foundation. A concrete pad or a large size concrete patio stone squares is
recommended for suitable floor base. Make sure it is firm and level and will allow drainage away from the site. The base foundation
should be at least 4 inches (100mm) larger than the shed dimensions. Please refer to the front page of your owner’s manual for the
exterior
dimensions of the shed. Manufacturer is not responsible for the choice and construction of the foundation.
(EN) For a concrete pad base, prepare a level bed for a firm footing layer of crushed stone. The concrete padshould then
be poured to a thickness of 4 inches (100mm) to 5 inches (125mm). Allow to dry thoroughly for at least 48 hours
(EN) Your shed must be firmly anchored to the concrete pad or large concrete patio stone squares, to help protect against damage in
high winds.
(EN) DO NOT store swimming pool chemicals in your building.
Combustibles and corrosive must be stored in air tight containers
(FR) IMPORTANT
(FR) Portez la protection d'oeil en employant n'importe quelle forme de machines-outils. N'employez pas les machines-outils de tension
dans un environnement humide afin d’éviter le choc électrique.
(FR) N'employez pas toute partie du hangar en tant que des moyens d'appui personnel tout en attachant des composants lors du montage..
(FR) Le hangar doit être construit sur une fondation de base solide. Une garniture en béton armé ou une pierre de patio en béton armé de
grande taille est recommandée pour une base appropriée du plancher. S'assurer qu'elle est ferme et de niveau et permettra le drainage
à partir de l'emplacement. La fondation de base devrait être au moins de 4 pouces (100mm) plus grande que les dimensions du hangar.
Veuillez vous référer à la première page de votre manuel de propriétaire pour les dimensions extérieures du hangar. Le fabricant n'est
pas responsable du choix et de la construction de la fondation.
(FR) Pour une base de garniture en béton armé, préparer un lit de niveau pour une couche de pied ferme en pierreécrasée.
La garniture en béton armé devrait alors être versée à une épaisseur de 4 pouces (100mm) à 5 pouces(125mm). Permettre
le séchage complètement pendant au moins 48 heures.
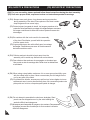
(EN) Care & Maintenance
(FR) Soin et entretien
Although this unit does not require any maintenance, care should be taken to prolong the life of your shed.
ROOF : Keep roof clean of leaves and snow with long handled, soft bristled broom. Heavy amountsof snow on the roof
can damage the shed making it unsafe. Do not step on the roof.
WALLS : Do not rest any object against the wall panels of the shed.
DOORS : Keep doors closed to prevent wind damage.
FASTENERS : Regularly check your shed for loose screws, bolts, nuts, etc. And retighten them as necessary.
MOISTURE : With changing temperatures, condensation will accumulate inside the shed. Good ventilation will help in
regulating and avoid moisture.
TIP : A noncorrosive caulking is helpful to seal the shed.
(EN)
Bien que cette unité n'exige aucun entretien, le soin devrait être pris afin de prolonger la vie de votre hangar.
TOIT : Le toit doit être nettoyé avec un balai mou et à long manche afin de le débarrasser des feuilles et de la neige.
Une grande quantité de neige sur le toit peuvent endommager le hangar le rendant peu sûr. Ne marchez pas sur le toit.
MURS : Ne mettez aucun objet contre les panneaux de mur du hangar.
PORTES: Assurez-vous que les portes sont fermées afin d’empêcher des dommages de vent.
PIÈ'C8CES DE FIXATION : Examinez régulièrement votre hangar s’il y a les vis, les boulons, les écrous lâches, etc.
Et resserrez-lesselon les besoins
HUMIDITÉ : Avec les températures changeantes, la condensation s'accumulera à l'intérieur du hangar. La bonne
ventilation aideradans la régulation et évitera l'humidité.
CONSEIL : Un calfeutrage non corrosif est utile de sceller le hangar.
(FR)
(FR) Votre hangar doit être fermement ancré à la garniture concrète ou aux grandes places concrètes de pierre de patio, pour
permettre à se protéger contre des dommages en forts vents.
(FR) Ne stockez pas les produits chimiques de piscine dans votre bâtiment.
Des combustibles et le corrosif doivent être stockés dans des récipients étanches.

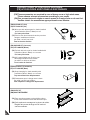
(EN)Parts List
Cordless Drill - Philips Head
Hammer or Rubber mallet
Carpenters Square
8’ Step Ladder
Adjustable pliers
Level - 3ft.
T
ape Measure
Caulk Gun
W
aterproof Clear Silicon
Hand Gloves
(EN) Tools You Will Need
5
B1LQ, B1RQ, B21Q,
B22Q, B3LQ, B3RQ
CB1A, CB2A,
CB3XA, CB4A, MJ
RS1LQ, RS1RQ, RS8Q
RS9Q, RS3LQ, RS3SQ
RS7Q, RS6Q,
RS13Q
RS2LQ, RS2RQ RS12Q
RS5Q, RS5JQ
RS14BQ, RS14TQ
CDLA
CDRA
CCQ
CMA
FDCL
FDCR
FCB
FMC
FCCRJ
EPS
CBC
PIN, PINL PPG & PPGL
S1, S2, S7
B1LQ 1
B1RQ 1
B21Q 2
B22Q 2
B3LQ 1
B3RQ 1
CB1A 2
CB2A 2
CB3XA 4
CB4A 2
RS1LQ 2
RS1RQ 2
RS3LQ 2
RS3SQ 2
RS2LQ 4
RS2RQ 4
RS12Q 2
RS13Q 4
RS5Q 2
RS5JQ 1
RS15Q 2
MJ 7
RS6Q 2
RS7Q 2
RS8Q 4
RS9Q 4
RS14BQ 6
RS14TQ 6
DSHQ 1
CMA 7
CCQ 4
CDLA 1
CDRA 1
SP 11
SPAW 1
R1LQ 1
R2LQ 1
R3LQ 1
R1RQ 1
R2RQ 1
R3RQ 1
FPLA1 2
FPRA1 2
DL 1
DR 1
(EN) PARTS
(EN) ACCESSORIES
S3
EC
FDCL 1
FDCR 1
FCC 4
FMC 7
FCB 4
RJ 4
EPS 4
CB
C 3
L 1
R 1
EC 2
PPG 80
PPGL 2
PIN 80
PINL
2
S1 245
S2 12
S3 16
S7 8
DSHQ
(EN) Before starting installation, please
refer Safety & Precautions.
(FR) Avant de commencer l'installation,
référez-vous svp à Sécurité et Précautions.
(FR)Liste des pièces
(FR) PIÈCES
(FR) ACCESSORIES
Perceuse sans fil - Tête Philips
Marteau ou Marteau de Caoutchou
Equerre de Charpenterie
Echelle de 8’
Pinces Ajustables
Levier - 3 Pieds
R
uban à mesurer
Pistolet Étanche
Silicium Clair Étanche
Gants
(FR) Outils dont vous aurez besoin
Note
F14A, F15A
F10A, F11A,
F12A, F13A
F10A 2
F11A 2
F12A 2
F13A 2
F14A 8
F15A 3
S1 34
RS15Q
R
L
(EN)CODE (EN)QTY
(FR)CODE (FR)QTÉ
(EN)CODE (EN)QTY
(FR)CODE (FR)QTÉ
(EN)CODE (EN)QTY
(FR)CODE (FR)QTÉ
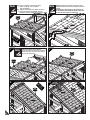
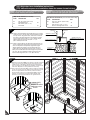
(EN) Foundation
(FR)Fontation
(EN) Foundation
(FR)Fontation
La page charge ...

(EN)Foundation
7
(FR) Fontation
A.
1
F11A
F10A
S1
2
F13A
F12A
S1
F14A
F14A
S1
3
(EN)Make 2 Sets.
(FR)Faire 2 ensembles.
Note
(EN)Make 2 Sets.
(FR)Faire 2 ensembles.
Note
(EN)Make 4 Sets.
(FR)Faire 4 ensembles.
Note
F10A 2
F11A 2
F12A 2
F13A 2
F14A 8
F15A 3
S1 34
(EN)CODE (EN)QTY
(FR)CODE (FR)QTÉ
(EN)Parts Needed:
(EN)Pièces nécessaires
(EN) Level Floor Surface Required
(FR) Sol Nivelé Requis
La page charge ...
La page charge ...

10
B. (EN)Base Frame
Note
(FR)Canaux de base
1
S1
B22Q
B1RQ
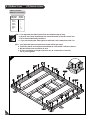
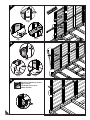
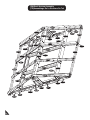
(EN) 1. It is important that these instructions are followed step by step.
2. All parts are clearly marked and care should be taken to use the correct one.
3. Don’t install under windy conditions.
4. If you are building the shed against a wall,build it 2.5 ft. away then slide it in.
(FR) 1. Il est important que ces instructions soient suivies pas à pas.
2.
Toutes les pièces sont clairement identifiées et il faut veiller à utiliser la bonne.
3. Ne pas installer sous conditions de vent.
4.
Si vous construisez le hangar contre un mur, le construire à un écart de
2,5 pi, puis le glisser.
B1LQ 1
B1RQ 1
B3LQ 1
B3RQ 1
B21Q 2
B22Q 2
S1 32
(EN)CODE (EN)QTY
(FR)CODE
(FR)QTÉ
(EN)Parts Needed:
(EN)Pièces nécessaires
S1
B1RQ
B22Q
B21Q
B3RQ
B22Q
B21Q
B1LQ
B3LQ

11
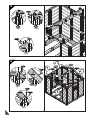
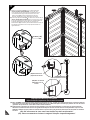
C. (EN) Wall & Columns
1
Fig.3
Fig.1
CDRA
Fig.2
CDRA
B1RQ
Back
Left
1
2&3
B1RQ
CDRA
B1LQ
B1RQ
CDRA
S1
(FR) Murs et Colonne
(EN) All parts are clearly marked and care should
be taken to use the correct one.
Note
(FR) Toutes les pièces sont clairement identifiées
et il faut veiller à utiliser la bonne.
(EN)Right
(FR)Droite
(EN)Front
(FR)Avant
CMA 7
CCQ 4
CDLA 1
CDRA 1
CB1A 2
CB2A 2
CB3XA 4
MJ 3
CB4A 2
FCB 4
CB
C 3
SP 11
SP
AW
1
S1 63
S2 4
(EN)Parts Needed:
(EN)Pièces nécessaires
(EN)CODE (EN)QTY
(FR)CODE (FR)QTÉ

12
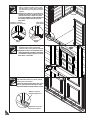
1. (EN) One shatter proof window panel
(SPAW ) included. This can be used in
any of the wall positions.
(FR) Un panneau de fenêtre incassable
(SPAW ) inclus. Ceci peut être utilisé dans
toutes les positions de mur.
2. (EN) Check the stamped label on top of
all panels inside.
(FR) Vérifiez l'étiquette apposée sur tous
les panneaux sur la partie intérieure
supérieure.
SP
2
B1RQ
CDRA
Fig.1
SP
Fig.2
CCQ
B1RQ
B22Q
Fig.1
CCQ
SP
Fig.3
CCQ
S1
SP
S2
CCQ
FCB
4
1
Fig.1
SP
CDRA
1
CCQ
SP
1
2&3
B1RQ
B22Q
3
CCQ
(EN)Front
(FR)Avant
Note
(EN)Front
(FR)Avant
(EN) Do not tighten the screw.
Leave it loose.
(FR) Ne pas serrer la vis.
Laisser le lâche.
Note
(EN)Front
(FR)Avant
La page charge ...

14
S1
SP
CMA
SP
CMA
B22Q
B21Q
8
Fig.3
Fig.1
CB3XA
FCB
S1
CB3XA
S1
CMA
1&2
3
9
CB3XA
CB1A
S1
Fig.2
CMA
B21Q
Fig.3
CMA
CB3XA
S1
CB2A
Fig.4
CBC
CB2A
CB3XA
CMA
CMA
S1
2
3&4
10
Fig.1
Fig.2
1
1
2
Fig.1 Fig.2
CMA
SPAW
SPAW
(EN)Right Wall
(FR)Mur à droite
CB3XA
CB2A
CMA
SP
CCQ
SPAW

15
SP
CCQ
Fig.1
B3RQ
B21Q
CCQ
Fig.2
Fig.3
B3RQ
CCQ
S1
CCQ
Fig.1
FCB
CCQ
S2
CB2A
S1
FCB
CCQ
Fig.1
1
1
11
12
13
(EN)Right Wall
(FR)Mur à droite
(EN) Do not tighten the screw.
Leave it loose.
(FR) Ne pas serrer la vis.
Laisser le lâche.
Note
2&3
1
SP
CCQ
B21Q
B3RQ
CB2A
La page charge ...
La page charge ...

18
CB3XA
S1
FCB
CCQ
Fig.1
1
CB3XA
SP
CMA
S1
Fig.2
SP
CMA
CMA
Fig.1
CB2A
FCB
S1
CB2A
CB3XA
S1
Fig.2
Fig.3
Fig.4
CMA
CB2A
S1
CB3XA
CBC
CB2A
CMA
CB3XA
3&4
1&2
B22Q
B21Q
20
21
22
Fig.1
1
2
(EN)Back Wall
(FR)Mur arrière
(EN)Left Wall
(FR)Mur à gauche
(EN)Left Wall
(FR)Mur à gauche
CB3XA
CB2A
SP
CCQ

19
S1
SP
CMA
Fig.2
CB3XA
S1
CMA
Fig.3
CMA
SP
3
2
SP
CCQ
B22Q
B21Q
B1LQ
B21Q
CCQ
Fig.2
Fig.3
S1
B1LQ
CCQ
SP
CCQ
Fig.1
B1LQ
2&3
1
FCB
CCQ
S2
Fig.1
1
23
24
25
Fig.1
1
CMA
(EN)Left Wall
(FR)Mur à gauche
(EN) Do not tighten the screw.
Leave it loose.
(FR) Ne pas serrer la vis.
Laisser le lâche.
Note
CB3XA
La page charge ...
La page charge ...

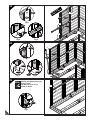
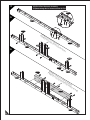
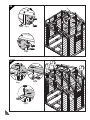
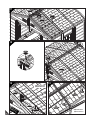
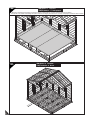
D. (EN)Roof Structures
RS1LQ 2
RS1RQ 2
RS2LQ 4
RS2RQ 4
RS3LQ 2
RS3SQ 2
RS5Q 2
RS5JQ 1
RS15Q 2
RS6Q 2
RS7Q 2
RS8Q 4
RS9Q 4
CMA
FMC
22
1
CMA
CMA
CMA
CMA
CMA
CMA
CMA
S1
CMA
FMC
RS12Q 2
RS13Q 4
DSHQ 1
FDCL 1
FDCR 1
FCC 4
MJ 4
FMC 7
RJ 4
S1 150
S2 4
S3 16
S7 8
(EN)Parts Needed:
(EN)Pièces nécessaires
(FR)Structure Du Toit
(EN)CODE (EN)QTY
(FR)CODE
(FR)QTÉ
(EN)CODE (EN)QTY
(FR)CODE (FR)QTÉ
La page charge ...
La page charge ...

25
S1
MJ
5
4
6
RS1RQ
RS1LQ
RS1RQ
RS1LQ
S1
(EN)Make sure these holes are up.
RS1RQ
RS1LQ
RS8Q
RS8Q
RS1LQ
RS1RQ
DSHQ
S1
(FR)Assemblage De La Structure Avant Du Toit
(EN)Front Roof Structure Assembly
(FR)Assurez-vous que ces trous sont en hauteur.
(FR)Assurez-vous que cette fente est orientée vers le bas.
(EN)Make sure this slot is facing down
ward
.
RS9Q
RS9Q

26
7
8
9
RS3LQ
RS3SQ
S1
S1
RS3LQ
RS3SQ
RS3LQ
RS3SQ
MJ
S1
MJ
RS1RQ
RS1LQ
RS1RQ
RS1LQ
S1
RS1RQ
RS1LQ
RS8Q
RS8Q
(EN) Back roof structure assembly
(FR) Assemblage De La Structure Arriere Du Toit
(EN)Make sure these holes are up.
(FR)Assurez-vous que ces trous sont en hauteur.
RS9Q
RS9Q

27
10
11
S1
RS3LQ
RS3SQ
RJ
RJ
RJ
RJ
S1
S1
RS3LQ
RS3SQ
S1
S1
RJ
RJ
S1
S1
(EN)Make 2 Sets.
(FR)Faire 2 ensembles.
Note
RS6Q
RS7Q

28
12
13
S3
S1
(EN)Make 2 Sets.
(FR)Faire 2 ensembles.
Note
RS13Q
RS13Q
RS6Q
RS7Q
RS5Q
RS5JQ
RS5Q
RS5Q
RS5Q
RS5Q
RS5JQ
RS5Q
La page charge ...
La page charge ...
La page charge ...
La page charge ...
La page charge ...

34
1
PPG
PIN
2
FPLA1
PPG
PIN
FPRA1
3
PPG
PIN
4
FPLA1
PPG
PIN
FPRA1
PPG
PIN
FPRA1
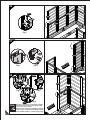
E. (EN)Roof Panels
(FR)Planches de Toiture
(EN)Insert roof plugs into Facia Panel only as indicated.
Use the same colour Plugs & Pins (PPG & PIN) to
fix the Roof Panels & Facia Panels .
Note
(EN)Apply silicone into the holes before inserting the pins
(
FR
)
Appliquez de la silicone dans les trous avant d'insérer les broches
(FR)Insérer les bouchons du toit dans le Panneau Facia
seulement comme indiqué.
Utilisez les mêmes couleurs de Bouchons et Épinglettes
(PPG et PIN) pour fixer les panneaux de toiture et
panneaux Facia.
This is optional and should be done for heavy rain areas if needed.
Cette étape est facultative et devrait se faire pour les zones de fortes
pluies, si nécessaire.
Note
(EN)Facia panel with ventilation cover (FPLA1 & FPRA1)
can be fixed in the front or back of the shed.
(FR)Panneau Facia avec couvercle de ventilation
(FPLA1 & FPRA1) peut être fixé à l'avant ou l'arrière du
hangar.
(EN) Front
(FR) Avant
(EN) Front
(FR) Avant
(EN) Back
(FR) Arrière
(EN) Back
(FR) Arrière
R1LQ 1
R2LQ 1
R3LQ 1
R1RQ 1
R2RQ 1
R3RQ 1
RS14BQ 6
RS14TQ 6
FPLA1 2
FPRA1 2
PPG 80
PIN 80
PPGL 2
PINL 2
EC 2
(EN)Parts Needed:
(FR)Pièces Nécessaires
(EN)CODE (EN)QTY
(FR)CODE (FR)QTÉ
(EN)CODE (EN)QTY
(FR)CODE (FR)QTÉ
La page charge ...
La page charge ...
La page charge ...
La page charge ...
La page charge ...
La page charge ...
La page charge ...
La page charge ...
La page charge ...
-
 1
1
-
 2
2
-
 3
3
-
 4
4
-
 5
5
-
 6
6
-
 7
7
-
 8
8
-
 9
9
-
 10
10
-
 11
11
-
 12
12
-
 13
13
-
 14
14
-
 15
15
-
 16
16
-
 17
17
-
 18
18
-
 19
19
-
 20
20
-
 21
21
-
 22
22
-
 23
23
-
 24
24
-
 25
25
-
 26
26
-
 27
27
-
 28
28
-
 29
29
-
 30
30
-
 31
31
-
 32
32
-
 33
33
-
 34
34
-
 35
35
-
 36
36
-
 37
37
-
 38
38
-
 39
39
-
 40
40
-
 41
41
-
 42
42
-
 43
43
-
 44
44


Duramax Building Products 30214 Mode d'emploi
- Taper
- Mode d'emploi
dans d''autres langues
Documents connexes
-
DuraMax 20224 Manuel utilisateur
-
Duramax Building Products 00283 Guide d'installation
-
 USP 01214 Guide d'installation
-
-
Duramax Building Products 30115 Guide d'installation
-
-
-
-
USP 30425 Le manuel du propriétaire
-
