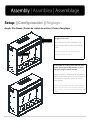
ROOMS TO GO 21612228 Assembly Instructions
- Catégorie
- Cheminées
- Taper
- Assembly Instructions

FA1119656

2 |

3 |

4 |
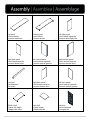
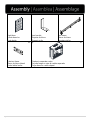
A x1
Top panel
Panel superior
Panneau supérieur
B x1
Bottom panel
Panel inferior
Panneau du bas
C x1
Left side panel
Panel lateral izquierdo
Panneau latéral gauche
D x1
Right side panel
Panel lateral derecho
Panneau latéral droit
E x1
Left vertical panel
Panel vertical izquierdo
Panneau vertical gauche
F x1
Right vertical panel
Panel vertical derecho
Panneau vertical droit
G x1
Front rail
Riel delantero
Rail avant
H x1
Right back panel
Panel trasero derecho
Panneau arrière droit
I x1
Left back panel
Panel trasero izquierdo
Panneau arrière gauche
J x1
Middle shelf
Estante del medio
L'étagère du milieu
K x2
Side shelf
Estante lateral
Tablette latérale
L x1
Left door
Puerta izquierda
Porte gauche

5 |
M x1
Right door
Puerta derecha
Porte droite
N x2
Iron bracket
Soporte de hierro
Support en fer
O x2
Iron frame
Marco de hierro
Armature de fer
P x2
Side iron frame
Marco de hierro lateral
Cadre latéral en fer
Q x1
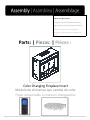
Firebox in separate carton
Caja de fuego en caja de cartón separada
Foyer dans un carton séparé

6 |
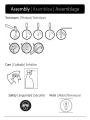
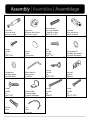
1 x16
Cam bolt
Perno de leva
Boulon à came
2 x16
Cam lock
Bloqueo de la leva
Serrure à came
3 x18
Wood dowel
Taco de madera
Cheville en bois
∅5/16”x1-1/4”L
4 x2
Doorstop
Tope de puerta
Butée de porte
5 x8
Screw
Tornillo
Vis
ø1/8”*5/8”L
6 x16
Cover
Tapa
Couverture
7 x14
Bolt
Tornillo
Boulon
ø1/4”*1/2”
8 x14
Spring washer
Arandela de resorte
Rondelle élastique
9 x14
Flat washer
Arandela plana
Rondelle plate
10 x1
Allen wrench
Lllave allen
Clé Allen
11 x26
Screw
Tornillo
Vis
ø1/8”*5/8”L
12 x4
Bracket
Soporte
Support
13 x8
Screw
Tornillo
Vis
ø1/8”*5/8”L
14 x12
Shelf holder
Estante titular
Support d'étagère
15 x3
Screw
Tornillo
Vis
∅8#x2”L
16 x4
Screw
Tornillo
Vis
ø1/4"*1-3/8"L
17 x4
Anchor
Ancla
Ancre
18 x2
Tie
Lazo
L'attache

7 |
7
8
9
10
x 8
x 8
x 8
x 1
10
7
8
9
10
7
8
9
7
8
9
x 6
x 6
x 6
10
7
8
9
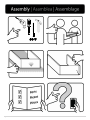
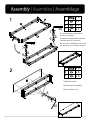
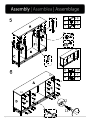
Do not fully tighten screws until all
screws are in position.
No apriete completamente los tornillos
hasta que estén en su posición.
Ne serrez pas complètement les vis tant
que toutes les vis ne sont pas en place.
Tighten all screws.
Apretar todos los tornillos.
Serrez toutes les vis.

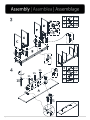
8 |
1
2
3
x 8
x 8
x 8
1
3
1
3
1
3
1
3
3x 2
x 2
4
5x 8
3
3
1
3
5
4
5
4
5
4
2
3
2
2
15 x 3
15
15
15
15

9 |
1
2
3
x 8
x 8
x 8
1
3
1
3
1
3
1
3
2
2
1
1
2
3
11
12
13
x 26
x 2
x 4
12
13
12
13
11
11
11
11
11
11
11
11
11
11
11
11
13
12
11

10 |
6x 16
14 x 12
14
14
14
14 14
14
6
6
6

11 |
13 x 4
13
13
13
14
14

12 |
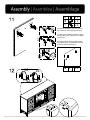
Anti-tipping hardware must be used for
this product to avoid tipping and injury.
El hardware antivuelco debe usarse para
este producto para evitar vuelcos y
lesiones.
Le matériel anti-basculement doit être
utilisé pour ce produit afin d'éviter le
basculement et les blessures.
12
16
17
x 2
x 4
x 4
12
16
17
12
16
17
17
12
18 x 2
18
12
12
18
Anti-tipping hardware must be used for
this product to avoid tipping and injury.
Se debe usar hardware antivuelco para
este producto para evitar que se vuelque
y se lesione.
Une quincaillerie anti-basculement doit
être utilisée pour ce produit afin d'éviter
tout basculement et blessure.

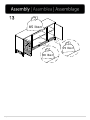
13 |
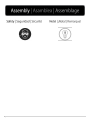
85 lbs<
15 lbs<
30 lbs<

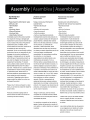
14 |

---
PO#
FA5523
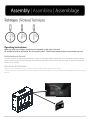
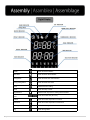
ELECTRICAL SPECIFICATIONS | ESPECIFICACIONES ELÉCTRICAS |CARACTÉRISTIQUES ÉLECTRIQUES
Voltage:
Tensión:
Tension :
120V, 60 Hz
Amps:
Amperios:
Intensité de courant :
11.7 Amps
Watts:
Watts:
Puissance :
1400 Watts
Lighting:
Iluminación:
Éclairage :
LED

2|

3|
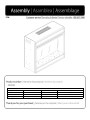
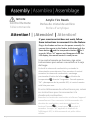
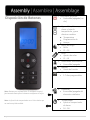
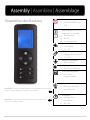
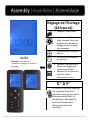
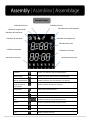
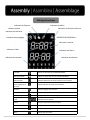
Operating Instructions:
When you plug in the firebox, please turn on the switch to the right of the vent.
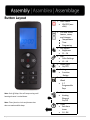
All operations must be performed with the remote control. Firebox insert does not have control buttons on unit.
Instrucciones de uso:
Cuando enchufe el módulo de chimenea, mueva el interruptor hacia la derecha de la ventilación para encender.
Debe usar el control remoto para ejecutar todas las operaciones. El módulo de chimenea no posee botones de
control en la unidad.
Directives d'utilisation :
Quand vous branchez le foyer, veuillez tourner l’interrupteur à droite de l’évent.
Toutes les étapes doivent s’effectuer à l’aide de la télécommande. L’unité de foyer encastrable ne comporte aucun
bouton.

4|

5|

6|
La page charge ...
La page charge ...
La page charge ...
La page charge ...
La page charge ...
La page charge ...
La page charge ...
La page charge ...
La page charge ...
La page charge ...
La page charge ...
La page charge ...
La page charge ...
La page charge ...
La page charge ...
La page charge ...
La page charge ...
La page charge ...
La page charge ...
La page charge ...
La page charge ...
-
 1
1
-
 2
2
-
 3
3
-
 4
4
-
 5
5
-
 6
6
-
 7
7
-
 8
8
-
 9
9
-
 10
10
-
 11
11
-
 12
12
-
 13
13
-
 14
14
-
 15
15
-
 16
16
-
 17
17
-
 18
18
-
 19
19
-
 20
20
-
 21
21
-
 22
22
-
 23
23
-
 24
24
-
 25
25
-
 26
26
-
 27
27
-
 28
28
-
 29
29
-
 30
30
-
 31
31
-
 32
32
-
 33
33
-
 34
34
-
 35
35
-
 36
36
-
 37
37
-
 38
38
-
 39
39
-
 40
40
-
 41
41


ROOMS TO GO 21612228 Assembly Instructions
- Catégorie
- Cheminées
- Taper
- Assembly Instructions
dans d''autres langues
- English: ROOMS TO GO 21612228
- español: ROOMS TO GO 21612228
Documents connexes
-
ROOMS TO GO 21810571 Assembly Instructions
-
-
-
Southern Enterprises 21612610 Mode d'emploi
-
-
-
-
-
-