Kichler Lighting 2643NI Manuel utilisateur
- Taper
- Manuel utilisateur

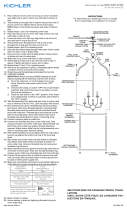
1) Threadonenialontooneendofonethreadedrod.
2) Slipotherendofthreadedroddownthroughholealongedgeofxturebody.
3) Threadlockwasherthenhexnutontothreadedrod.Tightenhexnuttosecurerodin
place.
4) Repeatabovestepsforremainingrods.
5) Carefullyslipglassoverthreadedrodsonxturebody.
6) Slipholesinbottomringoverendsofthreadedrods.Placebottomringupagainst
insideofglass.
7) Threadnialsontoendsofthreadedrods.Tightennialstosecureringinplace.(DO
NOTovertighten.)
8) TURNOFFPOWER.
IMPORTANT:Beforeyoustart,NEVERattemptanyworkwithoutshuttingoffthe
electricityuntiltheworkisdone.
a) Gotothemainfuse,orcircuitbreaker,boxinyourhome.Placethemain
powerswitchinthe“OFF”position.
b) Unscrewthefuse(s),orswitch“OFF”thecircuitbreakerswitch(s),thatcontrol
thepowertothextureorroomthatyouareworkingon.
c) Placethewallswitchinthe“OFF”position.Ifthexturetobereplacedhasa
switchorpullchain,placethoseinthe“OFF”position.
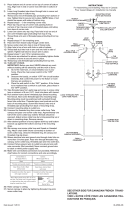
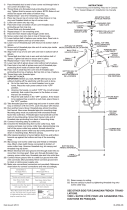
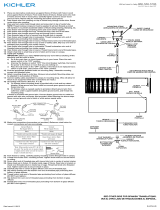
9) Determinetheheightfromceilingyouwouldlikeyourxturetohang.Fixtureisprovided
with(3)11-1/2”longtubesthatcanbeusedoromittedtoachievedesiredheight.
10) Assemblestemtoxture-
11) Notedirectionofexposedthreadedpipeonillustration.Bottomtwopipeswillhave
exposedthreadattop.Toppipewillnothaveexposedthreadedpipe.
12) Installcanopymountingscrews,ngertight.
13) Slipcanopythenmountingstrapoverstem(s)assembledtoxture.
14) ThreadballontopipeuntilsnugagainststemSecureballswivelinplacebythreading
ahexnutontothreadedpipeinsideball.
15) Liftmountingstrapupagainstballswivel,aligningslotinballwithtabinstrap.Snap
ballretainerintoplace.Placingonesideofballretainerinplaceandthensnapping
theotherinissuggested.
16) Attachassembledxture/mountingstraptooutletbox.Assemblemounting
straptoceilingwithballslotandtabtowardslowerportionofslopeinceiling.(REF:
IllustrationA)
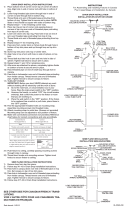
17) Attachgroundwirefromoutletboxbetweencuppedwasherandgreengroundscrew
andthreadgroundscrewintomountingstrap.Ifxtureisprovidedwithgroundwire,
connectxturegroundwiretooutletboxgroundwirewithwireconnectors(notprovided).
Neverconnectgroundwiretoblackorwhitepowersupplywire.
18) Makewireconnections(connectorsnotprovided.)Referencechartbelow
forcorrectconnectionsandwireaccordingly.
19) Carefullyslipcanopyupstemandsecuretoceilingusinglockwashers
andballknobs.
NOTE:Threadlockingcompoundmustbeappliedtoallstemthreadsasnotedbysymbol
(4)topreventaccidentalrotationofxtureduringcleaning,relamping,etc.
1) Visserl’ornementsuruneextrémitédelatigeletée.
2) Passerl’autreextrémitédelatigeletéeparletroulelongdubordduluminaire.
3) Visserlarondelledeblocagepuisl’écrouhexagonalsurlatigeletée.Resserrer
l’écrouhexagonalpourxerlatigeenplace.
4) Répéterlesétapesci-dessuspourlestigesrestantes.
5) Faireglissersoigneusementleverresurlestigesletéesduluminaire.
6) Passerlestrousdansl’anneauinférieursurlesextrémitésdestigesletées.Placer
l’anneauinférieurcontrel’intérieurduverre.
7)Visserlesornementssurlesextrémitésdesgoujonsletés.Serrerlesornementspour
xerl’anneau.(NEPASserreravecexcès).
8) COUPERLECOURANT.
IMPORTANT:TOUJOURScouperl’électricitéavantdecommencerletravail.
a) Localiserlecoffretàfusiblesouledisjoncteurdudomicile.Mettrel’interrupteur
principalenpositiond’Arrêt.
b) Dévisserleoulesfusibles(oumettreledisjoncteursurArrêt)quicontrôlent
l’alimentationversleluminaireoulapiècedanslaquelleletravailesteffectué.
c) Mettrel’interrupteurmuralenpositiond’Arrêt.Sileluminaireàremplacerest
dotéd’uninterrupteuroud’unechaîneconnectéeàl‘interrupteur,placerces
élémentsenpositiond’Arrêt.
9) Déterminerladistancedésiréeentrel’élémentetleplafond.Troistubesde11,5po
sontfounis.Ilspeuventêtreutilisésounonselonladistancedésirée.
10) Fixerlatigedesuspensionàl’élément.
11) Voirsurleschémacommentleletagedutubedoitapparaître.Celuidubasdes
deuxtubessetrouveraàl’extrémitésupérieureetceluidutuyausupérieurnesera
pasapparent.
12) Installerlesvisdemontagedel’écran,serreràlamain.
13) Glisserl’écranpuislapatedemontagesurla/lestige(s)montée(s)surl’élément.
14) Visserlabouleorientabledansletubeleté(jusqu’àcequ’elletouchelatige.)
Maintenirenplaceenvissantunécrouàsixpansàl’intérieurdelaboule.
15) Souleverlapattedemontagecontrelabouleorientable,alignerlafentedelaboule
aveclalanguettedelapattedemontage.Ilestconseillédemettred’abordenplace
uncôtédulogementdelaboulepuislesecond.
16) Fixerl’élémentetlapattedemontageàlaboîtedejonction.Fixerlapattedemontage
auplafond,lafentedelabouleetlalanguettedirigéesverslapartieinférieuredu
plafondincliné.(Voirl’illustrationA).
17) Fixerlecâbledemiseàlaterredelaboîtedejonctionentrelarondelleencuvette
etlavisvertedemiseàlaterreetvissercettedernieredanslapattedemontage.
Sil’élémentestmunid’uncâbledemiseàlaterre,connecterlecâbleàceluidela
boîtedejonctionavecdesconnecteursdecâble(nonfournis).Nejamaisconnecter
lecâbledemiseàlaterreaucâbled’alimentationélectriquenoiroublanc.
18) Connecterlescâbles(connecteursnonfournis).Voirletableauci-dessousou
s’adresseràunélectricienqualiépourfairelesconnections.
19) Glisseravecprécautionl’écransurlatigeetxerauplafondavecdesrondelles
d’arrêtetdesboutonsronds.
REMARQUE:Appliquerlefreinletsurtouslesletsdelatigeindiquésparlesymbol
(4)œpourempêcherlarotationaccidentelleduluminairependantlenettoyage,rem-
placementdelampe,etc.
GREEN GROUND
SCREW
WIRE CONNECTOR
(NOT PROVIDED)
OUTLET BOX
GROUND
CUPPED
WASHER
FIXTURE
GROUND
Connect Black or
Red Supply Wire to:
Connect
White Supply Wire to:
Black White
*Parallel cord (round & smooth) *Parallel cord (square & ridged)
Clear, Brown, Gold or Black
without tracer
Clear, Brown, Gold or Black
with tracer
Insulated wire (other than green)
with copper conductor
Insulated wire (other than green)
with silver conductor
*Note: When parallel wires (SPT I & SPT II)
are used. The neutral wire is square shaped
or ridged and the other wire will be round in
shape or smooth (see illus.)
Neutral Wire
3
3
FINIAL
ORNEMENT
THREADEDROD
TIGEFILETÉE
HEXNUT
ECROUHEXAGONAL
FINIAL
ORNEMENT
LOCKWASHER
RONDELLED’ARRÊT
GLASS
VERRE
RING
ANNEAU
ILLUSTRATION A
CANOPY
ECRAN
BALLRETAINER
LOGEMENTDELABOULE
HEXNUT
ECROUHEXAGONAL
MOUNTINGSTRAP
PATTEDEMONTAGE
THREADEDPIPE
TUBEFILETE
GREENGROUNDSCREW
VISVERTEDEMISEALA
TERRE
BALLSWIVEL
BOULEORIENTABLE
BALLKNOB
BOUTONROND
SLOTANDTAB
FENTEETLANGUETTE
SLOPEDCEILING
PLAFONDINCLINE
CENTERSTEM
TIGECENTRALE
INSTRUCTIONS
For Assembling and Installing Fixtures in Canada
Pour L’assemblage et L’installation Au Canada
DateIssued:1/27/12 IS-2643-CB
FIXTUREBODY
LUMINAIRE
-
 1
1

Kichler Lighting 2643NI Manuel utilisateur
- Taper
- Manuel utilisateur
dans d''autres langues
- English: Kichler Lighting 2643NI User manual
Documents connexes
-
 Kichler Lighting 42123CH Manuel utilisateur
-
 Kichler Lighting 3275NI Manuel utilisateur
-
 Kichler Lighting 42566BK Manuel utilisateur
-
 Kichler Lighting 42591BK Manuel utilisateur
-
 Kichler Lighting 3278AP Manuel utilisateur
-
 Kichler Lighting 3279AP Manuel utilisateur
-
 Kichler Lighting 42568BK Manuel utilisateur
-
 Kichler Lighting 42565BK Manuel utilisateur
-
 Kichler Lighting 43754AUB Manuel utilisateur
-
 Kichler Lighting 1897NI Manuel utilisateur


