
Read This First 1
À lire en premier lieu 9
Información importante 17
ML_RTF.book Page 1 Friday, October 13, 2006 12:12 PM
Black process 45.0° 240.0 LPI

Read This First 1
À lire en premier lieu 9
Información importante 17
ML_RTF.book Page 1 Friday, October 13, 2006 12:12 PM
Palm Orange spot 45.0° 240.0 LPI

ML_RTF.book Page 2 Friday, October 13, 2006 12:12 PM
Black process 45.0° 240.0 LPI

ML_RTF.book Page 2 Friday, October 13, 2006 12:12 PM
Palm Orange spot 45.0° 240.0 LPI

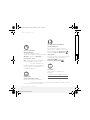
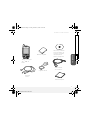
READ THIS FIRST
CHECK THE CONTENTS OF THE BOX
1
ENGLISH
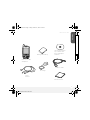
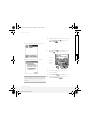
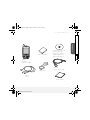
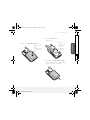
Check the contents of the box
Palm
®
Treo
™
700P
smartphone
AC charger
USB sync cable
Rechargeable battery
Printed material
Stereo
headset
CD (includes desktop
sync software and
bonus smartphone
software)
ML_RTF.book Page 1 Friday, October 13, 2006 12:12 PM
Black process 45.0° 240.0 LPI

READ THIS FIRST
CHECK THE CONTENTS OF THE BOX
1
ENGLISH
Check the contents of the box
Palm
®
Treo
™
700P
smartphone
AC charger
USB sync cable
Rechargeable battery
Printed material
Stereo
headset
CD (includes desktop
sync software and
bonus smartphone
software)
ML_RTF.book Page 1 Friday, October 13, 2006 12:12 PM
Palm Orange spot 45.0° 240.0 LPI

READ THIS FIRST
OVERVIEW
2
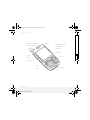
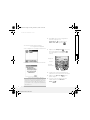
Overview
Indicator light (phone
and charge indicator)
Calendar
5-way navigator and
Center button
Earpiece
Menu
Send
Phone
Side button
Volume
button
Power/End
Messaging
Applications
ML_RTF.book Page 2 Friday, October 13, 2006 12:12 PM
Black process 45.0° 240.0 LPI

READ THIS FIRST
OVERVIEW
2
Overview
Indicator light (phone
and charge indicator)
Calendar
5-way navigator and
Center button
Earpiece
Menu
Send
Phone
Side button
Volume
button
Power/End
Messaging
Applications
ML_RTF.book Page 2 Friday, October 13, 2006 12:12 PM
Palm Orange spot 45.0° 240.0 LPI

READ THIS FIRST
INSERT THE BATTERY
3
ENGLISH
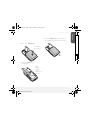
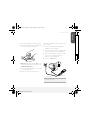
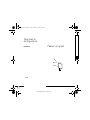
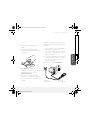
Insert the battery
1 Remove the battery door.
2 Insert the battery into the
compartment.
3 Slide the battery door onto the back of
the smartphone until it clicks into place.
Press battery
door release
Align
battery
contacts
with
smartphone
contacts
ML_RTF.book Page 3 Friday, October 13, 2006 12:12 PM
Black process 45.0° 240.0 LPI

READ THIS FIRST
INSERT THE BATTERY
3
ENGLISH
Insert the battery
1 Remove the battery door.
2 Insert the battery into the
compartment.
3 Slide the battery door onto the back of
the smartphone until it clicks into place.
Press battery
door release
Align
battery
contacts
with
smartphone
contacts
ML_RTF.book Page 3 Friday, October 13, 2006 12:12 PM
Palm Orange spot 45.0° 240.0 LPI

READ THIS FIRST
COMPLETE SETUP
4
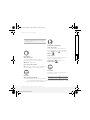
Complete setup
1 Select the language you want to use.
2 Follow the onscreen instructions.
3 (Optional) When the setup is complete,
press Applications and select
Quick Tour .
Make a call
1 Press Phone . (If prompted, press
Center to turn off Keyguard.)
2 Use the number keys to enter the
phone number.
3 Press Send to make the call.
4 When you’re ready to end the call,
press Power/End .
TIP
Ask your wireless service provider if their
network supports automatic date, time, and
time zone settings. If not, use the manual
settings.
Center
Phone
Number
keys
ML_RTF.book Page 4 Friday, October 13, 2006 12:12 PM
Black process 45.0° 240.0 LPI

READ THIS FIRST
COMPLETE SETUP
4
Complete setup
1 Select the language you want to use.
2 Follow the onscreen instructions.
3 (Optional) When the setup is complete,
press Applications and select
Quick Tour .
Make a call
1 Press Phone . (If prompted, press
Center to turn off Keyguard.)
2 Use the number keys to enter the
phone number.
3 Press Send to make the call.
4 When you’re ready to end the call,
press Power/End .
TIP
Ask your wireless service provider if their
network supports automatic date, time, and
time zone settings. If not, use the manual
settings.
Center
Phone
Number
keys
ML_RTF.book Page 4 Friday, October 13, 2006 12:12 PM
Palm Orange spot 45.0° 240.0 LPI

READ THIS FIRST
INSTALL THE SOFTWARE
5
ENGLISH
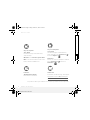
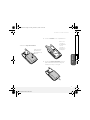
Install the software
1 Close all programs on your computer.
2 Insert the Palm Software Installation CD
into your computer’s CD drive.
3 Mac only: Double-click the CD icon on
the desktop, and then double-click the
PalmSoftware.pkg icon.
4 Select the same language you selected
on your smartphone.
5 Follow the onscreen instructions.
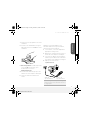
Sync and charge
When the installation software asks you to
sync, do this:
1 If necessary, attach the appropriate
adapter to the AC charger.
2 Connect the AC charger to a wall outlet
and to the bottom of your smartphone.
3 Connect the USB sync cable to a USB
port on your computer and to the
bottom of your smartphone.
4 Press the sync button.
TIP
Charge your smartphone until the indicator
light turns solid green.
Sync cable
Sync button
ML_RTF.book Page 5 Friday, October 13, 2006 12:12 PM
Black process 45.0° 240.0 LPI

READ THIS FIRST
INSTALL THE SOFTWARE
5
ENGLISH
Install the software
1 Close all programs on your computer.
2 Insert the Palm Software Installation CD
into your computer’s CD drive.
3 Mac only: Double-click the CD icon on
the desktop, and then double-click the
PalmSoftware.pkg icon.
4 Select the same language you selected
on your smartphone.
5 Follow the onscreen instructions.
Sync and charge
When the installation software asks you to
sync, do this:
1 If necessary, attach the appropriate
adapter to the AC charger.
2 Connect the AC charger to a wall outlet
and to the bottom of your smartphone.
3 Connect the USB sync cable to a USB
port on your computer and to the
bottom of your smartphone.
4 Press the sync button.
TIP
Charge your smartphone until the indicator
light turns solid green.
Sync cable
Sync button
ML_RTF.book Page 5 Friday, October 13, 2006 12:12 PM
Palm Orange spot 45.0° 240.0 LPI

READ THIS FIRST
WHERE’S MY MANUAL?
6
Where’s my manual?
On your computer
User Guide
Hundreds of pages of illustrated info,
steps, and tips.
Windows: Click Start>Programs>Palm.
Mac: In the Documentation folder on the
Palm Software Installation CD.
In the box
Quick Reference Guide
Printed intro to the basics.
On your smartphone
User Guide
Hundreds of pages of illustrated info,
steps, and tips. Press Applications
and select My Treo .
Quick Tour
An intro to common smartphone features.
Press Applications and select
Quick Tour .
On the web
Downloads, troubleshooting, and support.
www.palm.com/treo700pcdma-mytreo
www.palm.com/treo700pcdma-support
NOTE For questions about your mobile account, contact your wireless service provider.
ML_RTF.book Page 6 Friday, October 13, 2006 12:12 PM
Black process 45.0° 240.0 LPI

READ THIS FIRST
WHERE’S MY MANUAL?
6
Where’s my manual?
On your computer
User Guide
Hundreds of pages of illustrated info,
steps, and tips.
Windows: Click Start>Programs>Palm.
Mac: In the Documentation folder on the
Palm Software Installation CD.
In the box
Quick Reference Guide
Printed intro to the basics.
On your smartphone
User Guide
Hundreds of pages of illustrated info,
steps, and tips. Press Applications
and select My Treo .
Quick Tour
An intro to common smartphone features.
Press Applications and select
Quick Tour .
On the web
Downloads, troubleshooting, and support.
www.palm.com/treo700pcdma-mytreo
www.palm.com/treo700pcdma-support
NOTE For questions about your mobile account, contact your wireless service provider.
ML_RTF.book Page 6 Friday, October 13, 2006 12:12 PM
Palm Orange spot 45.0° 240.0 LPI

Intellectual property notices
© 2006 Palm, Inc. All rights reserved. Trademark, copyright, patent,
and other intellectual property notices are set forth on page ii within
Yo u r P a l m
®
Tr eo
™
700P Smartphone User Guide installed on the
user’s computer.
Disclaimer and limitation of liability
Palm, Inc. assumes no responsibility for any damage or loss resulting
from the use of this manual. Palm, Inc. assumes no responsibility for
any loss or claims by third parties that may arise through the use of
this product. Palm, Inc. assumes no responsibility for any damage or
loss caused by deletion of data as a result of malfunction, dead
battery, or repairs of this product.
ML_RTF.book Page 7 Friday, October 13, 2006 12:12 PM
Black process 45.0° 240.0 LPI

Intellectual property notices
© 2006 Palm, Inc. All rights reserved. Trademark, copyright, patent,
and other intellectual property notices are set forth on page ii within
Yo u r P a l m
®
Tr eo
™
700P Smartphone User Guide installed on the
user’s computer.
Disclaimer and limitation of liability
Palm, Inc. assumes no responsibility for any damage or loss resulting
from the use of this manual. Palm, Inc. assumes no responsibility for
any loss or claims by third parties that may arise through the use of
this product. Palm, Inc. assumes no responsibility for any damage or
loss caused by deletion of data as a result of malfunction, dead
battery, or repairs of this product.
ML_RTF.book Page 7 Friday, October 13, 2006 12:12 PM
Palm Orange spot 45.0° 240.0 LPI

ML_RTF.book Page 8 Friday, October 13, 2006 12:12 PM
Black process 45.0° 240.0 LPI

ML_RTF.book Page 8 Friday, October 13, 2006 12:12 PM
Palm Orange spot 45.0° 240.0 LPI
La page charge ...
La page charge ...
La page charge ...
La page charge ...
La page charge ...
La page charge ...
La page charge ...
La page charge ...
La page charge ...
La page charge ...
La page charge ...
La page charge ...
La page charge ...
La page charge ...
La page charge ...
La page charge ...
La page charge ...
La page charge ...
La page charge ...
La page charge ...
La page charge ...
La page charge ...
La page charge ...
La page charge ...
La page charge ...
La page charge ...
La page charge ...
La page charge ...
La page charge ...
La page charge ...
La page charge ...
La page charge ...
La page charge ...
La page charge ...
La page charge ...
La page charge ...
-
 1
1
-
 2
2
-
 3
3
-
 4
4
-
 5
5
-
 6
6
-
 7
7
-
 8
8
-
 9
9
-
 10
10
-
 11
11
-
 12
12
-
 13
13
-
 14
14
-
 15
15
-
 16
16
-
 17
17
-
 18
18
-
 19
19
-
 20
20
-
 21
21
-
 22
22
-
 23
23
-
 24
24
-
 25
25
-
 26
26
-
 27
27
-
 28
28
-
 29
29
-
 30
30
-
 31
31
-
 32
32
-
 33
33
-
 34
34
-
 35
35
-
 36
36
-
 37
37
-
 38
38
-
 39
39
-
 40
40
-
 41
41
-
 42
42
-
 43
43
-
 44
44
-
 45
45
-
 46
46
-
 47
47
-
 48
48
-
 49
49
-
 50
50
-
 51
51
-
 52
52
-
 53
53
-
 54
54
-
 55
55
-
 56
56


dans d''autres langues
- English: Palm Treo 700P
- español: Palm Treo 700P
Documents connexes
-
Palm Centro (Bell) Quick Start
-
PALMOME 650 Manuel utilisateur
-
Palm 700wx - Treo Smartphone 60 MB Manuel utilisateur
-
Mode TREO 600 Le manuel du propriétaire
-
-
Palm Treo 700P Manuel utilisateur
-
-
Autres documents
-
Yamaha YSP-4000 Le manuel du propriétaire
-
Yamaha RX-A720 Guide d'installation
-
Yamaha RX-V573 Guide d'installation
-
Yamaha RX-A820 Le manuel du propriétaire
-
-
Yamaha RX-A3020 Guide d'installation
-
Yamaha RX-A1020 Guide d'installation
-
Yamaha RX-V1073 Guide d'installation
-
-